
P1107 on 2002-2004 Oldsmobile Bravada 4.2L: Intermittent MAP Sensor Signal Guide
This code indicates an intermittent low voltage signal from the Manifold Absolute Pressure (MAP) sensor. The most common causes are a failing MAP sensor or, more frequently on this platform, damaged wiring near its connector. Expect to spend $15-$30 for a new connector pigtail or $30-$70 for a new sensor, which is a 1/5 difficulty DIY fix.
- P1107 on your Bravada specifically means the MAP sensor's signal is dropping out intermittently, which strongly points to a wiring issue.
- Before buying parts, perform a 'wiggle test' on the wiring harness going to the MAP sensor with the engine running. If the idle stumbles, the wiring is the problem.
- The most likely fix is replacing the MAP sensor connector pigtail (around $20), not the sensor itself.
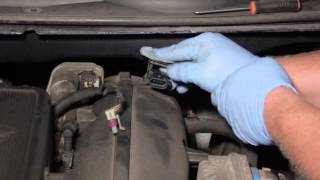
- This is a DIY-friendly repair, as the MAP sensor is easily accessible on top of the intake manifold.
What's Unique About the 2002-2004 Oldsmobile Bravada
The Oldsmobile Bravada shares its 4.2L LL8 engine and GMT360 platform with the Chevrolet TrailBlazer and GMC Envoy, making fixes and diagnostics identical across these models. While the MAP sensor itself can fail, this platform is known for wiring issues. The wiring harness leading to the MAP sensor can become brittle from engine heat and vibration, causing wires to break internally or fray near the connector. This internal wire break, often within 1-2 inches of the connector, can occur even if the outer insulation looks fine, leading to the intermittent signal drop that triggers P1107. A 'wiggle test' of this harness is a critical first diagnostic step for these vehicles.
Symptoms You May Notice
- Check Engine Light is on
- Rough or erratic idle
- Engine stalling, especially at idle or when coming to a stop
- Hesitation or stumbling during acceleration
- Reduced engine power
- Decreased fuel economy
- Black smoke from the exhaust
- Hard starting
- Replacing the MAP sensor when the actual fault is in the wiring harness or connector pigtail.
- Replacing the throttle body when the issue is a simple vacuum leak.
- Replacing oxygen sensors because of a rich or lean condition (like P0171 or P0172) that is actually caused by the faulty MAP data. The MAP sensor issue should always be fixed first.
Most Likely Causes
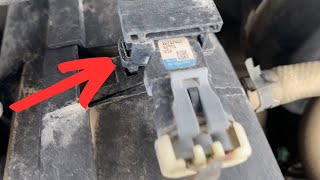
- Damaged Wiring or Connector for MAP Sensor 🔴 High Probability → Shop Manifold Absolute Pressure Sensor The engine cover on the 4.2L I6 can rub against the wiring harness, and engine heat makes the wires brittle over time. This leads to internal breaks or shorts, often right at the connector, which is a well-documented issue on the GMT360 platform.
How to confirm: With the engine idling, gently wiggle the wiring harness and connector for the MAP sensor. If this causes the idle to change, stumble, or stall, a wiring fault is confirmed. You can also backprobe the light green signal wire with a multimeter while wiggling the harness to see the voltage drop out.
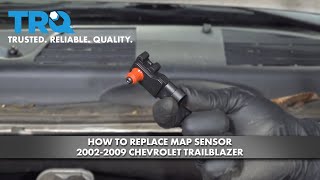
Typical fix: Repair the broken wire(s) or replace the pigtail connector for the MAP sensor. This involves splicing the new connector 🎬 See this walkthrough for installing a new MAP sensor. onto the existing harness.
Est. part cost: $10-$30 - Failing Manifold Absolute Pressure (MAP) Sensor 🟡 Medium Probability → Shop Manifold Absolute Pressure Sensor The MAP sensor is an electronic component exposed to significant temperature and pressure changes, leading to eventual failure. However, it is often misdiagnosed when the real issue is the wiring.
How to confirm: With the key on and engine off (KOEO), backprobe the sensor's signal wire (typically light green). It should read ~4.0-4.5V. With the engine idling, it should drop to 1.0-1.5V. If the voltage is stuck, erratic, or doesn't change with engine vacuum (and the wiring is confirmed good), the sensor is likely bad.
Typical fix: Replace the MAP sensor. It is held to the intake manifold by a small plastic clip. 🎬 Watch: Locate and replace the MAP sensor on the 4.2L engine.
Est. part cost: $30-$70 - Vacuum Leak ⚪ Low Probability Vacuum hoses can become dry, brittle, and cracked over time, creating leaks. A significant leak can cause MAP sensor readings to be lower than expected, though this is less common for triggering an intermittent code like P1107.
How to confirm: Perform a smoke test to check for leaks in the intake manifold, vacuum lines, and gaskets. Listen for hissing sounds around the engine bay at idle.
Typical fix: Replace the cracked or leaking vacuum hose or intake gasket.
Est. part cost: $5-$50
Rare But Worth Checking
- Faulty Powertrain Control Module (PCM): → Shop Engine Control Module (ECM) This is extremely rare and should only be considered after all other possibilities, including wiring and sensor issues, have been exhaustively ruled out. A PCM failure would likely present with multiple other unrelated codes.
Diagnosis Steps
- Check for other stored trouble codes. Address them in order of priority, but be aware that codes like P0107, P0106, and P0300 are often direct results of the P1107 fault.
- Using a scan tool, observe the live data for the MAP sensor. Note the reading with the Key On, Engine Off (KOEO), which should be around 4.0-4.5 volts at sea level. At a stable idle, the reading should be much lower, around 1.0-1.5 volts.
- Perform the 'Wiggle Test': With the engine running, gently wiggle the wiring harness and connector for the MAP sensor, which is located on top of the intake manifold. If this causes a change in engine idle, stumbling, or stalling, a wiring fault is present and is the likely cause.
- Perform a thorough visual inspection of the MAP sensor connector and its wiring harness. Look for chafing, corrosion, or loose pins. The break in the wire is often internal and not visible.
- If the wiggle test is inconclusive, test the circuit. Backprobe the connector to check for a stable 5-volt reference (Gray wire) and a good ground (Orange/Black wire). Then, monitor the signal wire (Light Green wire) for voltage drops while manipulating the harness.
- If wiring is confirmed to be good, test the sensor itself. Use a vacuum pump on the sensor while monitoring its voltage output to see if it responds correctly and smoothly to changes in vacuum.
- If the sensor and wiring are confirmed to be good, check for vacuum leaks using a smoke machine. Pay close attention to the intake manifold gasket and all connected vacuum hoses.
Parts You'll Likely Need
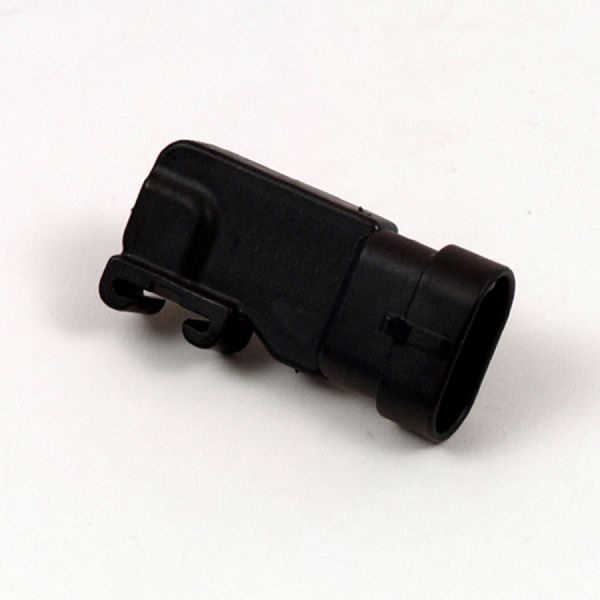
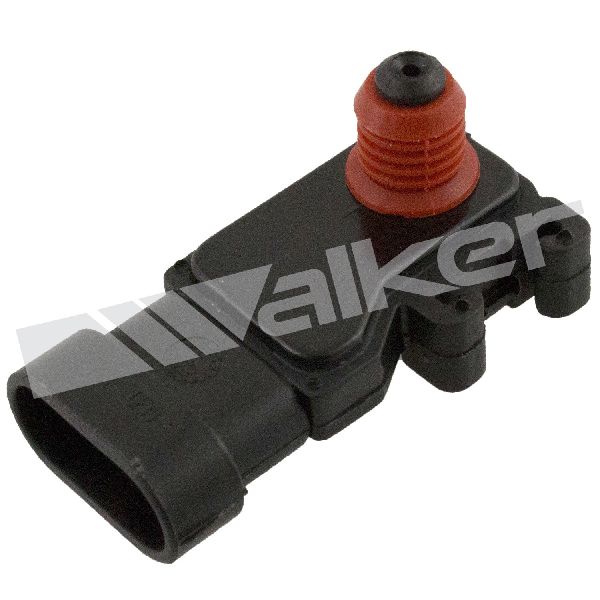
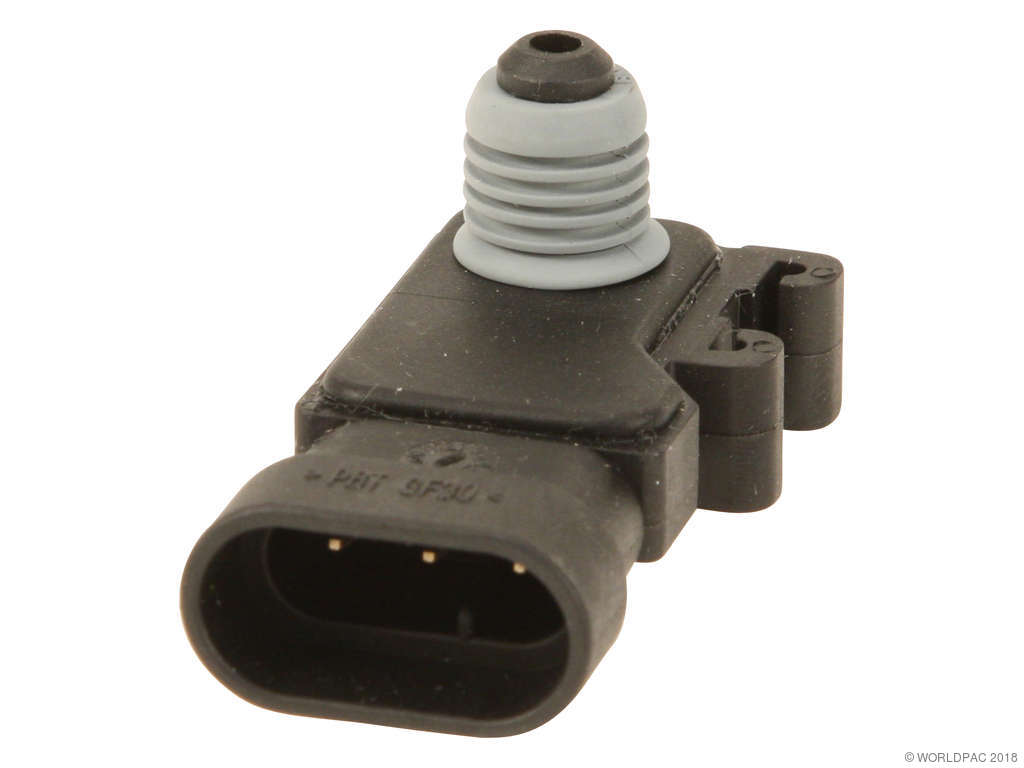
- Manifold Absolute Pressure (MAP) Sensor
(OEM #12620226)— This sensor is the primary component responsible for the reading that triggers the code. It is a common failure point, but should only be replaced after confirming the wiring is intact.
Trusted brands: ACDelco (GM Genuine), Delphi, Standard Motor Products (SMP), SKP
OEM price range: $50-$80
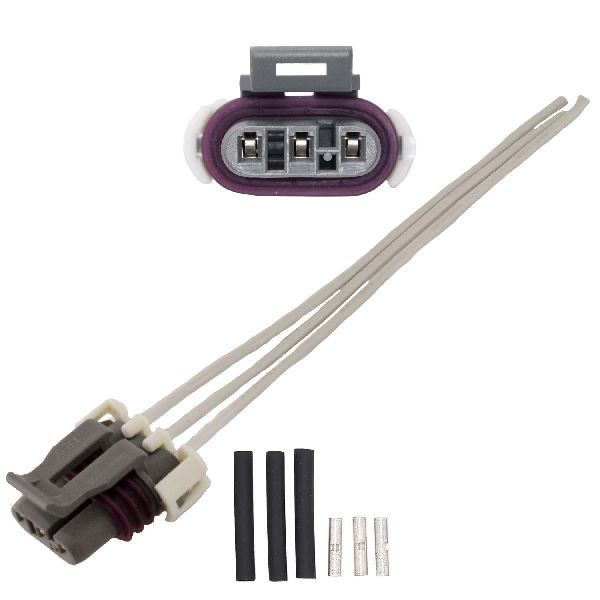
Aftermarket price range: $30-$60 - MAP Sensor Connector Pigtail
(OEM #ACDelco PT1799)— If the wiring is damaged or corroded directly at the connector (a very common issue), replacing the pigtail is the most effective repair.
Trusted brands: ACDelco, Dorman
OEM price range: $20-$35
Aftermarket price range: $10-$25
Related Codes That Often Appear With This One
- P0107 — P0107 is the generic code for 'MAP Circuit Low Input'. If the intermittent fault from P1107 becomes frequent or permanent, it will trigger the generic P0107 code.
- P0106 — This code for 'MAP Circuit Range/Performance' can be triggered because the intermittent signal drops from the P1107 fault make the sensor's overall output seem erratic to the PCM.
- P0300 — A 'Random/Multiple Cylinder Misfire' code is a common symptom. The incorrect MAP signal causes the PCM to deliver the wrong fuel mixture, leading to misfires.
Technical Service Bulletins (TSBs) & Recalls
- While no TSB is specific to P1107 on the Bravada, GM TSB #PIP4409F addresses the identical issue (P1107/P0106/P0300) on the platform-mate Chevrolet Colorado, identifying the cause as an internal wire break near the MAP sensor connector.
- GM TSB #03-06-04-030E: This bulletin addresses various driveability issues, including rough idle and misfires, caused by clogged fuel injectors. While not a direct cause of P1107, it's a related issue for engine performance on this platform.
Platform-Specific Known Issues
- Wiring Failure at Connector: Owners on forums like GMTNation and TrailVoy frequently report that the P1107 code on the 4.2L engine is caused by a broken wire inside the insulation, right at the MAP sensor connector. Many have replaced the sensor multiple times only to find the true culprit was the wiring, fixed by installing a new pigtail connector.
Mechanic-Grade Diagnostic Values
- MAP Sensor Ground Circuit Resistance — expected: Less than 5 Ohms to a known good chassis ground.. Failure: Resistance higher than 5 Ohms indicates a poor ground connection, which can cause intermittent low voltage readings.
- MAP Sensor 5V Reference Voltage — expected: Stable 5.0 Volts DC at the gray wire on the connector with Key On, Engine Off.. Failure: Voltage significantly lower than 5.0V or intermittent readings point to a problem with the PCM or the wiring from the PCM.
- MAP Sensor Signal Voltage (KOEO) — expected: ~4.0-4.5 Volts at sea level.. Failure: A reading significantly outside this range with the engine off suggests a faulty sensor or a wiring issue.
- MAP Sensor Signal Voltage (Warm Idle) — expected: 1.0-1.5 Volts.. Failure: Voltage that is stuck high, stuck low, or doesn't drop into this range at idle indicates a sensor, wiring, or vacuum leak issue.
Scan Tool Commands That Help
- Tech2 / GDS2: Graphing Live Data (MAP, TPS, RPM) — Used to observe the relationship between MAP sensor voltage, throttle position, and engine RPM in real-time. For P1107, a technician would watch for sudden, illogical drops in MAP voltage while wiggling the harness or manipulating the throttle, confirming an intermittent electrical fault.
Wiring & Ground Locations
- MAP Sensor Connector — On top of the intake manifold, toward the driver's side.. This is the primary failure point. Wires break internally within inches of the connector. Pinout for testing is: Pin A (Orange/Black) is Low Reference/Ground, Pin B (Light Green) is the Signal to the PCM, and Pin C (Gray) is the 5V Reference from the PCM.
- G101 — Located at the left front of the engine, on the lower block.. This is a primary ground for the Engine Control Module (ECM/PCM). A poor connection here can cause unstable sensor readings, including the MAP sensor, though it would likely cause multiple other codes as well.
- G103 — Located on the cowl in the left rear of the engine compartment, above the brake booster.. This grounds the Body Control Module (BCM) and Data Link Connector (DLC). While not a direct engine ground, a fault here can cause communication issues with scan tools during diagnosis.
Real Owner Repair Stories
- Various forum posts on 355nation.net and coloradofans.com (for platform-mate vehicles with the same issue) (2004-2011 GMC Canyon / Chevy Colorado (all engines, including Atlas family)) — Check Engine Light with code P1107, often accompanied by P0106 and P0300. Engine runs very rough at idle, hesitates, and sometimes stalls.
❌ Tried (didn't work) Replacing the MAP sensor
✅ What actually fixed it Performing a 'wiggle test' on the MAP sensor wiring harness confirmed the fault. Splicing in a new MAP sensor pigtail connector (e.g., ACDelco PT2187 or equivalent) resolved all symptoms and codes permanently.
OEM Part Supersession History
Unknown older PNs→GM 12620226 (ACDelco 213-796)— Part consolidation and design updates over the years.
Heads up: While this is the current specified replacement sensor, the sensor itself is rarely the cause of P1107 on this platform. The wiring pigtail (ACDelco PT1799) is the more critical part to verify.
Model Year Variations Within This Range
- 2002-2005: Engines from 2002-2005 are largely interchangeable with minor differences. For example, the oil level sender was deleted in 2003 and onward. These engines use a Speed Density system (no MAF sensor) and have a combined PCM/TCM. The core P1107 diagnosis remains the same across these years.
- 2006+: Starting in 2006, the LL8 engine was updated with a Mass Airflow (MAF) sensor, a redesigned cylinder head, and a separate Engine Control Module (ECM) and Transmission Control Module (TCM). While the P1107 code can still occur, diagnostics would also include the MAF sensor as a potential related input.
Diagnostic Flowchart
Other Known Issues on This Vehicle
Issues unrelated to this code that are worth knowing about as an owner of this generation:
- Cracked Exhaust Manifold 🔴 High — Very common. The original manifold design is prone to cracking from heat cycles. Replacement often involves dealing with broken bolts.
- Failing Electronic Fan Clutch 🔴 High — Extremely common failure. Symptoms include a loud roaring sound from the engine bay (fan stuck on) or overheating (fan not engaging). Codes like P0495 may be present. (Ref: PCM software updates were released to improve fan clutch logic, but do not prevent mechanical failure.)
- Faulty Ignition Switch / PassLock Issues 🟠 Medium — Common issue leading to intermittent no-start conditions or the engine dying while driving. (Ref: TSB #02068 addresses no-start conditions with DTC P1626 or P1631.)
- Failing Camshaft Position Actuator Solenoid 🟠 Medium — Common failure point due to clogging from dirty engine oil. Causes rough idle, poor performance, and codes like P0014.
- Instrument Cluster Failure 🟠 Medium — Like many GM vehicles of this era, the stepper motors in the instrument cluster can fail, causing gauges (speedometer, tachometer, etc.) to become stuck or read incorrectly.
- Rear Air Suspension Failure 🟠 Medium — The air bags or compressor for the rear load-leveling suspension are a common failure point. Many owners convert to conventional coil springs as a permanent, cheaper fix.
Used vs. New Parts: Buying Guide for This Vehicle
When a used part is the smart pick: A used MAP sensor from a low-mileage donor vehicle is a reasonable choice if you want to save money, as they are not a high-failure-rate item when the wiring is good. Sourcing a used pigtail connector with a few inches of wire from a junkyard is also a very cost-effective repair.
Donor-vehicle mileage cap: roughly under 100000 miles for the part to have meaningful remaining life.
What to inspect on the donor part:
- For a pigtail: Inspect the wiring for any signs of brittleness, cracking, or previous repairs. Ensure the connector lock tab is intact.
- For a sensor: Check the port for excessive oil or carbon buildup. Avoid sensors from engines that show signs of sludge or poor maintenance.
- Verify the donor vehicle is from the correct year range (2002-2005) to ensure compatibility.
OEM-only on this vehicle (don't cheap out):
- While not directly for this code, forum users often recommend using only OEM (ACDelco) or high-quality aftermarket fan clutches and motor mounts on the GMT360 platform, as cheaper alternatives are known to fail prematurely.
Aftermarket brands forum-validated for this vehicle:
- ACDelco (GM Genuine/OE)
- Delphi
- Standard Motor Products (SMP)
- NTK/NGK
Brands owners have reported issues with on this vehicle:
- No-name, unbranded sensors from online marketplaces should be avoided as their quality control and accuracy can be highly suspect.
Real Owner Stories
Aggregated from forums and TSBs cited above. Mileages and costs reflect what owners reported in those sources.
Oldsmobile Bravada LL8 4.2L I6
Symptoms: The P1107 code kept returning even after replacing the MAP sensor multiple times.
What fixed it: The actual problem was a broken wire inside the insulation, right at the MAP sensor connector. Installing a new pigtail connector permanently fixed the issue.
Cost: $10-$30
Source hint: vehicle_specific_issues section citing GMTNation and TrailVoy forums
GMT360 Platform Vehicle (e.g., Bravada, TrailBlazer)
Symptoms: Check Engine Light with code P1107. During a 'wiggle test' of the MAP sensor harness, the engine idle would change or stumble.
What fixed it: The fault was identified as the wiring, and the fix was a new wiring pigtail for the MAP sensor.
Source hint: GMTNation.com forum discussions
Related OBD-II Codes
Frequently Asked Questions
My 2003 Bravada has a P1107 code. Is it more likely the MAP sensor or the wiring?
How can I confirm the common wiring problem on my Bravada's MAP sensor without special tools?
I see TSB #PIP4409F mentioned. Does that apply to my Oldsmobile Bravada?
What are the correct voltage readings I should see from the MAP sensor on my 4.2L engine?
My Bravada is showing a P0300 (misfire) code along with P1107. Are these related?
Where is the MAP sensor located on the 2002-2004 Bravada 4.2L engine?
Helpful Videos
We Have This Part in Stock


The information in this article is provided for general reference and educational purposes only. Vehicle specifications, procedures, and part compatibility can vary by production date, trim level, and region. Always consult your vehicle's factory service manual and verify part numbers before purchasing or performing repairs. Safety-critical components such as airbags, seat belts, and braking systems should be installed by a qualified professional.
- Oldsmobile Bravada:
- 🧭 Diagnostic Flowchart
- 🎬 Helpful Videos
- 🛍️ Shop This Part
- What's Unique About the 2002-2004 Oldsmobile Bravada
- Symptoms You May Notice
- Most Likely Causes
- Rare But Worth Checking
- Diagnosis Steps
- Parts You'll Likely Need
- Related Codes That Often Appear With This One
- Technical Service Bulletins (TSBs) & Recalls
- Platform-Specific Known Issues
- Mechanic-Grade Diagnostic Values
- Scan Tool Commands That Help
- Wiring & Ground Locations
- Real Owner Repair Stories
- OEM Part Supersession History
- Model Year Variations Within This Range
- Other Known Issues on This Vehicle
- Used vs. New Parts: Buying Guide for This Vehicle
- Real Owner Stories
- Oldsmobile Bravada LL8 4.2L I6
- GMT360 Platform Vehicle (e.g., Bravada, TrailBlazer)
- Related OBD-II Codes
- Frequently Asked Questions
- 🎟️ Get 5% Off