
P1289 on 2008-2011 Ford Focus: CHT Sensor Circuit High Causes and Fixes
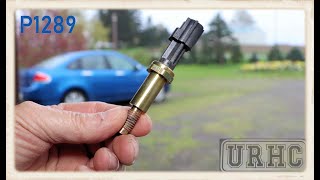
On a 2008-2011 Ford Focus, code P1289 is almost always caused by a failed Cylinder Head Temperature (CHT) sensor. This is a simple DIY fix requiring an extra-deep 19mm socket, with the part costing around $25-$60. The OEM Motorcraft part number is DY-1144.
- P1289 on your Focus means the CHT sensor circuit has a problem, most likely a failed sensor.
- Symptoms are easy to spot: a dead temperature gauge, A/C not working, and cooling fans that won't shut off.
- The fix is usually simple: replace the CHT sensor on top of the engine. The OEM part is Motorcraft DY-1144.
- You will need a special tool: an extra-deep 19mm socket is required for this job.
What's Unique About the 2008-2011 Ford Focus
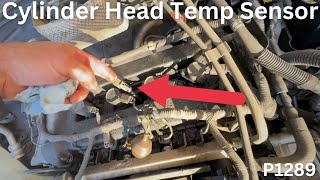
Unlike many vehicles that use a sensor submerged in coolant (an ECT sensor), the 2.0L Duratec engine in the Ford Focus uses a Cylinder Head Temperature (CHT) sensor. This sensor screws directly into the metal of the cylinder head between the #2 and #3 spark plugs. This design allows the PCM to monitor engine temperature even if there's a catastrophic coolant loss. For this specific code, it means the repair is a dry job—no need to drain the cooling system—and the sensor is relatively easy to access on top of the engine, hidden under a small rubber boot.
🎬 See exactly where the sensor is located on the engineSymptoms You May Notice
- Check Engine Light is on
- Temperature gauge on the dashboard is inoperative, reads cold, or erratically bounces between cold and normal.
- Radiator cooling fans run constantly at high speed, even when the engine is cold.
- Air conditioning (A/C) compressor does not turn on.
- Engine may enter a low-power 'limp mode'.
- A P1299 'Cylinder Head Over-Temperature Protection Active' code may also be present.
- In some cases, the vehicle may be very difficult to start, requiring multiple attempts before it will idle correctly.
- Replacing the thermostat. A thermostat issue would typically cause overheating or slow warm-up, not a 'Circuit High' code.
- Replacing the PCM. This is an expensive and unnecessary repair in almost all cases of a P1289 code.
Most Likely Causes
- Faulty Cylinder Head Temperature (CHT) Sensor 🔴 High Probability → Shop Engine Cylinder Head The sensor is subjected to extreme heat cycles on top of the cylinder head, leading to internal failure over time. Some owners have reported the sensor physically breaking in half. Manufacturer service bulletins, such as TSB Bulletin #TSB 19-2049, have specifically identified the CHT sensor as the primary cause for an illuminated MIL with code P1289 stored in the PCM.
How to confirm: With a scan tool, observe the CHT voltage. If it reads over 4.6V, or if the temperature shows an illogical value like -40°F on a warm day, the sensor has failed. Alternatively, if the sensor is visibly broken or cracked upon inspection, it needs replacement.
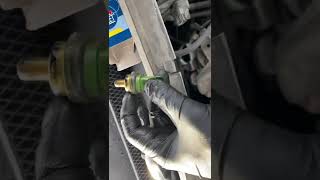
Typical fix: Replace the CHT sensor. The sensor is located on top of the cylinder head, between the #2 and #3 spark plugs. An extra-deep 19mm (or 3/4") s 🎬 Watch: A step-by-step guide to replacing the CHT sensorocket is required for removal and installation. The replacement part may look physically different (e.g., aluminum vs. copper body) from the original, which is a normal design update.
Est. part cost: $25-$60 - Damaged Wiring or Connector 🟡 Medium Probability The wiring harness is exposed to engine heat and vibration, which can cause wires to become brittle, frayed, or break over time. Rodent damage is also a possible cause, where animals chew through the wires. The connector's locking tab can become brittle and break during removal.
How to confirm: Visually inspect the wiring harness leading to the CHT sensor for any signs of breaks, chafing, or melting. Check that the connector is secure and the pins are clean. Perform a 'wiggle test' on the harness while monitoring CHT voltage on a scan tool to see if the value changes. If the code returns immediately after replacing the sensor, the fault is almost certainly in the wiring.
Typical fix: Repair the damaged section of wire or replace the connector pigtail. If the connector is damaged, a new pigtail can be spliced into the existing harness. If rodent damage is found, the entire affected section of the harness may need to be repaired.
Est. part cost: $10-$25 for a pigtail connector
Rare But Worth Checking
- Faulty Powertrain Control Module (PCM): → Shop Engine Control Module (ECM) This is extremely rare. The PCM should only be considered as the cause after the sensor and its entire circuit have been thoroughly tested and confirmed to be in perfect working order.
Diagnosis Steps
- Connect an OBD-II scanner and confirm the presence of code P1289. Note any other codes, especially P1299. An owner report in NHTSA ODI #10484858 noted that P1289 (Cylinder Head Temp Sensor High Input) can sometimes appear alongside ignition-related codes like P0303 and P0353.
- Using the scanner's live data function, monitor the CHT sensor voltage. A reading above 4.6 volts or a temperature reading of -40°F/°C confirms an open circuit fault.
- Turn the engine off. Remove the plastic engine cover to access the top of the engine.
- Locate the CHT sensor. On the 2.0L Duratec, it is situated between the spark plugs for cylinders #2 and #3, under a small rubber boot.
- Visually inspect the sensor's connector and the wiring harness leading to it. Look for any obvious signs of damage, such as cracks, breaks, corrosion, or melted plastic. Check for signs of rodent damage like chewed wires.
- If the wiring looks good, the most likely cause is the sensor itself. Disconnect the electrical connector. Be careful, as the locking tab can be brittle.
- Using an extra-deep 19mm (or 3/4") socket and a ratchet with an extension, carefully remove the old sensor. A standard deep socket will not be long enough.
- Install the new CHT sensor. Since it threads into aluminum, tighten it to be snug but do not overtighten to avoid damage. A typical torque spec is around 15-20 Nm (11-15 ft-lbs), but 'snug' is sufficient.
- Reconnect the electrical connector and ensure the rubber boot is properly seated.
- Clear the trouble codes with the OBD-II scanner. Start the engine and verify that the temperature gauge is working, the A/C engages, and the cooling fans are not running constantly. A drive cycle may be needed to 'retrain' the computer.
Parts You'll Likely Need
- Cylinder Head Temperature (CHT) Sensor
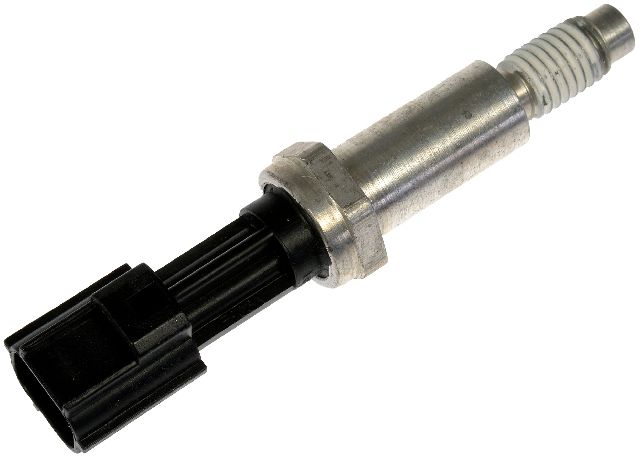
(OEM #Motorcraft DY-1144 (Ford P/N: 3F1Z-12A648-A or 8S4Z-6G004-A))— This sensor is the most common point of failure for a P1289 code, as it fails internally creating an open circuit.
Trusted brands: Motorcraft, Bosch, Standard Motor Products (SMP), Dorman
OEM price range: $35-$60
Aftermarket price range: $20-$45
Related Codes That Often Appear With This One
- P1299 — P1299 (Cylinder Head Over-Temperature Protection Active) is a direct result of P1289. The PCM receives the faulty 'high circuit' signal, assumes the engine is catastrophically overheating, and activates limp mode as a precaution. Fixing P1289 will resolve P1299. Manufacturer documentation in TSB Bulletin #TSB 16-0163 lists P1289 and P1299 together as part of a broader set of engine and powertrain codes requiring specific service procedures.
Platform-Specific Known Issues
- The primary vehicle-specific issue is the need for an extra-deep 19mm socket to perform the replacement. A standard deep socket is often not long enough to clear the top of the sensor.
- The original sensor can sometimes break apart during removal, leaving the threaded portion in the cylinder head.
- The wiring connector's plastic locking tab can become brittle with age and may break when you try to disconnect it.
Mechanic-Grade Diagnostic Values
- CHT Sensor Resistance (disconnected, measured across sensor pins) — expected: Resistance is temperature-dependent. A typical chart shows: ~37.4 kΩ at 68°F (20°C), ~16.0 kΩ at 104°F (40°C), ~7.5 kΩ at 140°F (60°C), ~2.0 kΩ at 212°F (100°C).. Failure: Infinite resistance (Open Loop) or extremely high resistance (Mega-Ohms) at any temperature. This is the direct cause of a P1289 code.
- CHT Sensor Signal Voltage (at PCM, Key On Engine Off) — expected: Varies with temperature. Should be around 3.26V at 68°F (20°C) and drop as the engine warms up.. Failure: Voltage is greater than 4.6V. This indicates an open circuit between the PCM and the sensor, or a failed sensor.
- CHT Sensor Reference Voltage (at sensor connector, unplugged, Key On) — expected: Approximately 5.0 volts on one of the pins (the VREF wire from the PCM).. Failure: 0 volts or significantly less than 5.0 volts, indicating a problem with the wiring or the PCM's 5V reference circuit.
Scan Tool Commands That Help
- FORScan: Key On Engine Off (KOEO) Self-Test — This is a more advanced test than simply reading codes. Running the KOEO self-test will actively check all sensor circuits, including the CHT, and will immediately flag a P1289 if the open circuit condition is present, confirming the fault without starting the engine. An owner in NHTSA ODI #10484858 reported performing a KOEO check with an OBDII scanner to specifically diagnose the P1289 Cylinder Head Temp Sensor High Input fault.
- Professional Scan Tool (e.g., FORScan, Snap-on): Live Data PID Monitoring (CHT V, CHT_F) — Continuously monitor the CHT voltage (CHT V) and calculated temperature (CHT_F). For a P1289, you will see the voltage stuck high (>4.6V) and the temperature at a default low value (e.g., -40°F), confirming the PCM is seeing an open circuit.
Wiring & Ground Locations
- CHT Sensor PCM Pins — At the Powertrain Control Module (PCM) connector, located at the rear of the engine bay. The CHT Signal wire goes to Pin 39, and the Signal Return (SIGRTN) wire goes to Pin 89.. Knowing these pin numbers allows a technician to test the entire wiring harness for continuity from the sensor connector to the PCM. This definitively rules out a wiring issue if the sensor replacement does not fix the code.
- G104 — A primary chassis ground point located on the driver's side inner fender, near the battery tray.. While a bad main ground is unlikely to cause an isolated P1289, it can create widespread, bizarre electrical issues. Verifying that G104 and other main grounds are clean and tight is a good practice when diagnosing any electrical fault.
- G101 — A primary engine ground point, often located on the engine block or transmission case, sometimes under the airbox.. A poor engine-to-chassis ground can affect the reference for multiple sensors. If the dedicated sensor return (SIGRTN) wire is compromised, the sensor may try to ground through the block, and a bad G101 could cause erratic readings.
Real Owner Repair Stories
- YouTube channel 'The Auto Teacher' (2009 Ford Focus SES 2.0L) — Poor running condition, check engine light. Upon inspection, the CHT sensor was found to be physically snapped in two.
❌ Tried (didn't work) Initial diagnosis by another shop correctly identified the need for a CHT sensor replacement.
✅ What actually fixed it The broken sensor was removed using a deep 3/4" (19mm) socket and needle-nose pliers to extract the broken piece. A new OEM sensor (which had an aluminum body, unlike the original copper/brass one) was installed, resolving the issue. - Ford F150 Forum user 'wjfawb0' (2010 Ford F-150 (Uses a similar CHT sensor and logic)) — Constant P1289 code, limp mode, fans on high, no A/C on cold starts. Code returns instantly after clearing.
❌ Tried (didn't work) Replacing the CHT sensor did not fix the problem., Replacing the pigtail connector by splicing it in did not fix the problem.
✅ What actually fixed it The user suspected further wiring damage upstream from the pigtail, likely from previous rodent damage, and was preparing to pull the intake manifold to inspect the full length of the harness. This highlights that if a new sensor and pigtail don't work, the fault lies in the wiring between the splice and the PCM.
OEM Part Supersession History
3F1Z-12A648-A (Motorcraft DY-961)→8S4Z-6G004-A (Motorcraft DY-1144)— The original sensor design used a brass body which could become brittle and break during removal. The updated part uses a steel/aluminum body for improved durability.
Heads up: The parts are functionally interchangeable, but the visual difference (brass vs. silver color) is notable. It is recommended to use the newer DY-1144 part.
Diagnostic Flowchart
Other Known Issues on This Vehicle
Issues unrelated to this code that are worth knowing about as an owner of this generation:
- Passenger-Side Engine Mount Failure 🔴 High — Very common, often failing between 60,000 and 120,000 miles. The hydraulic-filled mount leaks and collapses.
- Failing Alternator 🟠 Medium — Common failure item, typically after 100,000 miles.
- Automatic Transmission Shifting Issues 🟠 Medium — Reported by some owners, can occur at various mileages.
- Ignition Switch Failure 🟡 Low — A notable number of owners report this issue, where the key turns but nothing happens.
- Valve Cover and Spark Plug Well Gasket Leaks 🟠 Medium — Common oil leak point, especially after 80,000 miles.
Used vs. New Parts: Buying Guide for This Vehicle
When a used part is the smart pick: For this specific repair, using a used CHT sensor is NOT recommended. The part is a common failure item with a low cost for a new OEM or quality aftermarket replacement. The only used part that might be considered is a connector pigtail with a good length of wire from a junkyard harness if a new one is not available.
Donor-vehicle mileage cap: roughly under 1 miles for the part to have meaningful remaining life.
What to inspect on the donor part:
- If sourcing a connector pigtail, inspect for any signs of brittleness, cracking, or heat damage on the plastic.
- Ensure the locking tab on the connector is intact and functional.
- Check that the wires are flexible and the insulation is not cracked or frayed.
OEM-only on this vehicle (don't cheap out):
- While not strictly 'OEM-only', using the Motorcraft (DY-1144) sensor is the safest bet to guarantee correct temperature readings and avoid repeat repairs.
Aftermarket brands forum-validated for this vehicle:
- Motorcraft
- Standard Motor Products (SMP)
- NGK
- Bosch
Brands owners have reported issues with on this vehicle:
- Generic, unbranded sensors from online marketplaces should be avoided due to a higher likelihood of inaccurate readings or premature failure.
Real Owner Stories
Aggregated from forums and TSBs cited above. Mileages and costs reflect what owners reported in those sources.
2008-2011 Ford Focus 2.0L
Symptoms: The owner experienced the classic symptoms of fans running on high, no A/C, and a dead temperature gauge.
What fixed it: Replacing the CHT sensor located between spark plugs 2 and 3 resolved all the issues.
Source hint: Focus Fanatics Forum - P1289 CHT Sensor Replacement
2010 Ford Focus
Symptoms: The owner had an erratically bouncing temperature gauge and code P1289.
What fixed it: The issue was resolved by replacing the Cylinder Head Temperature Sensor.
Source hint: YouTube - Replacing The Cylinder Head Temperature Sensor On A 2010 Ford Focus
2008-2011 Ford Focus 2.0L — ~100000 miles
Symptoms: In a discussion about long-term reliability, a user mentioned this was the only mechanical problem they had experienced with the car.
What fixed it: Replacing the cylinder head temp sensor.
Source hint: Reddit - r/FordFocus - How reliable has your 2008-2011 Ford Focus been?
Related OBD-II Codes
Frequently Asked Questions
Do I need any special tools to replace the CHT sensor on my 2009 Ford Focus?
I bought a new CHT sensor for my Focus and it looks different from the original one. Did I get the wrong part?
Where is the CHT sensor located on the 2.0L Duratec engine?
Are there any common problems I should watch out for when removing the old CHT sensor?
My Focus's temperature gauge is dead and the radiator fans run constantly. Is the CHT sensor definitely the problem?
I just replaced the CHT sensor, but the P1289 code came back immediately. What should I check next?
Helpful Videos
We Have This Part in Stock


The information in this article is provided for general reference and educational purposes only. Vehicle specifications, procedures, and part compatibility can vary by production date, trim level, and region. Always consult your vehicle's factory service manual and verify part numbers before purchasing or performing repairs. Safety-critical components such as airbags, seat belts, and braking systems should be installed by a qualified professional.
- Ford Focus:
- 🧭 Diagnostic Flowchart
- 🎬 Helpful Videos
- 🛍️ Shop This Part
- What's Unique About the 2008-2011 Ford Focus
- Symptoms You May Notice
- Most Likely Causes
- Rare But Worth Checking
- Diagnosis Steps
- Parts You'll Likely Need
- Related Codes That Often Appear With This One
- Platform-Specific Known Issues
- Mechanic-Grade Diagnostic Values
- Scan Tool Commands That Help
- Wiring & Ground Locations
- Real Owner Repair Stories
- OEM Part Supersession History
- Other Known Issues on This Vehicle
- Used vs. New Parts: Buying Guide for This Vehicle
- Real Owner Stories
- 2008-2011 Ford Focus 2.0L
- 2010 Ford Focus
- 2008-2011 Ford Focus 2.0L — ~100000 miles
- Related OBD-II Codes
- Frequently Asked Questions
- 🎟️ Get 5% Off