
P1299 on 2003-2006 Ford Expedition 5.4L: Cylinder Head Overtemperature Causes and Fixes
This code means the engine's computer has activated 'Fail-Safe Cooling' mode due to a detected overheat, typically when the CHT sensor reports a temperature over 258°F. It's most often a faulty Cylinder Head Temperature (CHT) sensor, not actual overheating. The sensor is a ~$30 part, but its location under the intake manifold makes replacement labor-intensive, though a shortcut exists.
- P1299 means your Expedition's computer thinks the engine is overheating and has put it in a protective limp mode.
- The first step is to verify if the engine is actually hot. If not, the CHT sensor is the likely culprit.
- This engine uses a CHT sensor that reads metal temperature, not a coolant sensor.
- Replacing the CHT sensor is a difficult, labor-intensive job due to its location under the intake manifold.
- Do not drive the vehicle with this code. Have it towed to a repair shop to avoid catastrophic engine damage.
What's Unique About the 2003-2006 Ford Expedition
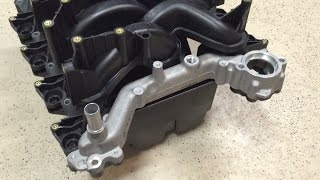
The 5.4L 2V Triton engine in this generation of Expedition does not use a traditional Engine Coolant Temperature (ECT) sensor that sits in coolant. Instead, it uses a Cylinder Head Temperature (CHT) sensor that threads directly into the driver's side cylinder head metal to infer temperature. This means a P1299 code can be triggered by a faulty sensor or wiring even if the cooling system is full and working perfectly. The sensor's location buried under the intake manifold, behind the alternator, makes what should be a simple sensor swap a significant labor task.
Symptoms You May Notice
- Check engine light is on
- Sudden and severe loss of engine power (limp mode)
- Engine running rough or shaking as if cylinders are misfiring
- Temperature gauge on the dashboard suddenly shoots to maximum HOT, sometimes moments after a cold start.
- Engine may stall and be difficult to restart until it cools down
- Cooling fans running on high speed constantly, even when the engine is cold.
- Immediately replacing cooling system components like the water pump or thermostat without first verifying if the engine is actually overheating. If the P1299 code appears on a cold engine, the problem is electrical (CHT sensor/wiring), not mechanical.
- Replacing the CHT sensor because of the P1299 code when the engine is genuinely overheating. The sensor is doing its job by reporting the high temperature; the root cause is a failure in the cooling system.
Most Likely Causes
- Faulty Cylinder Head Temperature (CHT) Sensor 🔴 High Probability → Shop Engine Cylinder Head The sensor is a very common failure item. Due to its location, it's subjected to extreme heat cycles, and the sensor itself can fail internally, sending an incorrect high-temperature signal to the PCM.
How to confirm: Check for the P1299 code immediately on a cold start. If the code appears and the temp gauge pegs HOT before the engine has had time to warm up (within the first minute), the sensor or its wiring is almost certainly the cause. An OBD-II scanner can also read the live CHT data; a reading of >250°F on a cold engine confirms a sensor/wiring issue.
Typical fix: Replace the CHT sensor and inspect the wiring pigtail for damage. Given the labor, using an OEM Motorcraft part is highly recommended. 🎬 See this walkthrough for replacing the CHT sensor.
Est. part cost: $20-$50 - Low Engine Coolant 🟡 Medium Probability The plastic intake manifold is known to develop cracks, and the intake manifold gaskets can leak coolant into the engine valley or cylinders. Other common leak points include the radiator, water pump, and heater hoses.
How to confirm: Visually inspect the coolant reservoir and radiator (when the engine is cold) to see if the level is low. Check for visible signs of coolant leaks (puddles under the vehicle, crusty green/yellow residue, or wetness in the engine valley below the intake manifold).
Typical fix: Find and repair the source of the leak. If it's the intake manifold or its gaskets, this is a significant repair. 🎬 Watch: How to find and fix intake manifold leaks. Then, refill and bleed the cooling system.
Est. part cost: $10-$500+ - Stuck Thermostat 🟡 Medium Probability → Shop Integrated Thermostat Housing Assembly
How to confirm: After starting the engine from cold, feel the upper radiator hose. It should remain cool for several minutes and then get hot quickly as the thermostat opens (around 190-195°F). If the engine temperature gauge climbs but the upper hose stays cool, the thermostat is likely stuck closed.
Typical fix: Replace the thermostat and gasket/O-ring. It is recommended to use an OEM Motorcraft thermostat.
Est. part cost: $20-$60 - Leaking Intake Manifold Gaskets 🟡 Medium Probability The composite plastic intake manifold and its gaskets are a known weak point on the 5.4L 2V engine. The gaskets can fail, causing coolant to leak externally into the engine valley or internally into an intake port, which can cause a true overheat and misfires.
How to confirm: Look for coolant pooling in the engine valley beneath the fuel rails. White steam from the exhaust and a corresponding misfire code (like P0301) can indicate an internal leak.
Typical fix: Replace the intake manifold gaskets. Many owners opt to replace the entire intake manifold assembly at the same time due to the plastic cracking near the coolant crossover.
Est. part cost: $50 (gaskets only) - $400+ (new manifold assembly) - Failing Water Pump ⚪ Low Probability → Shop Engine Water Pump
How to confirm: Look for coolant leaking from the water pump's weep hole, located on the underside of the pump housing. With the engine off and cool, check for play (wobble) in the water pump pulley. A rumbling or grinding noise from the front of the engine can also indicate a failing pump bearing.
Typical fix: Replace the water pump and its gasket.
Est. part cost: $50-$150
Rare But Worth Checking
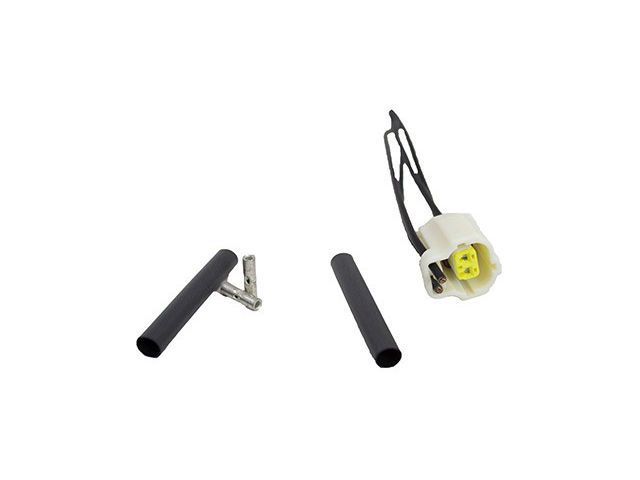
- Damaged CHT Sensor Wiring Harness: The wiring runs in a hot, tight space under the intake manifold. It can be damaged by rodents, mechanics during other repairs, or simply become brittle from heat cycles. In some cases, the wire can break internally inside the connector's insulation, showing no visible damage but creating an open circuit that the PCM interprets as extreme heat. Always inspect the pigtail and replace if it appears brittle or damaged.
- Air Trapped in the Cooling System: If the cooling system was recently serviced (e.g., water pump or thermostat replacement) and not properly bled, an air pocket can get trapped. This air pocket can prevent proper coolant circulation or cause a localized hot spot at the cylinder head, leading to a true overheat condition. The system must be properly 'burped' to remove all air.
- Blown Head Gasket: This is a worst-case scenario. A test for combustion gases in the coolant (using a block tester kit) can confirm this. This would typically be accompanied by other symptoms like persistent white smoke from the exhaust, milky-looking oil, or unexplained coolant loss.
Diagnosis Steps
- CRITICAL FIRST STEP: Determine if the engine is actually overheating. Use an infrared thermometer to check the temperature of the cylinder heads (near the CHT sensor location if possible) and radiator hoses. If you don't have one, carefully check for physical signs like steam, boiling sounds from the coolant reservoir, or intense radiant heat. DO NOT open a hot radiator cap.
- If the engine is NOT overheating (i.e., temperatures are normal or the code appears on a cold engine), the problem is almost certainly electrical. The primary suspect is the CHT sensor itself. The secondary suspect is the wiring/pigtail to the sensor.
- If the engine IS overheating, begin standard cooling system diagnostics.
- Check the coolant level in the reservoir and radiator (only when cool). Top off if necessary and check for obvious leaks, paying close attention to the plastic intake manifold and the valley underneath it.
- Check for proper cooling fan operation (they should be running on high with an overheat condition).
- Verify the thermostat is opening correctly by feeling the radiator hoses as the engine warms up. The top hose should get hot.
- Inspect the water pump for leaks from the weep hole or bearing play.
- If no external leaks are found but coolant is being lost, perform a block test to check for combustion gases in the coolant, which would indicate a blown head gasket.
Parts You'll Likely Need
- Cylinder Head Temperature (CHT) Sensor
(OEM #Motorcraft DY1144 (or 3L3Z-6G004-BA))— This is the most common point of failure for a false P1299 code on this engine. It either fails electrically or provides inaccurate readings.
Trusted brands: Motorcraft, Standard Motor Products (SMP), NTK
Related Codes That Often Appear With This One
- P1285 — This code means 'Cylinder Head Overtemperature Condition'. It is often a precursor to P1299, indicating the PCM has detected the high temperature but has not yet activated the full fail-safe injector shutdown strategy. Seeing both strongly points to the CHT circuit.
- P0117 / P0118 — These are generic codes for 'ECT/CHT Sensor Circuit Low Input' and 'Circuit High Input' respectively. They indicate a specific electrical fault with the sensor or its wiring (short or open circuit) and are often logged along with P1285/P1299, further confirming the issue is electrical.
- P030X (e.g., P0301, P0302) — A cylinder-specific misfire code. This can appear for two reasons: 1) The fail-safe mode is active, and the PCM is intentionally shutting down that cylinder's injector. 2) A leaking intake manifold or head gasket is allowing coolant into that cylinder, causing a misfire and a true overheat condition.
Technical Service Bulletins (TSBs) & Recalls
- TSB 06-21-15: While this TSB is officially for the later 5.4L 3V engine, it describes the identical problem of a false overheat condition with DTCs P1285 and P1299, pointing to it being a known issue with Ford's CHT sensor strategy.
Platform-Specific Known Issues
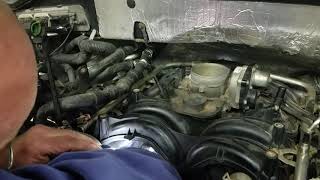
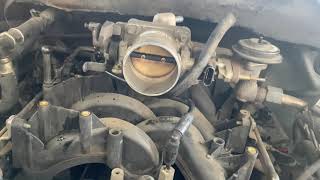
- Difficult CHT Sensor Location: The CHT sensor is located on the driver's side cylinder head, under the intake manifold and directly behind the alternator. The official Ford procedure requires removing the entire intake manifold for access, a 4-6 hour job.
- Alternator-Only Removal 'Shortcut': Many technicians and DIYers have successfully replaced the sensor by only removing the air intake tube and the alternator. This provides a very tight window of access from the front of the engine. Special tools are required, such as a 19mm flex-head ratcheting wrench or a 19mm crow's foot on a long extension. Even with this shortcut, access is difficult, and releasing the electrical connector tab can be the hardest part of the job.
Mechanic-Grade Diagnostic Values
- CHT Sensor Resistance vs. Temperature — expected: Approximately 37,000 Ohms at 68°F (20°C), decreasing as temperature rises. A common reference is ~1,000 Ohms at 77°F. A detailed chart shows specific values, for example, a voltage of 3.4V corresponds to a temperature between 50-68°F on a cold-soaked engine.. Failure: An open circuit (infinite resistance) or a short (near-zero resistance) at any temperature. Readings that do not align with the temperature/resistance chart indicate a faulty sensor.
- CHT Sensor Voltage at PCM (Key On, Engine Off) — expected: High voltage on a cold engine (e.g., ~3.4V after a 24-hour cold soak), decreasing to a low voltage signal on a hot engine.. Failure: A reading that corresponds to a very high temperature (e.g., <0.5V) on a cold engine indicates a short in the wiring or a failed sensor. A reading of 5V could indicate an open circuit.
Scan Tool Commands That Help
- Professional OBD-II Scanner (e.g., iCarsoft, Autel, BlueDriver): Live Data Monitoring for 'Cylinder Head Temperature' — This is the first and most critical diagnostic step. On a cold engine, the CHT value should be close to the ambient air temperature. If it instantly reads a high value (e.g., >250°F), it confirms the issue is with the CHT sensor or its circuit, not a real overheat.
- Ford IDS (Integrated Diagnostic System): Component Tests / Active Commands — Dealer-level tools may offer specific bidirectional tests to command cooling fans on or perform other system checks, but for P1299, live data monitoring is the primary function used to distinguish a false code from a real one.
Wiring & Ground Locations
- CHT Sensor Connector — Under the intake manifold, threaded into the driver's side cylinder head, behind the alternator.. This is the primary point of failure. The connector and its pigtail are exposed to extreme heat, causing them to become brittle and fail, creating an open or shorted circuit that triggers a false P1299. The two wires are the CHT signal and the Signal Return (ground reference) which goes to the PCM.
- CHT Sensor Power Source — The CHT sensor on this platform often receives its 5-volt reference voltage via a splice from the Throttle Position Sensor (TPS) circuit.. While uncommon, a problem with the TPS circuit could potentially affect the CHT sensor's reading. If the CHT sensor and its direct wiring test good, checking the 5V reference at the connector is a necessary step.
Real Owner Repair Stories
- Ford F150 Forum User (2003 Ford F-150 5.4L) — After replacing the intake manifold with a Dorman unit, the gasket on the passenger side rear started pouring out coolant after 3 days.
❌ Tried (didn't work) Following torque sequence and specs (18 ft-lbs) for the new manifold.
✅ What actually fixed it The user was advised that Dorman intake manifolds for this application are considered problematic by some installers, with reports of poor airflow, power loss, and sealing issues. The implied fix is to use a higher-quality OEM Ford intake manifold instead. - YouTube video by Rick Massie (Ford 5.4L Triton (model year not specified, but applicable to the 2V engine)) — Implied P1299 code from a faulty CHT sensor.
✅ What actually fixed it The CHT sensor was successfully replaced without removing the intake manifold. The process involved removing the alternator for access, using a 19mm flex-head GearWrench to reach the sensor, and carefully unplugging the connector. The total job took about an hour.
When the Usual Fixes Don't Work
- In one documented case on a 2003 Excursion with the 5.4L, the owner replaced the CHT sensor, the wiring pigtail, and the thermostat, but the P1299 code with pegged temperature gauge returned intermittently. Using a laser thermometer, they confirmed the actual head temperature was only 180-200°F. Restarting the vehicle would temporarily clear the fault. This points towards a more elusive issue, possibly a faulty ground, an intermittent short in the main harness, or a failing PCM, demonstrating that replacing the most common parts doesn't always resolve the issue.
OEM Part Supersession History
3L3Z-6G004-BA→Motorcraft DY1144 (also listed under 3F1Z-12A648-A, 8L3Z-6G004-A)— Part consolidation and minor revisions over many model years. The sensor is used across a wide range of Ford vehicles.
Heads up: While the sensor itself is widely used, always verify fitment for the specific vehicle. Some applications may come with a different adapter or housing.
Diagnostic Flowchart
Used vs. New Parts: Buying Guide for This Vehicle
When a used part is the smart pick: A used OEM intake manifold from a junkyard can be a cost-effective choice if your original plastic manifold is cracked. Given the high cost of a new OEM unit, a used one from a low-mileage, rear-ended vehicle is a viable option.
Donor-vehicle mileage cap: roughly under 120000 miles for the part to have meaningful remaining life.
What to inspect on the donor part:
- Inspect the plastic for any hairline cracks, especially around the coolant crossover port and thermostat housing area.
- Ensure all threaded inserts for the fuel rail and coil packs are intact and not stripped.
- Check that the gasket surfaces are flat and free of deep gouges or warping.
OEM-only on this vehicle (don't cheap out):
- Cylinder Head Temperature (CHT) Sensor: Due to the high labor cost to access it, using a non-OEM sensor is a significant risk. A failed aftermarket sensor would require repeating the entire job. Always use a Motorcraft sensor.
- Thermostat: This is a critical, low-cost component. An aftermarket thermostat that fails to open can cause a genuine overheat, leading to catastrophic engine damage. Stick with Motorcraft.
Aftermarket brands forum-validated for this vehicle:
- Dorman (Intake Manifold): The Dorman 615-188 is a widely available and commonly used replacement for the OEM intake manifold. It features a revised design and comes as a complete kit. However, quality can be inconsistent.
Brands owners have reported issues with on this vehicle:
- Dorman (Intake Manifold): Despite being a common choice, some professional mechanics and DIYers report issues with Dorman manifolds, including poor quality control (undrilled holes), gaskets failing prematurely, and a perceived loss of power compared to the OEM design. If choosing Dorman, inspect it carefully before installation and be aware of the potential for issues.
Real Owner Stories
Aggregated from forums and TSBs cited above. Mileages and costs reflect what owners reported in those sources.
2003-2006 Ford Expedition 5.4L 2V Triton V8
Symptoms: The owner experienced intermittent temperature spikes. The gauge would suddenly spike to hot and then return to normal instantly after restarting the engine.
What fixed it: The owner diagnosed the issue as a faulty CHT sensor or an electrical problem, not a true mechanical overheat, based on the gauge's behavior after an engine restart.
Source hint: Ford Expedition Forum thread titled 'coolant sensor possible cooling issue code p1299'
2003-2006 Ford Expedition 5.4L 2V Triton V8
Symptoms: A sudden loss of engine power occurred simultaneously with the temperature gauge spiking to the hot position.
What fixed it: The problem was identified as the 'cyl head overtemp' code (P1299), with the root cause being the CHT sensor located under the intake manifold.
Source hint: Ford Expedition Forum thread titled 'code p1299'
2003-2006 Ford Expedition 5.4L 2V Triton V8
Symptoms: The vehicle was genuinely overheating due to a coolant leak found in the engine valley, under and behind the alternator.
What fixed it: The owner traced the true overheat condition to a common coolant leak from the plastic intake manifold, which is a known failure point on this engine.
Source hint: Ford Expedition Forum thread titled 'intake manifold leak'
Related OBD-II Codes
Frequently Asked Questions
My Expedition's temperature gauge suddenly shot to HOT right after a cold start. Is the engine really overheating?
Where is the CHT sensor located on the 5.4L 2V engine, and is it difficult to replace?
Is there a shortcut to replace the CHT sensor without removing the intake manifold?
If my Expedition is actually overheating and has a P1299 code, what is a common cause on this specific vehicle?
What brand of CHT sensor or thermostat should I use for the repair?
I saw TSB 06-21-15 mentioned. Does that apply to my 2003-2006 Expedition for this P1299 code?
What happens if I ignore the P1299 code and keep driving with the temperature gauge on HOT?
Helpful Videos

We Have This Part in Stock


The information in this article is provided for general reference and educational purposes only. Vehicle specifications, procedures, and part compatibility can vary by production date, trim level, and region. Always consult your vehicle's factory service manual and verify part numbers before purchasing or performing repairs. Safety-critical components such as airbags, seat belts, and braking systems should be installed by a qualified professional.
- Ford Expedition:
- 🧭 Diagnostic Flowchart
- 🎬 Helpful Videos
- 🛍️ Shop This Part
- What's Unique About the 2003-2006 Ford Expedition
- Symptoms You May Notice
- Most Likely Causes
- Rare But Worth Checking
- Diagnosis Steps
- Parts You'll Likely Need
- Related Codes That Often Appear With This One
- Technical Service Bulletins (TSBs) & Recalls
- Platform-Specific Known Issues
- Mechanic-Grade Diagnostic Values
- Scan Tool Commands That Help
- Wiring & Ground Locations
- Real Owner Repair Stories
- When the Usual Fixes Don't Work
- OEM Part Supersession History
- Used vs. New Parts: Buying Guide for This Vehicle
- Real Owner Stories
- 2003-2006 Ford Expedition 5.4L 2V Triton V8
- 2003-2006 Ford Expedition 5.4L 2V Triton V8
- 2003-2006 Ford Expedition 5.4L 2V Triton V8
- Related OBD-II Codes
- Frequently Asked Questions
- 🎟️ Get 5% Off