
P1451 on 1999-2004 Ford Mustang: EVAP Vent Solenoid Circuit Malfunction Causes and Fixes
On a 1999-2004 Mustang, P1451 almost always points to a failed canister vent solenoid or, more commonly, a corroded connector or broken wire leading to it. The solenoid is located near the driver's side rear wheel. Expect to pay $30-$60 for a new solenoid.
- P1451 is an electrical circuit code, not a leak code. Focus your diagnosis on the wiring and the solenoid itself.
- Always check the wiring and connector for corrosion or damage before buying a new solenoid. The location on the Mustang makes this the most likely point of failure.
- The canister vent solenoid is located near the driver's side rear wheel, mounted to the charcoal canister.
- If other codes like P0135 or P0155 are present, check for a blown fuse first, as they may share a power source.
- The repair is straightforward for a DIYer with basic tools and a multimeter, often costing less than $75 in parts.
What's Unique About the 1999-2004 Ford Mustang
For the SN95 'New Edge' Mustang, the canister vent solenoid and its connector are located under the car near the driver's side rear wheel, making them highly susceptible to road debris, water, and salt. Consequently, a significant number of P1451 faults on these cars are due to simple wiring or connector corrosion issues rather than an actual failed solenoid, a fact frequently discussed by owners in forums.
Symptoms You May Notice
- Check Engine Light is on.
- Vehicle will fail an emissions inspection.
- A faint fuel smell may be noticeable near the rear of the car.
- In some cases, you may hear a 'hiss' or find it difficult to remove the gas cap due to pressure buildup in the tank.
- Hard starting immediately after refueling can occur if the vent is stuck closed.
- Replacing the gas cap. A bad gas cap typically causes a leak-related code (like P0455 or P0457), not a circuit-specific code like P1451.
- Replacing the Fuel Tank Pressure (FTP) sensor. While related to the EVAP system, P1451 specifically points to an electrical fault in the vent solenoid's control circuit, not a pressure reading issue. 🎬 Watch: Understanding the causes and fixes for the P1451 code.
- Replacing the EVAP Purge Valve/Solenoid. This component is located in the engine bay and has its own circuit code (P0443). While they can fail for similar reasons, P1451 is specific to the vent solenoid circuit at the rear of the vehicle.
Most Likely Causes
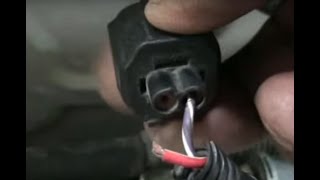
- Damaged Wiring or Corroded Connector 🔴 High Probability The solenoid is located behind the driver's side rear wheel, where its wiring and connector are exposed to water, road salt, and debris, leading to corrosion and breaks. Forum users frequently report finding corroded pins inside the connector or broken wires leading to it.
How to confirm: Visually inspect the connector and wiring harness leading to the canister vent solenoid for green/white corrosion, chafed insulation, or broken wires. Check for battery voltage (typically 12V) at the Red/White wire on the connector with the key on. The other wire, Violet/White, is the control wire from the PCM.
Typical fix: Clean the connector terminals with an electrical contact cleaner or a small pick. If corrosion is severe, replace the connector pigtail. Repair any broken sections of wire, paying close attention to the area where the harness may rub against the chassis or suspension components.
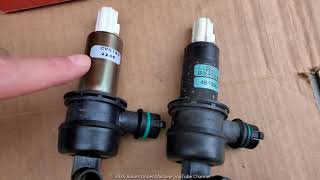
Est. part cost: $15-$30 for a new connector pigtail (e.g., Dorman 645-210). - Failed Canister Vent (CV) Solenoid 🔴 High Probability → Shop Vapor Canister The solenoid can fail electrically (internal coil shorts or opens) or mechanically (gets stuck open or closed) from age and exposure to the elements. Corrosion can build up and seize the internal plunger.
How to confirm: Disconnect the solenoid and measure the resistance across its two pins with a multimeter; a good reading is typically between 48 and 65 ohms. A reading of infinity (OL) indicates an open coil, while a reading near zero indicates a short. You can also apply 12V and ground directly to the pins to listen for an audible 'click'. No click indicates a stuck or failed solenoid.
Typical fix: Replace the canister vent solenoid. It is mounted to the charcoal canister assembly.
Est. part cost: $30-$75 - Blown Fuse ⚪ Low Probability The same fuse often powers multiple components. On 1999-2004 Mustangs, the EVAP system components share a fuse with the O2 sensor heaters, which are prone to shorting if their wiring touches the hot exhaust.
How to confirm: Check the fuse panel inside the car (Central Junction Box). A forum post on StangNet identifies fuse #8 (20A) as powering the EVAP system and O2 heaters for the 2000 model year. If this fuse is blown, it will cause P1451 along with O2 heater codes (P0135, P0155).
Typical fix: Replace the blown fuse. If it blows again immediately, you have a short circuit in one of the components on that circuit (most likely an O2 sensor wire) that must be diagnosed and repaired.
Est. part cost: <$5
Rare But Worth Checking
- Clogged Charcoal Canister: → Shop Vapor Canister This is more likely if you frequently overfill your fuel tank, which forces liquid gasoline into the canister, saturating the charcoal media and potentially causing blockages that trigger system faults. However, this typically sets other codes related to pressure or flow, not a circuit code like P1451.
- Failed Powertrain Control Module (PCM): → Shop Engine Control Module (ECM) This is extremely rare. The PCM should only be considered after all other possibilities, including the entire circuit from the fuse 🎬 See how to diagnose and fix a vent control valve fault. to the solenoid, have been thoroughly tested and confirmed to be good. A bad ground or short in the harness is far more likely than a failed PCM driver.
Diagnosis Steps
- Retrieve the P1451 code with an OBD-II scanner and note any other codes present. Codes like P0135, P0155, and P0443 are important clues.
- Check Fuse #8 (20A) in the Central Junction Box (under the dash). If it's blown, suspect a short in the O2 sensor wiring.
- Raise the rear of the vehicle and locate the EVAP canister and vent solenoid, located just in front of the driver's side rear tire, mounted to the canister assembly.
- Visually inspect the electrical connector and wiring going to the vent solenoid. Look for obvious signs of corrosion, damage, or breaks. Pay attention to where the harness is routed near the frame.
- Disconnect the connector. With the ignition key in the 'On' position, use a multimeter to verify that the Red/White wire in the connector has battery voltage (~12V).
- With the connector still unplugged, measure the resistance (ohms) across the two terminals on the solenoid itself. A reading between 48-65 ohms is expected; a reading of infinity (OL) indicates an open coil, while a reading near zero indicates a short.
- If the resistance is good, use jumper wires to carefully apply 12V power and ground directly to the solenoid's pins. You should hear a distinct click. No click means the valve is mechanically stuck.
- If the solenoid clicks and its resistance is good, the problem is almost certainly in the wiring (either the power or ground-side control wire) or the connector itself. Repair the wiring or replace the connector pigtail.
- If the solenoid fails the resistance or click test, replace the canister vent solenoid. 🎬 Watch this step-by-step guide to replacing the canister vent solenoid.
- After the repair, clear the codes with a scanner and perform a drive cycle to allow the EVAP monitor to run and confirm the fix.
Parts You'll Likely Need
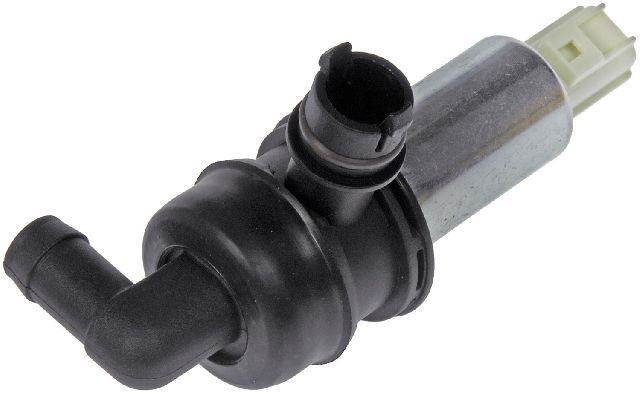
- EVAP Canister Vent Solenoid
(OEM #XR3Z-9F945-AA)— This is the component that fails most often, either electrically or mechanically, triggering the P1451 circuit code.
Trusted brands: Motorcraft, Standard Motor Products (CVS61), Dorman (911-201)
OEM price range: $50-$75
Aftermarket price range: $30-$60 - EVAP Canister Vent Solenoid Connector Pigtail
(OEM #3U2Z-14S411-JCA)— Due to its location, the factory connector often corrodes or breaks. Splicing in a new pigtail is often the only reliable fix.
Trusted brands: Dorman (645-210), Motorcraft, Standard Motor Products (S2058)
OEM price range: $20-$35
Aftermarket price range: $15-$30
Related Codes That Often Appear With This One
- P0443 — This code is for the EVAP Purge Control Valve Circuit. Since both the purge valve and vent valve are part of the same system and may share a power supply fuse, a wiring or fuse issue can sometimes trigger faults for both.
- P0135, P0155 — These codes indicate a fault in the O2 sensor heater circuits. On this Mustang, the O2 sensor heaters share a power fuse with the EVAP vent solenoid. A shorted O2 heater wire can blow the fuse, cutting power to the vent solenoid and causing P1451.
Platform-Specific Known Issues
- source — A user on Ford-Trucks.com with a similar EVAP system found a P1451 was caused by the wiring harness rubbing against a metal bracket underneath the air filter box, exposing a wire and causing an intermittent short. This highlights the need to inspect the entire circuit, not just the area near the solenoid.
- source — A detailed thread on StangNet forums from 2006 documents a case where P1451, P0443, P0135, and P0155 all appeared at once. The root cause was a blown 20A fuse (#8 in the central junction box) that powers all of these components. The ultimate failure was likely a shorted O2 sensor wire that took out the fuse.
Mechanic-Grade Diagnostic Values
- EVAP Canister Vent Solenoid Coil Resistance — expected: 48 to 65 Ohms. Failure: A reading of infinity (OL) indicates an open coil; a reading near zero indicates a shorted coil.
- EVAP Canister Vent Solenoid Connector Voltage (Key On, Engine Off) — expected: Approximately 12V (Battery Voltage) on the power wire (Red/White).. Failure: No voltage indicates a blown fuse or an open circuit in the power supply wire.
- PCM Command Voltage (Live Data) — expected: With the valve open (de-energized), voltage should be near battery voltage. When commanded closed (energized), a voltage drop of at least 4 volts should be observed.. Failure: No change in voltage when commanded indicates a wiring fault or a bad PCM driver.
Scan Tool Commands That Help
- Ford IDS (Integrated Diagnostic System): Output Test Mode (OTM) for EVAPCV (Canister Vent) — This bidirectional control allows a technician to command the canister vent solenoid on and off directly from the scan tool. It is used to verify if the solenoid clicks when commanded and to check the integrity of the control circuit wiring from the PCM to the solenoid without having to manually apply power.
Wiring & Ground Locations
- EVAP Canister Vent Control Solenoid — Located at the left rear of the vehicle, mounted to the charcoal canister assembly, in front of the driver's side rear wheel.. This is the component whose circuit is being monitored. Its exposed location is the primary reason for wiring and connector failures.
- G400 — A wiring diagram for the 2004 Mustang indicates a ground point G400 located in the left front of the luggage compartment (trunk).. While not the direct ground for the solenoid (which is PCM-controlled), a faulty chassis ground in this area could potentially affect the EVAP system's pressure sensor readings or other related components, though it's not a primary cause for a P1451 circuit code.
- Central Junction Box (CJB) — Located inside the vehicle, to the left of the steering column, under the dashboard.. This fuse panel contains the fuse (typically Fuse #8, 20A) that provides power to the EVAP vent solenoid circuit, often shared with O2 sensor heaters.
Real Owner Repair Stories
- GabrielAutoTech on YouTube (2001 Lincoln Town Car 4.6L (Shares similar EVAP system design with Ford)) — Check Engine Light with code P1451.
❌ Tried (didn't work) Initial diagnosis pointed to a circuit fault.
✅ What actually fixed it The electrical connector pin had corroded and broken off from the wire inside the connector housing. The final fix was to remove the terminal from the connector and solder it directly back onto the wire. - S197Forum.com user (Mustang (S197 generation, but principle applies)) — Trying to delete the EVAP system without triggering codes.
❌ Tried (didn't work) Guessing resistor values.
✅ What actually fixed it The user successfully prevented the P1451 code by wiring in a 60 Ohm resistor in place of the canister vent solenoid. This confirms the PCM is looking for a resistance value in this range.
OEM Part Supersession History
XR3E-9F945-AB→XR3Z-9F945-AA— Standard part number evolution and potential minor design or material updates by Ford.
Heads up: These parts are generally interchangeable for the 1999-2004 Mustang range.
Diagnostic Flowchart
Used vs. New Parts: Buying Guide for This Vehicle
When a used part is the smart pick: For this repair, a used part is generally not recommended for the solenoid itself due to the low cost of a new aftermarket part and the high failure rate of the original. However, obtaining a used connector pigtail from a junkyard car (especially from a dry, non-salt-belt region) can be a viable option if a new pigtail is unavailable. A used charcoal canister is also a reasonable choice if the original is physically damaged, as it is a passive component.
Donor-vehicle mileage cap: roughly under 100000 miles for the part to have meaningful remaining life.
What to inspect on the donor part:
- For a connector pigtail: Inspect for zero corrosion (no green or white powder), flexible and unbroken wires, and an intact locking tab.
- For a charcoal canister: Ensure the plastic housing is not cracked and that there are no loose charcoal pellets rattling inside, which would indicate internal failure.
Aftermarket brands forum-validated for this vehicle:
- Standard Motor Products (for solenoid and connector)
- Dorman (for solenoid and connector)
Brands owners have reported issues with on this vehicle:
- Unnamed, no-brand 'white box' parts from online marketplaces may have questionable coil resistance values or use brittle plastic, leading to premature failure.
Real Owner Stories
Aggregated from forums and TSBs cited above. Mileages and costs reflect what owners reported in those sources.
2000 Ford Mustang
Symptoms: The Check Engine Light came on with four codes at once: P1451, P0443, P0135, and P0155.
What fixed it: The root cause was a blown 20A fuse (#8 in the central junction box). Replacing the fuse resolved the codes, which were likely triggered by a short in an O2 sensor wire that shared the same circuit.
Source hint: Owner Experience: Multiple Codes Point to Fuse, citing a StangNet forums thread
Ford Truck (with similar EVAP system)
Symptoms: An intermittent P1451 code that was difficult to diagnose.
What fixed it: The wiring harness was found to be rubbing against a metal bracket underneath the air filter box. Repairing the exposed, chafed wire that was causing an intermittent short fixed the problem.
Source hint: Owner Experience: Chafed Wire Harness, citing a Ford-Trucks.com thread
2004 Ford Mustang
Symptoms: Service Engine Soon light was on with code P1451.
What fixed it: The problem was caused by water intrusion and corrosion inside the vent solenoid's electrical connector. Cleaning or replacing the connector resolved the issue.
Source hint: MustangForums.com (2004) thread
Ford Ranger (platform mate)
Symptoms: A persistent P1451 code that would not clear after initial checks.
What fixed it: The owner found a corroded wire loom near the fuel filter where multiple wires had been damaged by the elements. Repairing the damaged wires in the loom fixed the code.
Source hint: Ranger-Forums.com (2016) thread
Related OBD-II Codes
Frequently Asked Questions
Where is the canister vent solenoid located on my 1999-2004 Mustang?
I have codes P0135, P0155, and P0443 along with P1451. What should I check first?
How can I test the canister vent solenoid on my Mustang?
What makes the wiring for the vent solenoid so likely to fail on this car?
What is the part number for the replacement electrical connector for the vent solenoid?
Besides the Check Engine Light, what are other symptoms of a P1451 fault?
Helpful Videos

We Have This Part in Stock


The information in this article is provided for general reference and educational purposes only. Vehicle specifications, procedures, and part compatibility can vary by production date, trim level, and region. Always consult your vehicle's factory service manual and verify part numbers before purchasing or performing repairs. Safety-critical components such as airbags, seat belts, and braking systems should be installed by a qualified professional.
- Ford Mustang:
- 🧭 Diagnostic Flowchart
- 🎬 Helpful Videos
- 🛍️ Shop This Part
- What's Unique About the 1999-2004 Ford Mustang
- Symptoms You May Notice
- Most Likely Causes
- Rare But Worth Checking
- Diagnosis Steps
- Parts You'll Likely Need
- Related Codes That Often Appear With This One
- Platform-Specific Known Issues
- Mechanic-Grade Diagnostic Values
- Scan Tool Commands That Help
- Wiring & Ground Locations
- Real Owner Repair Stories
- OEM Part Supersession History
- Used vs. New Parts: Buying Guide for This Vehicle
- Real Owner Stories
- 2000 Ford Mustang
- Ford Truck (with similar EVAP system)
- 2004 Ford Mustang
- Ford Ranger (platform mate)
- Related OBD-II Codes
- Frequently Asked Questions
- 🎟️ Get 5% Off