
P1451 on 2000-2007 Ford Taurus: EVAP Vent Control Circuit Malfunction Causes and Fixes
On a 2000-2007 Ford Taurus, code P1451 is almost always caused by a failed EVAP canister vent solenoid or the wiring connected to it. The solenoid is located under the rear of the car near the charcoal canister, which is found behind a cover on the underside of the spare tire well. Its exposed location makes it prone to corrosion. Expect the part (Motorcraft CX-2795) to cost between $40 and $80 for a DIY-friendly repair.
- P1451 is an electrical circuit code, not a leak code. Do not start by replacing the gas cap.
- The most likely causes are a failed canister vent solenoid or damaged wiring to it, located under the rear of the car by the spare tire well.
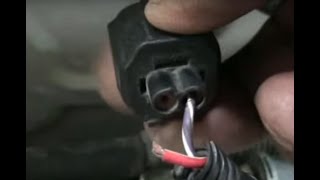
- Always inspect the wiring and connector for corrosion or damage before buying any parts, as a simple wire repair is a very common fix.
- You can test the solenoid with a multimeter; a good one should have a resistance between 48-65 ohms.
- This is a DIY-friendly repair that does not affect drivability but is necessary to pass an emissions test.
What's Unique About the 2000-2007 Ford Taurus
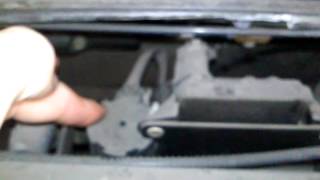
For the fourth-generation Ford Taurus, the EVAP canister vent solenoid is located underneath the rear of the car, mounted on or near the charcoal canister. This entire assembly is situated behind a protective cover on the bottom of the spare tire well. 🎬 Watch: Locate the EVAP canister and EGR valve This location exposes the solenoid and its wiring to road salt, moisture, and debris, making corrosion of the connector pins and physical damage to the wiring a very common cause of code P1451 on this platform.
Generation note: The 2000-2007 model years cover the entire fourth generation of the Ford Taurus. The EVAP system design and the components related to P1451 are consistent across this generation.
Symptoms You May Notice
- Check Engine Light is on.
- Vehicle will fail an emissions test.
- A faint fuel odor may be noticeable in rare cases.
- Difficulty removing the gas cap due to a vacuum in the tank if the solenoid is stuck closed.
- Replacing the gas cap. A bad gas cap typically causes EVAP leak codes (like P0442 or P0455), not an electrical circuit code like P1451.
- Replacing the EVAP Purge Valve/Solenoid. The purge valve is located in the engine bay, near the firewall on the passenger side, and is associated with different trouble codes (like P0443). P1451 specifically refers to the vent solenoid circuit near the fuel tank.
Most Likely Causes
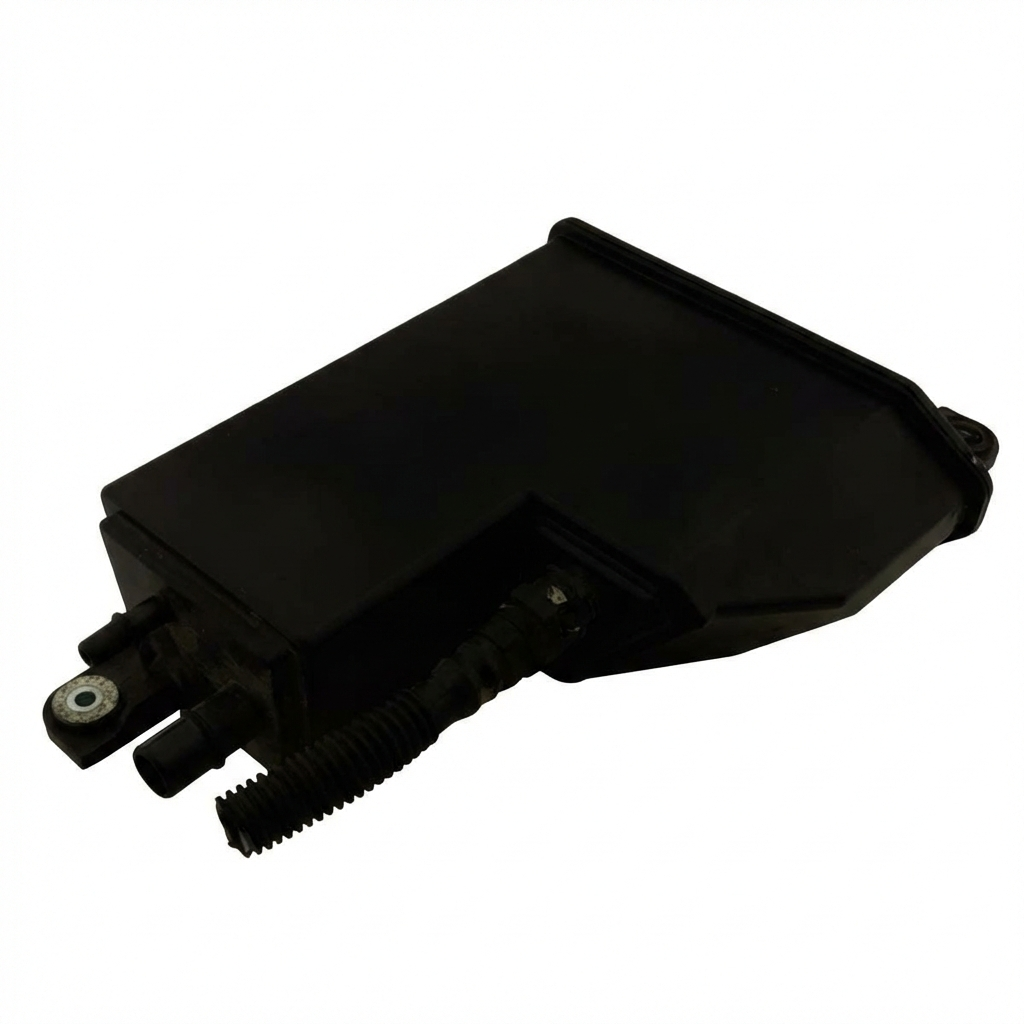
- Failed EVAP Canister Vent Solenoid 🔴 High Probability → Shop Vapor Canister The solenoid is located under the car, where it is exposed to road grime and moisture, leading to internal corrosion and coil failure over time.
How to confirm: Test the solenoid's resistance with a multimeter. A good Ford solenoid should measure between 48 and 65 ohms. An infinite (OL) or zero reading indicates a failed coil. You can also apply 12V directly to the solenoid's pins to listen for an audible 'click', confirming mechanical operation.
Typical fix: Replace the EVAP canister vent solenoid.
Est. part cost: $40-$80 - Damaged Wiring or Connector 🔴 High Probability The wiring harness leading to the vent solenoid is routed under the vehicle and can become corroded, chafed, or broken due to exposure to the elements. The connector pins are especially susceptible to corrosion from road salt.
How to confirm: Visually inspect the entire length of the wiring harness from the solenoid connector back. Check for 12V (battery voltage) at the power wire (typically a red wire on Fords) on the connector with the key on. A reading of 0V points to an open circuit in the power supply.
Typical fix: Repair the broken or corroded section of wire, or replace the connector pigtail if it is damaged.
Est. part cost: $5-$25 - Blown Fuse ⚪ Low Probability A short circuit in any component on the same fused circuit can cause the fuse to blow, cutting power to the vent solenoid.
How to confirm: Check the vehicle's fuse box for a blown fuse related to the emissions or EVAP system. A wiring diagram can help identify the specific fuse.
Typical fix: Replace the blown fuse and investigate the cause of the short circuit.
Est. part cost: $1-$5
Rare But Worth Checking
- Faulty Powertrain Control Module (PCM): → Shop Engine Control Module (ECM) This is extremely rare and should only be considered after all other possibilities (solenoid, wiring, fuses) have been exhaustively tested and ruled out.
Diagnosis Steps
- Retrieve codes with an OBD-II scanner to confirm P1451 is the primary code.
- Safely raise and support the rear of the vehicle. Locate the EVAP canister assembly under the spare tire well and remove any protective covers.
- Visually inspect the EVAP canister vent solenoid, its connector, and wiring harness. Look for any signs of green or white corrosion, chafing, or breaks.
- Check the fuse that supplies power to the EVAP system components in the vehicle's fuse box.
- With the key in the 'On' position (engine off), use a multimeter to check for battery voltage at the power wire (often red) on the solenoid's electrical connector.
- Disconnect the solenoid and measure the resistance across its two pins. A reading between 48-65 ohms is expected for a good Ford solenoid. Readings of infinity (OL) or near-zero ohms indicate a failed solenoid.
- If resistance is out of specification, replace the vent solenoid.
- If resistance is good and power is present at the connector, check the ground control wire for continuity back to the PCM. A wiring diagram is essential for this step.
- If a bi-directional scan tool is available, command the vent solenoid on and off to listen for an audible 'click', which indicates it is functioning mechanically.
Parts You'll Likely Need
- EVAP Canister Vent Solenoid
(OEM #CX-2795 (Motorcraft))— This solenoid is the most common part to fail internally, causing the P1451 circuit code.
Trusted brands: Motorcraft, Dorman, Standard Motor Products
OEM price range: $60-$90
Aftermarket price range: $40-$80 - EVAP Vent Solenoid Connector Pigtail — The connector itself can corrode or the wires can break right at the connector, requiring a new pigtail to be spliced in.
Trusted brands: Motorcraft, Dorman
OEM price range: $20-$35
Aftermarket price range: $10-$20
Related Codes That Often Appear With This One
- P0455 — This code indicates a large EVAP leak. If the P1451 fault causes the vent solenoid to be stuck open, the system cannot seal itself for a leak test, which the PCM interprets as a large leak. Fixing the P1451 circuit issue will often resolve the P0455 code.
- P0442 — Similar to P0455, this code for a small EVAP leak can be triggered if the vent solenoid isn't closing properly due to the circuit malfunction. An intermittent electrical fault can be interpreted by the PCM as a small leak.
Mechanic-Grade Diagnostic Values
- Voltage on Solenoid Control Wire (Solenoid Commanded OFF) — expected: Approximately 12V (Battery Voltage). Failure: A reading near 0V indicates a short to ground in the wiring or a faulty PCM driver.
- Voltage on Solenoid Control Wire (Solenoid Commanded ON) — expected: Near 0V (a minimum voltage drop of 4 volts is expected). Failure: Voltage remaining near battery voltage indicates an open in the control wire, a bad solenoid coil, or a faulty PCM driver that is not providing ground.
Scan Tool Commands That Help
- Ford IDS (or equivalent bidirectional scanner): Output Test Mode / Active Command — This allows a technician to manually command the vent solenoid on and off. It is used to listen for an audible 'click' from the solenoid and to observe the voltage change on the control wire with a multimeter, confirming the entire circuit's integrity from the PCM to the solenoid.
- Ford IDS (or equivalent bidirectional scanner): KOEO (Key On Engine Off) Self-Test — Running the KOEO self-test will specifically check all output circuits for electrical faults before the engine is even started. A P1451 fault will often be detected immediately during this test, confirming it's a hard electrical fault rather than an intermittent one.
Wiring & Ground Locations
- Vent Solenoid Power Wire — In the two-wire connector at the EVAP canister vent solenoid under the rear of the vehicle.. This wire, often Red or Violet/White, supplies battery voltage to the solenoid. A lack of 12V here points to a blown fuse or a break in the power supply wire.
- Vent Solenoid Control Wire — In the two-wire connector at the EVAP canister vent solenoid, running back to the Powertrain Control Module (PCM).. This wire, often Pink/White or a similar tracer color, is grounded by the PCM to activate the solenoid. The PCM monitors the voltage on this wire to check circuit integrity. An open or short in this wire is a direct cause of P1451.
- PCM Ground Control — Internal to the Powertrain Control Module (PCM).. The vent solenoid is not grounded to the chassis directly. The PCM provides the ground path internally. Therefore, testing involves checking the continuity of the control wire back to the PCM connector, not to a chassis ground point.
Real Owner Repair Stories
- Ford F150 Forum (1999 Ford F-150 4.2L V6 (similar EVAP system design)) — Persistent P1451 code.
❌ Tried (didn't work) Initial visual inspection of wiring.
✅ What actually fixed it The user traced a lack of voltage to a harness connector located under the air filter housing in the engine bay. The red power wire had chafed on a bracket and broken. Repairing this wire restored power to the vent solenoid and cleared the code. - Ford Truck Enthusiasts Forums (1999 Ford Explorer (similar EVAP system design)) — P1451 code returned immediately after clearing.
❌ Tried (didn't work) Replacing the vent solenoid.
✅ What actually fixed it The user discovered both wires were broken right at the connector to the solenoid. After repairing the wires and confirming 12V at the connector, the code was resolved. This highlights that even with a good solenoid, a bad connection at the pigtail is a common point of failure.
OEM Part Supersession History
F7DZ-9F945-AA→F7DZ-9F945-AB / Motorcraft CX-2795— Standard part revision.
Heads up: The parts are interchangeable for this application.
Diagnostic Flowchart
Other Known Issues on This Vehicle
Issues unrelated to this code that are worth knowing about as an owner of this generation:
- Automatic Transmission Failure (AX4N/AX4S) 🔴 High — Very common, often occurring between 80,000 and 130,000 miles. Can manifest as harsh shifting, slipping, or a sudden loss of forward gears due to stripped torque converter splines. (Ref: Multiple TSBs exist for various transmission symptoms, but no widespread recall was issued.)
- Front Coil Spring Fracture 🔴 High — Common, especially in regions using road salt ('Salt Belt'). Corrosion causes the spring to weaken and break suddenly, which can puncture the front tire and lead to a loss of control. (Ref: Ford issued recalls for some model years to install a protective shield to prevent a broken spring from contacting the tire, but not to replace the springs themselves.)
- Camshaft Synchronizer Failure (3.0L OHV Vulcan V6) 🟠 Medium — A frequent issue where the internal bushings of the synchronizer (which replaced the distributor) wear out. This typically begins with a persistent "chirping" or "squeaking" noise from the engine. If ignored, it can fail completely, damaging the camshaft position sensor and potentially causing engine damage.
- Clogged or Leaking Heater Core 🟠 Medium — Common on aging vehicles. A clogged core results in little to no heat in the cabin. A leaking core will produce a sweet smell of coolant inside the car, cause window fogging, and create a wet passenger-side floorboard. Replacement is very labor-intensive as it requires removing the entire dashboard.
- Leaking Valve Cover and Oil Pan Gaskets 🟡 Low — Common oil leaks for this engine. A leaking valve cover gasket often drips oil onto the hot exhaust manifold, causing a burning oil smell and smoke from the engine bay. An oil pan gasket leak is also a frequent source of oil drips underneath the vehicle.
Used vs. New Parts: Buying Guide for This Vehicle
When a used part is the smart pick: A used connector pigtail from a junkyard is a perfectly acceptable and cost-effective repair if the original connector is damaged. The solenoid itself is not recommended to be purchased used.
Donor-vehicle mileage cap: roughly under 120000 miles for the part to have meaningful remaining life.
What to inspect on the donor part:
- For a connector pigtail, inspect for at least 6 inches of flexible, non-brittle wire.
- Check that the plastic locking tab on the connector is intact.
- Ensure there is no green or white corrosion on the metal pins inside the connector.
Aftermarket brands forum-validated for this vehicle:
- Dorman
- Standard Motor Products (SMP)
Real Owner Stories
Aggregated from forums and TSBs cited above. Mileages and costs reflect what owners reported in those sources.
2002 Ford Taurus SES 3.0L V6
Symptoms: Owner observed a P1451 error and performed troubleshooting by testing for 12 volts at both the vent solenoid by the charcoal box and the purge solenoid in the engine bay.
What fixed it: The owner measured the solenoid resistance at 38.2 ohms, identifying a likely solenoid failure as it was out of the 48-65 ohm spec.
Source hint: Ford Forum - "2002 Taurus SES getting a P1451 error"
2000 Ford Taurus 3.0L V6
Symptoms: Owner was seeking the location of the vapor canister to address EVAP issues.
What fixed it: Identified the location of the vapor canister and valve at the rear underside of the car, behind a cover on the spare tire well, distinguishing it from the under-hood purge valve.
Source hint: BobIsTheOilGuy - "Help! Vapor Canister Location; 2000 Taurus"
Related OBD-II Codes
Frequently Asked Questions
Where is the EVAP canister vent solenoid located on my 2000-2007 Ford Taurus?
What resistance reading should I see when testing the vent solenoid on my Taurus?
My 2002 Taurus SES is showing P1451 and I measured 38.2 ohms at the solenoid; is this acceptable?
Why is the wiring on the Taurus so prone to causing the P1451 code?
Can I use a used part to fix the P1451 code on my Taurus?
Is there a specific fuse I should check for the P1451 code?
Does the Mercury Sable suffer from the same P1451 issues as the Taurus?
Helpful Videos

Used OEM Parts in Stock
New Aftermarket Parts Available


The information in this article is provided for general reference and educational purposes only. Vehicle specifications, procedures, and part compatibility can vary by production date, trim level, and region. Always consult your vehicle's factory service manual and verify part numbers before purchasing or performing repairs. Safety-critical components such as airbags, seat belts, and braking systems should be installed by a qualified professional.
- Ford Taurus:
- 🧭 Diagnostic Flowchart
- 🎬 Helpful Videos
- 🛍️ Shop This Part
- What's Unique About the 2000-2007 Ford Taurus
- Symptoms You May Notice
- Most Likely Causes
- Rare But Worth Checking
- Diagnosis Steps
- Parts You'll Likely Need
- Related Codes That Often Appear With This One
- Mechanic-Grade Diagnostic Values
- Scan Tool Commands That Help
- Wiring & Ground Locations
- Real Owner Repair Stories
- OEM Part Supersession History
- Other Known Issues on This Vehicle
- Used vs. New Parts: Buying Guide for This Vehicle
- Real Owner Stories
- 2002 Ford Taurus SES 3.0L V6
- 2000 Ford Taurus 3.0L V6
- Related OBD-II Codes
- Frequently Asked Questions
- 🎟️ Get 5% Off