
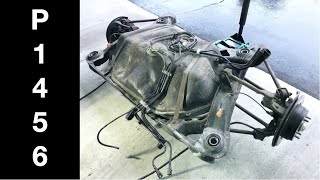
P1456 on 1996-2000 Acura RL: EVAP System Fuel Tank Leak Causes and Fixes
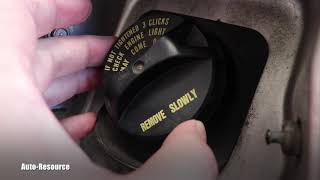
On a 1996-2000 Acura RL, P1456 is almost always caused by a loose or faulty gas cap. Before buying any parts, ensure the cap is tightened until it clicks at least three times. If the light returns, a new OEM gas cap (around $25-$50) is the most likely fix. Aftermarket caps are a common source of repeat failures. If the cap doesn't solve it, the next most likely cause is a rusted fuel filler neck.
- P1456 points to a leak on the fuel tank side of the EVAP system, not the engine side.
- Always start with the simplest fix: ensure your gas cap is tight (3+ clicks).
- If tightening doesn't work, a new OEM gas cap is the most likely and cost-effective next step. Avoid aftermarket caps.
- If a new OEM cap doesn't fix it, thoroughly inspect and clean the fuel filler neck for rust before moving to more complex diagnostics like a smoke test.
What's Unique About the 1996-2000 Acura RL
For this generation of Acura and Honda vehicles, the EVAP system is notoriously sensitive to the smallest leaks. The P1456 code is a very common issue that most owners will encounter at some point. The primary culprits are almost always related to the fuel cap's seal, either from not being tightened properly or from the rubber gasket deteriorating over time. Due to the vehicle's age, rust on the fuel filler neck where the cap seals is another frequent cause, especially in regions that use road salt. Forum users on AcuraZine repeatedly stress the importance of using a genuine OEM gas cap, as aftermarket versions often fail to seal correctly and cause the code to return.
Diagnostic Flowchart
Tap your situation to follow the diagnostic path that matches what you're seeing on this vehicle.
Symptoms You May Notice
- Check Engine Light is illuminated
- A faint smell of gasoline may be noticeable near the rear of the vehicle, especially after refueling.
- No 'whoosh' sound of pressure releasing when opening the gas cap after driving.
- Reduced fuel economy in some cases.
- Replacing the EVAP Purge Control Solenoid in the engine bay. The purge solenoid is part of the canister side of the system and is not a common cause for the tank-specific P1456 code.
- Replacing the entire EVAP canister. The canister itself rarely fails; the issue is more often the valves attached to it or the hoses leading to it. P1457 is the code that points more directly to the canister system.
Most Likely Causes
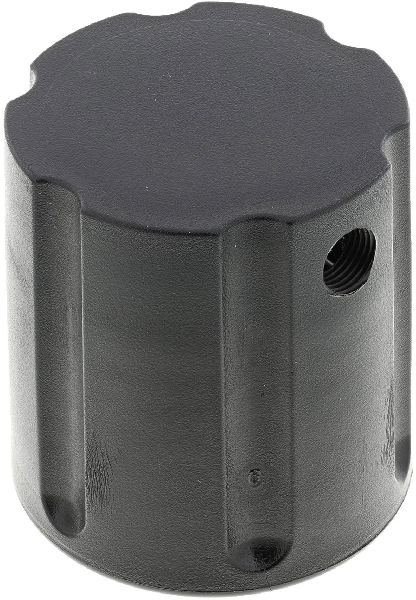
- Loose, Incorrect, or Faulty Gas Cap 🔴 High Probability → Shop Fuel Tank Cap The rubber seal on the gas cap becomes hard, brittle, and cracked over time, preventing a proper seal. Many owners also do not tighten the cap sufficiently after refueling. Aftermarket caps are notorious for not sealing correctly on these models.
How to confirm: Ensure the cap is tightened until it clicks at least three times. If the code returns, remove the cap and visually inspect the black rubber gasket for any cracks, stiffness, or deformities. A new OEM cap is often the easiest diagnostic step. 🎬 Watch: A quick guide to diagnosing and fixing code P1456.
Typical fix: Replace the gas cap. It is highly recommended to use a genuine OEM Acura part (labeled 'TOYODA'), as many aftermarket caps do not seal correctly and will not resolve the issue.
Est. part cost: $25-$50 - Rusted or Corroded Fuel Filler Neck 🟡 Medium Probability → Shop Fuel Filler Neck In areas with winter road salt or high humidity, the metal lip of the filler neck where the gas cap gasket seals can develop rust and pitting. This creates an uneven surface that prevents a perfect seal, even with a new cap.
How to confirm: With the gas cap removed, carefully inspect the metal rim of the filler neck. Feel for any roughness, rust flakes, or pitting. A strong fuel smell may also emanate from this area.
Typical fix: Use a Scotch-Brite pad or fine-grit sandpaper to gently clean the rust off the sealing surface until it is smooth and shiny. If the pitting is too deep to be cleaned, the fuel filler neck must be replaced. Some owners have reported success applying a thin layer of petroleum jelly to the cap gasket as a temporary measure.
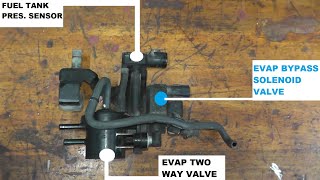
Est. part cost: $100-$250 - Faulty EVAP Two-Way Valve or Bypass Solenoid Valve ⚪ Low Probability These valves are part of the fuel tank's vapor control system, located near the EVAP canister under the car. Over time, they can stick open or closed, or their internal seals can fail, causing a leak.
How to confirm: This requires more advanced diagnosis. A smoke test is the most effective method, as it will show smoke leaking from the faulty valve. The official Acura TSB (B99-040) provides a step-by-step testing procedure using a vacuum pump and a dealer-level scan tool (HDS) to command the valves and check for pressure loss.
Typical fix: Replace the specific valve assembly that is identified as leaking.
Est. part cost: $50-$150 - Cracked or Disconnected EVAP Hoses ⚪ Low Probability The rubber and plastic hoses connected to the fuel tank and filler neck can become brittle with age and develop small cracks. They can also be knocked loose during other vehicle repairs or due to road debris.
How to confirm: A visual inspection may reveal an obviously disconnected or cracked hose, particularly around the filler neck and EVAP canister area. However, small cracks are often invisible, making a smoke test the definitive diagnostic method.
Typical fix: Replace the damaged section of hose and secure it with new clamps. One owner on AcuraZine fixed their P1456 by simply re-seating and re-clamping the three rubber hoses attached to the filler pipe.
Est. part cost: $10-$40
Rare But Worth Checking
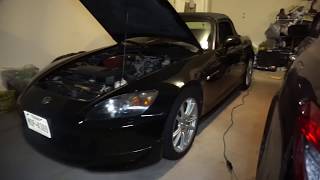
- Cracked Fuel Tank: → Shop Fuel Tank While uncommon, rust can eventually perforate the top of the fuel tank, causing an EVAP leak long before liquid fuel is seen. This is a significant repair and is usually found with a smoke test after all other components have been checked. A video exists showing a fuel tank replacement on a 2002 Acura TL to resolve P1456. 🎬 Watch this walkthrough of a full fuel tank replacement.
- Faulty Fuel Tank Pressure (FTP) Sensor: → Shop Fuel Tank The sensor that detects the pressure can fail, but it's much more likely that it's correctly detecting a leak from another component. The TSB provides voltage checks to verify sensor function; with the cap off and key on, the sensor should read close to 2.5V.
Diagnosis Steps
- Verify the gas cap is tight. Turn it until it clicks at least three times. Clear the code using a scan tool. The car must complete two drive cycles (cold start to operating temp) for the light to go off on its own.
- If the code comes back, remove and inspect the gas cap's rubber seal for cracks, dirt, or damage. Clean the seal and the filler neck rim. If the seal is damaged or suspect, replace the cap with a genuine OEM part.
- Thoroughly inspect the metal lip of the fuel filler neck for any signs of rust or corrosion. Use a Scotch-Brite pad or fine-grit sandpaper to clean the surface until smooth.
- Visually inspect all accessible EVAP hoses around the filler neck and fuel tank area for obvious cracks or disconnections.
- If the cap, filler neck, and visible hoses are in good condition, the next step is to perform a smoke test on the EVAP system. This involves introducing pressurized smoke into the system (usually via the purge valve line or a special adapter) and looking for where it escapes.
- The smoke test will pinpoint leaks in any of the EVAP hoses, the two-way valve, the bypass solenoid, the filler neck assembly, or the fuel tank itself.
- Once the leaking component is identified, replace it.
- After the repair, clear the code. The vehicle's EVAP monitor will need to run and complete during normal driving to confirm the fix. This can be verified with a capable scan tool.
Parts You'll Likely Need
- Fuel Filler Cap
(OEM #17670-SHJ-A31 (Supersedes older part numbers like 17670-S6M-A51, 17670-SHJ-A01, 17670-SHJ-A02))— This is the most common failure point. The rubber gasket degrades over time, causing a leak that the system detects. Aftermarket caps are a frequent cause of failed repairs.
Trusted brands: Acura (Genuine OEM), Honda (Genuine OEM)
OEM price range: $25-$50
Aftermarket price range: $15-$30 - Fuel Filler Neck
(OEM #17660-SZ3-A50 (for 2000-04 models, verify for earlier years))— Required if the original neck is rusted or pitted at the sealing surface, preventing the gas cap from sealing properly.
Trusted brands: Acura (Genuine OEM), Spectra Premium, Dorman
OEM price range: $200-$300
Aftermarket price range: $100-$180
Technical Service Bulletins (TSBs) & Recalls
- B99-040: Updates the troubleshooting procedures for DTC P1456 (Fuel Tank System Leak) and P1457 (EVAP Canister System Leak), providing detailed diagnostic steps for dealers. It applies to 1996-04 RL models and specifies using an HDS scan tool to test individual EVAP components.
Platform-Specific Known Issues
- OEM vs Aftermarket Gas Cap: → Shop Fuel Tank Cap Multiple owner threads on AcuraZine and other Honda forums confirm that using a non-OEM gas cap often fails to fix the P1456 code. The fix is only successful after switching to a genuine Honda/Acura part.
- Filler Neck Rust Cleaning: A common repair story involves buying a new gas cap, having the code return, and then finally fixing it by thoroughly sanding the rust off the filler neck sealing surface to restore a smooth finish.
Mechanic-Grade Diagnostic Values
- Fuel Tank Pressure (FTP) Sensor Voltage (Key On, Gas Cap Off) — expected: 2.45V - 2.55V. Failure: A reading outside this range suggests a faulty sensor or a wiring issue.
- EVAP Bypass Solenoid Valve Coil Resistance — expected: 30 - 40 Ohms. Failure: A reading significantly outside this range indicates a faulty solenoid coil.
- EVAP Canister Vent Shut Valve Coil Resistance — expected: 22 - 32 Ohms. Failure: An open circuit (infinite resistance) or a short (near zero resistance) indicates the valve's solenoid has failed.
Scan Tool Commands That Help
- Honda Diagnostic System (HDS): EVAP System Function Test — This is the primary dealer-level test to run before manual troubleshooting. It automatically checks the system's integrity.
- Honda Diagnostic System (HDS): INSPECTION > EVAP TEST > SINGLE SOLENOIDS / MULTI SOLENOIDS — This menu allows a technician to individually command each EVAP solenoid (Bypass Solenoid, Canister Vent Shut Valve, Purge Control Solenoid) to open or close. This is critical for isolating which specific component is failing to seal or operate during a manual pressure or vacuum test.
Wiring & Ground Locations
- G101 — Typically located on or near the thermostat housing in the engine bay.. This is a primary engine ground distribution point for many sensors, including the EVAP Purge Control Solenoid in the engine bay. A poor connection here can cause erratic solenoid operation, though it's less likely to cause a P1456 than a P1457.
- G551 — Located in the rear of the vehicle, often in the trunk area or near the fuel tank.. This is a likely chassis ground point for the fuel tank unit components, including the Fuel Tank Pressure (FTP) sensor and potentially the EVAP Canister Vent Shut Valve and Bypass Solenoid. A corroded or loose ground here could cause incorrect readings from the FTP sensor.
- Fuel Tank Pressure (FTP) Sensor Connector — On top of the fuel tank, part of the fuel pump assembly.. The three wires are typically a 5V reference, a signal wire, and a ground. Probing the signal wire is necessary to get the voltage readings described in the diagnostic values. TSB B99-040 specifies checking this circuit for opens or shorts if the sensor voltage is incorrect with hoses disconnected.
Real Owner Repair Stories
- AcuraZine Forum User (1999 Acura TL (system is nearly identical to the RL)) — Persistent P1456 code.
❌ Tried (didn't work) Replacing the gas cap with an aftermarket part., Replacing the aftermarket cap with a genuine OEM cap., Cleaning rust from the fuel filler neck.
✅ What actually fixed it A smoke test revealed a leak from the EVAP bypass solenoid valve located on the charcoal canister. Replacing the faulty valve assembly resolved the code. - Honda Odyssey Forum User (similar EVAP system) (Early 2000s Honda Odyssey) — P1456 code that would not clear.
❌ Tried (didn't work) Replacing the gas cap twice with new parts.
✅ What actually fixed it The fuel filler neck was severely rusted, not just on the sealing surface, but also on the smaller vent tube welded to it, causing a hard-to-find leak. Replacing the entire fuel filler neck assembly was the final fix.
"I Checked Everything" — The Actual Cause
- In one documented case on a similar Honda system, the car passed a smoke test and all component resistance tests when cold. The P1456 code would still return. The root cause was an intermittent failure of the EVAP Canister Vent Shut Valve; it would only fail to seal properly after it had warmed up during the PCM's EVAP self-test cycle. A technician found it by repeatedly running the bidirectional HDS function test until the component failed while being monitored.
OEM Part Supersession History
17670-S0X-A02, 17670-SL0-A02, 17670-SHJ-A01, 17670-SHJ-A02→17670-SHJ-A31— Standard part consolidation and potential minor design improvements over time.
Heads up: Using non-OEM (aftermarket) caps is a very common reason for the P1456 code to persist after a repair attempt. The genuine OEM cap, often made by 'TOYODA', is strongly recommended.
Helpful Videos
We Have This Part in Stock


The information in this article is provided for general reference and educational purposes only. Vehicle specifications, procedures, and part compatibility can vary by production date, trim level, and region. Always consult your vehicle's factory service manual and verify part numbers before purchasing or performing repairs. Safety-critical components such as airbags, seat belts, and braking systems should be installed by a qualified professional.
- Acura RL:
- 🧭 Diagnostic Flowchart
- 🎬 Helpful Videos
- 🛍️ Shop This Part
- What's Unique About the 1996-2000 Acura RL
- Symptoms You May Notice
- Most Likely Causes
- Rare But Worth Checking
- Diagnosis Steps
- Parts You'll Likely Need
- Technical Service Bulletins (TSBs) & Recalls
- Platform-Specific Known Issues
- Mechanic-Grade Diagnostic Values
- Scan Tool Commands That Help
- Wiring & Ground Locations
- Real Owner Repair Stories
- "I Checked Everything" — The Actual Cause
- OEM Part Supersession History
- 🎟️ Get 5% Off