
P1776 on 2009-2010 Dodge Challenger 3.5L: Solenoid Switch Valve Causes and Fixes
This code means the transmission is stuck in 'limp mode' (usually 2nd gear) because of a stuck valve. The most common cause is a worn-out Solenoid Switch Valve bore inside the transmission valve body. Simply replacing the solenoid pack often doesn't work; the valve body itself usually needs to be repaired or replaced.
- P1776 on this Challenger means the transmission is in a protective 'limp mode' because of an internal hydraulic circuit fault.
- The most probable cause is a worn-out bore in the transmission valve body, causing the Solenoid Switch Valve to stick.
- Before attempting an expensive internal repair, use a scan tool to check the 'TRS Code' in the freeze frame data. A 'TR2' code points to a simple shifter cable adjustment.
- Do not automatically replace the solenoid pack; it's a common misdiagnosis. The problem is more often the mechanical valve body.
- Continued driving in limp mode can cause severe overheating and lead to a much more expensive transmission failure.
What's Unique About the 2009-2010 Dodge Challenger
The 2009-2010 Challenger with the 3.5L V6 uses a 42RLE automatic transmission. For this specific transmission, code P1776 is very commonly caused by wear in the aluminum valve body itself, where the steel Solenoid Switch Valve (SSV) moves. Technicians and Chrysler technical service bulletins frequently warn against the misdiagnosis of simply replacing the electronic solenoid pack, as the root cause is often the mechanical sticking of the valve in its worn bore. Ignoring this can lead to a quick return of the code and wasted money on parts.
Symptoms You May Notice
- Check Engine Light is on
- Transmission is in 'limp mode' (stuck in 2nd or 3rd gear)
- Vehicle has limited power and poor acceleration
- Inability to shift into higher gears
- High engine RPM at moderate speeds
- Harsh or no engagement into Drive or Reverse
- Replacing only the solenoid pack when the valve body bore is worn. A Chrysler tech tip specifically warns that the Solenoid Switch Valve is in the valve body, not the solenoid pack, and is the primary cause of the code when the TRS code is 'OD'.
Most Likely Causes
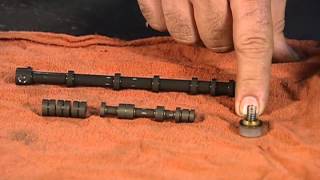
- Sticking/Worn Solenoid Switch Valve (SSV) in Valve Body 🔴 High Probability → Shop Transmission Valve Body The 42RLE's aluminum valve body bore for the steel SSV can wear over time, causing the valve to stick or bind. Debris in the fluid accelerates this wear, allowing hydraulic pressure to leak and falsely trigger the L/R pressure switch.
How to confirm: A scan tool may show a 'TRS Code' of 'OD' in the P1776 event data, pointing to this cause. Physical confirmation requires removing the valve body and manually checking if the valve moves freely in its bore. A sticking valve is the definitive sign.
Typical fix: The valve body must be removed. A transmission shop can ream the bore and install an oversized valve kit (e.g., Sonnax 92835-32K). The most common DIY/shop repair is to replace the entire valve body with a quality remanufactured unit.
Est. part cost: $250-$500 for a remanufactured valve body - Improperly Adjusted Shifter Cable 🟡 Medium Probability Stretching or misadjustment of the cable can prevent the manual valve inside the transmission from fully aligning with the selected gear (e.g., Drive), causing a confusing signal for the computer. This can also be related to the common 'pink thingy' failure in the shifter assembly.
How to confirm: Use a scan tool to check the P1776 event data. If the 'TRS Code' reads 'TR2', this indicates the manual valve was not fully in the Overdrive position when the code was set, making this the primary suspect.
Typical fix: Adjust the shifter cable according to the factory service manual procedure. Inspect for binding or excessive friction in the shift mechanism and check the shifter assembly for broken plastic components.
Est. part cost: $0 for adjustment, $25-$50 for a metal shifter interlock replacement part. - Faulty Transmission Solenoid Pack ⚪ Low Probability → Shop Transmission Assembly While less common than a valve body issue for this specific code, the solenoid pack (which contains the L/R solenoid) can fail electrically or mechanically. It is the most common misdiagnosis.
How to confirm: After ruling out the SSV and shift cable, the solenoid pack can be tested for correct resistance values. The L/R solenoid circuit should measure approximately 1.7 ohms. Often, it's replaced as a part of the diagnostic process when a valve body replacement doesn't solve the issue.
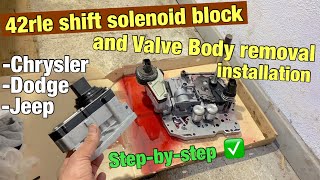
Typical fix: Replace the solenoid pack, which is bolted to the valve body. This requires dropping the transmission pan 🎬 Watch: Step-by-step 42RLE solenoid pack and valve body removal guide..
Est. part cost: $150-$300 - Low or Contaminated Transmission Fluid ⚪ Low Probability → Shop Transmission Assembly Old, burnt, or debris-filled fluid can cause any hydraulic valve to stick, including the SSV. Low fluid levels can cause erratic pressure readings.
How to confirm: Check the transmission fluid dipstick for level and condition. The fluid should be bright red (ATF+4) and not smell burnt. Dark color or suspended particles indicate a problem.
Typical fix: Perform a transmission fluid and filter change. If the fluid is very dirty, this may be a temporary fix or may dislodge debris that causes other issues. A full fluid flush is sometimes recommended.
Est. part cost: $70-$120 for fluid and filter
Rare But Worth Checking
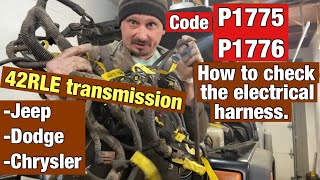
- Shorted wiring in the L/R Pressure Switch Sense Circuit: An electrical short to ground in the wiring harness between the TCM and the transmission (circuit T50) can mimic the signal of a closed pressure switch 🎬 Watch: How to check the electrical harness for wiring faults., tricking the computer. This would typically be investigated if replacing mechanical parts doesn't solve the issue.
- Faulty Transmission Range Sensor (TRS): → Shop Transmission Assembly A failing range sensor (also known as the neutral safety switch) can send an incorrect gear position signal to the computer, contributing to the logic fault that sets P1776.
Diagnosis Steps
- Check the transmission fluid level and condition. Top off or change if necessary. Use only ATF+4 fluid.
- Connect a professional scan tool and read the DTCs. Note any other codes, especially P1775 or P0841.
- Access the 'Event Data' for the P1776 code within the scan tool.
- Look for the 'TRS Code' value. If it is 'TR2', the manual valve was not fully in Drive. Inspect and adjust the shifter cable first.
- If the 'TRS Code' is 'OD', the issue is internal to the transmission, and a sticking Solenoid Switch Valve is the primary suspect.
- Safely raise the vehicle and drain the transmission fluid, then remove the transmission pan.
- Disconnect the solenoid pack connector and remove the bolts securing the transmission valve body assembly.
- Carefully lower the valve body. A detailed video guide can be found on YouTube that walks through this process.
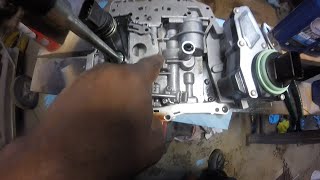
- With the valve body on a clean bench, locate the Solenoid Switch Valve (SSV). Check for free movement in its bore. If it sticks, binds, or feels gritty, the bore is worn.
- If the valve sticks, the best fix is to replace the valve body with a remanufactured unit or have it repaired by a specialist with a reaming tool and oversized valve kit (like Sonnax 92835-32K).
- If the valve moves freely, the solenoid pack is a more likely culprit. Consider replacing the solenoid pack.
- Reinstall the repaired/new valve body and pan with a new filter and gasket, torquing all bolts to factory specifications.
- Refill with the correct amount of ATF+4 fluid (approx. 4 quarts for a pan drop).
- Clear the codes and perform a 'Quick Learn' procedure with a compatible scan tool to recalibrate the transmission shift points.
- Perform a test drive, allowing the transmission to shift through all gears to verify the repair.
Parts You'll Likely Need
- Transmission Valve Body (Remanufactured)
(OEM #RL70877AA (Supersedes 5170877AA))— This is the most frequent cause, as the bore for the Solenoid Switch Valve wears out, requiring replacement of the entire assembly.
Trusted brands: Mopar (Remanufactured), ATS Diesel Performance, Street Smart Transmission
OEM price range: $400-$550 (Remanufactured)
Aftermarket price range: $250-$450 - Transmission Solenoid Pack / Block
(OEM #5170877AA, 68002342AD (Verify by VIN))— This is the most common misdiagnosis but can be the actual cause in some cases. It's an electronic block that controls hydraulic flow.
Trusted brands: Mopar, Rostra, Standard Motor Products (T-Series)
OEM price range: $250-$350
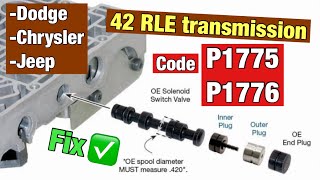
Aftermarket price range: $150-$250 - Oversized Solenoid Switch Valve Kit — For transmission shops or advanced DIYers, these kits provide an oversized valve and plugs to repair a worn bore, fixing the root cause without replacing the entire valve body. Requires special reaming tools (e.g., Sonnax F-92835-TL32).
Trusted brands: Sonnax (Part: 92835-32K)
Aftermarket price range: $80-$160 - Transmission Filter and Pan Gasket Kit
(OEM #5013470AC)— Required for any repair that involves dropping the transmission pan.
Trusted brands: Mopar, ATP, Wix
OEM price range: $30-$50
Aftermarket price range: $20-$40
Related Codes That Often Appear With This One
- P0841 — This code ('LR Pressure Switch Rationality') can appear with P1776 as it also relates to implausible signals from the Low/Reverse pressure switch circuit.
- P1775 — This code ('Solenoid Switch Valve Latched in TCC Position') is a sister code to P1776 and often points to the same root cause: a sticking Solenoid Switch Valve in the valve body.
Technical Service Bulletins (TSBs) & Recalls
- Chrysler TSB 21-001-13 (supersedes 21-008-04): Details the diagnostic procedure for P1776, emphasizing checking the 'TRS Code' in the event data. A 'TR2' code points to a shifter cable adjustment issue, while an 'OD' code points to a sticking Solenoid Switch Valve within the valve body.
Mechanic-Grade Diagnostic Values
- L/R Solenoid Resistance — expected: 1.5 - 2.5 ohms (typically 1.7 ohms). Failure: A reading significantly higher or lower than the expected range, or an open circuit.
- L/R Pressure Switch Resistance — expected: 270 - 330 ohms (typically 299 ohms). Failure: A reading outside this range indicates a faulty pressure switch resistor.
- L/R Pressure Switch Sense Circuit (T50) Voltage — expected: 0V when L/R clutch is applied (e.g., Park, 1st gear); System voltage (~12-14V) when L/R clutch is not applied (e.g., Reverse, 2nd-4th gears).. Failure: Voltage present when it should be 0V, or 0V when system voltage is expected. This code sets if voltage is low (indicating pressure) when the TCC is commanded.
- Low Clutch Circuit Pressure — expected: ~121 PSI in Park (example value). Failure: Pressure present in the circuit when in higher gears, which can be caused by a leaking Solenoid Switch Valve.
Hidden / Shadow Codes Worth Checking
- TRS Code: TR2: This is not a separate DTC but a piece of event data stored with P1776. It indicates the Transmission Range Sensor (TRS) detected the manual valve was not fully in the Overdrive/Drive position when the fault occurred. (see via View the 'Event Data' or 'Freeze Frame' for code P1776 using a professional-level scan tool (like Chrysler's wiTECH). This data points directly to a shifter cable adjustment issue as the cause.)
- TRS Code: OD: Event data stored with P1776 indicating the manual valve was correctly in the Overdrive/Drive position. This rules out the shifter cable and points to an internal fault, most commonly the sticking Solenoid Switch Valve (SSV). (see via View the 'Event Data' or 'Freeze Frame' for code P1776 using a professional-level scan tool.)
Scan Tool Commands That Help
- wiTECH, Autel, Snap-on, or other professional scanner: Quick Learn / Transmission Fast Learn — This procedure is required after replacing the valve body, solenoid pack, or entire transmission. It recalibrates clutch fill volumes and shift points. Failure to perform this can result in harsh or erratic shifting after the repair.
- wiTECH or equivalent: Actuate TCM Output / Pressure Switch Test — Used during electrical diagnosis to command the transmission outputs and monitor the response of circuits like the L/R Pressure Switch Sense circuit (T50) to verify wiring integrity between the TCM and the transmission connector.
Wiring & Ground Locations
- Transmission Solenoid Connector (10-pin) — On the driver's side of the 42RLE transmission case.. This is the main electrical interface. Pin 7 is for the L/R solenoid control, and Pin 10 is for the L/R pressure switch. Testing resistance and voltage at these pins can diagnose the solenoid pack and wiring harness.
- (T50) L/R Pressure Switch Sense Circuit — The wire running from the transmission's 10-pin connector (Pin 10) to the Powertrain Control Module (PCM/TCM).. A short to ground on this specific circuit can cause the computer to falsely believe the L/R clutch is applied, directly triggering code P1776.
- Main Chassis/Engine Grounds — Key ground points are from the battery negative terminal to the chassis and to the engine block.. Corroded or loose grounds can cause floating voltages and erratic behavior in control modules like the TCM, potentially leading to false codes. Ensuring clean, tight ground connections is a fundamental step in any electrical diagnosis.
Real Owner Repair Stories
- YouTube user comment (Vehicle with 42RLE transmission) — Limp mode, likely with P1776 or similar codes.
❌ Tried (didn't work) Took vehicle to Aamco, who diagnosed it as needing a full transmission replacement for nearly $4,000.
✅ What actually fixed it Owner ordered a new solenoid pack from Amazon and replaced it themselves in 6-7 hours following a YouTube tutorial. The vehicle drove normally again afterward, confirming the solenoid pack was the fault and the shop's diagnosis was incorrect. - Jeep forum user experience (Jeep with 42RLE transmission) — Intermittent limp mode with P1776 (LR switch stuck on).
❌ Tried (didn't work) Replacing the TCM (twice)., Disassembling the transmission multiple times.
✅ What actually fixed it The root cause was discovered to be a leaking plug on the valve body, which prevented thinner (hot) fluid from properly stroking the solenoid switch valve. - NHTSA ODI #10351889 (Dodge owner report) — An owner reported that the transmission may fail at any time, including on freeways and hillsides. Dealerships informed the owner that the computer was returning P1776 and P0700 codes, leading to recommendations for a full transmission replacement or a new solenoid pack.
OEM Part Supersession History
5170877AA (Solenoid Pack)→5170877AB, 5170877AC, 5170877AD, 5170877AF, 68353383AB, and finally 68353383AC.— Revisions to improve reliability and address failure modes.
Heads up: While later revisions are generally better, always verify fitment by VIN. The 42RLE also had a major change around 2007 to a VLP (Variable Line Pressure) system, which may affect compatibility. The 2009-2010 Challenger uses the VLP system.
Model Year Variations Within This Range
- 2007-onward (including 2009-2010 Challenger): These model years use a 42RLE with a VLP (Variable Line Pressure) design. This system has an additional electrical connector on the valve body compared to the earlier fixed line pressure design (2003-2006). Ordering the correct valve body for the VLP system is critical for a successful repair.
Diagnostic Flowchart
Other Known Issues on This Vehicle
Issues unrelated to this code that are worth knowing about as an owner of this generation:
- Alternator Failure 🔴 High — Common on 2011-2014 models, but the underlying design can affect earlier models. Failure can be sudden and cause stalling. (Ref: NHTSA 14V-634 / FCA Recall T36 (Primarily for 2011-2014 models with 160 amp alternators, but relevant).)
- Shift Interlock Failure ('Pink Thingy') 🟠 Medium — Extremely common across Chrysler LX platform cars of this era. A small plastic tab inside the shifter breaks, preventing the vehicle from being shifted out of Park. (Ref: No recall, but it is a widely known failure. Aftermarket metal replacement parts are the recommended fix.)
- Front Suspension Noise (Clunking/Rattling) 🟠 Medium — Commonly reported around 100k miles. Owners report clunking or rattling over bumps, often traced to worn tension struts (lower control arms) or upper control arm bushings. (Ref: TSB 02-005-23 addresses a similar noise for newer models but highlights the control arms as a known weak point.)
- Rocker Arm/Lifter Ticking (3.5L V6) 🟠 Medium — A characteristic ticking noise from the top of the engine, often caused by wear in the rocker arm assemblies leading to improper oiling.
Used vs. New Parts: Buying Guide for This Vehicle
When a used part is the smart pick: A used part is generally not recommended for the valve body due to the high probability of the donor part having the same bore wear issue. A used solenoid pack could be a budget-conscious choice if from a verified low-mileage vehicle, but it still carries risk.
Donor-vehicle mileage cap: roughly under 60000 miles for the part to have meaningful remaining life.
What to inspect on the donor part:
- For a valve body, inspect the Solenoid Switch Valve bore for any visible scoring or wear (if possible).
- For a solenoid pack, ensure connectors are free of corrosion and plastic is not brittle or cracked.
- Verify the donor vehicle did not have transmission-related trouble codes.
OEM-only on this vehicle (don't cheap out):
- Transmission Fluid (ATF+4): Using non-specified fluid can cause shifting problems and damage.
- Valve Body: While aftermarket options exist, a Mopar remanufactured unit or a professionally reconditioned original unit (e.g., with Sonnax kits) is the safest bet to ensure the core wear issue is properly addressed.
Aftermarket brands forum-validated for this vehicle:
- Sonnax (for valve body repair kits, part 92835-32K)
- ATS Diesel Performance (for performance-oriented remanufactured valve bodies)
Brands owners have reported issues with on this vehicle:
- No-name, unverified valve bodies or solenoid packs from online marketplaces can be poorly remanufactured and may fail quickly.
Real Owner Stories
Aggregated from forums and TSBs cited above. Mileages and costs reflect what owners reported in those sources.
2009 Dodge Challenger 3.5L V6
Symptoms: The car went into limp mode and was stuck in 2nd gear, with the Check Engine Light on for code P1776.
What fixed it: Replacing the entire valve body was the fix. An earlier attempt to replace just the solenoid pack did not solve the problem.
Source hint: ChallengerTalk Forum - 'Limp Mode P1776'
2006 Dodge Charger R/T
Symptoms: The 'pink thingy' shift interlock broke, causing shifting problems.
What fixed it: The fix was to install an aftermarket metal replacement part for the broken plastic original.
Source hint: Reddit r/Dodge - 'So my 06 Charger R/T's pink thingy broke'
2010 Dodge Challenger 3.5L V6
Symptoms: Transmission was stuck in 2nd or 3rd gear (limp mode) due to the solenoid switch valve being latched in position.
What fixed it: The repair involved removing the 42RLE valve body to access and free up the sticking solenoid switch valve, or replacing the valve body assembly.
Source hint: YouTube - '42rle P1775 P1776 solenoid switch valve latched in the LR or TCC position.'
Related OBD-II Codes
Frequently Asked Questions
My scan tool shows a 'TRS Code' in the event data for P1776 on my Challenger. What does 'OD' or 'TR2' mean?
Should I replace the transmission solenoid pack first to fix P1776 on my 2009 Challenger?
I've heard about a 'pink thingy' failure on these cars. Could that cause the P1776 code?
What is the Sonnax 92835-32K kit mentioned for the P1776 repair?
What specific transmission fluid should I use when servicing my Challenger's 42RLE transmission for this code?
Do I need a special tool after replacing the valve body on my Challenger?
Helpful Videos
We Have This Part in Stock


The information in this article is provided for general reference and educational purposes only. Vehicle specifications, procedures, and part compatibility can vary by production date, trim level, and region. Always consult your vehicle's factory service manual and verify part numbers before purchasing or performing repairs. Safety-critical components such as airbags, seat belts, and braking systems should be installed by a qualified professional.
- Dodge Challenger:
- 🧭 Diagnostic Flowchart
- 🎬 Helpful Videos
- 🛍️ Shop This Part
- What's Unique About the 2009-2010 Dodge Challenger
- Symptoms You May Notice
- Most Likely Causes
- Rare But Worth Checking
- Diagnosis Steps
- Parts You'll Likely Need
- Related Codes That Often Appear With This One
- Technical Service Bulletins (TSBs) & Recalls
- Mechanic-Grade Diagnostic Values
- Hidden / Shadow Codes Worth Checking
- Scan Tool Commands That Help
- Wiring & Ground Locations
- Real Owner Repair Stories
- OEM Part Supersession History
- Model Year Variations Within This Range
- Other Known Issues on This Vehicle
- Used vs. New Parts: Buying Guide for This Vehicle
- Real Owner Stories
- 2009 Dodge Challenger 3.5L V6
- 2006 Dodge Charger R/T
- 2010 Dodge Challenger 3.5L V6
- Related OBD-II Codes
- Frequently Asked Questions
- 🎟️ Get 5% Off