
OBD-II Code P1854: Transfer Case Contact Plate 'C' Circuit Failure
The Ultimate Guide to What P1854 Means, Why It Triggers, and How to Fix It
- Code P1854 disables your 4x4 system because the Transfer Case Control Module (TCCM) lost the position 'C' voltage signal.
- Replacing the transfer case shift motor fixes this code in over 60% of cases, especially on 2004-2014 Ford F-150s where the sensor is integrated.
- Stop driving if your transmission enters 'limp mode' (locked in 2nd or 3rd gear); exceeding 50 miles in this state causes $3,000+ in permanent clutch damage.
- Do not replace 4WD parts on VW or Audi vehicles showing P1854; on these European makes, it indicates a CAN data bus failure requiring network diagnostics.
- Perform a live data 'wiggle test' on the underbody wiring harness before buying parts to instantly identify intermittent shorts or broken ground wires.
What Does P1854 Mean?
P1854 means your vehicle's main computer lost the signal indicating a specific position of the four-wheel-drive (4WD) system. A sensor on the transfer case sends a unique voltage for each 4WD mode (e.g., 2WD, 4H, 4L). This code triggers when the signal for the position designated 'C' is open, shorted, or unreadable by the control module.
Technical definition: Transmission Transfer Case Contact Plate 'C' Circuit Failure. The Powertrain Control Module (PCM) or Transfer Case Control Module (TCCM) detects an open circuit, short to ground, or short to voltage in the electrical circuit for the 'C' position of the transfer case range position sensor.
Can I Drive With P1854?
Yes, But With Caution. Yes, but with severe limitations. Your four-wheel drive system is disabled. Many vehicles enter 'limp mode,' locking the transmission in 2nd or 3rd gear to prevent damage. Drive only to a nearby repair facility. Exceeding 50 miles in limp mode overheats the transmission, turning a $300 sensor repair into a $4,000 transmission replacement.
Common Causes
- Failed Transfer Case Shift Motor (Encoder Motor) (Very Common) — On many popular trucks (especially Ford and GM), the position sensor is integrated directly into the transfer case shift motor. The electronic board inside the motor housing fails, causing the sensor to stop sending a valid signal. The motor itself often still works mechanically, but the code sets due to the internal sensor circuit failure.
- Damaged Wiring, Corroded Connectors, or Water Intrusion (Very Common) — The wiring harness to the transfer case is highly exposed to road salt, moisture, and debris. Wires chafe against the chassis or break internally. High-pressure car washes or deep puddles force water into the connectors, leading to green, corroded pins that short out the 'C' circuit.
- Poor or Broken Ground Connection (Common) — The TCCM and position sensor rely on a clean ground reference to interpret voltage signals correctly. A corroded ground strap on the frame rail, a loose ground bolt, or a broken ground wire in the harness causes erratic voltage readings, tricking the module into setting a fault code.
- Failed Transfer Case Position Sensor (Standalone) (Common) — On vehicles where the sensor is a separate, bolt-on part, it fails internally. The sliding electrical contacts wear down, get coated in grime, or break, leading to an open or intermittent signal for the 'C' position.
- Failed Transfer Case Control Module (TCCM) (Less Common) — The dedicated 4WD computer fails due to internal circuit board corrosion from moisture exposure (if located under a seat or carpet) or a simple electronic component failure. Suspect this when no wiring or sensor faults exist.
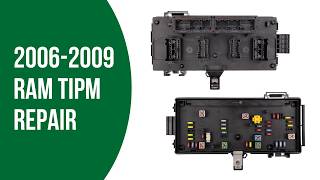
- Blown Fuse or TIPM/BCM Fault (Uncommon) — A fuse supplying power to the TCCM or shift motor blows due to a short circuit. On Dodge/Chrysler vehicles, a faulty Totally Integrated Power Module (TIPM) randomly cuts power to circuits, mimicking a specific circuit failure. 🎬 Watch: How to diagnose and replace a faulty Dodge RAM TIPM.
- Recent Unrelated Repairs (Uncommon) — Work on the transmission, driveshafts, or exhaust system leads to an accidentally pinched, stretched, or disconnected wiring harness for the transfer case. The fault appears immediately after the repair is completed.
Symptoms
- "Service 4x4" or Similar Warning Light — The dashboard displays a message like 'Service 4WD,' 'Check 4x4,' or an icon of a wrench over a drivetrain.
- Unable to Shift 4WD Modes — The 4WD selector switch (buttons or dial) is unresponsive. Indicator lights flash for a few seconds when a new mode is selected and then revert to the original position.
- 4WD System Stuck in One Mode — The vehicle locks in its last known good state, typically 2WD (2H).
- Transmission Enters 'Limp Mode' — The vehicle's computer forces the transmission into a single gear (usually 2nd or 3rd) to limit speed. This results in poor acceleration and high RPMs at moderate speeds.
- Check Engine Light On — The PCM illuminates the Malfunction Indicator Lamp (MIL) to alert the driver of a stored powertrain fault.
Common Fixes & Costs
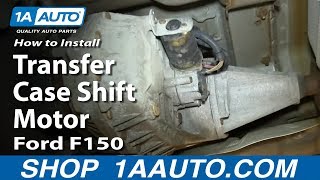
- Replace Transfer Case Shift Motor (Encoder Motor Assembly) 🎬 Watch: Step-by-step guide to replacing the transfer case shift motor. — Parts: $200-$500, Labor: $150-$300, ~1.5 hr book time (Intermediate)
- Wiring Harness Repair — Parts: $10-$50, Labor: $150-$300, ~2.0 hr book time (Intermediate)
- Ground Strap Repair/Cleaning — Parts: $0-$20, Labor: $75-$150, ~0.8 hr book time (DIY)
- Replace Transfer Case Position Sensor (if separate) — Parts: $100-$200, Labor: $150-$300, ~1.2 hr book time (Intermediate)
- Replace Transfer Case Control Module (TCCM) — Parts: $300-$700, Labor: $150-$250, ~1.0 hr book time (DIY)
Used vs. New Parts: Buying Guide
When a used part is worth it: For the most common fix (transfer case shift motor), a used OEM part from a low-mileage, non-corroded donor vehicle is a cost-effective option, especially for older trucks where the part cost is a large portion of the vehicle's value.
Donor-vehicle mileage cap: roughly under 80000 miles for the part to have meaningful remaining life.
Donor quality checklist:
- Verify the donor vehicle was not scrapped due to a 4WD system failure.
- Inspect the electrical connector on the used part for any signs of corrosion, bent pins, or water intrusion.
- Match the part number exactly. Superseded part numbers may work, but require verification.
- Avoid parts from regions in the 'Salt Belt' as they have a higher likelihood of internal corrosion.
Decision logic:
- If The vehicle is less than 8 years old or has low mileage (<100k) → Buy a new OEM or high-quality aftermarket part (like Dorman) to ensure longevity and warranty coverage.
- If The vehicle is over 10 years old and budget is the primary concern → A used part from a reputable salvage yard with a short-term warranty is an acceptable risk.
- If The part is purely electronic (like the TCCM) → Favor new or remanufactured, as used electronics carry a higher risk of unseen failure. Programming may be required regardless.
Warranty tradeoff: Used parts typically offer a 30-90 day warranty. Aftermarket new parts (e.g., Dorman) often come with a limited lifetime warranty. New OEM parts installed by a dealer carry a 1-2 year warranty.
Worst-case if a used part fails: 400-800 if a used part fails after the warranty period, as this requires paying for the labor a second time plus the cost of another replacement part.
What Happens If You Wait — Timeline
- 0-1 month: Code is set, 'Service 4WD' light is on, and the 4WD system is disabled. If no 'limp mode' is triggered, there are no other drivability symptoms. (MPG impact: 0%% · Added cost: $0)
- 1-3 months (if in limp mode): Vehicle is stuck in a single gear (2nd or 3rd), causing poor acceleration and high RPMs at moderate speeds. This puts significant strain on the transmission and causes it to run hotter than normal. Fuel economy plummets. (MPG impact: 15-30% decrease% · Added cost: $50-$200 in wasted fuel)
- 3-6 months (if in limp mode): Sustained high-heat operation degrades the transmission fluid, reducing its lubricating properties. Internal clutch packs start to glaze and slip from excessive heat and stress, causing permanent damage. (MPG impact: 15-30% decrease% · Added cost: $1,500-$2,500 (Requires transmission valve body or clutch pack service).)
- 6+ months (if in limp mode): Catastrophic transmission failure. The clutches are completely burned out, the torque converter is damaged, and metal debris circulates throughout the transmission. The vehicle stops moving altogether. (MPG impact: N/A (Vehicle likely undrivable)% · Added cost: $3,000-$7,000 (Complete transmission rebuild or replacement required).)
Cost of Not Fixing It
- Immediate: No access to 4WD. This is a critical safety and mobility issue in snow, mud, or off-road conditions. (Added cost: 0)
- 1-3 months: If the vehicle is in 'limp mode,' continued driving causes excessive heat and wear on the transmission's clutches and internal components. This turns a sensor issue into a transmission issue. (Added cost: 3000-7000)
- 3+ months: Catastrophic transmission failure is possible. Driving in a single gear puts immense strain on the transmission, leading to overheating and complete burnout, requiring a full replacement or rebuild. (Added cost: 3000-7000)
Diagnosis Steps
- Scan for All DTCs
Use a professional-grade OBD-II scanner capable of reading codes from the TCCM, not just the PCM. Confirm P1854 is present and look for related codes (e.g., P1858 for plate 'D', or U-codes for communication loss) which provide critical diagnostic clues.
Tools: OBD-II Scanner (with TCCM capability) (Beginner) - Inspect 4WD and TCCM Fuses
Consult the owner's manual to locate all fuse boxes. Visually inspect every fuse related to the '4WD', 'TCCM', 'TREC', or 'AWD' systems. A blown fuse points to a short circuit that must be located.
Tools: Owner's Manual, Fuse Puller (Beginner) - Perform Detailed Visual Inspection
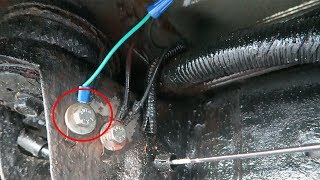
Safely raise the vehicle. Trace the wiring harness from the shift motor/position sensor as far as you can. Look for obvious damage: chafing against the frame, melting near the exhaust, green corrosion at connectors, or wires pulled taut. Check that all ground straps from the body to the frame are clean and tight.
Tools: Jack and Jack Stands, Flashlight, Safety Glasses (Intermediate) - Live Data 'Wiggle Test' (Pro Tip)
With your scanner displaying live data for the transfer case position sensor, have a helper start the vehicle. While watching the voltage reading, physically wiggle the wiring harness at the sensor connector, along the frame, and at the TCCM connector. If the reading flickers or drops out, you found the location of an intermittent break or short.
Tools: OBD-II Scanner (with live data), Helper (Intermediate) - Voltage Drop Test the Ground Circuit
Connect the black multimeter lead to the negative battery terminal. With the harness connected and the key ON, back-probe the ground wire at the position sensor connector with the red lead. A reading above 0.1 volts (100mV) indicates excessive resistance in the ground circuit. Trace the ground circuit to find the corroded connection.
Tools: Multimeter, Back-probe Kit, Wiring Diagram (Advanced) - Check Sensor Signal Voltage
Back-probe the 'C' signal wire at the TCCM. Use the service manual to find the specific voltage range for each gear position (e.g., 2H = 4.5V, 4H = 3.3V). Have a helper shift through the modes. If the voltage doesn't change or is stuck at 0V or 5V, the sensor/shift motor assembly failed. A reading above 4.8V indicates a short to voltage; near 0V suggests a short to ground.
Tools: Multimeter, Back-probe Kit, Vehicle-specific Repair Manual (Advanced) - Pinpoint Test the Sensor and Circuit
Disconnect the harness at the transfer case sensor and the TCCM. Check for continuity on the signal wire for plate 'C' between the two connectors. Check for a short to ground (infinite resistance expected). Finally, check the sensor's internal resistance across its pins against the service manual specifications to definitively condemn the sensor.
Tools: Multimeter, Vehicle-specific Wiring Diagram, Repair Manual (Advanced) - Test the 4WD Selector Switch
Test the switch inside the cab to ensure it sends the correct resistance or voltage signal to the TCCM when you change modes. This rules out the driver's input device as the source of the problem.
Tools: Multimeter, Vehicle-specific Wiring Diagram (Intermediate)
When This Code Triggers (Freeze-Frame Conditions)
- Engine Coolant Temp: 180-200°F (Fully warmed up)
- RPM: 1200-2500 RPM (During or immediately after a 4WD shift attempt, or during steady cruise)
- Vehicle Speed: 0 mph or 25-55 mph (Code sets either when attempting a shift while stationary or during a system self-test at cruising speed)
- System Voltage: 13.5-14.5V (Normal operating voltage; the fault is rarely caused by the charging system itself but is logged with it)
Related Codes
- P1858 — Indicates a failure in the 'D' contact plate circuit. Seeing both 'C' and 'D' codes together strongly suggests a failed sensor/motor assembly, a bad ground, or a compromised main connector. A single code (like P1854) is more likely a break in one specific wire.
- P1855, P1856, P1857 — More specific versions of P1854. P1855 means Open Circuit (broken wire). P1856 means Short to Battery (chafed wire touching a power source). P1857 means Short to Ground (chafed wire touching the frame). These codes are extremely helpful for narrowing down the electrical diagnosis.
- U-codes (e.g., U0102) — Codes like U0102 (Lost Communication With Transfer Case Control Module) indicate a communication network problem. If you see U-codes alongside P1854, the problem is a failed TCCM, a bad ground for the TCCM, or a break in the CAN bus wiring, not just the sensor circuit.
- P0882 / P0883 — Indicate 'TCM Power Input Signal Low' and 'High'. If the module controlling the transfer case has a power supply problem, it can't read sensors correctly, leading to codes like P1854. This points the diagnosis toward the power supply or main relay, not the sensor itself.
Climate & Environmental Factors
- Road Salt / High Humidity: States in the 'Salt Belt' see a much higher incidence of P1854 due to accelerated corrosion of the underbody wiring harness, connectors, and ground points. Humidity and water intrusion into connectors directly cause shorts and open circuits.
- Extreme Cold Weather: Cold temperatures cause older, brittle wiring insulation to crack, exposing the wire to moisture. It also makes fluids thicker, putting extra strain on the shift motor during engagement. The 'Service 4WD' light appearing only on very cold starts points to a marginal connection failing under thermal contraction.
How to Talk to a Mechanic About This Code
Say this: "I have a 'Service 4x4' light and my scanner is showing a P1854 code. I'd like to book a diagnostic appointment. Can you please start by checking the wiring harness for damage and performing a voltage drop test on the TCCM ground before quoting a replacement shift motor? I'd like to rule out the simple things first."
This signals to the shop that you're an informed customer. It directs them to check the most common and cheapest failure points (wiring/grounds) before jumping to the most expensive one (shift motor replacement). It prevents them from simply reading the code and replacing the most likely part without proper diagnosis.
Avoid saying:
- 'My 4x4 is broken, can you fix it?'
- 'My check engine light is on, I don't know why.'
- 'Just do whatever it takes to fix it.'
Questions to ask before authorizing the repair:
- What was the result of the visual inspection on the wiring harness?
- Did you perform a voltage drop test on the ground circuit, and what was the reading?
- Did you confirm the sensor signal was bad by testing voltage at the TCCM connector?
- If you are recommending a new part, can you show me the old one and explain why it failed?
- Is the quoted part OEM or aftermarket, and what is the warranty on both the part and the labor?
Where to Take It: Dealer vs Independent vs Chain
- Dealer:
A safe but expensive option. Recommended if you suspect a software or module programming issue, or if the vehicle is still under warranty.
Best for: Vehicles still under powertrain warranty., Repairs that involve a Technical Service Bulletin (TSB) or require TCCM reprogramming., Complex electrical issues on newer vehicles where the dealer has proprietary tools.
Downsides: Highest labor rates, often 25-50% more than independent shops., Defaults to replacing an entire assembly (like the shift motor) when a simpler wiring repair suffices. (Typical cost: +50% vs. baseline) - Independent Shop:
Best fit for most cases. An experienced independent technician, especially one who specializes in trucks, has likely seen and fixed P1854 many times and will check wiring and grounds first to save you money.
Best for: Out-of-warranty trucks and SUVs where this code is common (Ford, GM, Dodge)., Cost-conscious owners who want a thorough diagnosis beyond just code-reading., Building a long-term relationship with a trusted mechanic.
Downsides: Quality and diagnostic skill varies greatly; look for ASE certifications and good reviews specifically mentioning electrical or 4x4 work., Lacks the latest TSBs or programming capabilities for very new models. (Typical cost: +0% vs. baseline) - Chain Shop:
AVOID for diagnosis. While they might replace a shift motor if you tell them to, they are not the right choice to accurately diagnose the root cause of an electrical code like P1854. High risk of misdiagnosis.
Best for: Simple, non-diagnostic jobs like tire changes or oil services.
Downsides: Technician skill varies dramatically and is often not specialized in complex electrical diagnostics., Business model pressures technicians to replace parts rather than perform detailed diagnosis. (Typical cost: -10% vs. baseline)
When to Walk Away From the Repair
If the estimated repair cost exceeds 50% of your vehicle's private-party value (using a source like Kelley Blue Book), you should seriously consider selling or trading it in as-is.
- Car worth $5000, fix is $1800: Walk away. The repair cost is a significant percentage of the truck's value. Consider selling it 'as-is' to a DIY mechanic or trading it in.
- Car worth $15000, fix is $1200: Fix it. The repair cost is well below the 50% threshold and restores a critical function (4WD) to a valuable vehicle.
- Car worth $8000, fix is $400: Fix it. If the diagnosis confirms a simple wiring or ground issue, this is a low-cost repair that adds significant value and functionality back to the vehicle.
What Scan Tool You Need for This Code
Minimum: A scanner that reads manufacturer-specific codes (for ABS, Airbag, Transmission) and displays live data. For P1854, you MUST be able to read codes from the Transfer Case Control Module (TCCM).
A basic $20 code reader only checks for generic engine codes (P-codes) and will not communicate with the TCCM. It cannot see the specific 4WD system faults or display the live sensor voltage data required for a proper 'wiggle test' diagnosis.
Budget: BlueDriver Pro Scan Tool (~$100) — Connects to your smartphone via Bluetooth. It reads enhanced codes from the TCCM, ABS, and other modules on many GM, Ford, and Chrysler vehicles. It also graphs live data, essential for watching the sensor voltage while wiggling wires to find an intermittent fault.
Mid-range: Foxwell NT510 Elite / NT530 (~$180) — A powerful handheld scanner offering brand-specific software. It provides deep diagnostic access to the 4WD system, reads and clears TCCM codes, and displays live data. Some versions offer bidirectional controls to command specific functions.
Professional: Autel MaxiCOM MK808S (~$450) — A professional-level tablet scanner offering OE-level diagnostics for all systems. It provides fast, comprehensive scanning, detailed live data graphing, and bidirectional controls (active tests) to command the shift motor or solenoids directly.
Rent vs buy: For a one-time code read, use a free loaner tool from a parts store like AutoZone. However, these tools are often basic and may not read TCCM codes or live data. If you plan to diagnose the issue yourself, buy a scanner with the minimum capabilities listed above. Given the cost of a single diagnostic hour at a shop ($150+), buying a capable scanner pays for itself in one use.
How to Clear the Code After You Fix It
- Use an OBD-II scan tool to clear the Diagnostic Trouble Codes (DTCs) from the TCCM and PCM.
- Perform the specific drive cycle recommended by the manufacturer to allow readiness monitors to run.
- Re-scan the vehicle to confirm P1854 and any related codes have not returned.
Drive cycle (~20 minutes): A general drive cycle includes: a cold start (sit for 8+ hours), idle for 2-3 minutes, drive at a steady speed of 55 mph for 5-10 minutes, followed by 10 minutes of stop-and-go city driving. During the drive, attempt to shift into all 4WD modes (2H, 4H, 4L) as per the owner's manual instructions.
Readiness monitors affected: Comprehensive Component Monitor (CCM), Catalyst (CAT) Monitor, Evaporative System (EVAP) Monitor
Before emissions retest: drive at least 50 miles to fully set monitors.
Watch out for:
- Simply disconnecting the battery clears the code but also resets all emissions readiness monitors, causing an automatic emissions test failure.
- The code returns immediately if the underlying electrical fault was not properly fixed.
- Failure to perform the full drive cycle leaves readiness monitors as 'Not Ready', preventing a successful smog check.
Will This Fail Emissions / State Inspection?
Yes — this code typically fails an OBD-II emissions inspection.
- California: An illuminated Check Engine Light is an automatic failure of the smog check. All required readiness monitors must be 'Ready', which requires driving 50-100 miles after a repair before re-testing.
- New York: The NYS vehicle inspection includes an OBD-II check. An illuminated 'check engine' light causes the vehicle to fail the emissions inspection. For 2001 and newer vehicles, only one readiness monitor is allowed to be 'Not Ready'.
- Texas: In counties requiring emissions testing, an illuminated Check Engine Light is an automatic failure. After clearing codes, you must drive 50-100 miles to set the readiness monitors before a re-test.
Most Commonly Affected Vehicles
- Ford F-150 (2004-2014) — Extremely common. The issue is almost always the transfer case shift motor, which contains the sensor.
- Chevrolet Silverado 1500 (2007-2013) — Known for failures of the 4WD selector switch, TCCM ground wire issues (check the ground point on the frame under the driver's door), and corrosion in the harness connectors. GM issued multiple TSBs for 'Service 4WD' messages.
- GMC Sierra 1500 (2007-2013) — Mechanically identical to the Silverado, it shares the same vulnerabilities, particularly with the dash switch, TCCM grounds, and related wiring.
- Dodge Ram 1500 (2006-2012) — Highly susceptible to issues with the Totally Integrated Power Module (TIPM), which cuts power to the 4WD system and triggers this code. Always investigate potential TIPM failure before replacing other 4WD components.
- Ford Explorer (2002-2010) — Similar to the F-150, the transfer case shift motor assembly is a primary failure point, with the internal position sensor being the root cause.
- Nissan Frontier / Titan (2005-2015) — The transfer case position switches on these models fail due to water intrusion and internal corrosion, leading to P1854.
- Honda Pilot / Ridgeline (2006-2014) — Most often traced back to wiring harness damage near the transfer assembly or a faulty position sensor itself.
- Jaguar X-Type (2002-2009) — The code points directly to a fault in the transfer case position sensor circuit, which fails from age or corrosion in the underbody wiring.
Manufacturer-Specific Notes
- Ford: On F-150s, Explorers, and Expeditions, do not replace just the sensor if it's integrated into the transfer case shift motor. The failure is almost always the electronics inside the motor assembly. Replacing the entire motor is the standard, reliable fix.
- Volkswagen / Audi: CRITICAL: On VW and Audi vehicles, P1854 means 'Data-Bus Powertrain Hardware Defective' or 'CAN data bus, ABS - defective'. It has NOTHING to do with the transfer case. It indicates a communication failure on the vehicle's network. Diagnosing this as a 4WD sensor leads to a complete misdiagnosis.
- Dodge / Chrysler / Jeep: This code is frequently reused. On some Dodge vehicles, it means 'Fuel Injector 4 Circuit Malfunction'. On some Chryslers, it means 'Unable To Obtain Desired Ride Height' for the air suspension system. Always verify the code definition for the specific year and model.
- General Motors (Chevy/GMC): A common failure point is the ground wire for the TCCM, located on the frame rail beneath the driver's side door. This single ground point corrodes and causes numerous 4WD-related codes, including P1854. Always clean and secure this ground before replacing expensive modules.
Real Owner Stories
2005 Ford F-150 with 150K+ miles
While driving on the highway, the 'TRANS FAULT' notification appeared on the dash and the transmission would not shift into overdrive. The truck was drivable but locked in lower gears.
What they tried:
- Took it to a local shop that diagnosed a failed transmission and quoted $3,200 for a replacement.
Outcome: Owner found a YouTube video describing a common issue. A wiring harness near the passenger side exhaust manifold melted from the heat, causing a short. The owner repaired the damaged wires with electrical tape in about an hour, completely fixing the problem and saving thousands.
Lesson: On Ford trucks, always perform a detailed visual inspection of the wiring harnesses, especially where they run near hot exhaust components, before agreeing to a major component replacement.
2010 Chevrolet Silverado at 120K miles
The 'Service 4WD' light came on intermittently, especially in damp or cold weather. The 4WD selector switch lights would not illuminate, and 4WD would not engage.
What they tried:
- Initially suspected the 4WD selector switch in the dash and the transfer case shift motor.
- Scanned for codes and found P1854 and a communication code U0102.
Outcome: Following advice from a forum, the owner located the main TCCM ground point on the frame rail under the driver's side door. The bolt and terminal were heavily corroded. After removing the bolt, cleaning all contact surfaces to bare metal with a wire brush, and re-securing it, all codes cleared and the 4WD system functioned normally.
Lesson: On GM trucks, a corroded frame ground is a very common cause for 'Service 4WD' lights and communication codes. Always clean and tighten this ground connection before replacing expensive parts.
2011 Dodge Ram 1500 at 95K miles
Vehicle set a P1854 code and was stuck in 2WD. Simultaneously, the horn stopped working and the windshield wipers activated randomly.
What they tried:
- The shop's initial diagnosis focused on the P1854 code, suggesting a faulty transfer case shift motor.
- The shift motor was replaced, but the problem persisted alongside the strange electrical issues.
Outcome: A different mechanic recognized the combination of unrelated electrical issues as a classic sign of a failing Totally Integrated Power Module (TIPM). Replacing the TIPM for ~$1,200 resolved the P1854 code and all other electrical problems.
Lesson: On Dodge/Chrysler/Jeep vehicles, if P1854 appears alongside bizarre, unrelated electrical faults, the TIPM is the primary suspect. Diagnose the TIPM before replacing individual 4WD components.
How to Prevent This Code From Triggering
- Apply Dielectric Grease to Connectors (Every 2-3 years or during any underbody service) — Disconnect the main harness at the transfer case, fill the connector with dielectric grease, and reconnect. The grease is non-conductive and seals out moisture and oxygen, preventing pin corrosion.
- Clean and Protect Chassis Grounds (Every 2-3 years) — Locate, remove, and clean the main TCCM and body-to-frame ground connections with a wire brush until shiny. Re-install tightly. This ensures control modules have a clean reference voltage.
- Apply an Underbody Protectant Annually (Once per year (before winter)) — Spraying the undercarriage with a wax-and-oil based rust inhibitor like Fluid Film creates a barrier that repels road salt and moisture, protecting vulnerable wiring insulation from cracking.
- Regularly Wash the Underbody in Winter (Every 1-2 weeks in 'Salt Belt' regions) — Using a pressure washer or an undercarriage spray physically removes highly corrosive road salt and brine before it eats away at connectors, wiring, and ground points.
Frequently Asked Questions
Can a bad battery or alternator cause code P1854?
Yes. Low system voltage causes various electronic modules, including the TCCM, to behave erratically and set false codes. If you have other electrical issues or the vehicle is slow to crank, have your battery and charging system tested before diving into a complex 4WD diagnosis.
What is the difference between the TCCM and the PCM?
The PCM (Powertrain Control Module) is the main computer for the engine and transmission. The TCCM (Transfer Case Control Module) is a smaller, secondary computer dedicated solely to managing the four-wheel-drive system. The TCCM reads the sensors and selector switch, then commands the shift motor.
Can I just reset the TCCM to fix the code?
Resetting the TCCM only clears the code temporarily. Since P1854 indicates a persistent hardware or circuit fault, the TCCM detects the failure again on its next self-test and the code returns, usually within one or two drive cycles.
Are there any common misdiagnosis mistakes for P1854?
The biggest mistake is ignoring manufacturer-specific definitions. On VW/Audi, P1854 is a data bus error, while on GM vehicles, replacing the shift motor when a TSB points to a corroded ground wire is a costly error. Always check for TSBs and verify grounds before replacing modules.
What is a transfer case contact plate?
It's the technical name for the position sensor. It contains a series of metallic contacts arranged in a pattern. As the transfer case shifts, a wiper moves across these contacts, completing different circuits to create a unique voltage signal for each gear.
Can I fix P1854 myself?
Yes, if the cause is simple. Checking fuses, cleaning ground connections, and replacing a bolt-on shift motor are within reach for a skilled DIYer. Accurately diagnosing an intermittent electrical short requires a multimeter, wiring diagrams, and an understanding of voltage drop testing.
Why did my 4WD stop working when the code appeared?
This is a fail-safe. When the TCCM loses the ability to confirm the transfer case's position, it disables all shifting commands to prevent mechanical damage.
Is it expensive to fix code P1854?
It varies widely. A corroded ground wire fix costs under $150. However, the most common repair, a transfer case shift motor replacement, costs between $350 and $800 depending on parts and labor rates.
Key Takeaways
- Code P1854 disables your 4x4 system because the Transfer Case Control Module (TCCM) lost the position 'C' voltage signal.
- Replacing the transfer case shift motor fixes this code in over 60% of cases, especially on 2004-2014 Ford F-150s where the sensor is integrated.
- Stop driving if your transmission enters 'limp mode' (locked in 2nd or 3rd gear); exceeding 50 miles in this state causes $3,000+ in permanent clutch damage.
- Do not replace 4WD parts on VW or Audi vehicles showing P1854; on these European makes, it indicates a CAN data bus failure requiring network diagnostics.
- Perform a live data 'wiggle test' on the underbody wiring harness before buying parts to instantly identify intermittent shorts or broken ground wires.
Helpful Videos
Shop the Parts Behind P1854
Below are the parts most often responsible for code P1854, ranked by how frequently each one is the actual culprit (per the diagnosis above). Tap any to see what we have for your vehicle.


The information in this article is provided for general reference and educational purposes only. Vehicle specifications, procedures, and part compatibility can vary by production date, trim level, and region. Always consult your vehicle's factory service manual and verify part numbers before purchasing or performing repairs. Safety-critical components such as airbags, seat belts, and braking systems should be installed by a qualified professional.
- 🎬 Helpful Videos
- 🛍️ Shop This Part
- What Does P1854 Mean?
- Can I Drive With P1854?
- Common Causes
- Symptoms
- Common Fixes & Costs
- Used vs. New Parts: Buying Guide
- What Happens If You Wait — Timeline
- Cost of Not Fixing It
- Diagnosis Steps
- When This Code Triggers (Freeze-Frame Conditions)
- Related Codes
- Climate & Environmental Factors
- How to Talk to a Mechanic About This Code
- Where to Take It: Dealer vs Independent vs Chain
- When to Walk Away From the Repair
- What Scan Tool You Need for This Code
- How to Clear the Code After You Fix It
- Will This Fail Emissions / State Inspection?
- Most Commonly Affected Vehicles
- Manufacturer-Specific Notes
- Real Owner Stories
- 2005 Ford F-150 with 150K+ miles
- 2010 Chevrolet Silverado at 120K miles
- 2011 Dodge Ram 1500 at 95K miles
- How to Prevent This Code From Triggering
- Frequently Asked Questions
- Can a bad battery or alternator cause code P1854?
- What is the difference between the TCCM and the PCM?
- Can I just reset the TCCM to fix the code?
- Are there any common misdiagnosis mistakes for P1854?
- What is a transfer case contact plate?
- Can I fix P1854 myself?
- Why did my 4WD stop working when the code appeared?
- Is it expensive to fix code P1854?
- Key Takeaways
- 🎟️ Get 5% Off