
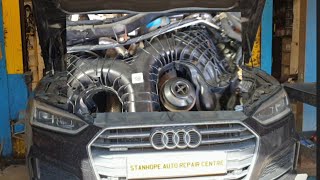
P2015 on 2012-2018 Audi A7 3.0L TDI: Intake Runner Position Sensor Causes and Fixes
On the Audi A7 3.0L TDI, code P2015 is almost always caused by a problem with the intake manifold's swirl flap mechanism. The primary failure is wear on a small plastic stop on the actuator motor, which allows it to over-rotate. The most common and cost-effective fix is installing an aftermarket metal repair bracket on the actuator motor to limit its travel, preventing the 'out of range' error. This bracket costs around $40-$80 and is a common DIY repair that can be done in under 30 minutes. Bef
- P2015 on your A7 3.0L TDI is a very common and well-understood problem.
- The issue is almost always mechanical wear in the swirl flap linkage, not a failed sensor.
- Do not let a shop replace the entire intake manifold (a $1500+ job) without first trying the simple and inexpensive repair bracket.
- The repair bracket is a widely accepted, effective, and often permanent fix that can be installed by a DIYer with basic tools in under an hour.
- It's a good idea to purchase a repair kit that includes brackets for both Bank 1 and Bank 2, as the other side is likely to fail soon if it hasn't already.
What's Unique About the 2012-2018 Audi A7
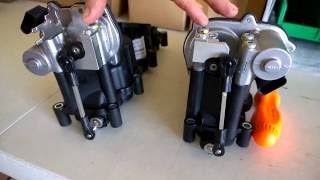
This is an extremely common issue on VAG (Volkswagen Audi Group) 2.7L and 3.0L TDI engines. The primary failure point is not usually the sensor or motor itself, but rather wear in the plastic linkage components that connect the motor to the flaps, specifically a small plastic stop on the actuator motor housing. Over time, heat cycles cause this plastic stop to wear down, allowing the actuator motor to slightly over-rotate. This pushes its integrated position sensor just outside the pre-programmed acceptable range, which triggers the P2015 fault code. This widespread, known issue has led to a robust aftermarket of simple, inexpensive metal brackets designed specifically to act as a new, hard stop to prevent this over-rotation.
Symptoms You May Notice
- Check Engine Light (Malfunction Indicator Lamp) is on.
- Reduced engine performance or sluggish acceleration.
- Rough or unstable idle.
- Decreased fuel economy.
- Potential for the vehicle to enter a reduced power 'limp mode'.
- Flashing glow plug light may be present in some cases.
- Replacing the entire intake manifold assembly. While this will fix the problem (as it includes a new motor, linkage, and clean flaps), it is often unnecessary and extremely expensive. The simple repair bracket is usually sufficient if the cause is the worn actuator stop.
- Replacing the intake manifold position sensor. The sensor is integrated into the actuator motor and is not the cause of the problem; it is simply reporting the out-of-range condition created by the worn linkage.
Most Likely Causes
- Worn Intake Manifold Swirl Flap Linkage / Actuator Over-Travel 🔴 High Probability → Shop Engine Intake Manifold The actuator motor assembly has a small plastic stop that limits its movement. This plastic becomes brittle from heat and wears down, creating excess play and allowing the motor to over-rotate. This is a well-documented design flaw.
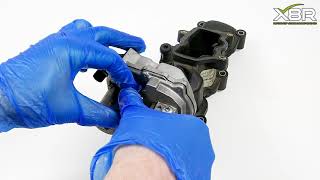
How to confirm: With the engine off, locate the actuator motor on Bank 1 (passenger side on US vehicles). Have a helper cycle the ignition (without starting the engine) or use a diagnostic tool to command the actuator. Observe if the linkage arm moves slightly too far, or if it can be wiggled past its intended stop. An immediate return of the P2015 code after clearing it strongly suggests this over-travel issue.
Typical fix: Install an aftermarket metal repair bracket onto the actuator motor. This bracket acts as a new, hard stop, preventing the motor from over-rotating. This is the most common, permanent, and cost-effective repair, often taking less than 30 minutes.
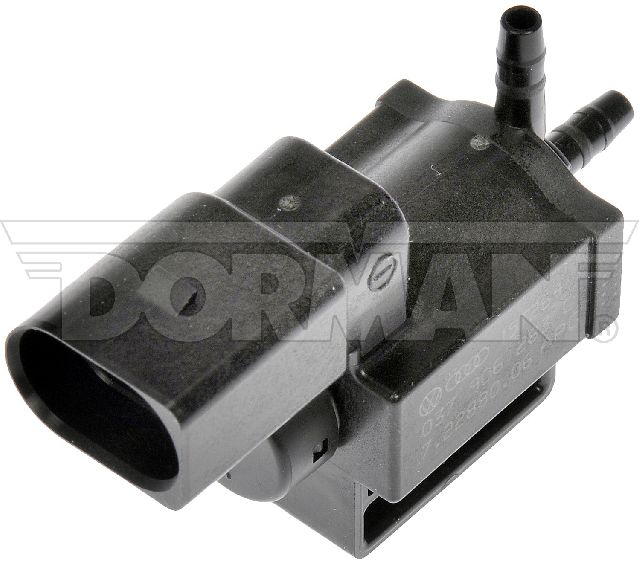
Est. part cost: $20 - $70 - Failing Intake Manifold Runner Motor (Actuator) 🟡 Medium Probability → Shop Engine Intake Manifold While less common than the worn stop, the electric motor (VDO/Bosch) itself can fail internally. The position sensor is integrated into this motor and is not sold separately.
How to confirm: Use a capable OBD-II scanner (like VCDS) to command the actuator motor to move. If it doesn't respond, makes grinding noises, or the linkage arm is broken, it has likely failed. You can also test the motor's electrical circuit for power and ground.
Typical fix: Replace the intake manifold runner motor. The OEM part number is often a variation of 059129086. In some cases, you may need to replace the entire intake manifold if other components are damaged.
Est. part cost: $150 - $300 - Excessive Carbon Buildup 🟡 Medium Probability Like all direct-injection diesel engines, the 3.0L TDI is susceptible to significant carbon buildup in the intake system. This can cause the swirl flaps to become sticky, bind, or get completely seized, preventing the motor from moving them properly.
How to confirm: This requires removing the intake manifold for visual inspection. If the flaps are difficult to move by hand or are visibly coated in thick, black carbon deposits, this is the cause. If the linkage is stuck and hard to move, carbon buildup is the likely culprit, whereas if it's loose and wiggles, the worn stop is more likely.
Typical fix: The intake manifold must be removed and manually cleaned ('de-coking' or 'walnut blasting'). This is a labor-intensive process. It is often recommended to clean the manifolds whenever they are removed for other service.
Est. part cost: $20 - $50 in gaskets and seals
Rare But Worth Checking
- Damaged Wiring or Connector: Check the wiring harness and connector going to the Bank 1 intake runner motor for any signs of damage, corrosion, or loose pins before replacing expensive parts. This can cause an implausible signal fault.
Diagnosis Steps
- Scan the vehicle's ECU for fault codes to confirm P2015 is present, and check if P2020 (Bank 2) is also stored.
- Clear the fault codes. Start the engine or cycle the ignition and see if the code returns immediately. An instant return strongly suggests the over-travel issue.
- Locate the intake runner actuator motor for Bank 1 (passenger side on US vehicles). Visually inspect the motor, linkage, and connector for any obvious damage, such as a broken linkage arm.
- With the engine off, try to wiggle the linkage arm. If it feels loose or can be pushed past its stop, the repair bracket is the indicated fix.
- If the linkage feels stuck or very stiff, suspect heavy carbon buildup inside the manifold.
- If the bracket fix is indicated, install it according to the manufacturer's instructions. This typically involves removing one or two T30 Torx screws, placing the bracket, and reinstalling the screws.
- Clear the codes again. If the P2015 code does not return, the repair is complete.
- If the code persists after installing the bracket, or if the actuator does not move at all when commanded by a scan tool, further diagnosis is needed. Use a multimeter to check for power and ground at the actuator motor connector.
- If the electrical circuit is good, the actuator motor itself may be faulty and require replacement.
- If carbon buildup is suspected, the intake manifold must be removed for cleaning or replacement.
Parts You'll Likely Need
- Intake Manifold Actuator Repair Bracket — This is the most common and direct fix for the actuator over-travel issue that causes the P2015 code on this engine. It provides a new, durable stop for the actuator arm.
Trusted brands: Diesel Geek, X8R, FCP Euro, Vaico
OEM price range: N/A
Aftermarket price range: $20 - $70 - Intake Manifold Runner Motor / Actuator
(OEM #059129086 (variants exist, e.g., 059129086M, 059129086L))— If the repair bracket does not solve the issue, or if the motor is unresponsive, the motor itself may have failed internally.
Trusted brands: Bosch, VDO (Continental)
OEM price range: $250 - $400
Aftermarket price range: $150 - $300
Related Codes That Often Appear With This One
- P2020 — P2020 is the identical 'Intake Manifold Runner Position Sensor/Switch Circuit Range/Performance' fault, but for Bank 2. It is very common to see both P2015 and P2020 together, as the linkage on both manifolds tends to wear at a similar rate. Repair kits are often sold with two brackets.
- P2008 — P2008 refers to 'Intake Manifold Runner Control Circuit/Open Bank 1'. This points more towards an electrical issue with the control circuit (e.g., failed motor winding) rather than a mechanical range problem, but they can be related.
- P1018 — P1018 ('Intake Manifold Runner (Bank 1) Lower limit not reached') is another related code indicating the flaps are not reaching their commanded position, often due to the same root causes like carbon buildup or linkage issues.
Technical Service Bulletins (TSBs) & Recalls
- TSB 24-16-53 (2044003): Addresses DTC P2015 on some Audi models due to corrosion in the changeover valve (N316), recommending replacement. While for a different engine (2.0L), it shows a history of TSBs for this code.
- TSB 01-13-50 (2030192): Addresses P2015/P2020 on 4.2L and 5.2L FSI engines caused by a deformed oil seal on the potentiometer, showing a pattern of linkage-related issues across VAG engines.
- Ross-Tech Wiki mentions TSB 24-17-04 / 2045138 for NAR vehicles with the 3.0L TDI (CREC) engine for a different fault (P0401), but shows active TSBs exist for this engine family.
- Bulletin #A0124312072273_2: Provides information for when the MIL is on for the electric changeover valve N316 with codes including P2015.
Platform-Specific Known Issues
- The failure of the plastic swirl flap components is a well-documented design flaw across multiple Audi and VW models using the 2.7L and 3.0L TDI engines.
- Some owners choose to install the repair brackets as a preventative measure even before the fault code appears to prevent future issues.
- The 'Dieselgate' Extended Emissions Warranty may cover this repair. Owners should contact an Audi dealer with their VIN to check for coverage before paying for any repairs.
Mechanic-Grade Diagnostic Values
- V157 Actuator Motor Connector Voltage Supply — expected: Approximately 12V (battery voltage) with ignition on.. Failure: No voltage or significantly low voltage indicates a wiring or fuse issue.
- V157 Actuator Motor Connector Ground Supply — expected: Approximately 12V (battery voltage) when measuring between the ground pin and battery positive.. Failure: No voltage or low voltage indicates a bad ground connection.
- V157 Actuator Position Sensor Voltage — expected: Nominal 5V reference voltage on the sensor circuit.. Failure: Incorrect voltage points to a sensor or ECU issue.
- VCDS Live Data - Intake Manifold Flap Position — expected: Value should change smoothly from ~0% to ~99% when running basic settings or an output test.. Failure: Value is stuck, jumps erratically, or shows 'ERROR' during adaptation.
Hidden / Shadow Codes Worth Checking
- 008213: VAG-specific code for 'Intake Manifold Flap Position Sensor (Bank 1): Implausible Signal', corresponds to P2015. (see via VCDS, OBDeleven, or other VAG-specific diagnostic tools.)
- 18447: Alternate VAG-specific fault code corresponding to P2015. (see via VCDS, OBDeleven, or other VAG-specific diagnostic tools.)
- 7859: Alternate VAG-specific fault code corresponding to P2015. (see via VCDS, OBDeleven, or other VAG-specific diagnostic tools.)
Scan Tool Commands That Help
- VCDS (VAG-COM): Engine -> Basic Settings -> Group 142 (for many TDI models) — To run the adaptation/test cycle for the intake manifold flaps. This will command the actuator through its full range of motion, allowing you to visually inspect its movement and check if it successfully adapts or throws an error.
- VCDS (VAG-COM): Engine -> Output Tests -> Intake Manifold Runner — To manually command the actuator motor to move, confirming if the motor itself is responsive to ECU commands. The opening and closing should be audible.
- OBDeleven: Engine Control Unit -> Output Test -> 'Intake manifold runner actuator' — Similar to VCDS Output Tests, this allows you to command the actuator to move to verify its function directly from the app.
Wiring & Ground Locations
- V157 Actuator Motor Connector — On the actuator motor for Bank 1 (passenger side in US models), attached to the rear of the intake manifold.. This 5-pin connector provides power, ground, and sensor signal paths. Checking for voltage and continuity here is a primary electrical diagnostic step. Pin assignments can be: Pin 1 (Sensor 5V+), Pin 2 (Sensor Signal), Pin 3 (Sensor Ground), Pin 4 (Motor -), Pin 5 (Motor +).
- Engine Bay Fuse Box (E-Box) — Located in the plenum chamber (under the plastic cowl below the windshield).. This box contains fuses for various engine components. While a specific fuse for V157 isn't clearly documented in search results, a blown fuse in this box related to the engine control module or its outputs could cause the actuator to lose power.
- Engine Block Ground Points — Multiple grounding posts are located on the engine block and chassis frame rails in the engine bay.. A poor ground connection for the engine wiring harness can cause a variety of implausible signal faults, including P2015. Ensuring the main engine ground straps are clean and tight is a good practice when diagnosing electrical issues.
Real Owner Repair Stories
- YouTube User Comment on a Dieselgeek video (Volkswagen Golf 6, 2.0 TDI) — P2015 error code and Check Engine Light persisted after installing the Dieselgeek repair bracket.
❌ Tried (didn't work) Installing the aftermarket repair bracket., Clearing codes with VCDS.
✅ What actually fixed it The previous owner had replaced the original actuator motor with an incorrect model that had different voltage/parameters. The owner sourced the original, old motor from the previous owner, reinstalled it with the bracket, and the fault was resolved. - BRISKODA forum user (Skoda Superb Mk2 2.0CR) — EML on with P2015 fault code.
❌ Tried (didn't work) Installing an aftermarket repair bracket.
✅ What actually fixed it Replacing the entire actuator motor fixed the problem. The user noted the new motor only cost £55 and was a 15-minute job, compared to the fiddly and ultimately unsuccessful bracket installation attempt. - NHTSA ODI #11542990 — An owner reported a P2015 code on an emissions failure report and noted that a technical service bulletin exists detailing the repair and how it should be covered under warranty.
"I Checked Everything" — The Actual Cause
- In a similar case on a 2.0TSI engine (P2015/P2004), all vacuum lines and mechanical components passed tests perfectly. The actuator moved correctly during scan tool adaptation but would still fail at the end of the sequence. The root cause was a faulty position sensor integrated into the intake manifold, which required replacing the entire manifold to fix. This demonstrates that even with no mechanical or linkage issues, the electronic sensor itself can fail internally.
When the Usual Fixes Don't Work
- While the aftermarket repair bracket is the most common fix, there are numerous owner reports where it did not solve the problem. In a case involving a 2012 Touareg 3.0 TDI, a user installed brackets on both banks, but the P2015 code continued to return after a few drives, despite being able to see the actuators moving via a scan tool. In other instances, owners have reported that only replacing the actuator motor itself resolved the code after a bracket failed to do so. This indicates that while the worn stop is the most probable cause, failure of the motor's internal electronics or position sensor is also a significant possibility that should not be ruled out if the bracket doesn't work.
OEM Part Supersession History
059129086D→059129086M— Revision of the actuator motor assembly.
Heads up: Some aftermarket replacement motors may specify that the ECU software must NOT be updated or re-trained after installation.Multiple variants exist (G, J, K, L)→059129086M appears to be a common supersession for many earlier part numbers.— Part consolidation and design updates.
Heads up: It is critical to use an actuator with the correct electronic parameters. Using a motor from a different engine, even if it fits physically, can cause the P2015 code to persist.
Model Year Variations Within This Range
- 2012-2018: The C7 generation had a facelift for the 2016 model year in North America, which introduced the updated CREC 'Gen 2 evo' 3.0 TDI engine, replacing the earlier CDUD/CPNB engines. While the fundamental design of the intake manifold and swirl flap actuators causing P2015 remained the same, there may be subtle differences in software and other engine components. However, the repair bracket fix is applicable to both pre- and post-facelift C7 A7 3.0 TDI models.
Diagnostic Flowchart
Other Known Issues on This Vehicle
Issues unrelated to this code that are worth knowing about as an owner of this generation:
- Timing Chain Tensioner Wear 🔴 High — More common at higher mileages (60k+ miles), can manifest as a rattling noise from the engine on cold starts for a few seconds.
- High-Pressure Fuel Pump (HPFP) Failure 🔴 High — Can fail without warning, potentially sending metal debris throughout the fuel system, requiring a very expensive repair. Misfueling with gasoline is a known cause. (Ref: NHTSA investigation EA11-003 looked into this issue.)
- Oil Leaks from Engine Valley (Oil Cooler Seals) 🟠 Medium — Seals for the oil cooler and other components located in the 'V' of the engine can degrade, causing significant oil or coolant leaks that pool in the valley.
- Diesel Particulate Filter (DPF) Clogging 🟠 Medium — Common for vehicles used primarily for short trips or city driving, as the DPF cannot get hot enough to perform a regeneration cycle. Leads to power loss and warning lights.
- Fuel Injector Failure 🟠 Medium → Shop Fuel Injector — Can occur after 60,000 miles, leading to rough idle, misfires, and reduced performance. Often caused by internal wear or clogging.
Used vs. New Parts: Buying Guide for This Vehicle
When a used part is the smart pick: A complete used intake manifold assembly can be a good value if it comes from a low-mileage, verified running vehicle. This is often done to solve both the P2015 code and address carbon buildup simultaneously. Buying just the used actuator motor is risky, as the failure is due to wear on a plastic component that may not be visible.
Donor-vehicle mileage cap: roughly under 50000 miles for the part to have meaningful remaining life.
What to inspect on the donor part:
- For a complete manifold, inspect the intake ports for heavy carbon buildup.
- Manually move the swirl flap linkage arm; it should be smooth, without binding (carbon) or excessive looseness (wear).
- Ask for the donor vehicle's VIN to check its history and mileage if possible.
OEM-only on this vehicle (don't cheap out):
- Intake Manifold Runner Motor (Actuator). While cheaper aftermarket motors exist, there are documented cases where non-OEM units have incorrect electronic parameters, causing the fault to persist even after replacement. Stick to OEM suppliers like VDO or Bosch.
Aftermarket brands forum-validated for this vehicle:
- For the repair bracket: Diesel Geek and X8R are frequently cited in forums and videos as providing reliable, well-made solutions that successfully fix the over-travel issue.
Brands owners have reported issues with on this vehicle:
- Generic, unbranded repair brackets from online marketplaces can be a gamble. Some owners have reported that cheaper brackets did not resolve the code, potentially due to improper dimensions or material flex.
Real Owner Stories
Aggregated from forums and TSBs cited above. Mileages and costs reflect what owners reported in those sources.
2014 Audi A8 4.2 FSI
Symptoms: The Check Engine Light came back immediately after clearing; the arms connected to the position sensors were not moving.
What fixed it: Replacement of the motor with a revised version (p/n 079129086B) due to a broken motor arm.
Source hint: AudiWorld Forums - P2020 and p2015 Intake Flap Codes
Audi A7 3.0L TDI
Symptoms: P2015 fault code present.
What fixed it: Installation of an aftermarket metal repair bracket, which resolved the issue in 11 minutes without needing to clear the code.
Source hint: Reddit r/Audi - Infamous Swirl Flap issue
Audi A7 3.0L TDI
Symptoms: P2015 fault code caused by the flap being jammed.
What fixed it: Replacing the intake manifold and cleaning the throttle body due to carbon buildup.
Source hint: Reddit r/Audi - Infamous Swirl Flap issue
2014 Audi Q7 3.0L TDI
Symptoms: Significant carbon buildup found inside the intake manifolds and coolant leaks in the engine valley.
What fixed it: Manual cleaning of the intake manifolds while they were removed for other service.
Source hint: AudiWorld Forums - TDI Coolant Leak from Oil Cooler / EGR - Owner Repair Stories
Related OBD-II Codes
Frequently Asked Questions
Will the 'Dieselgate' Extended Emissions Warranty cover the P2015 repair on my Audi A7 3.0L TDI?
Is there a TSB for P2015 that applies to the 3.0L TDI (CREC) engine family?
Should I install the repair bracket even if I don't have a Check Engine Light yet?
Can I just replace the position sensor on the intake manifold runner motor?
How can I tell if my P2015 is caused by a worn stop or carbon buildup?
Which side of the engine is Bank 1 for the P2015 code on US Audi A7 models?
Helpful Videos


We Have This Part in Stock


The information in this article is provided for general reference and educational purposes only. Vehicle specifications, procedures, and part compatibility can vary by production date, trim level, and region. Always consult your vehicle's factory service manual and verify part numbers before purchasing or performing repairs. Safety-critical components such as airbags, seat belts, and braking systems should be installed by a qualified professional.
- Audi A7:
- 🧭 Diagnostic Flowchart
- 🎬 Helpful Videos
- 🛍️ Shop This Part
- What's Unique About the 2012-2018 Audi A7
- Symptoms You May Notice
- Most Likely Causes
- Rare But Worth Checking
- Diagnosis Steps
- Parts You'll Likely Need
- Related Codes That Often Appear With This One
- Technical Service Bulletins (TSBs) & Recalls
- Platform-Specific Known Issues
- Mechanic-Grade Diagnostic Values
- Hidden / Shadow Codes Worth Checking
- Scan Tool Commands That Help
- Wiring & Ground Locations
- Real Owner Repair Stories
- "I Checked Everything" — The Actual Cause
- When the Usual Fixes Don't Work
- OEM Part Supersession History
- Model Year Variations Within This Range
- Other Known Issues on This Vehicle
- Used vs. New Parts: Buying Guide for This Vehicle
- Real Owner Stories
- 2014 Audi A8 4.2 FSI
- Audi A7 3.0L TDI
- Audi A7 3.0L TDI
- 2014 Audi Q7 3.0L TDI
- Related OBD-II Codes
- Frequently Asked Questions
- 🎟️ Get 5% Off