
P2015 on 2011-2015 Kia Optima 2.4L GDI: Intake Manifold Runner Sensor Causes and Fixes
This code usually means the intake manifold runner flaps are stuck or the sensor has failed. On the 2.4L GDI engine, this is often caused by heavy carbon buildup inside the plastic intake manifold, requiring cleaning or replacement of the manifold itself. A less common cause is a failed runner control actuator.
- For the 2011-2015 Optima 2.4L GDI, code P2015 is most often caused by carbon buildup jamming the flaps inside the intake manifold.
- Before replacing any parts, try to manually check if the runner flap linkage moves freely. If it's stiff or stuck, the manifold needs to be cleaned or replaced.
- A faulty intake runner actuator (motor/sensor) is the second most likely cause and is a relatively inexpensive part to replace.
- Always replace the intake manifold gasket when removing the manifold to prevent future vacuum leaks.
- This code is separate from the major engine failure recalls affecting the Theta II engine, but highlights another common issue with the platform.
What's Unique About the 2011-2015 Kia Optima
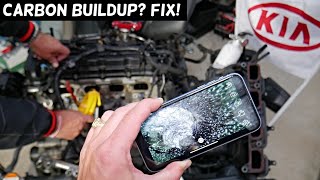
The Kia Optima's 2.4L GDI (Gasoline Direct Injection) 'Theta II' engine is highly susceptible to carbon buildup on the intake valves and inside the intake manifold. Unlike traditional port-injected engines, GDI engines don't spray fuel over the intake valves, a process which would normally keep them clean. This carbon accumulation can cause the plastic runner flaps to bind or stick, which is a primary cause of the P2015 code on this specific platform. Many owners on forums for Kia and its sister brand Hyundai confirm this is a common failure pattern.
Symptoms You May Notice
- Check Engine Light is on
- Reduced engine power and sluggish acceleration, especially at higher RPMs
- Rough or unstable idle
- Decreased fuel economy
- Engine hesitation
- Replacing only the runner actuator when the root cause is heavy carbon buildup inside the manifold. The new actuator will soon fail to overcome the resistance, and the code will return. It is critical to confirm the flaps move freely before replacing the actuator.
Most Likely Causes
- Sticking Intake Manifold Runner Flaps due to Carbon Buildup 🔴 High Probability → Shop Engine Intake Manifold The 2.4L GDI engine design leads to significant carbon deposits inside the intake manifold, which can physically restrict the movement of the runner flaps. This happens because fuel is injected directly into the cylinder, not over the intake valves where it would have a cleaning effect.
How to confirm: Remove the intake manifold runner actuator from the side of the manifold. Manually move the linkage arm on the manifold itself. It should move smoothly through its full range of motion. If it feels gritty, stiff, or stuck, the flaps are binding from carbon.
Typical fix: The intake manifold must be removed for a thorough cleaning of the internal runners and flaps. However, due to the plastic construction and difficulty of completely removing the baked-on carbon, replacing the entire intake manifold assembly is often the most effective and lasting repair. Some owners also perform walnut blasting on the intake ports while the manifold is off.
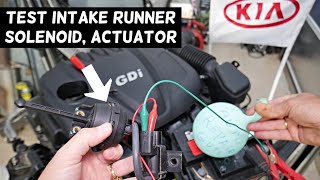
Est. part cost: $250-$460 - Faulty Intake Manifold Runner Actuator / Position Sensor 🟡 Medium Probability → Shop Engine Intake Manifold This electronic component, which moves the flaps and reports their position, can fail over time due to heat, vibration, or stripped internal plastic gears. It is a common failure item on many Hyundai/Kia vehicles.
How to confirm: With a capable OBD-II scanner, command the IMRC actuator open and closed while monitoring the sensor's position data (voltage or percentage). Expected voltage is typically between 0.5V (closed) and 4.5V (open). If the actuator doesn't move or the sensor reading is erratic, does not change, or does not match the commanded position, the part is likely faulty.
Typical fix: Replace the intake manifold runner actuator, which is mounted to the side of the intake manifold. This part is often called a 'Visor Actuator' or 'Variable Charge Motor (VCM)'.
Est. part cost: $25-$50 - Faulty Intake Runner Control Solenoid or Vacuum Leak ⚪ Low Probability
How to confirm: Inspect all vacuum lines connected to the intake manifold and runner control system for cracks or disconnections. Use a hand vacuum pump to test the actuator directly; it should move the runner arm and hold vacuum. Test the control solenoid for proper operation using a multimeter or by applying power and ground.
Typical fix: Replace the cracked vacuum hose or the faulty control solenoid.
Est. part cost: $10-$40 - Wiring or Connector Issue ⚪ Low Probability
How to confirm: Visually inspect the wiring harness and connector going to the intake manifold runner actuator for any signs of damage, corrosion, or loose pins. Use a multimeter to check for proper voltage and ground at the connector; on the 5-pin connector, Pin 5 is typically positive and Pin 4 is negative for the motor.
Typical fix: Repair the damaged wiring or clean/replace the connector.
Est. part cost: $5-$25
Diagnosis Steps
- Connect an OBD-II scanner to confirm P2015 is the active code and check for any other related codes like P200A.
- Use the scanner's live data feature to observe the commanded vs. actual position of the intake runner flaps. The reading is often a voltage or percentage. A normal range is typically 0.5V to 4.5V.
- Visually inspect the wiring harness and connector for the intake runner actuator for any obvious damage, corrosion, or loose connections.
- Locate the runner actuator on the side of the intake manifold. Check if its linkage is connected and appears intact.
- Disconnect the actuator from the manifold linkage. Manually move the actuator's linkage arm on the manifold itself to feel if the internal flaps move freely or if they feel stuck/gritty. This is the most crucial step to differentiate a bad manifold from a bad actuator.
- If the flaps feel stuck, the intake manifold must be removed for inspection and cleaning/replacement.
- If the flaps move freely, the actuator/sensor assembly is the primary suspect. Use a scan tool to command it open/closed while it's disconnected from the manifold. If it doesn't respond, or if the sensor reading is incorrect, the actuator/sensor assembly is faulty.
- If the actuator doesn't move when commanded, use a multimeter to check for power and ground at the actuator's electrical connector to rule out a wiring issue before replacing the part.
Parts You'll Likely Need
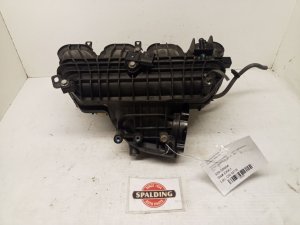
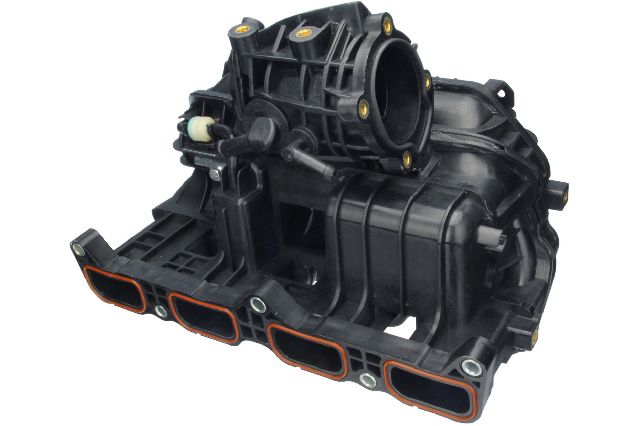
- Intake Manifold Assembly
(OEM #28310-2G710)— This is the most common fix for the 2.4L GDI engine because internal carbon buildup physically jams the runner flaps, and replacement is often more effective than cleaning. This part number fits the 2011-2015 Optima with the 2.4L engine.
Trusted brands: Kia (Genuine OEM), Hyundai (Genuine OEM), Dorman
OEM price range: $280-$460
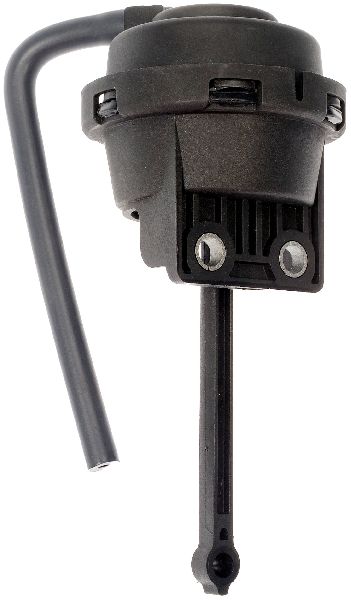
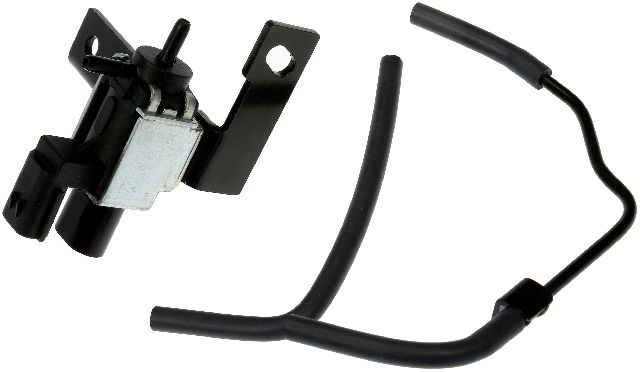
Aftermarket price range: $90-$200 - Intake Manifold Runner Actuator
(OEM #28321-2G700)— If the manifold flaps are not sticking, the electronic actuator/sensor assembly is the next most likely part to have failed. This part is also called an 'Actuator-Vis'.
Trusted brands: Kia (Genuine OEM), Hyundai (Genuine OEM), Dorman (689-001)
OEM price range: $25-$40
Aftermarket price range: $25-$50 - Intake Manifold Gasket
(OEM #28313-2G700)— This gasket must be replaced anytime the intake manifold is removed for cleaning or replacement to prevent vacuum leaks.
Trusted brands: Kia (Genuine OEM), Fel-Pro, Mahle
OEM price range: $5-$15
Aftermarket price range: $5-$10
Related Codes That Often Appear With This One
- P200A — This code means 'Intake Manifold Runner Performance Bank 1' and is very closely related, often triggered by the same set of faults like sticking flaps or a bad actuator.
- P2006 — This code means 'Intake Manifold Runner Control Stuck Closed' and points directly to the flaps not opening as commanded, which can be caused by carbon buildup or a failed actuator.
Technical Service Bulletins (TSBs) & Recalls
- While no TSB directly addresses P2015, Kia Campaign SC147 (NHTSA ID: 17V-224) is highly relevant as it pertains to the widespread Theta II engine failures and the resulting lifetime warranty and KSDS update for these vehicles.
Platform-Specific Known Issues
- The Theta II 2.4L GDI engine used in this Optima is subject to several major recalls and a lifetime warranty extension (Campaign SC147 / NHTSA 17V-224) for engine bearing failure. This was due to metal debris from manufacturing restricting oil flow, leading to premature bearing wear and engine seizure. While the P2015 code is unrelated to the bearing failure, it is critical context for owners regarding the platform's history and potential for major engine work covered under warranty.
- Many owners install an aftermarket oil catch can to reduce the amount of oil vapor entering the intake through the PCV system, which helps slow the rate of carbon buildup that causes the P2015 code.
Mechanic-Grade Diagnostic Values
- VCM (Actuator) Position Sensor Signal Voltage (Live Data) — expected: A smooth sweep from approximately 0.5V (closed) to 4.5V (open) as the actuator is commanded.. Failure: Voltage is stuck at a specific value, jumps erratically, or is outside the 0.5-4.5V range.
- VCM (Actuator) Position Sensor Coil Resistance — expected: 3,000 to 5,000 Ohms (3kΩ - 5kΩ) between pins 1 and 3 of the actuator connector.. Failure: Resistance is significantly outside this range, indicating a faulty internal position sensor.
- VCM (Actuator) Motor Coil Resistance — expected: Approximately 5.8 Ohms (at 68°F/20°C).. Failure: Significantly higher resistance, an open circuit (infinite resistance), or a short (near zero resistance) indicates a failed motor.
Scan Tool Commands That Help
- Kia GDS (Global Diagnostic System): Actuation Test > VCM Motor (Option) — This bidirectional command forces the actuator motor to cycle open and closed. It is essential for verifying if the motor is responding to ECU commands and for visually checking if the linkage moves smoothly or binds, which helps differentiate a failed actuator from a mechanically stuck manifold flap.
Wiring & Ground Locations
- Engine Ground Wiring Assembly — A specific ground wire assembly for the engine block. For 2011-2013 models, the part number is 91860-2T011. For 2014-2015 models, a similar part is 91861-4C010.. A poor engine ground can cause a variety of electrical issues and incorrect sensor readings. While not a primary cause, ensuring the main engine ground is clean and secure is a crucial step in diagnosing any electronic fault code.
- Main Fuse Box Ground Point — There is typically a primary grounding bolt, often 10mm or 12mm, located near the main interior fuse panel, where multiple ground wires connect to the chassis.. This is a central ground location. Verifying it is tight and corrosion-free can rule out widespread grounding problems that could affect the PCM and its sensor readings.
Real Owner Repair Stories
- gtd65 on YouTube (via Go-Parts.com article) (Hyundai i40 Diesel (system is analogous to the Optima 2.4L GDI)) — Check Engine Light with code P2015.
❌ Tried (didn't work) Initial inspection showed the actuator linkage was stiff to move by hand.
✅ What actually fixed it The owner removed the actuator, then thoroughly cleaned the corroded external pivot point and linkage arm on the manifold with sandpaper and a wire brush. After lubricating the pivot with grease and reassembling, the actuator moved freely and the code was resolved. - S&J's Garage on YouTube (via Go-Parts.com article) (2016 Kia Optima 2.4L GDI) — P200A code (closely related to P2015) and significant visible carbon buildup.
✅ What actually fixed it The owner replaced the entire intake manifold assembly to resolve the issue caused by heavy internal carbon deposits.
OEM Part Supersession History
28321-2G700→28321-2G700— No supersession found. The part number appears to be consistent for the model years.28310-2G700→28310-2G710— Minor revision or vendor change. Both parts are listed as compatible with the 2011-2015 Optima 2.4L GDI.
Heads up: The Pass 2 listed part number 28310-2G710 is the correct and most current replacement for the original 28310-2G700 manifold.
Diagnostic Flowchart
Other Known Issues on This Vehicle
Issues unrelated to this code that are worth knowing about as an owner of this generation:
- Catastrophic Engine Failure (Rod Bearing Failure) 🔴 High — Widespread across 2011-2019 models with the 2.0L and 2.4L Theta II engines. Can occur at various mileages, often under 100,000 miles. (Ref: NHTSA Recall 17V-224 / Kia Campaign SC147. A class-action lawsuit resulted in a lifetime warranty for the engine short block for affected vehicles, contingent on receiving the Knock Sensor Detection System (KSDS) software update.)
- Excessive Oil Consumption 🔴 High — Very common issue, often a precursor to the more serious engine failure. Many owners report adding a quart of oil every 1,000 miles or less. (Ref: Kia has an official oil consumption test procedure outlined in TSB ENG222.)
- Cracked Low-Pressure Fuel Hose 🔴 High — Common enough on 2013-2014 models to warrant a recall. The hose deteriorates from engine heat, cracks, and leaks fuel, posing a fire risk. (Ref: NHTSA Recall 18V-907000 / Kia Campaign SC172.)
- Steering Column Noise or Failure 🟠 Medium — A frequently reported problem where the steering wheel makes a clicking noise or feels loose. This is often due to a worn flexible coupling in the steering column.
- Peeling Exterior Paint 🟡 Low — Frequently reported by owners, especially on vehicles with white or pearl paint finishes.
Used vs. New Parts: Buying Guide for This Vehicle
When a used part is the smart pick: A used intake manifold is a reasonable choice ONLY if you can verify it came from a low-mileage vehicle and you thoroughly inspect and clean it before installation. Given that carbon buildup is the primary failure mode, a used part may have the same issue. A used actuator is a good, cost-effective option if confirmed to be working.
Donor-vehicle mileage cap: roughly under 60000 miles for the part to have meaningful remaining life.
What to inspect on the donor part:
- For a used intake manifold, inspect the plastic body for any cracks, especially around mounting flanges.
- Ensure the mounting surfaces that meet the cylinder head are flat and not warped.
- Manually operate the runner flap linkage; it must move smoothly with no binding or gritty feeling.
- Look inside the ports with a flashlight to gauge the level of carbon buildup. If it's heavy, the part may not be worth the effort to clean.
Aftermarket brands forum-validated for this vehicle:
- Dorman is a widely available aftermarket brand for both the intake manifold and the actuator.
Brands owners have reported issues with on this vehicle:
- No specific brands are consistently reported as problematic, but be wary of unbranded, exceptionally cheap electronic parts like actuators from online marketplaces, as their internal components and calibration may not meet OEM standards.
Real Owner Stories
Aggregated from forums and TSBs cited above. Mileages and costs reflect what owners reported in those sources.
2015 Kia Optima 2.4L GDI
Symptoms: The vehicle entered limp mode and the owner had to navigate dealership discussions regarding related campaigns like PI1802 and the knock sensor.
What fixed it: The owner sought dealer assistance to honor engine-related campaigns linked to the Theta II platform issues.
Source hint: Reddit r/kia - 2015 Kia Optima went into limp mode
2011-2015 Kia Optima 2.4L GDI
Symptoms: Loss of power and carbon buildup on intake valves and runners, which is noted as an inherent issue with the direct injection design.
What fixed it: Owners discuss the necessity of intake valve cleaning and the use of oil catch cans to mitigate the buildup.
Source hint: Kia-Forums.com - Direct fuel injection and intake valve cleaning
Related OBD-II Codes
Frequently Asked Questions
Is the P2015 code covered under the Kia Campaign SC147 lifetime warranty for the 2.4L GDI engine?
Why does my 2.4L Optima keep getting carbon buildup that causes this code?
Can I just replace the actuator (VCM) to fix P2015 on my Optima?
What is the 'Visor Actuator' or 'Variable Charge Motor' mentioned in Kia repairs?
Will installing an oil catch can help prevent P2015 on my 2015 Optima?
How can I tell if the P2015 code is a wiring issue instead of a mechanical failure?
Helpful Videos
Used OEM Parts in Stock
New Aftermarket Parts Available


The information in this article is provided for general reference and educational purposes only. Vehicle specifications, procedures, and part compatibility can vary by production date, trim level, and region. Always consult your vehicle's factory service manual and verify part numbers before purchasing or performing repairs. Safety-critical components such as airbags, seat belts, and braking systems should be installed by a qualified professional.
- Kia Optima:
- 🧭 Diagnostic Flowchart
- 🎬 Helpful Videos
- 🛍️ Shop This Part
- What's Unique About the 2011-2015 Kia Optima
- Symptoms You May Notice
- Most Likely Causes
- Diagnosis Steps
- Parts You'll Likely Need
- Related Codes That Often Appear With This One
- Technical Service Bulletins (TSBs) & Recalls
- Platform-Specific Known Issues
- Mechanic-Grade Diagnostic Values
- Scan Tool Commands That Help
- Wiring & Ground Locations
- Real Owner Repair Stories
- OEM Part Supersession History
- Other Known Issues on This Vehicle
- Used vs. New Parts: Buying Guide for This Vehicle
- Real Owner Stories
- 2015 Kia Optima 2.4L GDI
- 2011-2015 Kia Optima 2.4L GDI
- Related OBD-II Codes
- Frequently Asked Questions
- 🎟️ Get 5% Off