
OBD-II Code P2068: Fuel Level Sensor 'B' Circuit High
What P2068 means, why it triggers, and how to fix it
- P2068 triggers when the secondary ('B') fuel level sensor sends a voltage signal above 4.5V, causing the fuel gauge to stick on 'full'.
- Manually track your mileage immediately; running a direct-injection engine dry causes up to $2,500 in damage to the high-pressure fuel pump.
- Before buying a $200 replacement sensor, perform a voltage drop test on the ground circuit to ensure resistance is below 0.1V (100mV).
- On saddle-tank vehicles like VW, Audi, and GM, a clogged suction jet pump traps fuel on the 'B' side, physically mimicking a failed sensor.
What Does P2068 Mean?
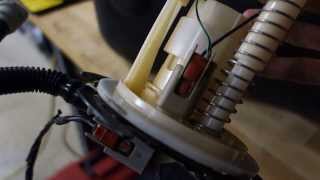
The Powertrain Control Module (PCM) detects an unusually high voltage signal from the 'B' fuel level sensor. This code specifically points to an electrical circuit failure in the secondary fuel level sensor, found in vehicles with dual-chambered 'saddle' gas tanks designed to fit around driveshafts or exhaust components.
Technical definition: The SAE/OBD-II definition is "Fuel Level Sensor 'B' Circuit High". This indicates the voltage from the 'B' fuel level sensor exceeds the manufacturer's specified maximum (usually 4.5V to 5.0V 🎬 Watch: A quick overview of fixing the P2068 error code.). The PCM triggers P2068 when it detects an open circuit, a short to power, a bad ground, or a sensor reading that remains implausibly high over a set driving distance.
Can I Drive With P2068?
Yes, But With Caution. You can drive, but your fuel gauge and distance-to-empty display are completely unreliable, creating a significant risk of running out of fuel. For vehicles with a high-pressure fuel pump (HPFP), such as many Volkswagen and Audi models, running the tank dry destroys the pump, adding $800 to $2,500 to the repair cost. Manually track your mileage and keep the tank well-fueled until repaired.
Common Causes
- Faulty fuel level sensor 'B' (Very Common) — The sensor's internal resistor card fails or develops an open circuit, sending a constant high-voltage signal to the PCM.
- Poor or corroded ground connection (Common) — A bad ground introduces high resistance into the circuit, forcing the voltage reading above the normal threshold.
- Damaged wiring harness or connectors (Common) — The signal wire shorts to a power source or breaks completely (open circuit). Rodents frequently chew these wires under rear seats, especially on VW models.
- Blocked fuel transfer jet pump (Common) — In saddle tanks, a blocked suction pump fails to transfer fuel to the main tank. The 'B' side remains physically full, so the sensor accurately reports high voltage, but the PCM flags it as an error.
- Fuel contamination (Less Common) — High sulfur content in cheap gasoline corrodes the sensor's resistor card, disrupting the electrical signal.
- Faulty Control Module or Instrument Cluster (Rare) — The PCM or instrument cluster fails internally and misinterprets the sensor data. Rule out all wiring and sensor issues before replacing modules.
Symptoms
- Check Engine Light is on — The Malfunction Indicator Lamp (MIL) illuminates on your dashboard.
- Stuck or erratic fuel gauge — The fuel gauge pegs to 'full' permanently, or erratically drops to empty and bounces back while driving.
- Unexpected low fuel warning — The system defaults to a fail-safe 'empty' reading, triggering the low fuel light and audible alarms even with a full tank.
- Vehicle enters limp mode (also visible on scanner) — The PCM restricts engine power to protect the fuel system, though this is rare for a standalone P2068 code.
Diagnostic Flowchart
Tap your situation to follow the diagnostic path that matches what you're seeing on this code.
Common Fixes & Costs
- Replace Fuel Level Sensor 'B' — Parts: $50-$250, Labor: $200-$450, ~1.5 hr book time (Intermediate)
- Replace Fuel Pump Module (if sensor is integrated) — Parts: $250-$800, Labor: $300-$800, ~3.5 hr book time (Professional)
- Clean or Repair Ground Connection — Parts: $5-$20, Labor: $50-$100, ~0.8 hr book time (DIY)
- Repair Damaged Wiring or Connectors — Parts: $15-$60, Labor: $100-$300, ~1.5 hr book time (Intermediate)
Used vs. New Parts: Buying Guide
When a used part is worth it: Buying a used fuel level sensor or pump module is a budget-friendly option for older, high-mileage vehicles where the cost of a new OEM part is a significant portion of the car's value. It is a gamble, as used electronic parts have an unknown lifespan.
Donor-vehicle mileage cap: roughly under 80000 miles for the part to have meaningful remaining life.
Donor quality checklist:
- Visually inspect electrical connectors for corrosion or damage.
- Verify the part number matches exactly, as resistance values differ even within the same model year.
- Choose parts from vehicles scrapped due to accidents rather than electrical issues.
Decision logic:
- If The repair requires dropping the fuel tank (high labor) → Buy a new, high-quality part. The risk of a used part failing and requiring a repeat of expensive labor is too high.
- If The part is easily accessible via an under-seat panel and the vehicle is over 150K miles → A used part from a low-mileage donor is an acceptable risk to save money.
- If The vehicle is less than 8 years old or has low mileage → Buy new. The potential savings from a used part do not justify the reliability risk.
Warranty tradeoff: Used parts from a salvage yard typically come with a 30-90 day warranty. New aftermarket parts carry a 1-year to limited lifetime warranty. A new OEM part offers the best guarantee of fit and function.
Worst-case if a used part fails: $300-$900 if a used part fails after the warranty period, requiring you to pay for the part again plus full labor costs.
What Happens If You Wait — Timeline
- 0-2 Weeks: Check Engine Light illuminates. Fuel gauge becomes unreliable, sticking on 'Full' or 'Empty'. Low fuel warning appears at random. (MPG impact: 0%% · Added cost: $0 (Inconvenience and risk of being stranded))
- 1-3 Months: The primary risk emerges: running out of fuel. A single instance of running the tank completely dry destroys the High-Pressure Fuel Pump (HPFP) on direct-injection engines. (MPG impact: 0%% · Added cost: $75-$250 (Towing) + $800-$2,500 (HPFP replacement))
- 3-12 Months: The vehicle automatically fails state emissions or safety inspections due to the active Check Engine Light, preventing registration renewal. (MPG impact: 0%% · Added cost: $50-$150 (Failed inspection fees and lost time))
- 12+ Months: The risk of running out of fuel and causing catastrophic HPFP failure remains constant and becomes more likely as the driver gets complacent. (MPG impact: 0%% · Added cost: $800-$2,500 (HPFP failure risk))
Cost of Not Fixing It
- Immediate: High risk of running out of fuel unexpectedly, leaving you stranded in an unsafe location. (Added cost: $75-$250 (Towing and roadside assistance))
- 1-6 Months: For direct-injection vehicles, running the tank dry causes the high-pressure fuel pump (HPFP) to fail from fuel starvation. (Added cost: $800-$2,500 (HPFP replacement cost))
- Long-Term: Guaranteed failure of state emissions/safety inspection due to the Check Engine Light. (Added cost: $50-$100 (Failed inspection fees and re-test costs))
Diagnosis Steps
- Read Codes and Live Data
Use an advanced OBD-II scanner to read P2068 and monitor the 'Fuel Level Sensor B Voltage' PID. A reading stuck above 4.5V (or 12V on some Chryslers) confirms a hard electrical fault.
Tools: Advanced OBD-II Scanner (Beginner) - Inspect Wiring and Connectors
Visually inspect the wiring harness from the fuel tank to the chassis. Look for chafing, melted insulation, or rodent damage, particularly at the connector on top of the fuel pump module.
Tools: Flashlight, Inspection Mirror (Beginner) - Perform a Voltage Drop Test on the Ground
Connect a multimeter (DC Volts) between the negative battery terminal and the fuel sender's ground pin. With the key on, the reading must be under 0.1 volts (100mV). Higher readings indicate a bad ground.
Tools: Multimeter (Intermediate) - Test the Sensor Circuit Voltage
Disconnect the sensor and probe the harness-side signal wire. With the ignition on, you should see a steady 5V reference voltage from the PCM. 0V indicates an open wire; 12V indicates a short to battery power.
Tools: Multimeter (Intermediate) - Test Fuel Level Sensor Resistance
Remove the sending unit and connect a multimeter (Ohms) to the sensor pins. Sweep the float arm manually. Resistance must change smoothly (e.g., 40Ω to 250Ω for GM) without dropouts.
Tools: Multimeter, Fuel Tank Lock Ring Tool (Advanced) - Check Fuel Transfer System (Saddle Tanks)
If the sensor tests good, inspect the suction jet pump. A blocked pump leaves the 'B' side full. Verify physical fuel levels in both tank lobes to confirm transfer operation.
Tools: Service Manual, Fuel Transfer Pump (Professional) - Perform a Gauge Sweep Test
Disconnect the fuel sender and ground the signal wire with a jumper. The gauge should sweep to empty. Remove the jumper, and it sweeps to full. This confirms the cluster and wiring to the dash are functional.
Tools: Jumper Wire (Intermediate)
When This Code Triggers (Freeze-Frame Conditions)
- Engine Coolant Temp: 180-200°F (82-93°C) (The engine is fully warmed up and operating in a stable state.)
- RPM: 1500-2500 RPM (The vehicle is driven at a steady cruise, not idling or accelerating hard.)
- Engine Load: 30-60% (Indicates normal power demand during steady driving, allowing the PCM to predict fuel consumption.)
- Vehicle Speed: 40-60 mph (65-97 kph) (Highway or steady suburban driving, where the PCM checks if the fuel level drops as expected over distance.)
Related Codes
- P2066 — Indicates a 'Performance' or rationality issue with the 'B' sensor circuit. P2068 is a hard electrical fault (stuck high), while P2066 is a logic fault where the signal is erratic.
- P2067 — This is the opposite of P2068, indicating the 'B' sensor circuit voltage is too low (short to ground). With P2068, the gauge usually reads full; with P2067, it reads empty.
- P0463 — This is the same 'Circuit High' fault but for the primary ('A') fuel level sensor. Seeing both P2068 and P0463 simultaneously strongly suggests a systemic problem like a blocked fuel transfer system or shared ground fault.
- P0461 — This code indicates a 'Range/Performance' issue with the primary ('A') sensor. If it appears with P2068, it further supports a system-wide problem.
Climate & Environmental Factors
- High Humidity & Road Salt (Cold Climates): These conditions significantly accelerate corrosion of the fuel tank ground strap and electrical connectors. This corrosion adds resistance to the ground circuit, causing the 'Circuit High' voltage reading.
- Extreme Temperatures (Hot or Cold): Extreme temperature cycles cause plastic connectors and wiring insulation to become brittle and crack, leading to intermittent open circuits or shorts.
How to Talk to a Mechanic About This Code
Say this: "I have a P2068 code and my fuel gauge is stuck on full. I'd like to book a diagnostic appointment. Based on my research, the most likely causes are the 'B' sensor, its wiring, the ground, or a fuel transfer issue. Please start by testing the wiring and ground circuit before recommending a new sensor."
This signals you want a proper diagnosis, not just a part replacement. It directs the technician to check the cheaper, common failure points (wiring/ground) first, potentially saving you money.
Avoid saying:
- 'My check engine light is on, can you look at it?' (This is too vague and invites a costly, open-ended diagnostic process.)
- 'Just replace the fuel sending unit.' (This leads to paying for a part you don't need if the actual problem is a bad wire, ground, or clogged transfer pump.)
- 'Just fix whatever's wrong.' (This gives the shop a blank check and leads to upsells.)
Questions to ask before authorizing the repair:
- What was the voltage reading on the 'Fuel Level Sensor B' live data PID?
- Did you perform a voltage drop test on the ground circuit? What was the result? (A good ground must be less than 0.1V).
- If you are recommending a new sensor, have you ruled out a wiring issue and a fuel transfer problem?
- What is the warranty on the recommended parts and labor?
Where to Take It: Dealer vs Independent vs Chain
- Dealer:
A safe, but expensive, choice. Recommended for in-warranty cars or specific known issues on German brands where specialized knowledge is key.
Best for: Vehicles under warranty (powertrain or emissions)., Complex, brand-specific issues (e.g., known VW/Audi sensor problems, GM fuel transfer TSBs)., Repairs requiring proprietary software for programming or diagnostics.
Downsides: Highest labor rates, often 1.5-2x more than independent shops., Defaults to replacing an entire expensive assembly when a smaller component has failed. (Typical cost: +50% vs. baseline) - Independent Shop:
Best fit for most situations. A good independent shop with strong electrical diagnostic skills effectively diagnoses and repairs P2068 at a much lower cost than the dealer.
Best for: Out-of-warranty vehicles where cost is a major factor., Diagnosing and repairing common electrical faults like bad grounds or wiring., Most P2068 cases on common domestic and Asian vehicles.
Downsides: Quality and diagnostic skill vary widely. Vet shops by checking for ASE certifications and online reviews., Lacks access to the very latest manufacturer TSBs or specialized tools for brand-new models. (Typical cost: +0% vs. baseline) - Chain Shop:
AVOID for P2068 diagnosis. The risk of misdiagnosis is high. They correctly identify the code but replace parts without confirming the root cause.
Best for: Simple, routine maintenance like oil changes and brake jobs.
Downsides: Technician skill is inconsistent; lacks deep diagnostic expertise for complex electrical or fuel system issues., Business model pressures technicians towards quick parts replacement over thorough diagnosis., Unwilling to perform repairs that require dropping a fuel tank. (Typical cost: -10% vs. baseline)
When to Walk Away From the Repair
If the estimated repair cost for P2068 exceeds 40-50% of your car's private-party value, seriously consider selling the car as-is or trading it in.
- Car worth $4000, fix is $2000: Walk away. A $2,000 repair on a $4,000 car is 50% of its value. This money is better spent as a down payment on a more reliable vehicle.
- Car worth $15000, fix is $1200: Fix it. The repair cost is only 8% of the vehicle's value. Fixing it preserves the car's value.
- Car worth $2500, fix is $800: Borderline. At 32% of the car's value, it is a tough call. If the rest of the car is in great shape, fixing it is worthwhile. If it has other problems, sell it.
What Scan Tool You Need for This Code
Minimum: A scanner that reads and graphs live data, specifically the Parameter Identification (PID) for 'Fuel Level Sensor B Voltage'.
A basic $20 code reader only tells you the P2068 code exists. It cannot show you the live voltage from the sensor, which is the critical piece of data needed to confirm if the circuit is actually stuck high.
Budget: BlueDriver Pro / OBDeleven / Car Scanner ELM OBD2 App with Bluetooth Dongle (~$60-120) — These Bluetooth scanners pair with a smartphone app to display and graph live data PIDs, including the necessary fuel level sensor voltage. This is sufficient for a DIYer to confirm the 'Circuit High' condition.
Mid-range: Foxwell NT510 Elite / Autel MaxiCOM MK808S (~$150-380) — These handheld scanners offer full system diagnostics, live data graphing, and bidirectional controls. This 'active test' capability commands a gauge sweep test directly from the tool to verify the instrument cluster.
Professional: Autel MaxiPRO MP900BT / Launch X431 Series (~$500-1200) — Provides full OEM-level diagnostics, advanced bidirectional controls, and ECU coding capabilities. These tools access manufacturer-specific PIDs and perform advanced functions like testing fuel pumps directly.
How to Clear the Code After You Fix It
- Use an OBD-II scan tool to clear the P2068 trouble code.
- Reconnect the battery if it was disconnected for the repair.
- Perform a complete drive cycle to allow the vehicle's readiness monitors to run.
Drive cycle (~20 minutes): A generic drive cycle includes: 1) Cold start and idle for 2-3 minutes. 2) Drive in stop-and-go city traffic for 5-10 minutes. 3) Drive at a steady highway speed (55-60 mph) for 5-10 minutes. 4) Allow the vehicle to cool down.
Readiness monitors affected: Fuel System Monitor, Catalyst Monitor, Oxygen (O2) Sensor Monitor
Watch out for:
- Simply clearing the code does not fix the underlying mechanical or electrical problem, and the code returns.
- Attempting an emissions test immediately after clearing the code results in a 'Not Ready' failure.
Will This Fail Emissions / State Inspection?
Yes — this code typically fails an OBD-II emissions inspection.
- California: An active Check Engine Light for P2068 is an automatic failure of the smog check. All readiness monitors must also be in a 'Ready' state to pass.
- New York: The NYVIP3 inspection includes an OBD-II scan. An illuminated MIL due to P2068 causes the vehicle to fail the inspection.
- Texas: In counties requiring an emissions test, an illuminated Check Engine Light is an automatic failure.
Most Commonly Affected Vehicles
- Volkswagen GTI, Golf R, Jetta, Tiguan, Atlas (2015-2022) — Extremely common on MQB platform vehicles with saddle tanks. The 'B' sensor (G169) often fails. On the Atlas, check for rodent damage to wiring under the rear seat before replacing parts.
- Audi A3, S3, Q3, A4 (B9) (2015-2022) — Shares platforms with affected VW models. On newer models like the B9 A4, the 'B' sensor is integrated into the fuel tank and is not separately replaceable.
- Chevrolet / GMC Corvette, Camaro, Trucks and SUVs (2005-2018) — Very common on C6 Corvettes (2005-2013), where the passenger side (RH) sensor fails. GM trucks suffer from blocked fuel transfer jets (TSB #18-NA-365).
- Dodge / Ram / Chrysler Charger, 300, Trucks (2005-2015) — Common on RWD sedans with saddle tanks and trucks with large capacity tanks. Some Chrysler systems use a 12V reference signal for the sensor circuit.
- Ford Mustang, Explorer, F-150 (2004-2014) — Ford vehicles with saddle-style or dual fuel tanks are prone to this issue. Corroded ground straps for the fuel tank are a frequent culprit.
- Cadillac XLR, CTS (2007-2009) — The Cadillac XLR shares its fuel system design with the C6 Corvette and suffers from the same passenger-side fuel level sensor failures.
- Lincoln MKZ (2007-2012) — Reports of this code appearing, sometimes intermittently, often traced to wiring or connector issues.
Manufacturer-Specific Notes
- General Motors (GM): On C6 Corvettes (2005-2013), the resistance of the fuel level sensors reversed starting in the 2007 model year. Installing a sensor from the wrong year range causes incorrect readings.
- Volkswagen / Audi: On some newer Audis (like the B9 A4), the service manual states the sensor is integral to the fuel tank and cannot be replaced separately. Rodent damage to the sender wiring under the rear seat is a known issue on the Atlas.
- Ford: The ground strap for the fuel tank is notoriously prone to corrosion where it attaches to the frame. This high-resistance ground is a primary cause of P2068.
- Chrysler / Dodge: Some Chrysler/Dodge platforms utilize a 12-volt reference signal for the fuel level sensor circuit, unlike the more common 5-volt system. Seeing 12 volts is normal and not necessarily a short to power.
Real Owner Stories
2018 VW Atlas at 65K miles - Gauge Stuck on Full
Check Engine Light came on, and the fuel gauge stuck on full. The distance-to-empty display froze.
What they tried:
- Owner suspected the fuel sending unit and prepared to order VW Part #5Q0919673F.
Outcome: The owner inspected the wiring harness under the rear driver-side seat and found chewed wires with soy-based insulation. They repaired the chewed section with a butt connector and heat shrink tubing for $5. The code cleared and the gauge worked immediately.
Lesson: On modern VWs, always perform a visual inspection of the wiring harness under the rear seats for rodent damage before replacing the fuel sender.
2007 C6 Corvette at 80K miles - Intermittent Gauge Failure
After filling the tank, the fuel gauge read empty and triggered P2068. After 15 minutes of driving, the gauge flickered and read correctly.
What they tried:
- Added multiple bottles of Techron fuel system cleaner, which made no difference.
- Received a quote of $1,200 to replace the passenger-side fuel sending unit.
Outcome: The owner chose to live with the problem rather than pay for the expensive repair, manually clearing the code after each fill-up.
Lesson: Fuel system cleaner rarely fixes a worn or internally failing sensor. The repair is costly due to labor, leading some owners to find workarounds.
2016 VW GTI at 75K miles - DIY Repair Creates New Problem
Car threw a P2068 code, and the fuel gauge stuck. Diagnosis pointed to a failed 'B' sensor.
What they tried:
- Owner purchased and installed a new passenger-side fuel pump assembly, misidentifying it as the 'B' sensor location.
Outcome: The P2068 code remained. Sensor 'B' (G169) on a GTI is the standalone sender on the driver's side, not the passenger side pump assembly. They performed the repair a second time on the correct side.
Lesson: Always verify the exact location of Sensor 'B' using a service manual. Sensor 'A' is usually with the main pump, while Sensor 'B' is a separate unit on the opposite side.
2008 Chevy Trailblazer - Misdiagnosed Transfer Pump Issue
Vehicle had a P2068 code, and the gauge never dropped below 3/8 of a tank, causing the owner to run out of gas.
What they tried:
- A mechanic replaced the 'B' fuel level sensor, but symptoms returned immediately.
Outcome: A second mechanic correctly diagnosed a clogged suction jet pump. The 'B' sensor accurately read 'full' because that side of the tank was always full. Cleaning the transfer pump resolved the issue.
Lesson: If P2068 is accompanied by running out of fuel while the gauge shows a significant level, suspect a fuel transfer issue before replacing the sensor.
How to Prevent This Code From Triggering
- Use Top Tier certified gasoline or a fuel system cleaner (Consistently or every few thousand miles) — High-quality detergents prevent the buildup of sulfur contaminants on the fuel sender's resistor card.
- Protect wiring with rodent-repellent tape or spray (Once, or as needed if signs of rodents appear) — Many modern cars use soy-based wire insulation that attracts rodents. Wrapping accessible fuel pump wiring with capsaicin-treated tape makes the wiring unpalatable.
- Inspect and clean fuel tank ground connections (During underbody service, especially in rust-belt regions) — The ground strap from the fuel tank to the chassis is exposed to road salt. Cleaning corrosion prevents the high-resistance ground path that causes P2068.
- Avoid consistently running the fuel tank near empty (Daily driving habit) — The fuel pump and sending unit are submerged in gasoline, which acts as a coolant. Consistently running the tank low causes the components to overheat and shortens their lifespan.
Frequently Asked Questions
What does the 'B' in P2068 mean?
The 'B' refers to the secondary fuel level sensor. Vehicles with all-wheel-drive or large capacities have specially shaped 'saddle' tanks with two sensors ('A' and 'B') to get an accurate reading across both sections.
What is a common misdiagnosis for P2068?
A common mistake is replacing the wrong fuel level sensor without verifying which one is 'B' in the service manual. Another pitfall is replacing the sensor when the actual problem is a blocked fuel transfer tube between the two halves of a saddle tank.
Can I replace just the sensor or do I need the whole fuel pump assembly?
It depends on the vehicle. On many VW and GM models, the 'B' sensor is a separate, standalone unit. On other vehicles, it is integrated into the main fuel pump module and must be replaced as a complete assembly.
Will a fuel additive like Techron fix P2068?
It is possible, but unlikely to be a permanent fix. If the issue is caused by sulfur contaminants on the sensor's resistor contacts, a high-quality fuel system cleaner cleans it temporarily. It will not fix a broken wire, bad ground, or internally failed sensor.
Why did the code appear right after I filled up my gas tank?
The problem already existed, but the PCM's logic to trigger the code was finally met. The PCM expects to see the fuel level voltage drop after a certain amount of driving. If the 'B' sensor is stuck sending a 'full' signal, the PCM sets the code.
What is a suction jet pump and how does it relate to P2068?
A suction jet pump uses flow from the main electric fuel pump to pull fuel from the secondary side of a saddle tank to the primary side. If it clogs, fuel gets trapped on the secondary side, causing the 'B' sensor to read full and triggering P2068.
Is there a recall for the P2068 code?
There are no widespread safety recalls for this specific issue. However, manufacturers like GM and VW have issued numerous Technical Service Bulletins (TSBs) providing updated diagnostic procedures for known problems.
Key Takeaways
- P2068 triggers when the secondary ('B') fuel level sensor sends a voltage signal above 4.5V, causing the fuel gauge to stick on 'full'.
- Manually track your mileage immediately; running a direct-injection engine dry causes up to $2,500 in damage to the high-pressure fuel pump.
- Before buying a $200 replacement sensor, perform a voltage drop test on the ground circuit to ensure resistance is below 0.1V (100mV).
- On saddle-tank vehicles like VW, Audi, and GM, a clogged suction jet pump traps fuel on the 'B' side, physically mimicking a failed sensor.
Helpful Videos


Shop the Parts Behind P2068
Below are the parts most often responsible for code P2068, ranked by how frequently each one is the actual culprit (per the diagnosis above). Tap any to see what we have for your vehicle.


The information in this article is provided for general reference and educational purposes only. Vehicle specifications, procedures, and part compatibility can vary by production date, trim level, and region. Always consult your vehicle's factory service manual and verify part numbers before purchasing or performing repairs. Safety-critical components such as airbags, seat belts, and braking systems should be installed by a qualified professional.
- 🧭 Diagnostic Flowchart
- 🎬 Helpful Videos
- 🛍️ Shop This Part
- What Does P2068 Mean?
- Can I Drive With P2068?
- Common Causes
- Symptoms
- Common Fixes & Costs
- Used vs. New Parts: Buying Guide
- What Happens If You Wait — Timeline
- Cost of Not Fixing It
- Diagnosis Steps
- When This Code Triggers (Freeze-Frame Conditions)
- Related Codes
- Climate & Environmental Factors
- How to Talk to a Mechanic About This Code
- Where to Take It: Dealer vs Independent vs Chain
- When to Walk Away From the Repair
- What Scan Tool You Need for This Code
- How to Clear the Code After You Fix It
- Will This Fail Emissions / State Inspection?
- Most Commonly Affected Vehicles
- Manufacturer-Specific Notes
- Real Owner Stories
- 2018 VW Atlas at 65K miles - Gauge Stuck on Full
- 2007 C6 Corvette at 80K miles - Intermittent Gauge Failure
- 2016 VW GTI at 75K miles - DIY Repair Creates New Problem
- 2008 Chevy Trailblazer - Misdiagnosed Transfer Pump Issue
- How to Prevent This Code From Triggering
- Frequently Asked Questions
- What does the 'B' in P2068 mean?
- What is a common misdiagnosis for P2068?
- Can I replace just the sensor or do I need the whole fuel pump assembly?
- Will a fuel additive like Techron fix P2068?
- Why did the code appear right after I filled up my gas tank?
- What is a suction jet pump and how does it relate to P2068?
- Is there a recall for the P2068 code?
- Key Takeaways
- 🎟️ Get 5% Off