
P2119 on 2016-2018 Chevrolet Volt: A Code You Might Not Need to Fix
On a 2016-2018 Chevy Volt, code P2119 is a known issue documented by GM. It typically sets without a check engine light or any symptoms. The official advice is to clear the code and not replace the throttle body if no other problems are present.
- P2119 on a 2016-2018 Chevy Volt is different from other cars; it's a known 'ghost' code per GM.
- Do not expect a check engine light or any driving problems from this code on a Volt when it appears alone.
- The official fix, per GM TSB #PIP5513, is to simply clear the code if it appears by itself.
- Do NOT replace the throttle body for a standalone P2119 code, as this is a common misdiagnosis. Replacement is only warranted if other codes and symptoms are present.
What's Unique About the 2016-2018 Chevrolet VOLT
For the 2016-2018 Chevrolet Volt, General Motors issued a Technical Service Bulletin, #PIP5513, specifically about P2119. This bulletin clarifies that P2119 is a 'Type C' code, which by design will not illuminate the Malfunction Indicator Lamp (MIL) or trigger a reduced engine power mode when it sets by itself. It is considered a 'ghost' code or diagnostic anomaly in this context, and GM explicitly advises technicians *not* to replace the throttle body based on this code alone.
Diagnostic Flowchart
Tap your situation to follow the diagnostic path that matches what you're seeing on this vehicle.
Symptoms You May Notice
- No Check Engine Light (MIL)
- No noticeable symptoms or drivability issues (as per TSB #PIP5513).
- No reduced engine power mode.
- Replacing the throttle body. The official GM Technical Service Bulletin for the Volt explicitly advises against replacing the throttle body for a solitary P2119 code.
Most Likely Causes
- Diagnostic Anomaly / Software Condition 🔴 High Probability The manufacturer issued a specific TSB (#PIP5513) acknowledging the code sets without a true fault, indicating a known software or diagnostic sensitivity unique to this platform. The bulletin classifies it as a Type C code that does not affect vehicle operation.
How to confirm: Scan the vehicle for codes. If P2119 is the only code present and there are no symptoms (no check engine light, no reduced power), this is the likely cause.
Typical fix: Clear the diagnostic trouble code with a scan tool. No parts replacement is necessary.
Est. part cost: $0
Rare But Worth Checking
- True Throttle Body Fault: → Shop Fuel Injection Throttle Body
Diagnosis Steps
- Use an OBD-II scanner to check for stored trouble codes.
- Confirm if P2119 is the only code present.
- Note the absence of a check engine light and any drivability symptoms (like reduced power or rough idle).
- If P2119 is present alone and there are no symptoms, this matches the condition described in TSB #PIP5513.
- Clear the code using the scan tool. No further action is required.
- If other throttle-related codes are present, or if there are actual symptoms like a lit MIL or reduced power, follow the diagnostic steps for those codes first.
- As a final check for a suspected real fault, TSB #PIP5513 advises a physical inspection: with the engine off, manually open the throttle plate and release it. It should snap back to a neutral position of about 30 degrees. If it fails to return, it indicates a mechanical failure like a broken spring, justifying replacement.
Parts You'll Likely Need
- None
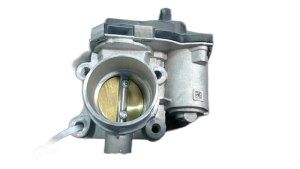
- Throttle Body Assembly (with Sensor)
Related Codes That Often Appear With This One
- P2135: If seen with P2119, this points towards a more legitimate throttle body or sensor correlation issue, rather than the ghost code anomaly.
Technical Service Bulletins (TSBs) & Recalls
- PIP5513: 'Diagnostic Tip For Malfunction Indicator Lamp (MIL) Illuminated With DTC P2119 Set Current Or History'. Published 08/21/2017. Advises that P2119 alone will not cause symptoms and the throttle body should not be replaced unless other codes or symptoms point to it as the cause of failure.
Platform-Specific Known Issues
- TSB #PIP5513 (published 08/21/2017) is the key document for this issue. It states that P2119 is a Type C code that will not illuminate the MIL or cause reduced engine power on its own. It explicitly warns against replacing the throttle body for this code alone.
Mechanic-Grade Diagnostic Values
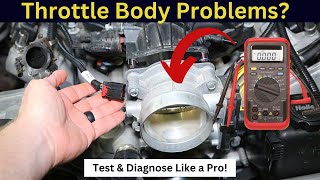
- Throttle Actuator Control (TAC) Motor Resistance — expected: ~1-2 Ohms. Failure: High resistance (e.g., 20-30 Ohms or higher) indicates contamination or failure of the internal motor.
- Throttle Position Sensor (TPS) 1 Resistance — expected: Approx. 1.2 kOhms (throttle closed) to 2.0 kOhms (throttle wide open). Resistance should change smoothly with no gaps when sweeping the throttle plate.. Failure: Values are significantly out of range, or a multimeter shows jumps/gaps in resistance as the throttle is moved.
- Throttle Position Sensor (TPS) 2 Resistance — expected: Approx. 2.7 kOhms (throttle closed) to 2.0 kOhms (throttle wide open). Resistance should change smoothly. Note the inverse sweep compared to TPS1.. Failure: Values are significantly out of range, or a multimeter shows jumps/gaps in resistance as the throttle is moved.
- Throttle Position Sensor (TPS) Voltage — expected: Above 0.35V at all times.. Failure: Voltage drops below 0.35V when the throttle plate is moved through its range by hand, indicating a dead spot.
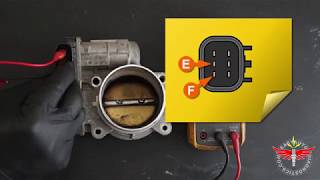
- 5-Volt Reference Circuit — expected: 5.0 Volts. Failure: Voltage is low or absent, indicating a wiring or ECM issue. The 5V reference is typically a gray wire on GM vehicles. 🎬 See how to test the electronic throttle body on GM vehicles.
Scan Tool Commands That Help
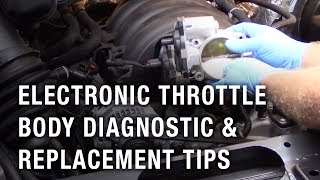
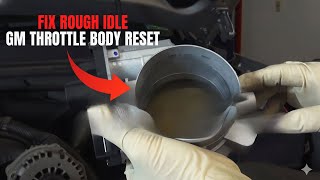
- GDS2 (or other professional scan tool): Throttle/Idle Learn Procedure — Required after cleaning or replacing the throttle body to allow the ECM to recalibrate the closed throttle position and idle airflow. Failure to perform this can cause idle issues. 🎬 Watch: How to manually reset and relearn your GM throttle body.
- GDS2 (or other professional scan tool): Actuator Test Command / Output Control — To verify if the throttle actuator motor is responding to ECM commands. The technician can command the throttle to open to specific percentages and observe if the actual position matches, helping to isolate a faulty motor or binding plate.
Wiring & Ground Locations
- G103 — Typically located on the cowl in the engine compartment, often above the brake booster.. This is a common grounding point for the Body Control Module (BCM) and Data Link Connector (DLC). A poor ground here can cause a wide range of communication and sensor issues.
- G105 / G106 — Typically located on the inner fenders in the engine compartment, near control modules or the air cleaner assembly.. These are splice packs that ground multiple engine compartment components. A corroded ground at these locations can cause erratic behavior from various sensors and actuators, including those related to the engine control system.
- ECM Ground — Directly on the engine block or cylinder head.. The Engine Control Module (ECM) must have a solid ground reference to the engine block. A poor or corroded engine ground strap can create voltage differentials that lead to incorrect sensor readings and false codes.
Real Owner Repair Stories
- YouTube user comment on a throttle body diagnostic video (2006 Volvo S40 T5 (uses a similar Bosch electronic throttle body)) — Multiple codes including P2281 (Air Leak) and random misfires (P0300 series).
❌ Tried (didn't work) Replacing spark plugs, coils, injectors, VVT solenoids, and camshaft position sensors., Cleaning the throttle body and MAF sensor.
✅ What actually fixed it The owner disassembled the throttle body and tested the actuator motor's resistance, finding it was high (28-35 Ohms). The cause was carbon buildup on the motor's internal commutator. After cleaning the commutator with spray and a fine abrasive to restore shiny copper, the motor resistance dropped to ~1 Ohm and all fault codes were resolved. - YouTube user comment (Unspecified vehicle with electronic throttle control) — Reduced power and code P2135 (Throttle/Pedal Position Sensor/Switch A/B Voltage Correlation).
❌ Tried (didn't work) Clearing the code, which would return immediately upon pressing the gas pedal.
✅ What actually fixed it The owner disconnected the negative battery terminal, then unplugged the electrical connectors at both the Accelerator Pedal Position (APP) sensor and the Throttle Position Sensor (TPS). The pins and connectors were thoroughly cleaned with electronic contact cleaner and a Q-tip. After letting them dry and reconnecting everything, the code was cleared and did not return.
OEM Part Supersession History
12651346→12673013— Undocumented, but part revisions are typically for reliability improvements or manufacturing process changes.12673013→12704594— Undocumented, but part revisions are typically for reliability improvements or manufacturing process changes.
Helpful Videos
Used OEM Parts in Stock
New Aftermarket Parts Available


The information in this article is provided for general reference and educational purposes only. Vehicle specifications, procedures, and part compatibility can vary by production date, trim level, and region. Always consult your vehicle's factory service manual and verify part numbers before purchasing or performing repairs. Safety-critical components such as airbags, seat belts, and braking systems should be installed by a qualified professional.
- Chevrolet VOLT:
- 🧭 Diagnostic Flowchart
- 🎬 Helpful Videos
- 🛍️ Shop This Part
- What's Unique About the 2016-2018 Chevrolet VOLT
- Symptoms You May Notice
- Most Likely Causes
- Rare But Worth Checking
- Diagnosis Steps
- Parts You'll Likely Need
- Related Codes That Often Appear With This One
- Technical Service Bulletins (TSBs) & Recalls
- Platform-Specific Known Issues
- Mechanic-Grade Diagnostic Values
- Scan Tool Commands That Help
- Wiring & Ground Locations
- Real Owner Repair Stories
- OEM Part Supersession History
- 🎟️ Get 5% Off