
OBD-II Code P2157: Fuel Injector Group 'D' Supply Voltage Circuit High
What P2157 means, why it triggers, and how to fix it
- Code P2157 indicates a high-voltage short circuit in the power supply for a specific group of fuel injectors, disabling those cylinders.
- A chafed engine wiring harness causes over 70% of P2157 codes, followed by corroded connectors and internally shorted fuel injectors.
- Expect an immediate 15-30% drop in fuel economy, severe engine shaking, and a flashing check engine light due to active misfires.
- Stop driving immediately; raw fuel from the dead cylinders melts your catalytic converter within 100 miles, adding $2,000+ to your repair bill.
What Does P2157 Mean?
Your car's Powertrain Control Module (PCM) detected the voltage in the electrical circuit for fuel injector 'Group D' exceeds the manufacturer's limit. The PCM disables these injectors to prevent component damage. This starves at least one cylinder of fuel, causing a severe engine misfire.
Technical definition: The SAE/OBD-II definition is "Fuel Injector Group 'D' Supply Voltage Circuit High". The PCM energizes an injector by grounding its control circuit. If the PCM detects high voltage on this circuit when the injector should be off, it triggers P2157.
Can I Drive With P2157?
No, recommended Driving is not recommended. The vehicle runs poorly, and continued operation dumps raw fuel into the exhaust. This rapidly overheats and destroys the catalytic converter. A catalytic converter failure turns a $300 injector circuit repair into a $2,500+ job. If driving is absolutely necessary, limit it to the shortest possible distance at low speeds.
Common Causes
- Damaged or Chafed Wiring Harness (Very Common) — This is the primary cause. The engine wiring harness rubs against brackets or the chassis, wearing away insulation. This creates a 'short to voltage' where the injector control wire touches a live power wire, sending a constant high-voltage signal.
- Corroded or Damaged Electrical Connector (Common) — Connectors are exposed to extreme heat and vibration. Water intrusion or fretting (micro-vibrations) creates poor connections, leading to high resistance, voltage spikes, or bridged terminals.
- Faulty Fuel Injector (Common) — An internal short circuit within the injector's electromagnetic coil windings causes a high voltage reading.
- Blown Fuse or Faulty Relay (Less Common) — A blown injector fuse usually indicates an underlying short circuit that must be located and repaired.
- Poor Electrical Ground (Rare) — A loose or corroded engine block ground forces circuits to find alternative paths, resulting in unexpected high voltage readings.
- Faulty Powertrain Control Module (PCM) (Rare) — The internal driver circuit for the injector group fails. Suspect this only after exhaustively testing all wiring and components.
Symptoms
- Drastically Reduced Fuel Economy — The engine runs inefficiently, causing the vehicle to consume significantly more fuel than normal.
- Strong Fuel Smell — The underlying short disrupts the air/fuel mixture, pushing unburned gasoline into the exhaust.
- Engine Stalling — When multiple injectors in a group disable, the engine stalls completely at low speeds.
- Flashing or Solid Check Engine Light (also visible on scanner) — A solid light indicates a fault. A flashing light warns of a severe, active misfire actively damaging the catalytic converter.
- Rough and Shaky Engine Idle (also visible on scanner) — With cylinders starved of fuel, the engine becomes unbalanced and shakes violently, especially at stops.
- Engine Misfires and Severe Loss of Power (also visible on scanner) — The car feels sluggish, weak, and stumbles upon acceleration. Reaching highway speeds becomes impossible.
Diagnostic Flowchart
Tap your situation to follow the diagnostic path that matches what you're seeing on this code.
Common Fixes & Costs
- Repairing Damaged Wiring Harness — Parts: $10-$50, Labor: $150-$500, ~1.5-4.0 hr book time (Intermediate)
- Replacing a Corroded Connector Pigtail — Parts: $15-$40, Labor: $80-$200, ~0.8-1.5 hr book time (DIY)
- Replacing a Faulty Fuel Injector — Parts: $50-$350, Labor: $150-$800, ~1.5-4.0 hr book time (Intermediate)
- Replacing a Blown Fuse and Repairing the Underlying Short — Parts: $1-$10, Labor: $100-$400, ~1.0-3.0 hr book time (Intermediate)
- Replacing the Powertrain Control Module (PCM) — Parts: $800-$2000, Labor: $150-$300, ~1.0-1.5 hr book time (Professional)
Used vs. New Parts: Buying Guide
When a used part is worth it: For out-of-warranty vehicles where budget is a primary concern, a quality remanufactured injector from a reputable supplier offers the best balance of cost and reliability. 'Used' salvage yard injectors are a high-risk gamble.
Donor-vehicle mileage cap: roughly under 80000 miles for the part to have meaningful remaining life.
Donor quality checklist:
- Choose 'remanufactured' over 'used' or 'refurbished'. Remanufactured injectors are disassembled, cleaned, and have wear items replaced.
- Ensure the supplier provides a flow-testing report to confirm the injector performs to OEM specs.
- Match the part number exactly. Do not rely on visual similarity.
Decision logic:
- If Vehicle is under factory powertrain warranty → Buy new OEM to avoid warranty claim denial.
- If Vehicle is > 100K miles and out of warranty → A quality remanufactured injector with a warranty is a smart, cost-effective choice.
- If The cost of a new OEM injector is less than $100 → Buy new; the savings from a remanufactured part are minimal and not worth the risk.
Warranty tradeoff: Used/salvage parts typically have a 30-90 day warranty. Quality remanufactured injectors often come with a 1-year to limited lifetime warranty. New OEM injectors are backed by the manufacturer's parts warranty (typically 12 months).
Worst-case if a used part fails: $250-800 if a non-new part fails after installation, requiring repeat labor costs plus the price of another injector.
What Happens If You Wait — Timeline
- 0-1 week (0-100 miles): Code P2157 sets, Check Engine Light is on (may be flashing). Engine runs rough, shakes, and has significantly reduced power. Vehicle stalls at low speeds. (MPG impact: 15-30%% · Added cost: $0)
- 1-4 weeks (100-250 miles): Unburned fuel from the dead cylinder continuously enters the hot catalytic converter, causing its internal temperature to skyrocket. The precious metal substrate begins to melt. (MPG impact: 20-35%% · Added cost: $50-100 in wasted fuel. The damage is now becoming irreversible.)
- 1-3 months (250-500 miles): The catalytic converter substrate melts and sinters, forming a partial blockage in the exhaust. The car struggles to exceed 40-50 mph. The converter is permanently damaged. (MPG impact: 30-50%% · Added cost: $1,200 - $2,800 (The original injector/wiring repair PLUS a new catalytic converter).)
- 3+ months (500+ miles): Complete catalytic converter meltdown. The substrate breaks apart, creating a major exhaust blockage. This creates extreme backpressure, causing engine overheating and damaging downstream oxygen sensors. (MPG impact: >50%% · Added cost: $2,000 - $4,500+ (The initial repair, a new catalytic converter, new O2 sensors, and possible engine damage).)
Cost of Not Fixing It
- Immediate (0-100 miles): Severe engine misfire, poor performance, and a 15-30% drop in fuel economy. Vehicle stalls unexpectedly. (Added cost: Negligible)
- Short-Term (100-500 miles): Raw fuel from the dead cylinder overheats the catalytic converter, causing irreversible damage to the internal substrate. (Added cost: $1,200 - $2,800)
- Long-Term (500+ miles): Complete catalytic converter failure leads to a blocked exhaust, engine overheating, and damage to downstream oxygen sensors. (Added cost: $2,000 - $4,500+)
Diagnosis Steps
- Read Codes and Review Freeze Frame Data
Using an OBD-II scanner, confirm P2157 is present. Freeze frame data shows sensor values at the exact moment the fault occurred. Look for related codes like P030X (e.g., P0304 for Cylinder 4 misfire) or P020X (e.g., P0204 for Cylinder 4 injector circuit malfunction) to identify the specific cylinder at fault.
Tools: OBD-II Scanner (Beginner) - Perform a Detailed Visual Inspection
Inspect the engine wiring harness for the affected injector group. Look for wires rubbing against brackets, melted plastic conduit, or rodent damage. Disconnect the injector connector and inspect for green corrosion, bent pins, or black dust (fretting).
Tools: Flashlight, Inspection Mirror (Beginner) - Pro Tip: The Harness Wiggle Test
With the engine running, carefully wiggle sections of the engine wiring harness leading to the suspect injector. If the misfire changes or the engine stumbles, you pinpointed the exact location of the short or break in the wiring.
Tools: Heavy-duty Gloves, Safety Glasses (Intermediate) - Check the Injector Fuse
Locate the fuse for the fuel injectors in the fuse box. Pull the relevant fuse and visually inspect it. A blown fuse confirms a short circuit exists in the system.
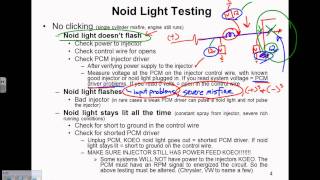
Tools: Fuse puller or needle-nose pliers (Beginner) - Test the Injector Circuit with a Noid Light
Disconnect the suspect injector and plug in a noid light. Start the engine. A healthy circuit flashes rapidly. For P2157, the light often stays ON SOLID, confirming a constant voltage supply and a short to voltage.
Tools: Noid Light Set (Intermediate) - Test for Short to Voltage with a Multimeter
Disconnect the injector and the PCM. Set your multimeter to DC Volts. Connect the black lead to the negative battery terminal. With the ignition ON, probe the injector control wire terminal at the injector connector. A reading of 12V confirms the control wire is shorted to a power source in the harness.
Tools: Digital Multimeter, Vehicle Wiring Diagram (Advanced) - Test Fuel Injector Resistance
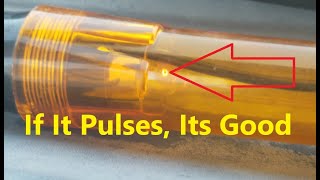
Unplug the suspect fuel injector and set a multimeter to Ohms (Ω). Measure the resistance between the two terminals on the injector. Compare this to the manufacturer's specification (typically 11-18 Ohms for port injection, 2-5 Ohms for low-impedance). A reading near 0.0 Ohms confirms an internal short, requiring replacement.
Tools: Digital Multimeter, Service Manual (Intermediate) - Advanced Waveform Analysis
Connect an oscilloscope to the injector's control circuit. A healthy waveform shows a steady line at battery voltage, a sharp drop to near-zero, followed by a large inductive spike over 60V. A 'short to voltage' shows constant voltage. A shorted injector shows a weak or non-existent inductive spike.
Tools: Automotive Oscilloscope (Professional)
When This Code Triggers (Freeze-Frame Conditions)
- Engine Coolant Temp: 170-230°F (Sets when the engine is fully warmed up and in closed-loop operation.)
- RPM: 1500-2500 (Occurs during steady-state driving or light cruise, rarely during heavy acceleration.)
- Engine Load: 25-60% (Associated with moderate engine load consistent with maintaining speed on a level road.)
- Vehicle Speed: 45-65 mph (Registers at steady highway or city cruising speeds.)
Related Codes
- P2156 — This is the direct opposite: 'Fuel Injector Group D Supply Voltage Circuit Low'. P2157 points to a short to voltage, while P2156 suggests a short to ground or an open circuit (broken wire).
- P0204 — This code means 'Cylinder 4 Injector Circuit Malfunction'. P0204 confirms the fault is specific to that cylinder's injector circuit, while P2157 points to the shared power supply. Seeing both strongly suggests a wiring or injector issue at that specific cylinder.
- P0304 — This code indicates 'Cylinder 4 Misfire Detected'. P2157 tells you why the injector isn't working (an electrical fault), while P0304 tells you the result (a misfire). You almost always have a misfire code with P2157.
- P2146, P2149, P2152 — These are identical codes for different injector groups (A, B, C). Seeing multiple group voltage codes simultaneously points towards a broader issue like a failing PCM or a major harness problem.
Climate & Environmental Factors
- Extreme Temperatures (Hot and Cold): Temperature extremes accelerate the aging of plastic wiring insulation and connectors, making them brittle. Engine vibration causes this hardened insulation to crack, leading to shorts.
- Humidity and Moisture: In humid climates, water intrusion into connectors bridges electrical pins, causing shorts. Moisture accelerates corrosion on terminals, impeding connectivity and causing voltage irregularities.
- Road Salt (Winter Climates): Salt spray coats wiring and connectors. Salt is highly corrosive and dramatically accelerates the degradation of electrical connections, leading to a higher incidence of P2157.
How to Talk to a Mechanic About This Code
Say this: "I have an engine code P2157 for 'Injector Group D Circuit High,' a rough idle, and a flashing check engine light. I suspect an electrical issue like a wiring short or a faulty injector. I'd like to schedule a diagnostic appointment to trace and confirm the circuit fault."
This language shows you've done your research. It directs the technician to perform electrical diagnostics rather than guessing and replacing expensive parts. It establishes you as an informed customer.
Avoid saying:
- 'My check engine light is on, can you just fix it?'
- 'The internet says to replace the injector, can you give me a price for that?'
- 'Just do whatever you think is necessary.'
Questions to ask before authorizing the repair:
- Did you find a definitive short-to-voltage in the wiring, or did the injector itself test bad? Can you show me?
- If you are recommending a wiring repair, how will you protect the harness to prevent this from happening again?
- Before I authorize a PCM replacement, can you show me the tests that conclusively ruled out all wiring, connector, and injector faults?
- What is the warranty on your diagnostic labor and the recommended repair?
Where to Take It: Dealer vs Independent vs Chain
- Dealer:
A strong choice if the vehicle is under warranty or has a known TSB. For out-of-warranty vehicles, it's a costly but generally reliable option for a difficult diagnosis.
Best for: Vehicles still under powertrain warranty., Known manufacturer-specific issues covered by a TSB (like on modern GM trucks)., Complex electrical issues where factory-specific tools and diagrams are a major advantage.
Downsides: Highest labor rates, often 1.5x to 2x more than an independent shop., May favor replacing an entire wiring harness over repairing a single wire. (Typical cost: +50% vs. baseline) - Independent Shop:
The best fit for most owners. An experienced independent technician traces a wiring short or tests an injector just as effectively as a dealer, but at a much lower cost. Find a shop that specializes in diagnostics.
Best for: Out-of-warranty vehicles where cost is a factor., Shops with a reputation for strong electrical and diagnostic skills (look for ASE certifications).
Downsides: Diagnostic skill varies greatly from shop to shop; vetting is crucial., May have less experience with brand-new models or highly specific manufacturer quirks. (Typical cost: +0% vs. baseline) - Chain Shop:
AVOID for this code. P2157 requires true diagnostic skill to avoid replacing unnecessary parts. This is not a job for a quick-lube or tire chain.
Best for: Simple, high-volume jobs like oil changes, tires, and brakes.
Downsides: Technician skill and experience with complex electrical diagnostics are limited., Business model pressures technicians to replace parts rather than perform time-consuming diagnostics, leading to misdiagnosis. (Typical cost: -10% vs. baseline)
When to Walk Away From the Repair
If the total estimated repair cost exceeds 50% of the car's private-party value, seriously consider selling or trading it in. For older, high-mileage cars, lower this threshold to 40%.
- Car worth $5000, fix is $750: Fix it. The repair cost is only 15% of the car's value and is a smart investment in its reliability.
- Car worth $3000, fix is $1800: Walk away. The repair cost is 60% of the car's value. Put that money towards a more reliable vehicle.
- Car worth $4000, fix is $3500: Definitely walk away. This scenario implies the initial fault was ignored, leading to catalytic converter failure. The repair cost is nearly 90% of the car's value.
What Scan Tool You Need for This Code
Minimum: A scanner that reads and clears codes, and critically, shows both Freeze Frame data and Live Data streams.
A $20 reader only gives you the code 'P2157.' It cannot show you the engine conditions when the code set (Freeze Frame) or display live voltage readings to help you perform a 'wiggle test,' making diagnosis a guessing game.
Budget: BlueDriver Pro Scan Tool (~$99) — Connects to your phone via Bluetooth and provides a great interface for viewing live data (to find intermittent shorts) and freeze frame data. It also provides repair reports based on a professional database.
Mid-range: Foxwell NT510 Elite (~$180) — This handheld unit offers manufacturer-specific diagnostics for one free brand. It accesses deeper systems and performs basic bi-directional tests, helpful in confirming if the PCM is trying to control the injector.
Professional: Autel MaxiCOM MK808S/MK808BT (~$400-550) — Provides full bi-directional control, allowing you to command the injector to buzz or click to test its function directly from the scanner. This is the closest a DIYer gets to a professional-grade tool for definitive testing.
Rent vs buy: Most auto parts stores read your code for free, but they won't let you take the scanner. For P2157, since diagnosis involves testing (like the wiggle test), you need the scanner with you. Buying a budget pick like BlueDriver is a smart investment.
How to Clear the Code After You Fix It
- Reconnect battery (if disconnected for repair)
- Use an OBD-II scan tool to clear all diagnostic trouble codes
- Perform a complete OBD-II drive cycle to allow readiness monitors to run
Drive cycle (~20 minutes): A generic drive cycle includes a cold start (engine sitting for 8+ hours), a 2-3 minute idle, 10-15 minutes of steady highway driving (55-60 mph), a 5-minute period of stop-and-go city driving, and a cool-down period.
Readiness monitors affected: Catalyst (CAT) Monitor, Oxygen (O2) Sensor Monitor, Oxygen Sensor Heater Monitor
Before emissions retest: drive at least 50 miles to fully set monitors.
Watch out for:
- Clearing the code without fixing the underlying short causes the code to return immediately.
- Disconnecting the battery erases all readiness monitor data, forcing you to complete a new drive cycle from scratch.
- Not driving long enough or at steady enough speeds prevents the Catalyst monitor from running.
Will This Fail Emissions / State Inspection?
Yes — this code typically fails an OBD-II emissions inspection.
- California: A Check Engine Light results in an automatic smog check failure. All readiness monitors must be complete before a test can be passed.
- New York: An illuminated Check Engine Light is an automatic failure. For vehicles 2001 and newer, only one readiness monitor is allowed to be 'Not Ready'.
- Texas: In the 17 counties requiring emissions testing, an illuminated Check Engine Light causes the vehicle to fail the OBD inspection.
Most Commonly Affected Vehicles
- Chevrolet / GMC Silverado, Sierra, Suburban, Tahoe (2019-2023) — A well-known issue covered by TSB 21-NA-149 involves the engine wiring harness chafing against a sharp edge on the ECM/TCM bracket or the shock tower. This wears through insulation and causes a short to voltage.
- Ford F-150 (2005-2008) — On the 4.6L and 5.4L V8 engines, 'Group D' often corresponds to the rear passenger-side injector, Cylinder 4. This injector is difficult to access near the firewall.
- Fiat 500 (2008-2015) — Highly susceptible to wiring problems. A single compromised wire in the main loom near the ECU causes faults for all injectors and ignition coils at once. Numerous recalls exist for wiring chafing issues.
- Dodge / Ram Ram 1500 (2007-2012) — Issues trace to the main wiring harness or the Totally Integrated Power Module (TIPM), a combined fuse box and control module that is a known failure point for electrical problems.
- Chevrolet Equinox (2010-2017) — Service manuals provide detailed diagnostic charts for P2157, indicating a known potential code. The issue relates to shorts in the high voltage supply or control circuits.
- Subaru Various Models (2008-2018) — Testing injector resistance (spec is often 11-13 ohms) is a common and critical diagnostic step on these engines to rule out internal shorts.
- Volkswagen Various Models (2009-2015) — Diagnosis follows standard procedures of checking the wiring, connectors, and injectors for the specified group, particularly on 2.0T engines prone to harness heat damage.
- Kia / Hyundai Various Models (2011-2016) — The diagnostic approach focuses on electrical circuit integrity before condemning the GDI injector or PCM.
Manufacturer-Specific Notes
- General Motors (Chevrolet/GMC): On modern GM trucks and SUVs, the engine wiring harness rubs against brackets near the engine computer or on the shock tower, causing wires to chafe and short out. This is detailed in TSB 21-NA-149.
- Fiat / Dodge / Ram: On the Fiat 500, a single faulty power feed wire knocks out all injectors and coils. On Dodge/Ram trucks, the Totally Integrated Power Module (TIPM) is a known failure point causing bizarre electrical faults.
- Ford: On Ford V8 engines, the rearmost cylinders (like 4 and 8) are the most common culprits for injector circuit faults because the wiring is in a tighter, hotter spot.
- General Motors (All Brands): Per TSB 20-NA-098, GM uses flow-rated injectors (nominal, low, or high flow) within the same engine. When replacing an injector, the specific part number on the old injector body must be used to order the correct replacement.
Real Owner Stories
2019 Chevy Silverado 5.3L at 75,000 miles
Check Engine Light came on, truck went into limp mode with rough idle. Codes P2157 and P0300 (random misfire) were present.
What they tried:
- Owner first suspected a bad fuel injector and was about to order one.
Outcome: After finding TSB 21-NA-149 online, the owner inspected the wiring harness near the driver-side shock tower and found a spot where the loom rubbed through against a bracket. Repaired the two chafed wires and wrapped the harness with protective tape. Cleared codes, and the problem was solved for under $20 in materials.
Lesson: Always check for Technical Service Bulletins (TSBs) related to your specific vehicle. For modern GM trucks, wiring harness chafing is a primary suspect and must be inspected before replacing parts.
2013 Fiat 500 Abarth at 110,000 miles
Car suddenly started running extremely rough, flashing CEL, and stalled. Codes for P2157 and multiple injector circuit faults (P0201, P0202, etc.) were stored.
What they tried:
- Shop A diagnosed a bad PCM and quoted $1800 for replacement and programming.
- Shop B suspected injector failure and wanted to replace all four injectors for $950.
Outcome: Owner took it to a third shop specializing in European cars. The technician found a single corroded power supply wire in the main engine harness near the firewall. The corrosion created high resistance and voltage fluctuations, triggering faults for the entire injector group. A wiring repair fixed the issue for $350.
Lesson: Multiple, simultaneous circuit codes point to a single power or ground wire issue rather than multiple component failures. A high quote for a PCM warrants a second opinion focused on wiring diagnostics.
2006 Dodge Ram 1500 5.7L at 150,000 miles
Intermittent rough idle and P2157 code that only appeared in hot weather or after long drives. The truck ran fine when cold.
What they tried:
- Replaced the fuel injector for the corresponding cylinder, but the code returned.
- Performed a 'wiggle test' on the wiring harness but couldn't replicate the fault consistently.
Outcome: The owner measured the resistance of the suspect fuel injector when the engine was cold, and it was within spec (12 ohms). He checked it again immediately after a long drive when the problem occurred. The hot injector measured only 4 ohms, indicating an internal short that only manifested when heat-soaked. Replacing the injector a second time with a quality OEM part permanently solved the problem.
Lesson: Temperature affects failing electronic components. If a fault is intermittent, test the suspected component both when cold and when hot to reveal the failure.
How to Prevent This Code From Triggering
- Protect Wiring Harnesses from Chafing (During any under-hood maintenance) — Since wiring damage is the #1 cause of P2157, proactively inspect harnesses. If any section rubs against a bracket, secure it with a zip tie or add a protective sleeve to prevent insulation wear.
- Clean and Protect Electrical Connectors (Every 30,000 miles or when disconnected) — Spray electrical connectors with electronic contact cleaner. Apply a thin layer of dielectric grease to the connector seal before reconnecting. This prevents moisture intrusion and corrosion.
- Use Top Tier Gasoline (Every fill-up) — Top Tier fuels contain a higher concentration of detergents that keep fuel injector nozzles clean, preventing performance issues that complicate diagnosis.
- Periodically Use a Quality Fuel System Cleaner (Every 5,000-10,000 miles) — Adding a fuel system cleaner with PEA (polyetheramine) removes internal deposits from injectors, ensuring mechanical parts operate smoothly and reducing the chance of internal failure.
- Avoid Long Periods of Idling (Daily habit) — Extended idling leads to incomplete combustion and carbon buildup on injector tips. This causes the injector to operate at higher temperatures, stressing its internal coil.
Frequently Asked Questions
What does 'Group D' actually mean?
'Group D' refers to a specific bank or set of fuel injectors that the car's computer controls as a single unit. The exact cylinder numbers in Group D vary by manufacturer and engine type, requiring a service manual to verify. For example, on a 2005 Ford F-150 V8, Group D is cylinder 4.
Can I just clear the code and keep driving?
You can clear the code with a scanner, but it returns instantly because the underlying electrical short still exists. Ignoring the code destroys your catalytic converter.
What's the difference between P2157 and a specific injector code like P0204?
P2157 indicates a fault in the shared power supply for a group of injectors. P0204 points to a problem with a single injector's control circuit. If you only see P2157, the short is on the main power feed wire before it splits.
What is a common misdiagnosis for P2157?
The most common mistake is replacing the fuel injector without testing the wiring. Since a shorted wire is the primary cause, a new injector rarely fixes the problem. Never replace the PCM before confirming all wiring is intact.
The code appeared right after an oil change or other service. Is that related?
Yes, a technician likely disturbed the engine wiring harness while working. This causes an already-brittle wire to break or a chafing wire to short out. Always inspect the area where the recent work occurred first.
My scanner shows P2157 but the car seems to run fine. What's going on?
This indicates an intermittent fault, like a chafed wire making and breaking contact over bumps. The short circuit causing the high voltage only happens under specific conditions. Use the 'Harness Wiggle Test' to pinpoint the exact location of the break.
Could a bad battery cause a P2157 code?
No, a weak battery causes low voltage problems. P2157 is a 'circuit high' code, meaning there is too much voltage on a specific, isolated circuit.
Key Takeaways
- Code P2157 indicates a high-voltage short circuit in the power supply for a specific group of fuel injectors, disabling those cylinders.
- A chafed engine wiring harness causes over 70% of P2157 codes, followed by corroded connectors and internally shorted fuel injectors.
- Expect an immediate 15-30% drop in fuel economy, severe engine shaking, and a flashing check engine light due to active misfires.
- Stop driving immediately; raw fuel from the dead cylinders melts your catalytic converter within 100 miles, adding $2,000+ to your repair bill.
Helpful Videos

Shop the Parts Behind P2157
Below are the parts most often responsible for code P2157, ranked by how frequently each one is the actual culprit (per the diagnosis above). Tap any to see what we have for your vehicle.


The information in this article is provided for general reference and educational purposes only. Vehicle specifications, procedures, and part compatibility can vary by production date, trim level, and region. Always consult your vehicle's factory service manual and verify part numbers before purchasing or performing repairs. Safety-critical components such as airbags, seat belts, and braking systems should be installed by a qualified professional.
- 🧭 Diagnostic Flowchart
- 🎬 Helpful Videos
- 🛍️ Shop This Part
- What Does P2157 Mean?
- Can I Drive With P2157?
- Common Causes
- Symptoms
- Common Fixes & Costs
- Used vs. New Parts: Buying Guide
- What Happens If You Wait — Timeline
- Cost of Not Fixing It
- Diagnosis Steps
- When This Code Triggers (Freeze-Frame Conditions)
- Related Codes
- Climate & Environmental Factors
- How to Talk to a Mechanic About This Code
- Where to Take It: Dealer vs Independent vs Chain
- When to Walk Away From the Repair
- What Scan Tool You Need for This Code
- How to Clear the Code After You Fix It
- Will This Fail Emissions / State Inspection?
- Most Commonly Affected Vehicles
- Manufacturer-Specific Notes
- Real Owner Stories
- 2019 Chevy Silverado 5.3L at 75,000 miles
- 2013 Fiat 500 Abarth at 110,000 miles
- 2006 Dodge Ram 1500 5.7L at 150,000 miles
- How to Prevent This Code From Triggering
- Frequently Asked Questions
- What does 'Group D' actually mean?
- Can I just clear the code and keep driving?
- What's the difference between P2157 and a specific injector code like P0204?
- What is a common misdiagnosis for P2157?
- The code appeared right after an oil change or other service. Is that related?
- My scanner shows P2157 but the car seems to run fine. What's going on?
- Could a bad battery cause a P2157 code?
- Key Takeaways
- 🎟️ Get 5% Off