
P2299 on 2008 Dodge Durango 4.7L: Brake and Accelerator Pedal Conflict Causes and Fixes
This code almost always means the brake and gas pedals were pressed at the same time. The most common cause is a 'two-footed' driving style. Before buying any parts, check for an obstructed floor mat and ensure you are only using your right foot for both pedals. If a part has failed, the inexpensive brake light switch is the most likely culprit.
- First, check your driving habits. This code is a safety feature and is most often triggered by resting your foot on the brake while accelerating.
- Second, check your driver-side floor mat to ensure it is not interfering with the pedals.
- If your brake lights are stuck on, the brake light switch is the most likely failed part and is an easy, inexpensive DIY fix.
- Do not replace the expensive accelerator pedal assembly unless you have definitively ruled out driving habits and a faulty brake light switch.
What's Unique About the 2008-2008 Dodge Durango
For Dodge/Chrysler/Jeep vehicles like your Durango, the Brake-Throttle Override system is quite sensitive. The manufacturer has issued multiple service bulletins and STAR cases (e.g., #9003413) for similar models explicitly stating that P2299 is most often caused by the driver's habits ('two-footed driving') rather than a component failure. This means the system is working as designed, and owners should exhaustively rule out driving style and pedal obstructions before suspecting a faulty part. A forum post from 2008 specifically notes that Chrysler documentation points to 'Brake Torquing' (holding the brake and applying throttle) as a primary trigger.
Symptoms You May Notice
- Check Engine Light is on
- Electronic Throttle Control (ETC) warning light (a lightning bolt symbol) is illuminated.
- Severely reduced engine power, often called 'limp mode'.
- Poor or sluggish throttle response.
- Cruise control will not engage or turns off unexpectedly.
- Brake light warning on the dash may stay on.
- Replacing the accelerator pedal assembly before checking driving habits or the much cheaper brake light switch. Dodge explicitly warns against this in service bulletins.
Most Likely Causes
- Driver Pressing Both Pedals Simultaneously 🔴 High Probability The vehicle's Brake-Throttle Override software is designed to trigger this code as a safety feature. Dodge TSB #9003413 confirms this is the most common cause on their trucks and SUVs. This can happen unintentionally when wearing bulky boots, resting a foot on the brake pedal, or intentionally when 'brake torquing'.
How to confirm: Honestly assess your driving style. Do you use your left foot for the brake and your right for the accelerator? Do you rest your left foot on the brake pedal while driving? This is the first diagnostic step recommended by technicians.
Typical fix: Adjust driving style to use only the right foot for both pedals. Clear the code with a scanner. This fix is free.
Est. part cost: $0 - Obstructed or Incorrect Floor Mat 🟡 Medium Probability Thick or improperly placed aftermarket floor mats can bunch up under the pedals, preventing the accelerator from returning to idle or slightly depressing the brake pedal, causing a signal conflict.
How to confirm: Visually inspect the area around the pedals. Remove the floor mat entirely and see if the problem can be reproduced. Ensure any mat used is properly secured and does not interfere with the full travel of either pedal.
Typical fix: Reposition, secure, or replace the floor mat with a correct, model-specific one.
Est. part cost: $0-$70 - Faulty Brake Pedal Position Sensor (Brake Light Switch) 🟡 Medium Probability → Shop Brake Pedal
How to confirm: Check if your brake lights are stuck on even when the pedal is not pressed. If so, the switch is almost certainly the problem. Alternatively, use a scan tool to monitor the 'Brake Pedal Status' in the live data stream while pressing and releasing the pedal. The status should change from 'Off' to 'On' without sticking.
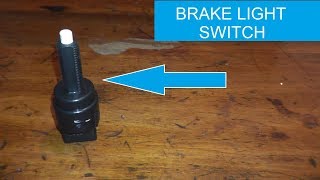
Typical fix: Replace the brake light switch. It is a small, inexpensive sensor located on the bracket above the brake pedal arm. It typically installs with a simple twist-and-lock motion. 🎬 Watch: How to test and replace the brake light switch.
Est. part cost: $20-$40 - Faulty Accelerator Pedal Position (APP) Sensor ⚪ Low Probability → Shop Accelerator Pedal Assembly
How to confirm: Use a scan tool to monitor the live data for the APP sensor's voltage. A diagnostic guide suggests APP Sensor 1 should sweep smoothly from ~0.45V to ~4.6V, and APP Sensor 2 from ~0.22V to ~2.31V. If the reading is erratic, stuck, or doesn't correspond to pedal movement, the sensor is likely faulty. Dodge specifically warns against replacing this part for a P2299 code unless other causes are ruled out.
Typical fix: Replace the entire accelerator pedal assembly, as the sensor is integrated into it. After installation, an 'ETC RELEARN' function may need to be performed with a scan tool.
Est. part cost: $70-$150
Rare But Worth Checking
- Wiring or Connector Issue: Check for damage, corrosion, or loose pins in the wiring harnesses and connectors leading to the brake light switch and accelerator pedal, especially if any recent under-dash work has been performed.
- Powertrain Control Module (PCM) Issue: → Shop Engine Control Module (ECM) In very rare cases, a software glitch or internal PCM failure could cause this code. On some other Chrysler/Dodge/Jeep models, TSBs have been issued for software updates to fix overly sensitive P2299 logic, though none are specific to the 2008 Durango. This should only be considered after all other possibilities have been exhausted.
Diagnosis Steps
- Ask the Driver: The first and most important step is to ask the primary driver if they use two feet to drive or rest their foot on the brake pedal.
- Check the Floor Mat: Ensure the floor mat is not bunched up or interfering with either pedal's movement.
- Scan for Codes: Read the code and any associated freeze-frame data to understand the conditions when the fault occurred. Note that the ETC light may turn off once the pedal conflict is resolved, but the code will remain stored.
- Inspect Brake Lights: With the ignition on (engine off), have a helper observe the brake lights. If they are stuck on, the brake light switch is the primary suspect.
- Analyze Live Data: Use a scan tool to view live data. Monitor the Accelerator Pedal Position (APP) sensor percentage/voltage and the Brake Pedal Position (BPP) sensor status (On/Off).
- Test the Sensors: While watching the live data, press and release each pedal individually. The APP sensor voltage should be smooth and linear, within the expected ranges (~0.45V to ~4.6V for sensor 1). The BPP sensor should switch cleanly from 'Off' to 'On' when the brake is applied.
- Confirm the Conflict: If the BPP sensor reads 'On' while the APP sensor shows a value greater than idle, you have confirmed the conflict. If the BPP is stuck 'On', replace the brake light switch. If the APP sensor is erratic or provides no signal, suspect the pedal assembly.
- Inspect Wiring: If sensor data seems abnormal or intermittent, perform a visual inspection of the wiring and connectors for both sensors for any signs of damage, corrosion, or looseness.
- Replace Parts: Based on your findings, replace the most likely component, starting with the brake light switch due to its higher failure rate and low cost compared to the accelerator pedal.
Parts You'll Likely Need
- Brake Light Switch (Stoplamp Switch)
(OEM #56029454AC)— This is the most common part to fail that causes a P2299 code. It can get stuck in the 'on' position, telling the computer the brakes are applied even when they are not. This part number is listed as compatible with the 2005-2010 Jeep Grand Cherokee, a platform mate, and supersedes numbers 56029454AA and 56029454AB.
Trusted brands: Mopar, Standard Motor Products (SMP)
OEM price range: $25-$45
Aftermarket price range: $15-$30 - Accelerator Pedal Assembly
(OEM #53032907AB)— This is a less common cause. It is only replaced if diagnostic testing confirms the integrated position sensor is faulty. The sensor is serviced with the pedal assembly. This part number is listed for 2006-2009 Durango/Aspen models.
Trusted brands: Mopar, Dorman, Carquest Premium
OEM price range: $120-$200
Aftermarket price range: $70-$150
Technical Service Bulletins (TSBs) & Recalls
- 9003413 (STAR Case): This is an internal Chrysler document, not a public TSB, but is widely referenced by repair databases. It states that DTC P2299 is usually caused by a 'two-footed driver' and the accelerator pedal should not be replaced for this fault.
- 18-003-08: While not directly for P2299, this TSB involves a PCM reflash for 2007-2008 models (including Durango) to correct an erroneous P0524 (Engine Oil Pressure Too Low) code, showing that PCM software updates were a known fix for sensor logic issues on this platform.
Platform-Specific Known Issues
- source — A 2008 DodgeForum.com thread about P2299 includes a detailed technical explanation confirming the code is set when the PCM sees a brake application while the accelerator pedal is showing a fixed opening. The post notes the most likely cause is the customer 'Brake Torquing' the engine.
Mechanic-Grade Diagnostic Values
- Accelerator Pedal Position Sensor (APPS) 5V Supply — expected: Approximately 5.0V at pins 3 and 5 of the APP sensor connector with Key On, Engine Off (KOEO).. Failure: Voltage significantly lower or higher than 5.0V indicates a problem with the PCM or wiring, not necessarily the sensor itself.
- Accelerator Pedal Position Sensor (APPS) Ground Return — expected: Less than 0.1V on pins 2 and 6 (the return circuits) when back-probed with KOEO.. Failure: Voltage higher than 0.1V suggests a poor ground connection, which can cause erratic sensor readings.
- Accelerator Pedal Position Sensor 1 (APPS 1) Signal Voltage — expected: Approximately 0.3V at idle (pedal released) sweeping smoothly to 2.5V at Wide Open Throttle (WOT). This is tested by back-probing pin 4.. Failure: Voltage that is jumpy, has dropouts, or does not sweep smoothly indicates a failing sensor.
- Circuit Resistance Between Sensor and PCM — expected: Less than 5.0 ohms.. Failure: Resistance over 5.0 ohms indicates excessive resistance in the wiring harness or connectors, which can cause signal loss or corruption.
Scan Tool Commands That Help
- wiTECH (Dealer Scan Tool) or equivalent: ETC Relearn / Throttle Body Calibration — This function should be performed after replacing the accelerator pedal assembly or the throttle body. It forces the PCM to learn the new sensor's idle and wide-open throttle positions. Failure to do so can cause idle issues or other throttle-related codes.
- Manual Procedure (No Scan Tool): Manual Throttle Position Relearn — If a capable scan tool is not available, a manual relearn can be attempted. Turn the ignition to 'ON' (do not start) for 10 seconds. Slowly press the accelerator pedal to the floor and slowly release it. Turn the ignition 'OFF' for 10 seconds, then start the engine. This allows the PCM to recalibrate to the pedal's sweep.
Wiring & Ground Locations
- Accelerator Pedal Position Sensor Connector — Located at the top of the accelerator pedal assembly, under the driver's side dash.. This is the primary connection point for testing APP sensor voltages and signals. It is a 6-pin connector.
- Brake Light Switch (Stoplamp Switch) Connector — Located on the brake pedal support bracket, above the brake pedal arm.. This 6-pin connector provides the brake 'on' signal to the PCM. A loose connection or corroded pin here can cause the signal to be stuck on, triggering P2299.
- G100 — Located on the right side of the engine compartment.. This is a primary ground for the Powertrain Control Module (PCM). A poor connection here can cause numerous engine management issues, including faulty sensor readings.
- G208 — Located behind the left kick panel, near the junction block.. This is a major interior ground point. A loose or corroded G208 can affect various components inside the cabin, including those related to the instrument cluster and pedal sensors.
Real Owner Repair Stories
- ScannerDanner Forum (2013 Dodge Durango 3.6L V6 (Similar platform, demonstrates a relevant edge case)) — Car goes into limp mode, throws P2127 (APP Sensor Circuit Low) and P0652 (Sensor Reference Voltage Low), along with a host of other intermittent sensor codes.
❌ Tried (didn't work) Replaced alternator, Replaced PCM, Replaced battery, Replaced both camshaft sensors, crankshaft sensor, TPS, MAP sensor, and accelerator pedal sensor, Visually inspected engine harness, Cleaned PCM ground point
✅ What actually fixed it The owner found a dangling engine ground strap that had not yet been reconnected. Although not the final post, the discovery of a major unattached ground after replacing nearly every related component points to it as the likely root cause for the widespread, intermittent low voltage sensor codes.
OEM Part Supersession History
56029454AA, 56029454AB→56029454AC— Standard part revision and consolidation by the manufacturer.
Heads up: The newer part number 56029454AC is the correct service replacement for the older versions and is fully compatible.
Diagnostic Flowchart
Other Known Issues on This Vehicle
Issues unrelated to this code that are worth knowing about as an owner of this generation:
- Totally Integrated Power Module (TIPM) Failure 🔴 High — A very common issue for this era of Chrysler/Dodge/Jeep vehicles. Symptoms include engine stalling, no-start, fuel pump running continuously, and random operation of electrical components (horn, wipers). (Ref: While recalls existed for other models, the 2008 Durango was not specifically recalled for the TIPM fuel pump relay, but it suffers from the same failure.)
- Clogged or Faulty EGR Valve 🟠 Medium — Common on the 4.7L V8, leading to rough idle, stalling, and codes like P0404 or P0406. The valve is in a very difficult-to-access location on the rear of the driver's side cylinder head. (Ref: FCA extended the warranty for the EGR valve on some 4.7L applications (Ram 1500) under bulletin X63, but not explicitly for the Durango.)
- Engine Oil Sludge Buildup 🔴 High — The 4.7L V8 is known to be prone to developing oil sludge if maintenance intervals are extended, leading to overheating, blocked oil passages, and eventual engine failure. Frequent oil changes (every 3,000 miles) are recommended.
- Dropped Valve Seats 🔴 High — A notorious and catastrophic failure mode for the 4.7L engine where a valve seat can dislodge from the cylinder head and fall into the cylinder, causing severe engine damage. This is often preceded by overheating.
- Broken Exhaust Manifold Bolts 🟠 Medium — The bolts securing the exhaust manifold to the cylinder heads are prone to breaking, causing an exhaust leak recognized by a ticking noise that is loudest on a cold start and may quiet down as the engine warms up.
Used vs. New Parts: Buying Guide for This Vehicle
When a used part is the smart pick: A used accelerator pedal assembly from a reputable auto recycler can be a cost-effective option, as they are not a high-wear item and failure is relatively uncommon. A used brake light switch is generally not recommended due to its low cost when new and the difficulty in assessing its remaining lifespan.
Donor-vehicle mileage cap: roughly under 100000 miles for the part to have meaningful remaining life.
What to inspect on the donor part:
- For a used accelerator pedal, ensure the connector pins are clean, straight, and free of corrosion.
- Check that the pedal moves smoothly without any binding or grittiness.
- Verify the donor vehicle was not in a frontal collision that could have stressed the pedal assembly or its wiring.
OEM-only on this vehicle (don't cheap out):
- Powertrain Control Module (PCM) - While not a common cause, if the PCM is condemned, a new or professionally remanufactured unit programmed to your vehicle's VIN is essential. A used PCM from another vehicle will not work due to anti-theft and configuration mismatches.
Aftermarket brands forum-validated for this vehicle:
- Brake Light Switch: Standard Motor Products (SMP), Mopar (OEM)
- Accelerator Pedal Assembly: Dorman, Carquest Premium, Mopar (OEM)
Brands owners have reported issues with on this vehicle:
- Avoid unbranded, 'white-box' electronic sensors from online marketplaces. These often have high failure rates and may not meet the precise voltage specifications, leading to a quick return of the P2299 code.
Related OBD-II Codes
Frequently Asked Questions
Is it true that my driving style could cause the P2299 code on my 2008 Durango?
My mechanic wants to replace the accelerator pedal for a P2299 code. Is this the right move for my Durango?
My brake lights are stuck on and I have a P2299 code. Are these issues related?
Could a software update fix the P2299 code on my 2008 Durango?
Can an aftermarket floor mat really cause the Check Engine Light and P2299 code?
What other vehicles share this same P2299 issue with my 2008 Durango?
Helpful Videos
We Have This Part in Stock


The information in this article is provided for general reference and educational purposes only. Vehicle specifications, procedures, and part compatibility can vary by production date, trim level, and region. Always consult your vehicle's factory service manual and verify part numbers before purchasing or performing repairs. Safety-critical components such as airbags, seat belts, and braking systems should be installed by a qualified professional.
- Dodge Durango:
- 🧭 Diagnostic Flowchart
- 🎬 Helpful Videos
- 🛍️ Shop This Part
- What's Unique About the 2008-2008 Dodge Durango
- Symptoms You May Notice
- Most Likely Causes
- Rare But Worth Checking
- Diagnosis Steps
- Parts You'll Likely Need
- Technical Service Bulletins (TSBs) & Recalls
- Platform-Specific Known Issues
- Mechanic-Grade Diagnostic Values
- Scan Tool Commands That Help
- Wiring & Ground Locations
- Real Owner Repair Stories
- OEM Part Supersession History
- Other Known Issues on This Vehicle
- Used vs. New Parts: Buying Guide for This Vehicle
- Related OBD-II Codes
- Frequently Asked Questions
- 🎟️ Get 5% Off