
P2402 on 2017-2022 Honda CR-V: EVAP Pump Circuit High Causes and Fixes
Code P2402 on a 2017-2022 Honda CR-V almost always points to a faulty EVAP Leak Detection Pump. This is an electrical fault, not a leak. The PCM has detected a higher-than-normal voltage on the pump's control circuit, often due to an internal short in the pump itself. Expect to pay between $275 and $400 for a new OEM pump, which is a moderately easy DIY replacement for many owners.
- P2402 is an electrical fault in the EVAP leak detection pump circuit, not a physical leak.
- The most likely cause is a failed leak detection pump assembly due to an internal short.
- Driving is not dangerous, but the Check Engine Light will remain on and you will fail an emissions test.
- The correct OEM part number for the 2017-2022 CR-V (1.5L & 2.4L) is 17391-TLA-A03.
- Always inspect the wiring and connector for damage or corrosion before replacing the pump.
What's Unique About the 2017-2022 Honda CR-V
For the 2017-2022 Honda CR-V, this code points specifically to an electrical failure. Unlike general EVAP leak codes (like P0455 or P0456) which can be caused by a loose gas cap, P2402 indicates a circuit malfunction. The diagnostic procedure for Honda often involves using the specific Honda Diagnostic System (HDS) to run a module self-test. This test helps determine if the fault is with the pump, wiring, or PCM. The leak detection pump itself is the most common point of failure for this code on many modern vehicles, including this CR-V generation.
Symptoms You May Notice
- The Check Engine Light is illuminated.
- The vehicle will fail an emissions test.
- No noticeable impact on engine performance or fuel economy.
- Possible rattling or buzzing noise from the rear of the vehicle where the pump is located.
- In rare cases, a fuel or fume smell may be noticeable.
- Replacing the gas cap. This code is for an electrical circuit fault, not a system leak.
- Replacing the EVAP charcoal canister. While part of the same system, the canister is not typically the cause of a 'circuit high' code. The leak detection pump is often attached to it, leading to confusion.
Most Likely Causes
- Faulty EVAP Leak Detection Pump 🔴 High Probability → Shop Vapor Canister The pump motor can wear out or develop an internal short circuit over time, causing it to draw excessive current or create a high voltage condition in the control circuit. This is the most common failure for this code across many makes and models.
How to confirm: After checking wiring, this is the most likely cause. The pump can be tested by measuring its internal resistance with a multimeter and comparing it to factory specifications (typically a low resistance, e.g., 2-20 Ω). If the resistance is infinite (open circuit) or out of spec, the pump is bad. A bi-directional scan tool can also be used to command the pump on and off to verify its operation.
Typical fix: Replace the EVAP leak detection pump assembly.
Est. part cost: $275-$400 - Wiring Harness or Connector Issue 🟡 Medium Probability The pump and its wiring are located near the fuel tank under the rear of the vehicle, an area exposed to moisture, road salt, and debris. This can lead to corrosion on connector pins or physical damage to wires over time.
How to confirm: Visually inspect the wiring harness and the 8-pin connector going to the leak detection pump for any signs of damage, corrosion, or loose pins. Use a multimeter to check for a short to power on the control circuit wire. Also, check for continuity on the ground wire.
Typical fix: Repair the damaged section of the wiring harness or clean/replace the corroded connector.
Est. part cost: $10-$50 - Faulty Powertrain Control Module (PCM) ⚪ Low Probability → Shop Engine Control Module (ECM) While rare, the internal driver circuit within the PCM that controls the pump can fail. This can cause it to send a constant high voltage signal or fail to provide the ground signal to activate the pump.
How to confirm: This should only be considered after the pump and wiring have been thoroughly tested and confirmed to be good. A technician would use a scan tool to monitor the PCM's command to the pump and a multimeter to verify the output voltage directly at the PCM pin. If the PCM fails to pull the voltage to ground when commanded, its internal driver has likely failed.
Typical fix: Replace and reprogram the Powertrain Control Module.
Est. part cost: $600-$900
Diagnosis Steps
- Read the Code: Use an OBD-II scanner to confirm that P2402 is the only code present. Note any other codes and review freeze-frame data.
- Inspect the Gas Cap: While not a cause for this specific code, it's a good habit to ensure the gas cap is tight and the seal is intact.
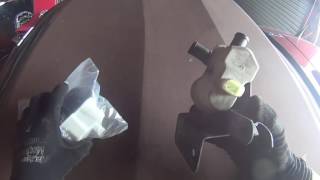
- Locate the EVAP Leak Detection Pump: The pump is located under the rear of the vehicle, near the charcoal canister, often behind the passenger-side rear wheel.
- Inspect Wiring and Connector: Carefully inspect the electrical connector (an 8-pin connector on this model) and wiring harness leading to the pump. Look for green corrosion, chafed or broken wires, or loose pins. Pay close attention to areas exposed to road debris.
- Perform Electrical Tests: Disconnect the pump. With the key on, engine off, use a multimeter to check for battery voltage at the connector's power pin. Then, check the control wire for voltage. A high voltage reading on the control wire when the pump should be off points to a short to power in the harness or a faulty PCM driver.
- Test the Pump: If the wiring appears okay, measure the resistance across the terminals of the leak detection pump itself. Compare this reading to the manufacturer's specification. If the reading is out of spec (e.g., open or shorted), the pump has failed internally.
- Replace the Faulty Component: Based on your findings, replace the leak detection pump or repair the wiring. If both check out, the issue may be with the PCM, which is a rare and more complex diagnosis that should be confirmed by a professional.
Parts You'll Likely Need
- Evaporative Emissions System Leak Detection Pump
(OEM #17391-TLA-A03)— This is the most common component to fail for a P2402 code, due to internal electrical shorts or wear.
Trusted brands: Honda (OEM)
OEM price range: $265-$400
Aftermarket price range: $150-$250
Technical Service Bulletins (TSBs) & Recalls
- No specific TSB for P2402 on the 2017-2022 CR-V was found. However, Honda has issued TSBs for similar EVAP system codes on other models, like TSB 15-010 for P2422 on Accords, which involved clogged vent tubes. This highlights the importance of checking for blockages, although P2402 is primarily an electrical code.
Platform-Specific Known Issues
- DIY Replacement Experience: Owners who perform the replacement themselves note that access is tight but manageable by jacking up the rear of the vehicle. The pump is typically held by two bolts and has several hose connections that can be tricky to remove without proper pliers. Spraying penetrating oil on the hose connections can help ease removal.
Mechanic-Grade Diagnostic Values
- EVAP Leak Detection Pump Control Circuit (ELCMP line) continuity — expected: Continuity should exist between the pump's 8-pin connector and the PCM.. Failure: No continuity indicates an open wire in the harness that must be repaired.
- Voltage at Pump Driver Input — expected: 11.5–12.5 V with ignition on.. Failure: A reading above 13 V points to a high-voltage condition in the circuit.
- EVAP Leak Detection Pump Coil Resistance — expected: While no Honda-specific value was found, a typical range for these pumps is 2-20 Ω.. Failure: A reading of OL (infinite resistance) indicates an open circuit, while a reading near 0 Ω indicates a short. Either requires pump replacement.
Scan Tool Commands That Help
- Honda Diagnostic System (HDS): EVAP Leak Check Module Test — This is a primary diagnostic step to command the pump module to run its self-test. A failure reported by the HDS confirms a malfunction in the pump or its circuit, helping to quickly isolate the problem.
Wiring & Ground Locations
- PCM Connector E, Pin 47 — This pin is on one of the main connectors to the Powertrain Control Module (PCM).. This is the specific terminal for the EVAP Leak Check Module control line (ELCMP line). A key Honda diagnostic step is to check for continuity between this pin and the corresponding pin at the pump's 8-pin connector to rule out an open wire in the harness.
- EVAP Leak Check Module 8-Pin Connector — Connected to the EVAP Leak Detection Pump, located under the rear of the vehicle near the charcoal canister.. This is the main connection point for all power, ground, and control signals to the pump. It must be inspected for corrosion or damage, and it is the primary location for performing voltage and resistance tests on the pump and its circuit.
OEM Part Supersession History
17391-TLA-A03→17391-TLA-A03— This part number appears to be stable and correct for the entire 2017-2022 generation.
Heads up: The subsequent generation (2023+ CR-V) uses a different part number (17391-3A0-A00), confirming that 17391-TLA-A03 is specific to the 5th generation and earlier models.
Diagnostic Flowchart
Other Known Issues on This Vehicle
Issues unrelated to this code that are worth knowing about as an owner of this generation:
- Engine Oil Dilution (1.5L Turbo) 🔴 High — Common in 2017-2021 models, especially in cold climates or with frequent short trips. Unburnt fuel mixes with engine oil, reducing lubrication. (Ref: Honda issued software updates (PCM recalibration) and extended warranties to address the issue.)
- Premature Fuel Injector Failure (1.5L Turbo) 🔴 High — Very common on 2017-2022 models, often causing misfires (e.g., P0202) and contributing to oil dilution. (Ref: Honda has extended the warranty on fuel injectors for many affected vehicles. The fix often involves replacing all four injectors with an updated part set (06160-5PA-305).)
- Parasitic Battery Drain 🟠 Medium → Shop Vehicle Battery — Reported across 2017-2019 models. A software bug in the Vehicle Stability Assist (VSA) module can prevent the PCM from fully sleeping, draining the battery overnight. (Ref: Honda TSB A19-039 addresses this with a PCM software update for 2019 models. Other models may experience drain from other components.)
- Sticky Steering 🔴 High — Affects 2022+ models primarily, but some earlier models are included in investigations. Drivers feel a notch or momentary resistance in the steering at highway speeds. (Ref: Recall 24V-744 was issued. The fix involves replacing a spring and redistributing grease in the EPS gearbox, though some consider it a temporary solution.)
- A/C Condenser / Compressor Seal Leaks 🟠 Medium — Common issue where the A/C system fails to cool due to refrigerant leaking from compressor seals or cracks in the condenser. (Ref: Honda has had recalls and warranty extensions for A/C condensers on various models, including some CR-Vs.)
Used vs. New Parts: Buying Guide for This Vehicle
When a used part is the smart pick: For this repair, a used OEM part from a reputable auto recycler can be a smart choice to save significant money, as the part is a complete, self-contained module. It is a common failure item, so the primary risk is the remaining lifespan of the used part.
Donor-vehicle mileage cap: roughly under 80000 miles for the part to have meaningful remaining life.
What to inspect on the donor part:
- Inspect the 8-pin electrical connector for any signs of green or white corrosion on the pins.
- Ensure the plastic housing is not cracked or showing signs of heat damage/melting.
- Check that all hose connection ports are intact and not broken or brittle.
- If possible, ask the seller if the part was tested or if it comes from a vehicle that did not have EVAP-related codes.
OEM-only on this vehicle (don't cheap out):
- While aftermarket options exist, the EVAP Leak Detection Pump is an electronic emissions component. For maximum reliability and to avoid potential compatibility issues, sticking with a new or tested used OEM Honda part (17391-TLA-A03) is strongly recommended.
Brands owners have reported issues with on this vehicle:
- Unbranded, low-cost parts from online marketplaces should be avoided, as their internal electronics may not meet OEM specifications, leading to premature failure or persistent codes.
Real Owner Stories
Aggregated from forums and TSBs cited above. Mileages and costs reflect what owners reported in those sources.
2017-2022 Honda CR-V
Symptoms: The owner noted that access to the pump is tight but manageable by jacking up the rear. They found that the pump is held by two bolts and several hose connections that are difficult to remove without proper pliers.
What fixed it: Replacement of the EVAP leak detection pump assembly, using penetrating oil to ease the removal of stuck hose connections.
Source hint: vehicle_specific_issues: DIY Replacement Experience
2017-2022 Honda CR-V
Symptoms: The Check Engine Light returned only days after the DMTL pump was replaced. The owner also reported a noticeable fume or plastic smell inside the cabin.
What fixed it: The source suggests a potential complication or misdiagnosis, as the code returned immediately after a pump replacement.
Source hint: Reddit r/MechanicAdvice - "Code P2402 Engine light. Is it safe to drive 200 miles until I take it to service?"
Related OBD-II Codes
Frequently Asked Questions
Does TSB 15-010 for the Honda Accord apply to my 2017-2022 CR-V for code P2402?
I'm seeing code P2402; could this be related to the common oil dilution issue on my 1.5L Turbo engine?
Can I use a used part to fix this, or should I buy the $275-$400 new pump?
Where exactly is the leak detection pump located on the 2017-2022 CR-V?
Is the P2402 code related to the fuel injector warranty extension for the 1.5L Turbo?
Will a loose gas cap cause P2402 on my CR-V?
Helpful Videos


The information in this article is provided for general reference and educational purposes only. Vehicle specifications, procedures, and part compatibility can vary by production date, trim level, and region. Always consult your vehicle's factory service manual and verify part numbers before purchasing or performing repairs. Safety-critical components such as airbags, seat belts, and braking systems should be installed by a qualified professional.
- Honda CR-V:
- 🧭 Diagnostic Flowchart
- 🎬 Helpful Videos
- What's Unique About the 2017-2022 Honda CR-V
- Symptoms You May Notice
- Most Likely Causes
- Diagnosis Steps
- Parts You'll Likely Need
- Technical Service Bulletins (TSBs) & Recalls
- Platform-Specific Known Issues
- Mechanic-Grade Diagnostic Values
- Scan Tool Commands That Help
- Wiring & Ground Locations
- OEM Part Supersession History
- Other Known Issues on This Vehicle
- Used vs. New Parts: Buying Guide for This Vehicle
- Real Owner Stories
- 2017-2022 Honda CR-V
- 2017-2022 Honda CR-V
- Related OBD-II Codes
- Frequently Asked Questions
- 🎟️ Get 5% Off