
P2420 on 2010-2015 Toyota Prius: EVAP Switching Valve and Canister Fixes
On a 2010-2015 Prius, code P2420 is almost always caused by a failed vent valve inside the charcoal canister assembly. The fix is to replace the entire canister assembly. Expect to pay $550-$750 for a new OEM part, with DIY difficulty rated at 2/5.
- P2420 on a 2010-2015 Prius almost always points to a bad charcoal canister assembly due to an internal vent valve failure.
- The primary symptom is just the Check Engine Light; the car will drive normally.
- This is a DIY-friendly repair for those comfortable working under their car. The canister is typically held by a few bolts and hose connections.
- Do not replace the gas cap or purge valve for this specific code; they are not the cause.
- An official Toyota TSB exists for the 2010 model, confirming this is a known issue and providing specific VINs and diagnostic procedures.
- Avoid 'topping off' your fuel tank to prolong the life of the replacement canister.
What's Unique About the 2010-2015 Toyota Prius
For the third-generation Prius, this code is so commonly linked to a specific part failure that Toyota issued a Technical Service Bulletin (TSB-0028-11) for the 2010 model year. The bulletin acknowledges the issue and points to an updated charcoal canister assembly as the fix. The TSB specifically covers 2010 Prius vehicles within the following VIN ranges: JTDKN3DU#A0050338 – JTDKN3DU#A0067103, JTDKN3DU#A1068283 – JTDKN3DU#A1090900, and JTDKN3DU#A5056320 – JTDKN3DU#A5073902. While the TSB is limited to these 2010 models, the failure pattern is widely reported by owners of all years in this generation (2010-2015), indicating a common weak point in the original part design that was used for several years. This issue is not unique to the Prius; for example, TSB Bulletin #T-SB-0024-15 notes that other Toyota models with the 2ZR engine family may also exhibit a MIL "ON" condition with DTC P2420 due to the Evaporative Emission Pressure Switching Valve being stuck OFF.
Symptoms You May Notice
- Check Engine Light is on.
- Inability to pass an emissions test.
- No noticeable drivability problems, such as rough idle or loss of power.
- Rarely, a faint fuel odor may be noticed around the rear of the car, though this is more common with other EVAP codes.
- Replacing the gas cap. While a loose or faulty gas cap can cause other EVAP codes (like P0455 or P0456), it does not cause a P2420 circuit code.
- Replacing the purge valve/solenoid. The purge valve is located in the engine bay and is a different part of the EVAP system. P2420 specifically points to the vent/switching valve circuit at the rear of the vehicle.
Most Likely Causes
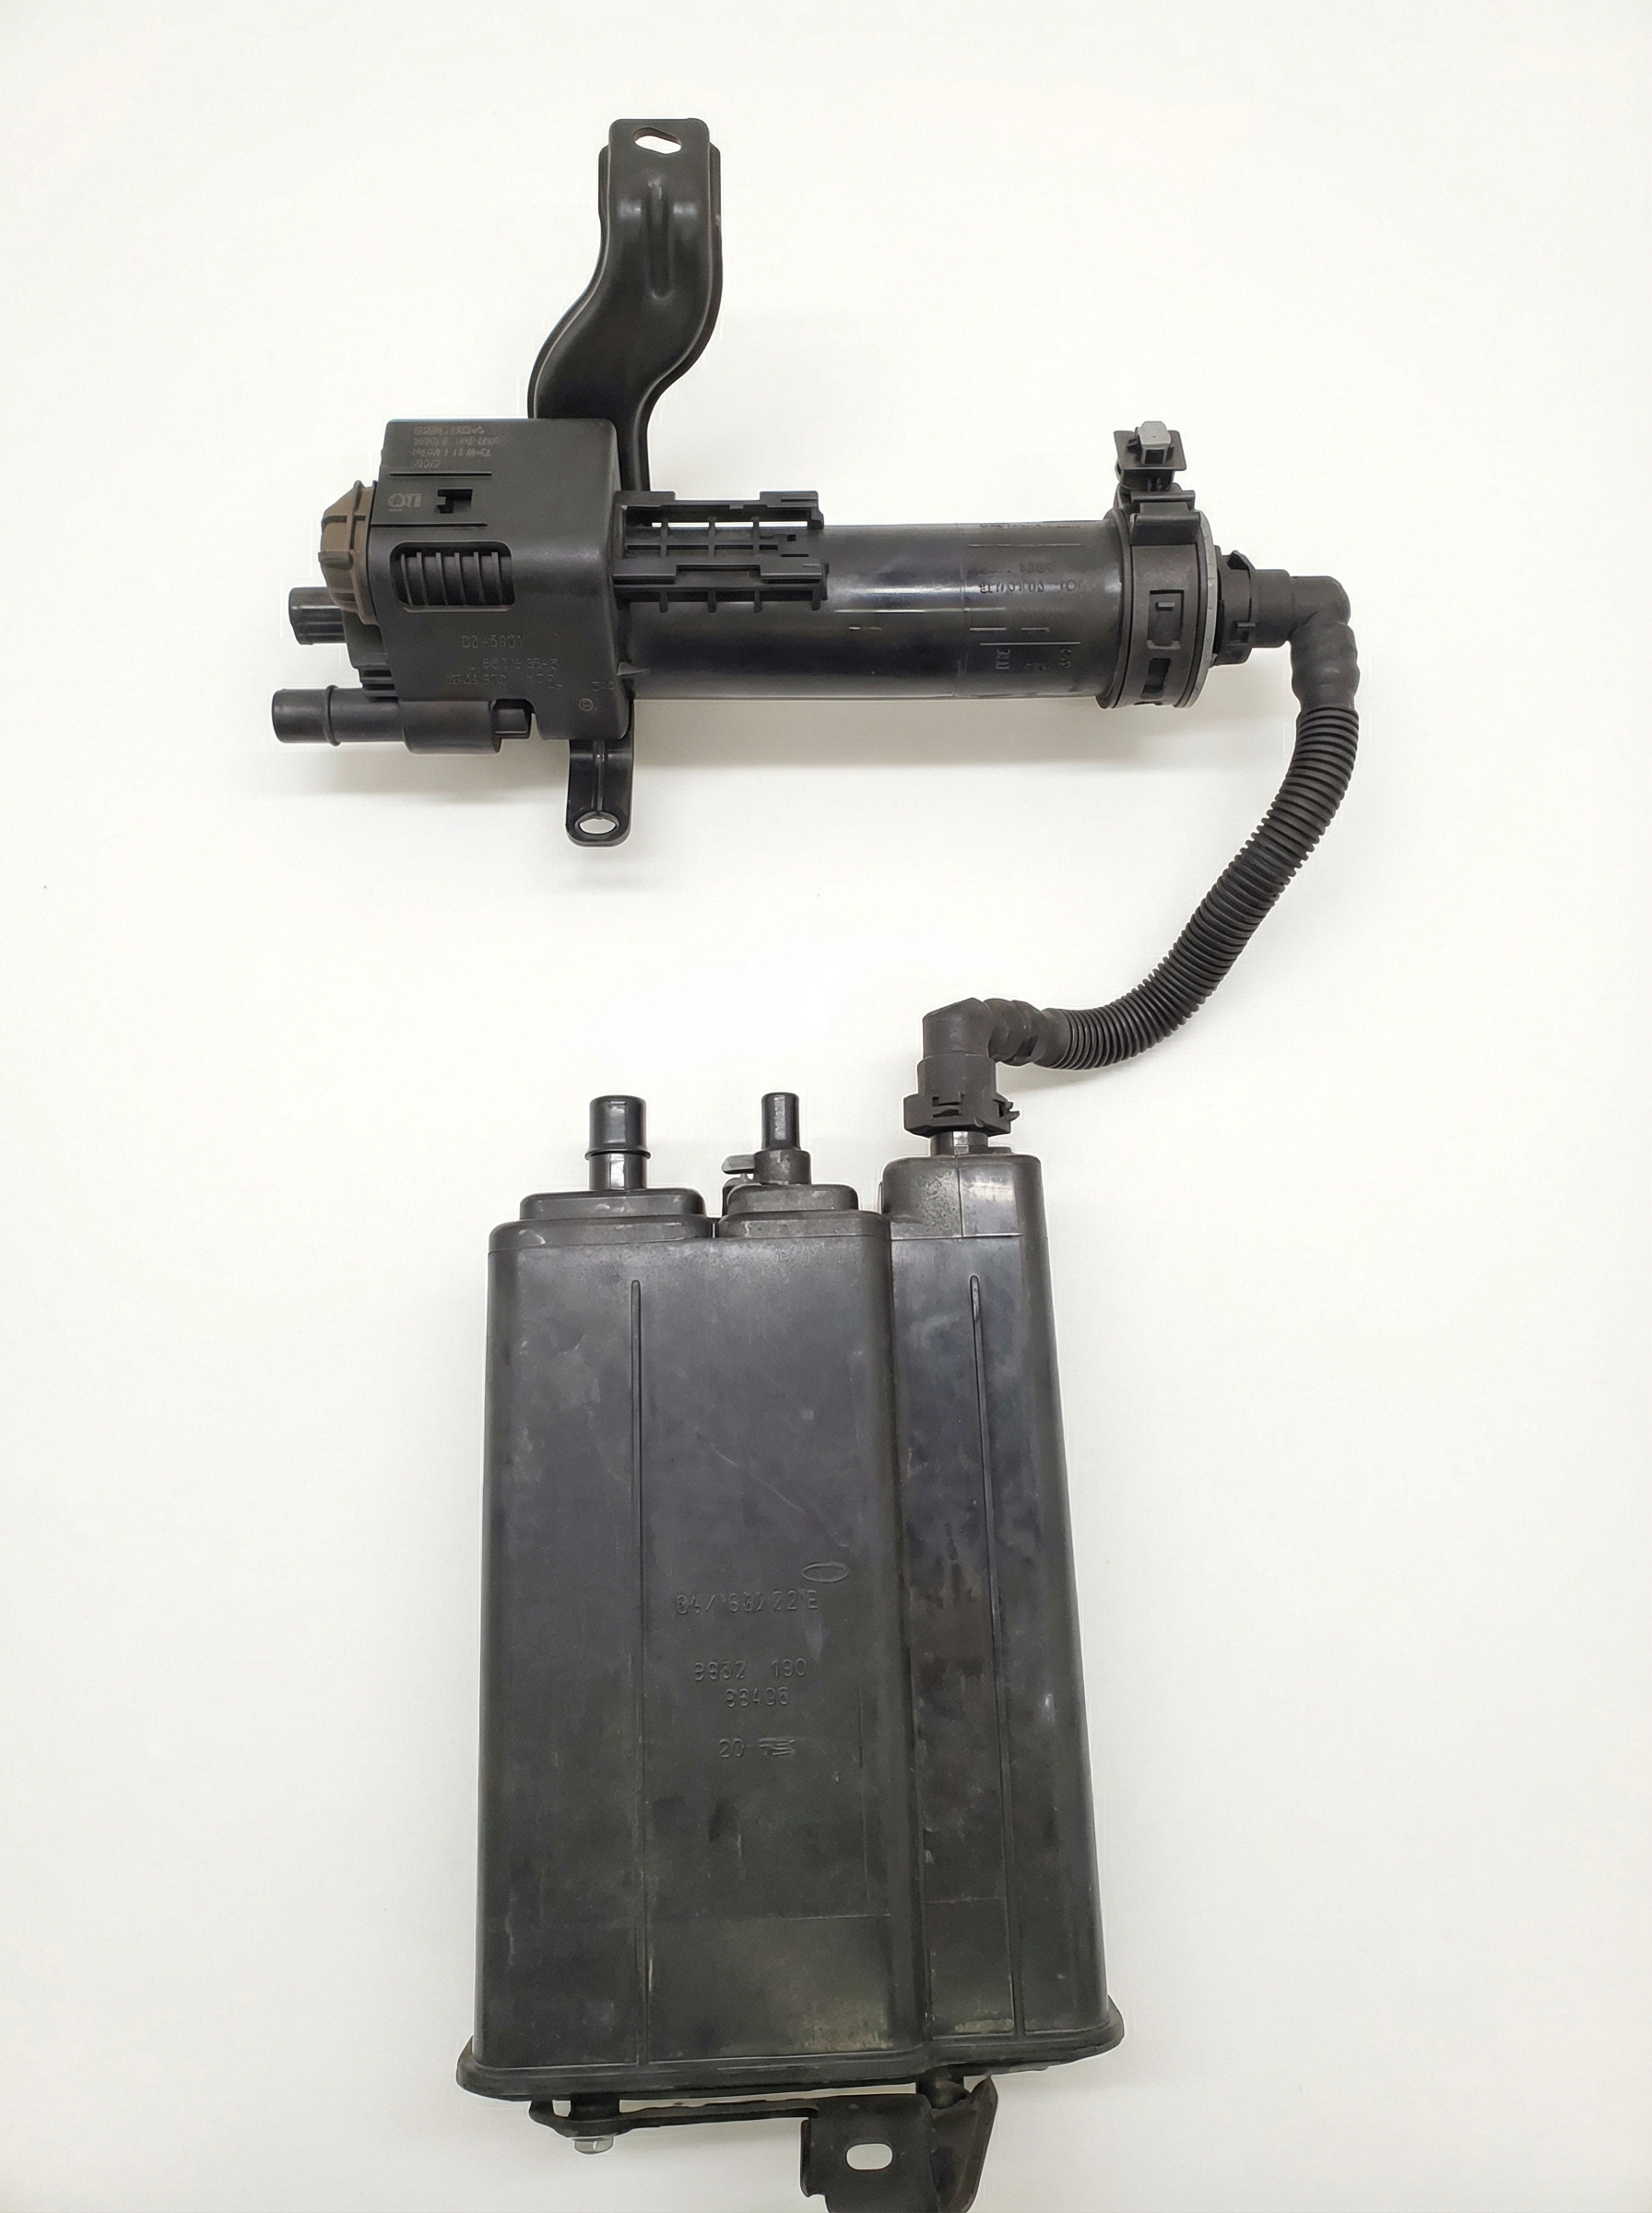
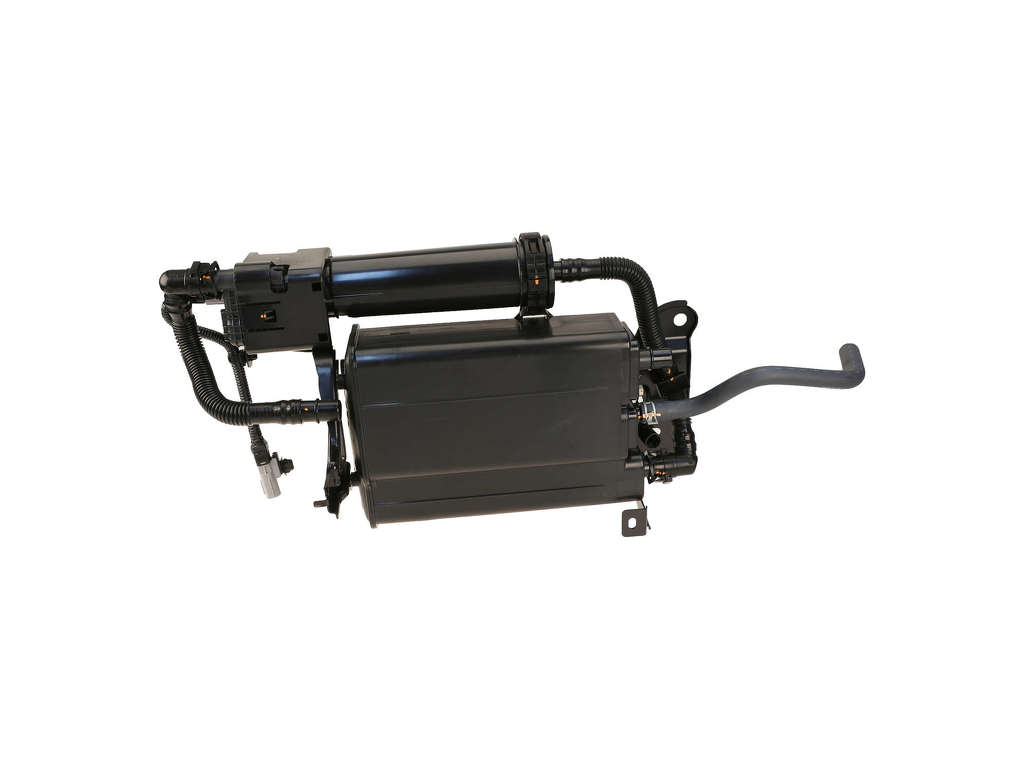
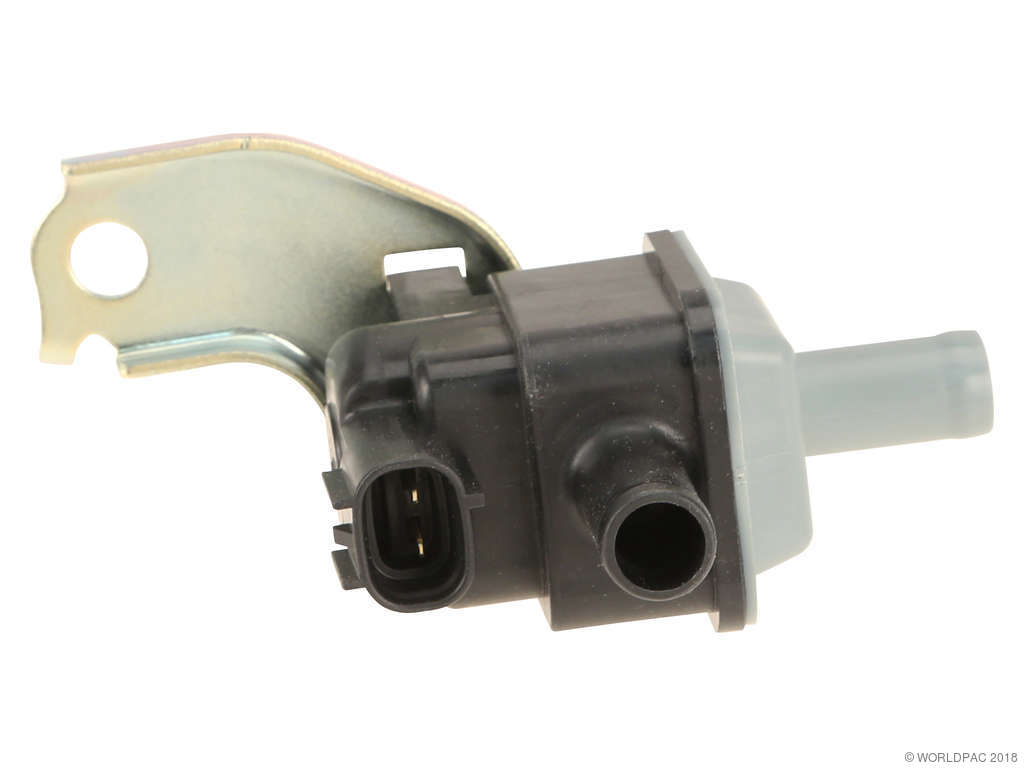
- Failed Charcoal Canister Assembly 🔴 High Probability → Shop Vapor Canister The vent valve (switching valve) is integrated into the canister assembly and is a known failure point due to an internal open circuit in its solenoid. Toyota released an updated part under TSB T-SB-0028-11 for 2010 models, acknowledging a design or manufacturing issue with the original part.
How to confirm: A technician can use a bi-directional scan tool (like Toyota Techstream) to command the vent valve 'ON'. While commanded, the voltage on the control wire (Pin 8, VGND) at the canister connector should drop to near 1V. If it stays high (9V-14V), and the power wire (Pin 9, VLVB) has battery voltage, the canister assembly is faulty. For a DIYer, if the wiring looks good, this is the most probable cause.
Typical fix: Replace the entire charcoal canister assembly located near the fuel tank. It is a single, non-serviceable unit. The original part number 77740-47060 has been superseded by an updated version.
Est. part cost: $550-$750 - Damaged Wiring or Connector ⚪ Low Probability The canister is located under the vehicle near the driver's side rear wheel, exposing its wiring harness to potential road debris, moisture, and corrosion over time.
How to confirm: Visually inspect the wiring harness and the 8-pin connector going to the charcoal canister assembly. Look for any breaks, corrosion on the pins, or chafed insulation. Check for battery voltage on Pin 9 (power) and continuity to the ECM on Pin 8 (control) with the connector unplugged.
Typical fix: Repair the damaged section of the wire harness or clean/replace the connector.
Est. part cost: $5-$50
Rare But Worth Checking
- Faulty Engine Control Module (ECM): → Shop Engine Control Module (ECM) This is extremely rare. The ECM's internal driver for the vent valve circuit can fail, but this should only be considered after the canister assembly and wiring have been definitively ruled out as the cause.
Diagnosis Steps
- Read the code with an OBD-II scanner to confirm P2420 is the primary code present.
- Check if your vehicle's VIN falls under Toyota TSB T-SB-0028-11, which is specific to some 2010 models.
- Raise and safely support the rear of the vehicle to access the charcoal canister assembly, located near the driver's side rear wheel, just behind the fuel tank. You may need to remove a plastic undertray.
- Visually inspect the electrical connector and wiring harness attached to the canister. Look for any signs of damage, corrosion, or loose connections.
- If you have a multimeter, turn the ignition ON (engine off). Back-probe the canister connector. Pin 9 (VLVB) should have battery voltage (9-14V) relative to chassis ground. Pin 8 (VGND) should also read battery voltage when the valve is not commanded on.
- The most definitive test involves using a bi-directional scanner (like Toyota Techstream) to command the 'Vent Valve' to close (ON). While commanded, the voltage on Pin 8 should drop to less than 1V. If it stays high, the valve is not activating.
- Based on the high probability of failure, if the wiring appears intact and has correct baseline voltages, the charcoal canister assembly is the confirmed culprit.
Parts You'll Likely Need
- Charcoal Canister Assembly
(OEM #77740-47060 (Original), 77740-47061 (Updated))— This is the most common cause of P2420, as the internal vent valve fails with an open circuit. The valve is not sold separately, requiring replacement of the entire assembly.
Trusted brands: Toyota (Genuine OEM), Aisan (Often the OEM supplier)
OEM price range: $510-$765
Aftermarket price range: $450-$600
Technical Service Bulletins (TSBs) & Recalls
- T-SB-0028-11 (April 7, 2011): Addresses a MIL 'ON' with DTC P2420 on some 2010 Prius vehicles. It identifies the cause as a faulty charcoal canister and instructs technicians to replace it with an updated part. It also provides specific VIN ranges and diagnostic steps, including voltage checks on pins 8 and 9 of the canister connector.
- TSB Bulletin #T-SB-0024-15_Rev (February 6, 2018): While written for the Corolla, this bulletin highlights that vehicles with the 2ZR engine family may exhibit a MIL "ON" condition with DTC P2420 specifically due to the Evaporative Emission Pressure Switching Valve being stuck off.
Platform-Specific Known Issues
- Toyota issued Technical Service Bulletin T-SB-0028-11 for certain 2010 Prius models due to a high failure rate of the original charcoal canister (P/N 77740-47060), which causes code P2420. The fix is an updated part.
- Manufacturer records for other Toyota models using similar EVAP logic, such as NHTSA ODI #10573840, confirm that P2420 is frequently stored as a MIL "ON" condition across multiple platforms, sometimes appearing alongside other codes like P2195 or P0138.
Mechanic-Grade Diagnostic Values
- EVAP Vent Valve (Switching Valve) Solenoid Resistance — expected: Approximately 20-30 ohms at 68°F (20°C).. Failure: An infinite resistance (OL) reading indicates an open circuit, which is the direct cause of P2420. A reading far outside the expected range also indicates a fault. Note that a solenoid can have correct resistance but be mechanically jammed.
- EVAP Vent Valve Control Circuit Voltage (Active Test) — expected: Less than 1V when commanded ON (closed) via scan tool.. Failure: Voltage remains high (9V-14V) when commanded ON. This confirms the ECM's command is not reaching the valve or the valve's coil is open.
Hidden / Shadow Codes Worth Checking
- Permanent DTC (P-DTC): After a repair, even if the active DTC is cleared with a standard scanner, a 'Permanent' version of the code may remain stored. This will prevent the EVAP monitor from running and will cause an emissions test failure. It cannot be cleared by disconnecting the battery or with most basic scanners. (see via Visible with professional scan tools like Toyota Techstream or advanced consumer scanners. The code will self-clear only after the ECM successfully runs the internal EVAP monitor test, which may require specific drive cycles and a cold soak (sitting for 5-8 hours).)
Scan Tool Commands That Help
- Toyota Techstream: Active Test: 'Control the EVAP Vent VSV' — This is the primary bidirectional test to confirm the fault. Use this while back-probing Pin 8 at the canister connector to see if the ECM can successfully ground the circuit and activate the valve.
- Toyota Techstream: Utility: 'EVAP System Check' — After replacing the canister and clearing the codes, run this utility to force the EVAP monitor to run and verify the entire system is functioning correctly. This can confirm the fix and help clear the Permanent DTC without waiting for multiple natural drive cycles.
Wiring & Ground Locations
- Canister Connector Pin 8 (VGND) — The 8-pin connector on the charcoal canister assembly, located under the car near the driver's side rear wheel.. This is the control wire that the ECM grounds to activate the vent valve. A 'Circuit High' code means this wire is not being pulled to ground, most often due to an open coil inside the canister.
- ECM Ground (E1, E5) — The Engine Control Module (ECM) has several ground points. On similar Toyota models, these are typically bolted directly to the chassis or engine block in the engine bay.. A poor ECM ground can cause a host of unpredictable electrical issues, including faulty readings on sensor circuits. While not a common cause for P2420, it's a foundational check if direct circuit testing is inconclusive.
Real Owner Repair Stories
- Toyota Yaris Forums user (2014 Toyota Yaris, 183k miles) — Check Engine Light with pending and permanent P2420 code. Car drove fine.
❌ Tried (didn't work) No other parts were replaced. Diagnosis went straight to the canister.
✅ What actually fixed it The user tested the original canister by applying 12V to the vent valve pins and heard no 'click', confirming a mechanical or electrical failure of the solenoid. Replacing the canister with a new OEM part resolved the issue. The user noted the permanent code cleared after a couple of drive cycles that included the car sitting for over 6 hours.
OEM Part Supersession History
77740-47060→77740-47061— The original part had a high failure rate for the internal vent valve solenoid, prompting the updated design referenced in TSB T-SB-0028-11.
Model Year Variations Within This Range
- 2010: The official Toyota TSB (T-SB-0028-11) only lists specific VIN ranges for the 2010 model year. While the failure is common across the 2010-2015 generation, the TSB provides a direct, warranty-supported path for repair on those specific early models.
Diagnostic Flowchart
Used vs. New Parts: Buying Guide for This Vehicle
When a used part is the smart pick: Given the high cost of a new OEM canister ($550+), a used OEM part from a reputable auto recycler is a very smart choice for this repair, often costing under $200.
Donor-vehicle mileage cap: roughly under 150000 miles for the part to have meaningful remaining life.
What to inspect on the donor part:
- Visually inspect for cracks or physical damage to the canister body and hose ports.
- **Crucial Test:** Before purchasing, if possible, use a 9V battery or 12V power source to briefly apply voltage across the two vent valve pins on the electrical connector (Pin 8 and Pin 9). You should hear an audible 'click' as the solenoid activates. No click means the part is bad.
- Ask the recycler for the VIN of the donor car to ensure it's from a compatible year range and not from a flood-damaged vehicle.
OEM-only on this vehicle (don't cheap out):
- Charcoal Canister Assembly - Even when buying used, stick to a genuine Toyota (OEM) part. Aftermarket versions are not widely trusted for longevity in forum communities.
Aftermarket brands forum-validated for this vehicle:
- Aisan (often the original manufacturer for Toyota)
Brands owners have reported issues with on this vehicle:
- Generic, unbranded units sold on auction sites have a poor reputation for failing prematurely.
Real Owner Stories
Aggregated from forums and TSBs cited above. Mileages and costs reflect what owners reported in those sources.
2013 Toyota Prius C — 39000 miles
Symptoms: The check engine light came on with code P2420 after previously clearing other EVAP codes (P043E, P043F, P2401, P2402, P2419).
What fixed it: Replaced the charcoal canister assembly. The owner purchased a used assembly on eBay for $200 and installed it themselves after a dealer quoted $900 for the repair.
Cost: $200
Source hint: Check Engine Light (CEL) P2420 - PriusChat
2010 Toyota Prius
Symptoms: Check engine light came on with a group of six EVAP codes: P043E, P043F, P2401, P2402, P2419, and P2420.
What fixed it: The owner reported two years later that they had ignored the light and the car was still running fine without any repairs.
Source hint: Check engine light for 2010 Toyota Prius : r/prius
2010 Prius
Symptoms: A pending P2420 code appeared along with a blinking fuel gauge.
What fixed it: The forum thread did not reach a conclusion on what fixed the P2420 code for this owner.
Source hint: PriusChat
Related OBD-II Codes
Frequently Asked Questions
My 2010 Toyota Prius has code P2420. Is there a known issue or TSB for this?
What is the most common cause of P2420 on the 2010-2015 Prius?
Can I just replace the vent valve instead of the entire charcoal canister assembly?
Where is the charcoal canister located on my Prius?
Besides the Check Engine Light, are there any other symptoms of P2420 on this car?
How much does it cost to fix P2420 on a 2010-2015 Prius?
I have a Lexus CT200h with the same engine. Does it have this same P2420 problem?
Used OEM Parts in Stock
New Aftermarket Parts Available


The information in this article is provided for general reference and educational purposes only. Vehicle specifications, procedures, and part compatibility can vary by production date, trim level, and region. Always consult your vehicle's factory service manual and verify part numbers before purchasing or performing repairs. Safety-critical components such as airbags, seat belts, and braking systems should be installed by a qualified professional.
- Toyota Prius:
- 🧭 Diagnostic Flowchart
- 🛍️ Shop This Part
- What's Unique About the 2010-2015 Toyota Prius
- Symptoms You May Notice
- Most Likely Causes
- Rare But Worth Checking
- Diagnosis Steps
- Parts You'll Likely Need
- Technical Service Bulletins (TSBs) & Recalls
- Platform-Specific Known Issues
- Mechanic-Grade Diagnostic Values
- Hidden / Shadow Codes Worth Checking
- Scan Tool Commands That Help
- Wiring & Ground Locations
- Real Owner Repair Stories
- OEM Part Supersession History
- Model Year Variations Within This Range
- Used vs. New Parts: Buying Guide for This Vehicle
- Real Owner Stories
- 2013 Toyota Prius C — 39000 miles
- 2010 Toyota Prius
- 2010 Prius
- Related OBD-II Codes
- Frequently Asked Questions
- 🎟️ Get 5% Off