
OBD-II Code P2539: Low-Pressure Fuel System Sensor Circuit
What P2539 means, why it triggers, and how to fix it
- P2539 indicates an electrical fault in the low-pressure fuel sensor circuit, with a failed sensor or corroded wiring causing 80% of cases.
- Never replace the sensor without first verifying the 5-volt reference and ground wires at the connector using a digital multimeter.
- Driving with P2539 causes hard starts, stalling, and forces the high-pressure fuel pump to overwork, risking a $1,500+ replacement.
- Check your vehicle's fuel level and fuel pump relay before diving into complex diagnostics, as an empty tank or blown $15 fuse triggers this exact code.
What Does P2539 Mean?

The Engine Control Module (ECM) detected an electrical circuit problem with the low-pressure fuel system sensor. This sensor measures fuel pressure from the in-tank pump before it reaches the high-pressure pump. The computer requires this data to manage fuel delivery; an incorrect signal disrupts engine performance.
Technical definition: The Powertrain Control Module (PCM) detected a voltage signal from the low-pressure fuel system sensor outside the expected range, or identified an open or short circuit. The PCM checks the sensor's signal at startup expecting a specific voltage; an irrational or missing signal sets code P2539.
Can I Drive With P2539?
Yes, But With Caution. You can usually drive, but expect hard starting, stalling, and reduced power. Get it checked immediately to avoid getting stranded. Ignoring the code strains the expensive high-pressure fuel pump on direct-injection engines and damages the catalytic converter from a rich fuel mixture, adding $800 to $2,500 to the final repair bill.
Common Causes

- Faulty Low-Pressure Fuel Sensor (Very Common) — The sensor fails internally due to electronic degradation or fuel contamination, sending incorrect voltage readings to the computer.
- Wiring or Connector Damage (Common) — The wiring harness or sensor connector becomes damaged, corroded, or loose. This creates an open or short circuit, interrupting the signal. Green-tinted corrosion on connector pins or chafed insulation are primary indicators.
- Faulty Fuel Pump Relay or Fuse (Common) — A corroded fuse holder or failing fuel pump relay causes an intermittent loss of power to the entire low-pressure circuit. This is frequently overlooked and leads to misdiagnosis.
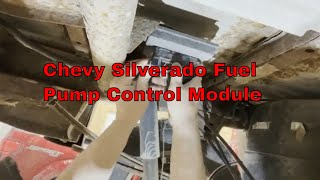
- Faulty Fuel Pump Control Module (FPCM) (Less Common) — Modern vehicles use a dedicated module to control fuel pump speed. If this module fails or its connector corrodes, it cannot regulate the pump, leading to pressure values the ECM interprets as a sensor circuit fault. 🎬 Watch: How to fix a common fuel pump control module issue.
- Mechanical Fuel Delivery Issues (Less Common) — An empty fuel tank, a failing in-tank fuel pump, or a severely clogged fuel filter causes pressure to drop so low that the ECM deems the sensor's reading out of range.
- Powertrain Control Module (PCM) or Software Issues (Rare) — Outdated software contains incorrect thresholds for the sensor reading, or the ECM's internal circuits fail. Always check for manufacturer TSBs regarding software updates before replacing the PCM.
Symptoms

- Check Engine Light On — The Malfunction Indicator Lamp (MIL) illuminates immediately upon detecting the circuit fault.
- Hard Starting or No Start — The engine requires multiple cranks to start, takes longer than usual, or fails to start entirely.
- Engine Stalling or Rough Idle — The engine stalls when coming to a stop, idling, or when the fuel tank is low. A rough, vibrating idle is highly common.
- Reduced Engine Power and Acceleration — The vehicle feels sluggish, hesitates under load, or enters a 'limp mode' with severely restricted power.
- Poor Fuel Economy — The computer commands more fuel than necessary to compensate for the incorrect sensor reading, drastically reducing gas mileage.
Diagnostic Flowchart

Tap your situation to follow the diagnostic path that matches what you're seeing on this code.
Common Fixes & Costs
- Replace Low-Pressure Fuel Sensor — Parts: $50-$200, Labor: $100-$250, ~1.2 hr book time (DIY)
- Repair Wiring or Connector — Parts: $10-$50, Labor: $100-$200, ~1.5 hr book time (Intermediate)
- Replace Fuel Pump Relay or Fuse — Parts: $15-$50, Labor: $50-$100, ~0.5 hr book time (DIY)
- Replace Fuel Pump Control Module (FPCM) — Parts: $100-$300, Labor: $100-$200, ~1.0 hr book time (Intermediate)
- Replace In-Tank Fuel Pump — Parts: $200-$700, Labor: $200-$500, ~3.0 hr book time (Professional)
DIY vs Professional
- Replace Low-Pressure Fuel Sensor — Beginner:
- Repair Wiring or Connector — Beginner:
- Replace Fuel Pump Relay or Fuse — Beginner:
- Replace Fuel Pump Control Module (FPCM) — Beginner:
- Replace In-Tank Fuel Pump — Beginner:
Used vs. New Parts: Buying Guide
When a used part is worth it: Buying a used low-pressure fuel sensor is never recommended. It is a relatively inexpensive electronic component where age and condition are unknown. The savings do not justify the risk of premature failure.
Donor-vehicle mileage cap: roughly under 40000 miles for the part to have meaningful remaining life.
Donor quality checklist:
- If buying a used FPCM, only source from a very low-mileage wrecked vehicle.
- Ensure the part number is an exact match, as superseded parts are common.
- Avoid parts from flood or rust-belt vehicles due to severe corrosion risk.
Decision logic:
- If The part is a low-pressure fuel sensor → Buy a new OEM or high-quality aftermarket part. The cost savings of a used part do not justify the risk.
- If You are replacing a Fuel Pump Control Module (FPCM) → A tested, guaranteed used module from a reputable recycler is a cost-effective option, but verify if it requires dealer programming.
- If The vehicle is old (>150k miles) and the budget is extremely tight → A used sensor is a gamble but serves as a temporary fix. Expect a significantly shorter lifespan.
Warranty tradeoff: Used parts typically offer a 30-90 day warranty on the part only. New aftermarket parts offer a 1-year to limited lifetime warranty. New OEM parts carry a 1-2 year warranty.
Worst-case if a used part fails: $200-$400 if a used sensor fails shortly after installation, requiring repeat labor costs and the purchase of another part.
What Happens If You Wait — Timeline
- 0-2 weeks: Check Engine Light illuminates. You notice occasional longer crank times to start the engine, but no major performance issues. (MPG impact: 0-2%% · Added cost: $0)
- 2 weeks - 3 months: Hard starting becomes frequent. Engine hesitates during acceleration. A noticeable drop in fuel economy occurs as the ECM defaults to a rich fuel mixture. (MPG impact: 5-10%% · Added cost: $50-$150 in wasted fuel)
- 3-6 months: Engine stalling at idle becomes common. Vehicle enters 'limp mode' with restricted power. The high-pressure fuel pump (HPFP) is under constant strain from inconsistent low-side pressure. (MPG impact: 10-15%% · Added cost: $800-$2000 (Risk of HPFP failure increases significantly))
- 6+ months: A no-start condition is highly likely. The risk of complete HPFP failure is severe. Prolonged rich running damages the catalytic converter. (MPG impact: 15-25%% · Added cost: $1500-$3500+ (Cost of HPFP and/or catalytic converter replacement))
Cost of Not Fixing It
- 0-1 month: Noticeable drop in fuel economy (5-15%), poor acceleration, and potential stalling. Risk of being stranded increases. (Added cost: Negligible, aside from extra fuel costs.)
- 1-6 months: Increased strain on the high-pressure fuel pump (HPFP) in direct-injection engines as it works harder to compensate for low supply pressure, leading to premature failure. (Added cost: $800-$2000+)
- 6+ months: A persistent incorrect air/fuel mixture overheats and destroys the catalytic converter, leading to a massive repair bill. (Added cost: $1200-$2800)
Diagnosis Steps
- Check Codes and TSBs
Use an OBD-II scanner to read all trouble codes. Note any codes accompanying P2539, as they provide crucial context. Check for Technical Service Bulletins (TSBs) for your specific vehicle, as a known software update or warranty extension often exists.
Tools: OBD-II Scanner (Beginner) - Visually Inspect Wiring, Fuses, and Fuel Level
Verify the vehicle has at least a quarter tank of gas. Locate the low-pressure fuel sensor and inspect its connector and wiring harness for frayed wires, corrosion, or loose connections. Check the fuel pump fuse and relay in the power distribution box.
Tools: Flashlight (Beginner) - Test Sensor Reference and Ground
With the key on and engine off (KOEO), disconnect the sensor. Use a multimeter to test the harness terminals. You must find a 5-volt reference wire from the PCM and a solid ground wire (near 0 volts). A missing 5V reference or bad ground confirms a wiring or PCM issue, not a bad sensor.
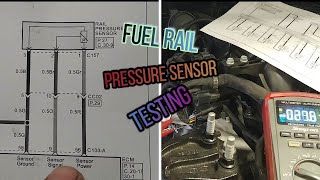
Tools: Digital Multimeter, Vehicle Service Manual (Intermediate) - Test Sensor Signal Voltage
Reconnect the sensor and back-probe the signal wire. Monitor the voltage with KOEO, then while cranking and idling. Voltage must change with fuel pressure (typically 0.5V at no pressure to 4.5V at max pressure). A static 0V or 5V reading confirms internal sensor failure.
Tools: Digital Multimeter, Back-probe Kit (Intermediate) - Check Mechanical Fuel Pressure
If the sensor and wiring test good, use a mechanical fuel pressure gauge to test the actual pressure from the in-tank pump. Compare the reading to manufacturer specs (typically 40-75 PSI). Low actual pressure confirms a failing fuel pump or clogged filter.
Tools: Fuel Pressure Gauge (Advanced) - Perform a Voltage Drop Test
Connect the positive multimeter lead to the sensor's ground pin and the negative lead to the battery's negative terminal. With the fuel pump running, the reading must be under 0.2 volts (200mV). Higher readings indicate high resistance in the ground circuit.
Tools: Digital Multimeter, Back-probe Kit (Advanced) - Analyze Live Data PIDs
Using an advanced scan tool, monitor 'Fuel Rail Pressure' (low side) and 'Commanded Fuel Rail Pressure'. At idle, actual pressure must closely match commanded pressure. Significant deviation or erratic readings point to a failing sensor, pump, or FPCM.
Tools: Advanced OBD-II Scan Tool (Advanced) - Analyze Sensor with an Oscilloscope
Connect an oscilloscope to the sensor's signal wire and ground. A good sensor shows a clean, stable voltage line that rises and falls smoothly. A bad sensor shows a noisy, erratic signal with sudden dropouts or spikes that a multimeter is too slow to catch.
Tools: Oscilloscope, Back-probe Kit (Advanced)
When This Code Triggers (Freeze-Frame Conditions)
- Engine Coolant Temp: 175-205°F (Fully warmed up during steady driving.)
- RPM: 700-2500 RPM (Code sets at idle or during cruise/light acceleration.)
- Engine Load: 20-50% (Occurs under steady state or light load conditions where pressure is expected to be stable.)
- Vehicle Speed: 0 mph or 40-65 mph (Triggers at idle (no-start) or during steady highway driving.)
Related Codes
- P0087 — P0087 means 'Fuel Rail/System Pressure - Too Low.' While P2539 is an electrical circuit code, P0087 indicates actual pressure is low. If you have both, a mechanical issue like a bad pump is likely causing both codes.
- P2540 — P2540 is for 'Low Pressure Fuel System Sensor Circuit Range/Performance.' P2539 indicates a hard electrical fault (open/short), while P2540 means the sensor is working but its signal is irrational. Having both confirms internal sensor failure.
- P0190 — P0190 is 'Fuel Rail Pressure Sensor Circuit Malfunction.' This refers to the HIGH-pressure sensor on the fuel rail. P2539 refers to the LOW-pressure sensor before the high-pressure pump. They are separate sensors.
- P008A — P008A is 'Low Pressure Fuel System Pressure - Too Low.' If you see P2539 and P008A together, verify actual fuel pressure with a mechanical gauge to rule out a failing fuel pump before condemning the sensor circuit.
Climate & Environmental Factors
- High Humidity / Road Salt: Accelerates corrosion of wiring connectors, fuse box terminals, and the Fuel Pump Control Module (FPCM). This corrosion creates high resistance or open circuits, a primary cause of P2539.
- Extreme Heat: Causes electronic components within the fuel pressure sensor or FPCM to fail under 'heat soak' conditions, leading to intermittent faults that only appear when the engine bay is hot.
- Extreme Cold: Reduces battery capacity, causing low system voltage during startup that triggers spurious electronic fault codes. It also forces older fuel pumps to struggle to achieve pressure.
How to Talk to a Mechanic About This Code
Say this: "I have a check engine light with code P2539 and I'd like to schedule a diagnostic appointment. I'm looking for a technician to test the low-pressure fuel sensor circuit, not just replace the sensor. Specifically, I'd like you to verify the 5-volt reference, ground, and signal wire integrity at the sensor connector."
This signals to the shop that you understand P2539 is a circuit code requiring proper electrical diagnosis. It discourages them from simply replacing the sensor without testing, saving you money on unnecessary parts.
Avoid saying:
- 'Just fix my check engine light.'
- 'My car is stalling, I think it's the fuel pump.'
- 'Go ahead and replace the fuel pressure sensor.'
Questions to ask before authorizing the repair:
- What were the voltage readings for the sensor's 5V reference, ground, and signal wire?
- Did you find any corrosion or damage on the sensor connector or the Fuel Pump Control Module (FPCM) connector?
- If the sensor and wiring are good, what is the next diagnostic step you recommend?
- What is the warranty on the parts and labor for this repair?
Where to Take It: Dealer vs Independent vs Chain
- Dealer:
Recommended if the issue is traced to a control module that needs programming or if the vehicle is known for specific manufacturer quirks.
Best for: Vehicles under warranty, Complex electrical issues or FPCM/PCM programming is required, Vehicles with known TSBs or recalls for this issue (e.g., GM, Hyundai)
Downsides: Highest labor rates, typically 1.5-2x more than independent shops., Recommends replacing entire modules or harnesses when a simpler repair is possible. (Typical cost: +50% vs. baseline) - Independent Shop:
Best fit for most cases. A good independent technician performs the necessary circuit tests effectively and at a lower cost than a dealer.
Best for: Out-of-warranty vehicles where cost is a concern., Shops with strong electrical diagnostic capabilities (look for ASE certifications).
Downsides: Quality and diagnostic skill vary widely. Vet shops carefully through reviews., Lacks access to the very latest manufacturer-specific TSBs or programming tools. (Typical cost: +0% vs. baseline) - Chain Shop:
High risk of misdiagnosis. Avoid for P2539 unless you are certain the fix is a simple part swap. They lack the time for proper circuit tracing.
Best for: Simple, clear-cut repairs like a fuse or an easily accessible relay.
Downsides: Technician skill varies dramatically., Incentivized to replace parts rather than perform detailed diagnostics, leading to replacing a good sensor when the fault is in the wiring. (Typical cost: -10% vs. baseline)
When to Walk Away From the Repair
If the estimated repair cost for the P2539 fault exceeds 40-50% of your car's current private-party market value, pause and consider your options.
- Car worth $4000, fix is $350: Fix it. This is a relatively inexpensive repair that is well below the threshold and restores drivability.
- Car worth $12000, fix is $1200: Fix it. While more expensive (likely involving a fuel pump or FPCM), the cost is still well under the threshold for a vehicle of this value.
- Car worth $2500, fix is $1400: Walk away. The repair cost is over half the car's value. It is not economically sensible to proceed. Consider selling the car 'as-is'.
What Scan Tool You Need for This Code
Minimum: An OBD-II scanner that reads and displays live data PIDs, specifically the 'Fuel Rail Pressure' PID for the low-pressure system. A basic code reader is not sufficient.
A simple $20 code reader only tells you P2539 exists. It cannot show you the live voltage or pressure reading the sensor sends to the computer, which is essential to see if the sensor's reading is stuck or erratic.
Budget: BlueDriver Pro (~$100) — Connects to your smartphone and provides live data graphing for the fuel pressure sensor. This allows you to watch the sensor's output in real-time to see if it drops out.
Mid-range: Foxwell NT510 Elite (~$180) — Offers manufacturer-specific diagnostics and bidirectional controls. For certain vehicles, it activates the fuel pump directly, isolating the fault to the sensor circuit.
Professional: Autel MaxiCOM MK808S (~$450) — Provides full bidirectional control, allowing a technician to command components like the fuel pump on and off to test the circuit under load. Offers comprehensive all-system scans.
Rent vs buy: For a one-time fix, auto parts stores offer free loaner tools that read live data. However, a digital multimeter ($25) is an equally important tool for testing the wiring directly. If you do your own maintenance, buying the BlueDriver offers excellent long-term value.
How to Clear the Code After You Fix It
- Reconnect any disconnected components.
- Use an OBD-II scan tool to clear the P2539 trouble code from the PCM's memory.
- Perform a complete OBD-II drive cycle to allow the vehicle's readiness monitors to run and set to 'Ready'.
Drive cycle (~30 minutes): A generic drive cycle includes a cold start (engine temp below 122°F), 2-3 minutes of idling, 10-15 minutes of mixed city/highway driving including steady speeds around 55 mph, and several smooth decelerations without hard braking. The vehicle must then be shut off and allowed to cool.
Readiness monitors affected: Catalyst Monitor, Evaporative System (EVAP) Monitor, O2 Sensor Monitor
Before emissions retest: drive at least 50 miles to fully set monitors.
Watch out for:
- Disconnecting the battery clears the code but resets all readiness monitors to 'Not Ready', guaranteeing an emissions test failure.
- The code returns immediately if the underlying electrical or mechanical fault is not properly repaired.
- Failing to complete a full drive cycle leaves monitors 'Not Ready', preventing the vehicle from passing an OBD-II emissions test.
Will This Fail Emissions / State Inspection?
Yes — this code typically fails an OBD-II emissions inspection.
- California: An illuminated Check Engine Light results in an automatic smog check failure. After repair, a drive cycle must be completed to set readiness monitors before a re-test.
- New York: The NYS DMV inspection includes an OBD-II scan. An active P2539 code causes an automatic failure of the emissions portion of the inspection.
- Texas: In counties requiring emissions testing, an active Check Engine Light for P2539 causes the vehicle to fail the OBD-II test.
Most Commonly Affected Vehicles
- Audi A4, A6, Q5 (2009-2016) — Common on 2.0T TFSI and 3.0T engines. The low-pressure sensor (G410) is a frequent failure point. Ensure you use the latest revised part number.
- Volkswagen Jetta, Passat, GTI (2008-2015) — Vehicles with 2.0T FSI/TSI direct-injection engines are prone to this code due to a failing sensor or FPCM. Often presents as VAG-specific code P310B.
- Ford Transit, F-Series Super Duty (2011-2020) — Noted on 6.7L Powerstroke and Transit vans. Causes range from the sensor to a bad fuse box connection or a chafed wire harness near the frame rail.
- BMW 3-Series, 5-Series (2007-2013) — Logged under manufacturer-specific code 29F3, pointing directly to the low-pressure fuel sensor located on the fuel line in the engine bay.
- Chevrolet / GMC Silverado, Sierra, Equinox, Traverse (2016-2023) — Experiences P2539 due to faulty sensors or severe corrosion at the FPCM connector mounted on the frame rail. Check for active GM recalls.
- Hyundai / Kia Elantra N, Kona N, Veloster N, Sonata (2019-2023) — Multiple recalls and TSBs address high-pressure fuel pump issues that cause related fuel system faults. Fixes involve software updates and pump replacement.
- Subaru Ascent, Impreza, Legacy, Outback (2013-2020) — A massive recall addresses defective Denso low-pressure fuel pumps that fail and cause stalling, triggering related pressure codes.
- Mercedes-Benz Various Models (2010-2018) — Code definitions sometimes appear incorrectly as 'Passenger Compartment Dimming 2 Circuit' on generic scanners. Always cross-reference with drivability symptoms.
Manufacturer-Specific Notes
- Volkswagen/Audi (VAG): VAG-specific scan tools display code P310B ('Low Fuel Pressure Regulation') instead of P2539. It points to a faulty G410 low-pressure sensor, which had warranty extensions on several models.
- BMW: BMW systems use the specific code 29F3 to report a fault with the low-pressure fuel sensor, which is the direct equivalent of the generic P2539 code.
- Ford: On 6.7L Powerstroke diesels, P2539 is often accompanied by turbo codes like P0299 (Turbo Underboost). The fuel system issue causes a lack of power that the computer misinterprets as a turbo problem.
- Chevrolet / GMC: GM issued safety recall N212332040 for 2021-2023 models for a faulty Fuel Pump Power Control Module (FPCM) that fails and causes a stall. Dealerships replace the FPCM for free under this recall.
- Hyundai/Kia: Recall 262/023G addresses high-pressure fuel pump failure in N models. Always check for recalls with a dealer, as an ECU update or component replacement is often covered free of charge.
Real Owner Stories
2011 Audi A6 3.0T with intermittent stalling
The car stalled after long drives followed by short trips in hot weather. The P2539 code reappeared consistently after being cleared.
What they tried:
- Initial thought was a failing low-pressure fuel pump (LPFP).
Outcome: The owner replaced the cheaper low-pressure sensor (G410, part #06E906051K). This fixed the issue entirely, and the code did not return.
Lesson: For intermittent heat-related stalling with P2539 on VAG cars, the low-pressure sensor is a common and inexpensive first part to replace before suspecting the entire fuel pump.
2013 Audi A4 at 180k miles with persistent P2539
Check engine light was on with code P2539. The owner had already tried swapping the high-pressure fuel pump (HPFP) with no success.
What they tried:
- Replaced the HPFP.
- Replaced the low-pressure fuel sensor - code came back.
- Checked PCV valve and for air leaks.
Outcome: The owner discovered a stuck-closed EVAP Purge Valve (N80). After replacing it with an OEM unit and driving 40 miles, the code cleared and the car passed smog.
Lesson: P2539 has unusual root causes. If direct circuit and sensor checks don't resolve the issue, investigate related systems like EVAP before replacing expensive components.
2007-2013 Chevy/GMC Truck with no-start
Vehicle would not start. Owner suspected either the in-tank fuel pump or the Fuel Pump Control Module (FPCM), a known issue on these trucks.
What they tried:
- Bypassed the FPCM by jumping the power and ground wires at its connector. With the key on, the fuel pump could be heard running.
Outcome: This test confirmed the in-tank pump was functional and the FPCM had failed. The owner replaced the FPCM with a pre-programmed aftermarket unit for $70, resolving the no-start.
Lesson: On GM trucks, quickly test the FPCM by jumping the large power/ground wires at the module connector. If the pump runs, the FPCM is bad, saving you from dropping the fuel tank.
How to Prevent This Code From Triggering
- Use Top-Tier Certified Gasoline (Every fill-up) — Top-Tier gas contains a higher concentration of detergent additives that prevent and clean deposits from fuel injectors and intake valves, reducing strain on the entire fuel system.
- Replace Fuel Filter at Recommended Intervals (Per manufacturer's schedule (e.g., every 30,000-60,000 miles)) — A clean fuel filter ensures unrestricted fuel flow, preventing the low-pressure pump from overworking. A clogged filter leads to pressure drops that trigger sensor codes.
- Apply Dielectric Grease to Connectors (During sensor replacement or if working near connectors) — Applying dielectric grease to the pins of the fuel pressure sensor and FPCM connectors seals out moisture and prevents corrosion, a primary cause of circuit faults.
- Keep the Fuel Tank Above 1/4 Full (Daily habit) — Fuel cools the in-tank electric fuel pump. Consistently running near empty causes the pump to overheat, shortening its life and leading to intermittent pressure problems.
- Periodically Use a Fuel System Cleaner (Once or twice a year) — A quality fuel system cleaner with PEA (polyetheramine) removes water condensation and cleans sulfur deposits from sensor components, ensuring accurate readings.
Frequently Asked Questions
Can I fix P2539 myself?
Replacing a bad sensor is a manageable DIY repair for someone with basic tools. However, if the problem involves wiring, the fuel pump, or the ECM, stop and seek professional diagnosis. Always relieve fuel pressure before starting.
What are the most common misdiagnosis mistakes for P2539?
The top mistake is replacing the low-pressure sensor without testing the electrical circuit. The fault frequently lies in damaged wiring, a corroded connector, or a blown fuse. Always verify the 5-volt reference and ground before buying parts.
Why did the code come back after I replaced the low-pressure sensor?
If the code returns, the original sensor was likely functional. The root cause is elsewhere in the circuit, such as a chafed wire, bad ground, or failing Fuel Pump Control Module (FPCM). A weak mechanical fuel pump also causes a new sensor to send out-of-range signals.
What happens if I ignore the P2539 code?
Ignoring it causes worsening performance, stalling in traffic, and eventual no-start conditions. On direct-injection engines, it forces the high-pressure fuel pump to overwork, leading to premature failure. A persistent rich condition also destroys the catalytic converter over time.
Can a bad battery cause a P2539 code?
Yes, a weak battery causes low system voltage during startup. This voltage drop confuses electronic modules and triggers spurious fault codes like P2539. Always ensure your battery rests above 12.4 volts before chasing complex electrical gremlins.
Is the low-pressure fuel sensor the same as the fuel rail pressure sensor?
No, they are entirely different components. The low-pressure sensor (P2539) measures 40-75 PSI from the in-tank pump. The fuel rail pressure sensor (P0190) measures the 2,000+ PSI generated by the high-pressure pump on direct-injection engines.
Can a clogged fuel filter cause P2539?
Yes. A severely clogged filter restricts fuel flow, dropping pressure below the sensor's plausible range. The PCM interprets this extremely low reading as a sensor circuit failure. Consider this if all electrical circuit tests pass.
Key Takeaways
- P2539 indicates an electrical fault in the low-pressure fuel sensor circuit, with a failed sensor or corroded wiring causing 80% of cases.
- Never replace the sensor without first verifying the 5-volt reference and ground wires at the connector using a digital multimeter.
- Driving with P2539 causes hard starts, stalling, and forces the high-pressure fuel pump to overwork, risking a $1,500+ replacement.
- Check your vehicle's fuel level and fuel pump relay before diving into complex diagnostics, as an empty tank or blown $15 fuse triggers this exact code.
Helpful Videos
![Easy Fix for Common Chevy Problem [Fuel Pump Control Module]](https://img.youtube.com/vi/38Xeo1uLBoU/mqdefault.jpg)
Shop the Parts Behind P2539
Below are the parts most often responsible for code P2539, ranked by how frequently each one is the actual culprit (per the diagnosis above). Tap any to see what we have for your vehicle.


The information in this article is provided for general reference and educational purposes only. Vehicle specifications, procedures, and part compatibility can vary by production date, trim level, and region. Always consult your vehicle's factory service manual and verify part numbers before purchasing or performing repairs. Safety-critical components such as airbags, seat belts, and braking systems should be installed by a qualified professional.
- 🧭 Diagnostic Flowchart
- 🎬 Helpful Videos
- 🛍️ Shop This Part
- What Does P2539 Mean?
- Can I Drive With P2539?
- Common Causes
- Symptoms
- Common Fixes & Costs
- DIY vs Professional
- Used vs. New Parts: Buying Guide
- What Happens If You Wait — Timeline
- Cost of Not Fixing It
- Diagnosis Steps
- When This Code Triggers (Freeze-Frame Conditions)
- Related Codes
- Climate & Environmental Factors
- How to Talk to a Mechanic About This Code
- Where to Take It: Dealer vs Independent vs Chain
- When to Walk Away From the Repair
- What Scan Tool You Need for This Code
- How to Clear the Code After You Fix It
- Will This Fail Emissions / State Inspection?
- Most Commonly Affected Vehicles
- Manufacturer-Specific Notes
- Real Owner Stories
- 2011 Audi A6 3.0T with intermittent stalling
- 2013 Audi A4 at 180k miles with persistent P2539
- 2007-2013 Chevy/GMC Truck with no-start
- How to Prevent This Code From Triggering
- Frequently Asked Questions
- Can I fix P2539 myself?
- What are the most common misdiagnosis mistakes for P2539?
- Why did the code come back after I replaced the low-pressure sensor?
- What happens if I ignore the P2539 code?
- Can a bad battery cause a P2539 code?
- Is the low-pressure fuel sensor the same as the fuel rail pressure sensor?
- Can a clogged fuel filter cause P2539?
- Key Takeaways
- 🎟️ Get 5% Off