
U0073 on 2015-2020 Chevrolet Trax: Causes and Fixes for Communication Bus Failure
On a 2015-2020 Chevy Trax, code U0073 is most often caused by a poor ground connection at G103 (in front of the battery) or a chafed engine wiring harness near the firewall or G100 ground stud. These known issues are documented in GM TSBs. The fix is typically low-cost, involving cleaning the ground or repairing a wire, and can often be a DIY job for those comfortable with basic wiring.
- U0073 on a Chevy Trax is almost always a wiring or ground issue, not a failed computer.
- The top three places to check are the G103 ground connection and the engine harness for chafing against the firewall and the G100 ground stud.
- This issue is well-documented by GM, and the TSBs provide a clear roadmap for diagnosis and repair.
- The repair is inexpensive, often requiring only basic tools and electrical tape, but can be labor-intensive to access and fix.
- Do not replace expensive modules like the ECM or TCM until these common, specific wiring and ground issues have been completely ruled out.
What's Unique About the 2015-2020 Chevrolet TRAX

The 2015-2020 Chevrolet Trax and its platform-mate, the Buick Encore, are known for specific, well-documented issues that trigger the U0073 code. Unlike a generic communication failure that could be anywhere, on the Trax the problem is frequently traced to either a poor ground connection at the G103 stud (due to paint or corrosion) or the engine wiring harness rubbing through its insulation at specific points, such as the firewall or the G100 ground stud. General Motors has issued multiple Technical Service Bulletins (TSBs) detailing these exact failure points, which makes diagnosis much more direct than on other vehicles.
Diagnostic Flowchart

Tap your situation to follow the diagnostic path that matches what you're seeing on this vehicle.
Generation note: The 2015-2020 year range covers the first generation of the Chevrolet Trax, which includes a significant facelift for the 2017 model year. The documented causes, particularly the TSBs regarding wiring and grounds, apply across this entire year range, both pre and post-facelift.
🎬 Watch: Common issues and overview of the 1st Gen TraxSymptoms You May Notice

- Check Engine Light (Malfunction Indicator Lamp or MIL) is on.
- Erratic or non-functional instrument cluster gauges, especially the speedometer dropping out.
- Intermittent service messages appearing on the driver information center, such as 'Service StabiliTrak', 'Service All Wheel Drive', or loss of power steering warnings.
- Car goes back to normal after being turned off and on again.
- Potential for sudden loss of power steering.
- Transmission may shift harshly or get stuck in one gear (limp mode).
- On AWD models, an 'AWD OFF' message may appear.
- Replacing the ECM or TCM without confirming a wiring or ground fault first. The TSBs strongly suggest the issue is external to the modules themselves, making module replacement an expensive and often ineffective first step.
Most Likely Causes

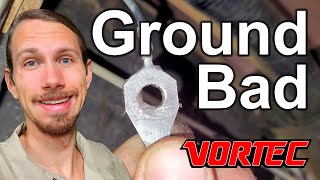
- Poor Ground Connection at G103 🔴 High Probability GM issued TSB #19-NA-068 specifically for this issue on 2015-2020 models. The ground point on the left front frame rail can have paint overspray from the factory or become corroded, leading to a poor connection for critical modules.
How to confirm: Locate ground G103 on the left front frame rail, in front of the battery. Disconnect the battery, remove the ground nut, and inspect the stud, mating surface, and eyelet terminals for paint, corrosion, or looseness. Check resistance between the eyelet and a clean chassis point.
Typical fix: Clean the ground stud, the frame surface, and the terminal eyelets with a wire brush or sandpaper to ensure bare metal contact. 🎬 See how to properly clean and fix a bad ground Reassemble securely and torque the fastener to specification. TSB #19-NA-068 notes to ensure the eyelet fully seats if it has a hex-shaped anti-rotational feature.
Est. part cost: $0-$5 - Engine Wiring Harness Chafing on Bulkhead (Firewall) 🟡 Medium Probability → Shop Engine Wiring Harness TSB #19-NA-113 identifies this issue for 2015-2019 models. Engine vibrations cause the harness to rub against the metal bulkhead where it passes through, eventually wearing through the protective conduit and wire insulation, causing a short.
How to confirm: Visually inspect the section of the engine wiring harness where it passes near or touches the firewall. Look for rub marks, exposed copper wire, or damage to the plastic conduit. A technician may manipulate the harness in this area while monitoring scan tool data to see if the fault appears.
Typical fix: Repair any damaged wires by splicing and using heat-shrink tubing. The TSB specifically recommends wrapping the repaired section and vulnerable areas of the harness with Woven Polyester Electrical Tape (PET) in a double layer to provide superior abrasion resistance. Reposition the harness to prevent future contact.
Est. part cost: $5-$20 - Engine Wiring Harness Chafing on G100 Ground Stud 🟡 Medium Probability → Shop Engine Wiring Harness TSB #18-NA-114 points this out for 2018-2019 models, and an update TSB #20-NA-114 expanded the inspection area. The harness can make contact with the sharp edge of the G100 ground stud, causing a short to ground or a short between CAN bus wires.
How to confirm: Visually inspect the wiring harness in the immediate vicinity of the G100 ground stud for signs of rubbing, abrasion, or exposed wires. The later TSB also suggests inspecting the harness near the X112 connector after removing the battery.
Typical fix: Repair the damaged wires as needed. Protect the harness by wrapping it in a double layer of Woven Polyester Electrical Tape (PET). Reposition the harness to ensure it no longer contacts the stud.
Est. part cost: $5-$20 - Weak or Failing Battery ⚪ Low Probability → Shop Vehicle Battery Modern vehicles are sensitive to system voltage. Low voltage during startup or operation can prevent modules from initializing correctly, causing them to drop off the communication network.
How to confirm: Test the battery voltage with a multimeter. A healthy battery should read approximately 12.6 volts with the engine off and 13.7-14.7 volts with the engine running. Many auto parts stores will test your battery and charging system for free.
Typical fix: Replace the vehicle's battery.
Est. part cost: $150-$250
Rare But Worth Checking
- Failed Control Module: While possible, this is far less common than wiring or ground issues for this specific vehicle. A single faulty module (like the ECM, TCM, or BCM) can disrupt the entire network by either not communicating or 'shouting' on the bus, preventing others from talking. Diagnosis usually involves using a high-end scan tool to see which module is not responding.
- Corrosion in a Connector: Water intrusion into a major harness connector (like at the firewall or fuse block) can cause corrosion on the CAN bus pins, leading to intermittent communication. This is more likely if the vehicle has been in a flood or if there's a known water leak.
- Faulty Aftermarket Electronics: Improperly installed remote starters, alarms, or stereo systems can interfere with the CAN bus network, causing communication errors. If the problems started after an accessory was installed, try disconnecting it to see if the code clears.
Diagnosis Steps
- Check Battery Health: Ensure the battery is fully charged (12.6V+ engine off) and the alternator is charging correctly (13.7-14.7V engine on). Clean any corrosion from the battery terminals.
- Scan for All Codes: Use an OBD-II scanner capable of reading codes from all modules (ECM, TCM, BCM, ABS, etc.) to get a full picture. Note all communication 'U' codes present.
- Inspect Ground G103: Following TSB #19-NA-068, locate G103 on the driver's side frame rail, ahead of the battery. Disconnect the battery, then disassemble, clean all contact surfaces (stud, frame, eyelets) to bare metal, and re-torque the nut.
- Inspect Engine Harness at Bulkhead: Following TSB #19-NA-113, carefully inspect the engine wiring harness where it runs along the firewall for any signs of chafing, rubbing, or damage. Pay close attention to points of contact with metal edges.
- Inspect Engine Harness at G100 Stud: Following TSB #18-NA-114, inspect the harness for contact with the G100 ground stud. Check for abrasion on the harness loom.
- Repair and Protect Wiring: If any chafing is found, carefully cut back the loom, repair the individual wires using splice connectors and heat shrink. Wrap the repaired harness area with woven polyester electrical tape (PET), such as GM Part No. 19333240, to provide robust abrasion resistance.
- Check for Termination Resistance: For advanced users, with the battery disconnected, measure the resistance between Pin 6 (CAN High) and Pin 14 (CAN Low) at the OBD-II port. A healthy network should read approximately 60 Ohms. A reading of 120 Ohms indicates an open circuit or a missing terminating resistor.
Parts You'll Likely Need
- Woven Polyester Electrical Tape
(OEM #19333240)— Used to repair and protect the engine wiring harness from abrasion at known chafe points, as specifically recommended by multiple GM TSBs. This tape is more durable and abrasion-resistant than standard vinyl electrical tape.
Trusted brands: Tesa (OEM supplier), GM Genuine, 3M
OEM price range: $15-$25
Aftermarket price range: $8-$15 - Wire Splice Connectors — Needed if the wiring harness is chafed through and individual wires need to be repaired before being wrapped.
Trusted brands: Dorman, Gardner Bender
OEM price range: $5-$15
Aftermarket price range: $5-$10
Related Codes That Often Appear With This One
- U0100 — Lost Communication With ECM/PCM. This code is often set alongside U0073 because the ECM is a primary module on the high-speed CAN bus.
- U0101 — Lost Communication With TCM. The transmission control module also uses this bus, and its loss of communication is a common companion code.
- U0121 — Lost Communication With Anti-Lock Brake System (ABS) Control Module. The ABS/StabiliTrak system is another critical module on the bus that will log a fault when communication is lost.
- P0700 — Transmission Control System (MIL Request). This code is set by the TCM to tell the ECM to turn on the Check Engine Light when a transmission-related fault (like loss of communication) occurs.
- U0131 — Lost Communication With Power Steering Control Module. This often accompanies the U0073 code and corresponds with the symptom of losing power steering.
Technical Service Bulletins (TSBs) & Recalls
- 19-NA-068: Malfunction Indicator Lamp (MIL) Illuminated, Intermittent Service Messages, Gauges May Be Erratic - DTCs U0073, U0121, U0100 and/or U0101 Set, G103 Inspection.
- 19-NA-113: Erratic Instrument Panel Cluster (IPC) and Gauge Readings, Malfunction Indicator Lamp (MIL) Illuminated - DTC U0073, U0100, U0101 and/or U0121 Set.
- 18-NA-114: Service All Wheel Drive (AWD)/Service Stability Messages Displayed, Erratic Speedometer, MIL Illuminated - Multiple DTCs including U0073.
Platform-Specific Known Issues
- Owner Experience with G103 Ground: Multiple owners on forums like Chevrolet Trax Forum and Reddit report that cleaning the G103 ground completely solved their intermittent issues. One user on Reddit with a 2018 Trax described having the StabiliTrak light come on and losing power steering, accompanied by codes P0700 and U0073. After erasing the codes, the car would run normally for a while before the issue returned, a classic sign of an intermittent connection. This matches the symptoms described in TSB #19-NA-068 perfectly.
- Confusion with DIC Code '73': A separate GM document, PI1176, notes that on some Chevrolet Trax models, a 'CODE 73' or 'CODE 173' message on the Driver Information Center (DIC) is related to a software anomaly in the Rear Differential Control Module on AWD models, which can be fixed by a software update. This is a distinct issue from the diagnostic trouble code U0073, though it's possible for them to occur together if the RDCM loses communication.
Mechanic-Grade Diagnostic Values
- CAN Bus Network Resistance — expected: Approximately 60 Ohms. Failure: A reading of 120 Ohms indicates an open circuit or one of the two terminating resistors is not seen by the network. A reading near 0 Ohms indicates a short between the CAN High and CAN Low wires.
- CAN High Voltage to Ground — expected: Average of ~2.6V - 2.7V (fluctuating between 2.5V and 3.5V). Failure: No voltage, or voltage that is stuck high or low, indicates a fault on the line.
- CAN Low Voltage to Ground — expected: Average of ~2.3V - 2.4V (fluctuating between 2.5V and 1.5V). Failure: No voltage, or voltage that is stuck high or low, indicates a fault on the line.
Scan Tool Commands That Help
- GDS2 (GM Global Diagnostic System 2): Data Bus Diagnostic Tool — This function, installed with GDS2, actively polls the CAN bus to determine which modules are communicating and which are not. It helps pinpoint the location of the communication breakdown by showing a list of responsive vs. non-responsive modules, which is crucial for isolating the fault.
- GDS2 (GM Global Diagnostic System 2): Module Status / High Speed Communication DTCs — Before diving into wiring, use the GDS2 to view which specific modules are logging the U0073 code. The tool can also show a list of all modules on the network and their communication status (Active/Inactive), helping to identify which module might be the source of the disruption.
- High-end OBD-II Scanner or GDS2: Live Data Monitoring while performing a 'Wiggle Test' — While monitoring the live status of module communication, physically manipulate the known chafe areas of the wiring harness (at the firewall, G100 stud, X112 connector). If the communication drops in and out as you move the harness, you have found the location of the physical fault. TSB #19-NA-113 specifically recommends this procedure.
Wiring & Ground Locations
- G103 — On the left front frame rail, located in front of the battery.. This is a primary ground point. TSB #19-NA-068 identifies that paint overspray or corrosion at this location can cause a poor connection, leading directly to U0073 and other communication codes.
- G100 — A ground stud located on the left side of the engine.. TSB #18-NA-114 and #20-NA-114 identify this stud as a point where the engine wiring harness can rub, causing wires (including CAN bus lines) to chafe and short out, triggering a loss of communication.
- Bulkhead / Firewall — The metal wall separating the engine compartment from the passenger cabin.. TSB #19-NA-113 details how the engine wiring harness can rub against the bulkhead, wearing through the insulation and causing shorts that result in U0073.
- X112 Connector — An electrical connector on the left side of the engine, near the G100 ground stud. The battery must be removed for access.. An update to the TSB regarding G100 chafe (TSB #20-NA-114) added this area as another inspection point, suggesting harness damage can occur approximately 3 inches from this connector.
- Data Link Connector (DLC) — Under the driver's side dashboard, typically to the left of the steering column.. This is the 16-pin OBD-II port where diagnostic tests are performed. Pins 6 (CAN High) and 14 (CAN Low) are used for network resistance and voltage tests.
Real Owner Repair Stories
- YouTube video on a Chevrolet Traverse with identical codes (2017 Chevrolet Traverse LS AWD (Similar GM platform and CAN architecture)) — Gauges pinning to max and back down, no throttle response, StabiliTrak Disabled message, and a long list of communication codes including U0073, U0100, U0121, and U0140.
❌ Tried (didn't work) Replacing the battery did not fix the issue.
✅ What actually fixed it The owner discovered that wiggling the main electrical connectors going into the ECM caused the problem to appear and disappear. The final fix was securing the connection at the ECM harness plugs, indicating a poor pin fit or loose connector was the root cause.
OEM Part Supersession History
42578925, 42600196, 42711288→42772837— This is the part number for the front driver's side door wiring harness. While not the main engine harness, damage to door harnesses can sometimes cause network issues. This history shows GM has updated the part multiple times.
Model Year Variations Within This Range
- 2015-2019: TSB #19-NA-113, which specifically addresses harness chafing at the firewall, officially covers the 2015-2019 model years.
- 2018-2020: TSB #18-NA-114 and its successor #20-NA-114, which address harness chafing at the G100 stud and X112 connector, apply to the 2018-2020 model years.
- 2015-2020: TSB #19-NA-068, which points to the G103 ground as a primary cause, covers the entire 2015-2020 range.
Helpful Videos


The information in this article is provided for general reference and educational purposes only. Vehicle specifications, procedures, and part compatibility can vary by production date, trim level, and region. Always consult your vehicle's factory service manual and verify part numbers before purchasing or performing repairs. Safety-critical components such as airbags, seat belts, and braking systems should be installed by a qualified professional.
- Chevrolet TRAX:
- 🧭 Diagnostic Flowchart
- 🎬 Helpful Videos
- What's Unique About the 2015-2020 Chevrolet TRAX
- Symptoms You May Notice
- Most Likely Causes
- Rare But Worth Checking
- Diagnosis Steps
- Parts You'll Likely Need
- Related Codes That Often Appear With This One
- Technical Service Bulletins (TSBs) & Recalls
- Platform-Specific Known Issues
- Mechanic-Grade Diagnostic Values
- Scan Tool Commands That Help
- Wiring & Ground Locations
- Real Owner Repair Stories
- OEM Part Supersession History
- Model Year Variations Within This Range
- 🎟️ Get 5% Off