
U0101 on 2008-2010 Pontiac G6: Lost Communication with TCM Causes and Fixes
On a 2008-2010 Pontiac G6, code U0101 is most often caused by a poor electrical connection. Before replacing any parts, inspect the wiring and connector pins at the transmission, the underhood fuse block, and the primary TCM ground (G105) on the transmission stud, as highlighted in multiple GM Technical Service Bulletins.
- Do not assume the TCM has failed. The most likely cause of U0101 on a 2008-2010 G6 is a wiring or connection issue.
- Start your diagnosis by checking the TCM and TRANS fuses, the main transmission connector, and the TCM ground.
- Cleaning connectors with electrical cleaner and applying dielectric grease can often fix this issue for a low cost.
- If the TCM does need to be replaced, it will require professional programming to work with your vehicle.
What's Unique About the 2008-2010 Pontiac G6
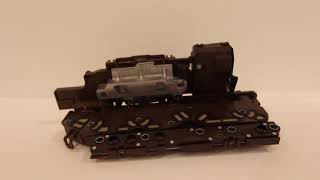
For this specific generation of Pontiac G6 and its platform-mates (Chevy Malibu, Saturn Aura), the U0101 code is so frequently linked to wiring and connection issues that General Motors issued multiple Technical Service Bulletins (TSBs) about it. These bulletins guide technicians to check for poor pin connections at the transmission, fuse block, and grounds before ever considering a module replacement. This indicates a known vulnerability in the vehicle's wiring harness, connectors, and ground points rather than a high rate of actual TCM failure. A key variation is the transmission type: 4-speed models use an external TCM, while 6-speed models use an internal Transmission Electro-Hydraulic Control Module (TEHCM), which significantly changes the replacement procedure.
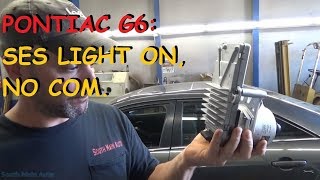
🎬 See this walkthrough on 6-speed TEHCM and TCM replacements.Diagnostic Flowchart
Tap your situation to follow the diagnostic path that matches what you're seeing on this vehicle.
Symptoms You May Notice
- Check Engine Light is on
- Transmission warning light is on
- Vehicle is stuck in one gear (limp mode), often 1st or 2nd.
- Harsh or erratic shifting
- Transmission will not shift at all.
- Speedometer does not work.
- Gear indicator on the dash may be blank or incorrect.
- Vehicle may not shift out of Park.
- Replacing the Transmission Control Module (TCM) without first verifying that all wiring, power, and ground connections are perfect. The TSBs for this vehicle strongly suggest the fault is usually in the wiring, not the module itself.
- Replacing the transmission itself, believing the limp mode and shifting issues are a sign of internal mechanical failure when it is purely an electrical/communication problem. 🎬 Watch: A helpful guide on how to fix the U0101 code.
Most Likely Causes
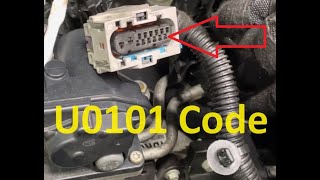
- Poor Terminal Pin Fit at Transmission Connector 🔴 High Probability → Shop Transmission Assembly This is a primary cause cited in GM TSBs #PIP4990C and #PIP4990D. The connector's flip-style locking latch can cause the female pin terminals to spread open if the connector is pulled sideways during removal, leading to a poor connection upon reinstallation. Moisture and corrosion also frequently build up in this exposed location.
How to confirm: Disconnect the main harness connector at the transmission. Visually inspect for corrosion, moisture, or any pins that look spread apart or pushed back. A 'pin drag' test with a proper terminal tool can verify tension. Ensure the connector is pulled straight up when using the lever to unlock it.
Typical fix: Clean the connector terminals with electrical contact cleaner. Apply dielectric grease to seal out moisture. If pins are damaged or loose, the connector pigtail may need to be replaced.
Est. part cost: $20-$50 - Poor Ground Connection at G105 🔴 High Probability The TCM shares a critical ground point, G105, with the ECM and other components. This ground is located on an engine/transmission stud, often under the throttle body, an area prone to corrosion. A poor connection here can cause intermittent voltage drops, leading to communication loss.
How to confirm: Locate ground G105 on the transmission stud. Disassemble, clean all contact surfaces (wire lug, stud, and chassis) to bare metal, and re-secure tightly. A voltage drop test from the TCM ground pin to the negative battery terminal should show less than 0.1 volts. A YouTube video by ScannerDanner shows a G6 where this exact ground failed, causing a no-start and module communication loss. 🎬 Watch this video to see how a bad ground causes these issues.
Typical fix: Remove the ground bolt/nut, thoroughly clean the wire terminal and the chassis mounting point with a wire brush or sandpaper, and re-fasten securely. Applying a corrosion inhibitor after tightening is recommended.
Est. part cost: $5 for cleaning supplies - Damaged Wiring Harness 🟡 Medium Probability TSB #PIP4990D specifically warns to check for the harness rubbing through on sharp objects, particularly on top of the transmission where it can contact the engine block. Another known chafe point is the ECM/PCM harness rubbing at the strut tower area. Vibrations over time can wear through the insulation, causing shorts or open circuits in the CAN bus or power/ground wires.
How to confirm: Visually inspect the entire wiring harness leading to the transmission, paying close attention to the area on top of and behind the transmission case and near the driver's side strut tower. Look for any signs of chafing, melting, or breaks. Flexing the harness while monitoring communication with a scan tool can sometimes reveal an intermittent fault.
Typical fix: Repair the damaged section of wire using solder and heat-shrink tubing or a quality butt connector. Reroute or protect the harness with loom or tape to prevent future damage.
Est. part cost: $10-$30 for wiring repair supplies - Poor Connection at Underhood Fuse Block 🟡 Medium Probability → Shop Fuse Box Also cited in TSB #PIP4990C/D, the female terminals within the fuse block that hold the TCM and TRANS fuses can become loose or corroded, creating an unstable power supply to the module.
How to confirm: Check the 10A TRANS (No. 4) and 10A TCM (No. 42) fuses. Remove the fuses and inspect the terminals inside the fuse block for corrosion, discoloration, or looseness. Wiggle the fuses while checking for power at the TCM to see if the connection is intermittent.
Typical fix: Clean the fuse block terminals. Ensure fuses are fully seated. In severe cases, a terminal may need to be re-tensioned or the fuse block may need repair or replacement.
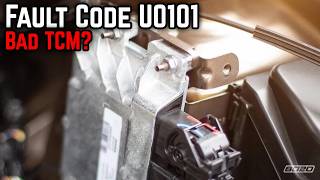
Est. part cost: $5-$15 for fuses, $100+ for a fuse block - Failed Transmission Control Module (TCM) ⚪ Low Probability → Shop Transmission Assembly
How to confirm: This should only be considered after all wiring, connectors, power, and ground circuits have been exhaustively tested and confirmed to be good. A scan tool that can communicate with other modules but not the TCM is a strong indicator, especially after performing a CAN bus bypass test.
Typical fix: Replace the Transmission Control Module. The new module must be programmed to the vehicle with a dealer-level scan tool like a Tech 2. A used module from a junkyard will not work without being reprogrammed to the car's VIN.
Est. part cost: $250-$500
Rare But Worth Checking
- Low Battery Voltage: → Shop Vehicle Battery Communication networks are sensitive to voltage. A weak or failing battery can cause unpredictable communication errors between modules. Always ensure the battery and charging system are healthy before diagnosing network codes.
Diagnosis Steps
- Check the battery to ensure it has a full charge (12.4V+ engine off) and the alternator is functioning correctly (~14V engine on).
- Scan for all diagnostic trouble codes in all vehicle modules. Note which modules are and are not communicating. The presence of U0101 in multiple modules points towards a wiring or TCM issue.
- Check the 10A TRANS fuse (No. 4) and the 10A TCM fuse (No. 42) in the underhood fuse block. Inspect the terminals for corrosion or a loose fit.
- Locate and inspect the primary TCM ground, G105, on the transmission stud. Disassemble, clean all contact surfaces to bare metal, and re-secure.
- Following TSB #PIP4990D, disconnect and inspect the main transmission electrical connector. Look for corrosion, moisture, or damaged/spread pins. Clean with contact cleaner and apply dielectric grease.
- Trace the wiring harness from the TCM to the transmission, looking for any areas where it might be rubbing against the engine block or chassis, especially on top of the transmission and near the strut tower.
- If wiring appears good, test the CAN bus. With the battery disconnected, measure resistance between the two CAN wires at the diagnostic port (Pins 6 and 14). It should be ~60 ohms. Infinite resistance or 120 ohms suggests a break in the wiring or a faulty terminating module.
- With the key on, test for 12V power and clean ground at the TCM connector pins using a multimeter. A test light is better for checking grounds as it applies a load.
- For advanced diagnosis, check the CAN bus wires for a square wave DC signal of approximately 2.5 volts with an oscilloscope. A bypass test jumping the CAN wires at the TCM connector can determine if the TCM is internally open and breaking the network chain.
- If power, ground, and CAN bus wiring are all confirmed good, the TCM is the likely culprit.
Parts You'll Likely Need
- Electrical Contact Cleaner and Dielectric Grease — This is the first-line defense for fixing corroded or contaminated connector pins at the transmission, fuse block, and grounds, which is a highly probable cause.
Trusted brands: CRC, Permatex
Aftermarket price range: $15-$25 - Transmission Control Module (TCM)
(OEM #24256861 (Verify with VIN))— This is the part to replace if all wiring and connection checks pass. It is the brain of the transmission. It is located inside the transmission side cover (on 6-speed models) and requires programming upon replacement.
Trusted brands: ACDelco (GM Genuine), Dorman OE Solutions
OEM price range: $350-$500
Aftermarket price range: $250-$400
Related Codes That Often Appear With This One
- U0100 - Lost Communication With ECM/PCM
- U0140 - Lost Communication With Body Control Module
- U0073 - Control Module Communication Bus A Off
- P0700 - Transmission Control System (MIL Request)
Technical Service Bulletins (TSBs) & Recalls
- PIP4990D: Supersedes previous versions. Advises a full diagnostic review, gathering all DTCs, and checking specific areas like the transmission connector, fuse block, TCM ground (G106, G107, etc.), and harness for chafing before replacing the TCM.
- PIP4990C: Specifically points to checking terminal pin fit at the transmission connector and underhood fuse block as a likely cause for U0101.
Platform-Specific Known Issues
- A GM Technical Service Bulletin (#PIP4990D) specifically calls out checking the terminal pin fit at the transmission connector, the underhood fuse block, and the TCM ground before replacing parts.
Mechanic-Grade Diagnostic Values
- CAN Bus Network Resistance — expected: ~60 Ω. Failure: A reading of ~120 Ω indicates an open circuit or a single faulty terminating module. A reading of 0 Ω indicates a short between the two CAN wires.
- CAN Bus Voltage (Oscilloscope) — expected: A square wave DC signal at approximately 2.5V on both CAN High and CAN Low lines.. Failure: No signal, or a signal that is shorted to ground (0V) or power (~12V).
- Ground Circuit Voltage Drop — expected: Less than 0.1 V. Failure: A reading higher than 0.1 V indicates excessive resistance in the ground circuit.
Hidden / Shadow Codes Worth Checking
- U0073, U0100, U2106, C0561: These are additional communication error codes that may be stored in various modules (ECM, BCM, ABS) alongside U0101, helping to diagnose the location of a network fault. (see via A professional scan tool capable of reading codes from all vehicle modules, such as a GM Tech 2.)
Scan Tool Commands That Help
- GM Tech 2 / GDS2: Service Programming System (SPS) — This function is required to program a new or used replacement TCM/TEHCM to the vehicle's VIN. The vehicle will not operate correctly without this step.
- Professional Scan Tool: Network Communication Test / Bidirectional Data Request — Used to actively ping the TCM to see if it responds. If the scan tool can communicate with other modules but not the TCM, it confirms the communication loss is specific to the TCM or its wiring.
Wiring & Ground Locations
- G105 — On a transmission stud, described as being on the left rear side of the engine compartment, sometimes below the upper coolant hose.. This is a primary ground point for the ECM and TCM. Corrosion or looseness here is a very common cause of U0101 and other communication codes.
- Transmission Harness Connector (14-way for 6-speed) — On the side of the transmission case.. This is the main interface to the TCM/TEHCM. TSBs specifically cite poor pin fit and corrosion in this connector as a top cause of U0101. The CAN bus passes through here on pins 6, 7, 8, and 14.
- Harness Chafe Point 1 — On top of the transmission, where the harness can rub against sharp areas on the engine block.. Vibrations can cause the harness to wear through, shorting power, ground, or CAN bus wires. This is specifically mentioned in TSB PIP4990D.
- Harness Chafe Point 2 — The ECM/PCM harness may rub against the driver's side strut tower.. This can cause the high-speed GMLAN circuits (CAN bus) to short to ground, bringing down the network and causing codes like U0101.
Real Owner Repair Stories
- 2CarPros Forum User (Pontiac G6 (year not specified)) — U0101 code present.
❌ Tried (didn't work) Replacing the TCM with a used one from a junkyard.
✅ What actually fixed it The issue was that the junkyard TCM was not programmed to the vehicle's VIN, which caused an additional U0001 code to appear. The fix requires programming the replacement module with a dealer-level scan tool like a Tech 2. This story highlights that even a correct part replacement will fail without the necessary programming step. - YouTube video by 'Alex's Automotive' (2010 Pontiac G6) — No crank, no start, U0100 (Lost communication with ECM).
❌ Tried (didn't work) Initial checks pointed towards a bad ECM.
✅ What actually fixed it The root cause was a corroded ground connection on the transmission stud (G105), which serves both the ECM and TCM. The user cleaned and relocated the ground wires to a clean chassis point, which restored communication and fixed the no-start condition. This demonstrates the critical importance of the G105 ground for module communication.
"I Checked Everything" — The Actual Cause
- In cases involving the 6T40 transmission, all wiring and ground tests may pass, but the U0101 code persists. A documented but uncommon cause is a voltage spike generated by the engine cooling fan assembly, which can damage the internal TCM (TEHCM). The fix requires replacing the TEHCM with an updated GM part that includes a voltage spike prevention circuit. This fault would not be found with standard wiring checks.
OEM Part Supersession History
24256861 (For 6-Speed 6T40/45 TEHCM)→19431596, 19435614, 19434978— Part revisions and updates by the manufacturer. Later versions may include reliability improvements.
Heads up: These supersession numbers are primarily documented for truck applications using Allison transmissions but sharing the same base part number. Always verify the correct, latest part number for a Pontiac G6 using the vehicle's VIN.24239926 (For 4-Speed 4T45E TCM)→Interchangeable with 24252114, 24234503— Part revisions for the external T42-style TCM.
Heads up: This part is for the 4-speed automatic only and is physically and electronically incompatible with the 6-speed transmission's internal TEHCM.
Model Year Variations Within This Range
- 2008-2010: The vehicle could be equipped with a 4-speed (4T45E) or 6-speed (6T40/6T45) automatic transmission. The 4-speed uses an external TCM (T42 module), while the 6-speed uses an internal TEHCM (part of the valve body). This is the most critical variation for diagnosis and repair, as the module location, part numbers, and replacement labor are completely different.
Helpful Videos

We Have This Part in Stock


The information in this article is provided for general reference and educational purposes only. Vehicle specifications, procedures, and part compatibility can vary by production date, trim level, and region. Always consult your vehicle's factory service manual and verify part numbers before purchasing or performing repairs. Safety-critical components such as airbags, seat belts, and braking systems should be installed by a qualified professional.
- Pontiac G6:
- 🧭 Diagnostic Flowchart
- 🎬 Helpful Videos
- 🛍️ Shop This Part
- What's Unique About the 2008-2010 Pontiac G6
- Symptoms You May Notice
- Most Likely Causes
- Rare But Worth Checking
- Diagnosis Steps
- Parts You'll Likely Need
- Related Codes That Often Appear With This One
- Technical Service Bulletins (TSBs) & Recalls
- Platform-Specific Known Issues
- Mechanic-Grade Diagnostic Values
- Hidden / Shadow Codes Worth Checking
- Scan Tool Commands That Help
- Wiring & Ground Locations
- Real Owner Repair Stories
- "I Checked Everything" — The Actual Cause
- OEM Part Supersession History
- Model Year Variations Within This Range
- 🎟️ Get 5% Off