
U0109 on 2008-2014 Cadillac CTS: Lost Communication with Fuel Pump Control Module Causes and Fixes
On a 2008-2014 Cadillac CTS, code U0109 is most often caused by a poor connection at the main transmission wiring harness connector (X1), as noted in GM TSB PIC4740E. Before replacing the Fuel Pump Control Module (FPCM), inspect this connector for corrosion or loose pins. The FPCM is located in the driver's side of the trunk behind the trim. If the module is faulty, a replacement costs $150-$250 and requires dealer programming.
- Code U0109 on a 2008-2014 CTS means the Fuel Pump Control Module (FPCM) isn't communicating, usually resulting in a no-start condition.
- Before replacing any parts, inspect the main wiring connector on the transmission (X1 connector) for looseness or corrosion, as this is a known issue per TSB PIC4740E.
- Also check the 20A fuel pump fuse in the trunk's passenger-side fuse box.
- The FPCM is located behind the trim on the driver's side of the trunk.
- If the FPCM needs to be replaced, the new module must be professionally programmed to your car's VIN to function correctly.
What's Unique About the 2008-2014 Cadillac CTS

What's unique to this Cadillac platform and its relatives is a known issue documented in General Motors Technical Service Bulletin PIC4740E. While U0109 points to the fuel pump module, the actual cause is frequently a poor connection at the main transmission wiring harness connector (X1). The communication wires (Tan & Tan/White) for the FPCM, along with many other modules, are routed through this single connector located on the driver's side of the transmission. A fault here, often from fretting corrosion, can cause a widespread communication failure, making the transmission connector a primary suspect before you consider replacing the FPCM itself.
Diagnostic Flowchart

Tap your situation to follow the diagnostic path that matches what you're seeing on this vehicle.
Generation note: This guide covers the second generation of the Cadillac CTS (2008-2014), which is built on the GM Sigma II platform. The causes and fixes are generally consistent across this generation and may also apply to platform mates like the 2010-2015 Chevrolet Camaro.
Symptoms You May Notice
- Engine cranks but will not start
- Engine stalls unexpectedly while driving
- Extended crank time before starting
- Reduced engine power or hesitation
- Check Engine Light is illuminated
- No audible humming or whining from the fuel pump when the key is turned to the 'ON' position
- Replacing the in-tank fuel pump. While a bad fuel pump can cause a no-start, it will not cause a U0109 communication code. The U0109 code points to an electrical communication problem with the control module, not the mechanical pump itself.
Most Likely Causes

- Poor Connection at Transmission X1 Harness Connector 🔴 High Probability → Shop Transmission Assembly As identified in GM Technical Service Bulletin #PIC4740E, the terminals in the main transmission harness connector can develop fretting corrosion or become loose, disrupting the GMLAN (CAN bus) communication network. This single point of failure affects multiple modules, including the FPCM, because their communication wiring passes through it.
How to confirm: Visually inspect the large electrical connector (X1) on the driver's side of the transmission housing. Disconnect it (battery disconnected first) and check for any signs of corrosion (white or green powder, or a subtle gray film), moisture, or backed-out/loose pins. Carefully tug on each wire to ensure pins are fully seated. The presence of other communication codes (U-codes) like U0121 or U0073 strongly suggests this is the cause.
Typical fix: Clean the connector terminals with a dedicated electrical contact cleaner and a small brush. Apply a small amount of dielectric grease to the connector seal before reconnecting to prevent future moisture intrusion. If terminals are damaged or loose, the connector may need to be repinned or replaced.
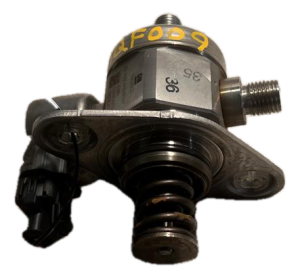
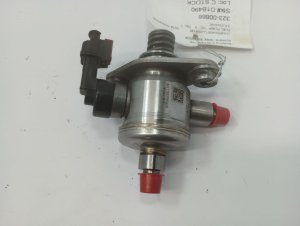
Est. part cost: $5-$25 - Failed Fuel Pump Control Module (FPCM) 🟡 Medium Probability → Shop Fuel Pump The FPCM, located in the driver's side of the trunk behind the trim panel, can fail from heat, vibration, or internal electronic faults. Water intrusion into the trunk is another potential cause of failure for modules in this location.
How to confirm: After confirming the wiring, fuses, and connectors are good, the module itself becomes the primary suspect. Diagnosis requires a scan tool capable of communicating with the FPCM. If the scan tool cannot establish communication, and power (12V) and ground are verified at the module's connector, the FPCM has likely failed.
Typical fix: Replace the Fuel Pump Control Module. This part MUST be programmed to the vehicle's VIN using dealer-level software (GM SPS). Failure to program the new module will result in a no-start condition.
Est. part cost: $150-$250 - Blown Fuse for FPCM ⚪ Low Probability An electrical short in the circuit or a faulty FPCM can blow the fuse protecting the FPCM circuit, cutting off its power and communication.
How to confirm: Locate the rear fuse block in the passenger side of the trunk. Check the fuse labeled for the fuel pump or FPCM (typically a 20A fuse, often in position F21). Use a multimeter or test light to verify the fuse has continuity.
Typical fix: Replace the blown fuse. If the new fuse blows again immediately, it indicates a short circuit in the wiring harness or within the FPCM itself that requires further diagnosis.
Est. part cost: $1-$10
Rare But Worth Checking
- Damaged Wiring Harness: Beyond the main connectors, the wiring itself can be damaged by chafing against the chassis (a known issue near the right cylinder head per TSB PIC-5058), road debris, or rodents. This is less common than connector issues but possible.
- Faulty Engine Control Module (ECM): → Shop Engine Control Module (ECM) It is extremely rare for the ECM to be the cause of a single communication code. This should only be considered after all other possibilities, including the FPCM and all wiring, have been exhaustively ruled out by a professional.
Diagnosis Steps
- Scan for All Codes: Use a professional OBD-II scanner to check for all codes in all modules. A long list of U-codes (U0100, U0121, etc.) strongly points towards a network wiring issue like the X1 connector.
- Check FPCM Fuse: Inspect the fuel pump fuse (typically 20A, F21) in the rear fuse block located in the right side of the trunk. Replace if blown.
- Inspect Transmission X1 Connector: This is the most critical vehicle-specific step. Disconnect the negative battery terminal. Safely raise the vehicle. Locate the large, main electrical harness connector (X1) on the driver's side of the transmission. Disconnect it and carefully inspect both male and female ends for corrosion (especially a gray film), moisture, or bent/backed-out pins. Clean with contact cleaner and apply dielectric grease before reseating firmly.
- Inspect FPCM Connector: Locate the FPCM in the left (driver's) side of the trunk, behind the trim panel. Disconnect its electrical connector and inspect for corrosion or damage. Ensure it's securely plugged in.
- Test for Power and Ground at FPCM: With the key on, use a multimeter to verify that the FPCM is receiving battery voltage (approx. 12V) on its power supply wire and has a solid ground connection (near 0 ohms to chassis ground) at its connector.
- Test CAN Bus Wires: This is an advanced step. With the battery disconnected, use a multimeter to check the resistance between the two CAN bus lines (Tan and Tan/White wires) at the FPCM connector. The resistance should be approximately 60 ohms. If it's 120 ohms, one of the terminating resistors (in the ECM or FPCM) is not connected. If it's open or shorted, there is a wiring fault.
- Suspect FPCM: If all wiring, connectors, and fuses are confirmed to be good, and the scan tool still cannot communicate with the module, the FPCM itself is the most likely culprit.
Parts You'll Likely Need
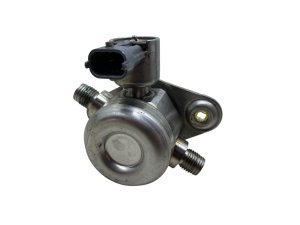
- Fuel Pump Control Module
(OEM #22872266 (supersedes 20979890, 20791901, 20877116, 20759945))— This module can fail internally, causing a loss of communication. It is the most commonly replaced part *after* wiring issues are ruled out. Requires programming.
Trusted brands: ACDelco (GM OE), GM Genuine Parts, Dorman (e.g., 601-009)
OEM price range: $180-$260
Aftermarket price range: $150-$200
Related Codes That Often Appear With This One
- U0073 — Control Module Communication Bus A Off. This is a general CAN bus failure code that reinforces the likelihood of a wiring or connector problem, and is specifically mentioned in TSB PIC4740E.
- U0100 — Lost Communication with ECM/PCM. Its presence with U0109 points to a broader network issue, possibly originating from the X1 connector fault.
- U0121 — Lost Communication With Anti-Lock Brake System (ABS) Control Module. This code is also listed in TSB PIC4740E and strongly suggests the transmission X1 connector fault is the root cause.
- P069E — Fuel Pump Control Module Requested MIL Illumination. This code is often stored in the ECM when the FPCM detects an internal problem and asks the ECM to turn on the Check Engine Light. It can be a precursor or companion to U0109.
Technical Service Bulletins (TSBs) & Recalls
- PIC4740E: Addresses multiple communication DTCs (U0109, U0073, U0100, U0121, etc.) and directs technicians to inspect the transmission X1 connector terminals for a loose fit or fretting corrosion. It also notes to check for harness chafing near the bell housing.
Platform-Specific Known Issues
- GM Technical Service Bulletin #PIC4740E specifically calls out that a variety of communication codes, including U0109, can be caused by a poor connection at the transmission X1 connector. This should be a primary inspection point.
- A user on Camaro5 forums (a platform mate) with a U0109 code was advised by a GM tech that water intrusion into the FPCM could be a cause, leading to a disruption in the case seal and internal damage.
Mechanic-Grade Diagnostic Values
- CAN Bus Network Resistance — expected: ~60 Ω. Failure: A reading of ~120 Ω indicates a missing terminating resistor or an open in the bus. A reading near 0 Ω indicates a short between the CAN High and CAN Low wires.
- FPCM Power Supply Voltage — expected: ~12V (Battery Voltage). Failure: 0V or significantly low voltage indicates a blown fuse, wiring issue, or problem with the power source.
- FPCM Ground Circuit Resistance — expected: < 1.0 Ω. Failure: High resistance or an open circuit (OL) indicates a poor or broken ground connection.
Scan Tool Commands That Help
- GDS2 / Tech2: Fuel Pump On/Off Command — This bidirectional control allows a technician to directly command the FPCM to activate the fuel pump. If the pump runs with this command, it proves the FPCM, wiring to the pump, and the pump itself are functional, pointing the fault toward the communication line with the ECM.
- GDS2 / Tech2: FSCM/FPCM Module Replacement/Setup — This function is mandatory after replacing the Fuel Pump Control Module. It programs the new module with the vehicle's VIN and specific operating parameters. Skipping this step will result in a no-start condition as the new module will not communicate with the ECM.
Wiring & Ground Locations
- X1 Connector — Large 16-pin electrical connector on the driver's side of the transmission housing.. This is a major pass-through connector for multiple modules. The GMLAN (CAN bus) wires for the FPCM route through here, and corrosion or loose pins at this location is a primary cause of U0109 and other U-codes, as cited in TSB PIC4740E.
- FPCM Connector — Connected to the Fuel Pump Control Module, located in the driver's side of the trunk, typically behind the trim panel or rear seat upper bolster.. This is the direct connection to the module. Verifying power (Pin 16 - Pink), ground (Pin 8 - Black), and CAN signals (Pin 6 - Tan, Pin 7 - Tan/White) here is a critical diagnostic step.
- G305 / G402 — Rear body grounds. G305 is often under the vehicle near the left B-pillar. G402 is in the luggage compartment on the right side.. These are common ground points for rear-mounted modules like the FPCM. A corroded or loose connection at these locations will interrupt power to the module and cause communication loss.
- Engine Ground Strap (G104/G108) — A heavy braided strap connecting the engine block (often rear of cylinder head) to the chassis/firewall.. A corroded or broken main engine ground can cause unstable voltage across the entire vehicle network, leading to random communication codes like U0109 that are difficult to trace to a single module.
Real Owner Repair Stories
- CadillacForums User (2008 Cadillac CTS) — Crank no-start, multiple communication codes including U0109 and U0100.
❌ Tried (didn't work) Replacing the Fuel Pump Control Module (FPCM).
✅ What actually fixed it The engine-to-chassis ground strap was found to be corroded. Cleaning the contact points of the ground strap restored stable voltage to the network and resolved all communication codes. - Camaro5 Forums User (Platform Mate) (2010 Chevrolet Camaro) — Intermittent Check Engine Light with codes U0109 and P069E.
❌ Tried (didn't work) Initial checks of fuses.
✅ What actually fixed it The electrical connector at the FPCM in the trunk was not fully seated. The user disconnected it, cleaned the pins with electrical contact cleaner, applied dielectric grease, and reconnected it securely, which permanently fixed the issue. - CadillacForums User (2011 Cadillac CTS) — Crank no-start condition with code U0109.
❌ Tried (didn't work) Replacing the Fuel Pump Control Module (FPCM) at home.
✅ What actually fixed it The vehicle still would not start after the DIY replacement. The car was towed to a dealer who then performed the mandatory programming of the newly installed FPCM. The car started immediately after programming was complete.
"I Checked Everything" — The Actual Cause
- In one documented case for a 2008 CTS, a crank-no-start with multiple U-codes (including U0109) was not resolved by replacing the FPCM. The actual cause was a corroded main engine-to-chassis ground strap. This created unstable voltage and ground offsets throughout the CAN network, causing modules to drop offline. Technicians often miss this by focusing only on the wiring directly connected to the FPCM instead of the vehicle's primary grounding system.
When the Usual Fixes Don't Work
- While the TSB-identified X1 connector and the FPCM itself are the most common culprits for U0109, several owner-documented repairs show these fixes failing to solve the problem. In one instance on a 2008 CTS, the final solution was cleaning a corroded main engine ground strap, which was causing network-wide voltage instability. In another case on a related platform, a faulty OnStar module was found to be disrupting the CAN bus, leading to the U0109 code. These cases highlight that if the common fixes don't work, the diagnostic scope must be widened to include the entire vehicle's electrical grounding system and other seemingly unrelated modules on the same data network.
OEM Part Supersession History
20979890→22872266— Standard part revision by GM to improve reliability or integrate design changes.
Heads up: The newest part number (22872266) is the correct service replacement for the previous numbers. All versions require vehicle-specific programming via GM's Service Programming System (SPS) to function.
Model Year Variations Within This Range
- 2013-2014: For models with the 3.6L LFX direct-injection engine, the FPCM's precise control of fuel pressure is even more critical. While the U0109 diagnostic process is the same, the performance-related symptoms (hesitation, stalling) may be more pronounced. Also, the location of the engine ground G104 may differ slightly on 2013+ models.
Used OEM Parts in Stock
New Aftermarket Parts Available


The information in this article is provided for general reference and educational purposes only. Vehicle specifications, procedures, and part compatibility can vary by production date, trim level, and region. Always consult your vehicle's factory service manual and verify part numbers before purchasing or performing repairs. Safety-critical components such as airbags, seat belts, and braking systems should be installed by a qualified professional.
- Cadillac CTS:
- 🧭 Diagnostic Flowchart
- 🛍️ Shop This Part
- What's Unique About the 2008-2014 Cadillac CTS
- Symptoms You May Notice
- Most Likely Causes
- Rare But Worth Checking
- Diagnosis Steps
- Parts You'll Likely Need
- Related Codes That Often Appear With This One
- Technical Service Bulletins (TSBs) & Recalls
- Platform-Specific Known Issues
- Mechanic-Grade Diagnostic Values
- Scan Tool Commands That Help
- Wiring & Ground Locations
- Real Owner Repair Stories
- "I Checked Everything" — The Actual Cause
- When the Usual Fixes Don't Work
- OEM Part Supersession History
- Model Year Variations Within This Range
- 🎟️ Get 5% Off