
OBD-II Code U0110: Lost Communication With Drive Motor Control Module "A"
What U0110 means, why it triggers, and how to fix it
- Code U0110 indicates a total communication failure with the Drive Motor Control Module, immediately disabling the electric motor and forcing the vehicle into a 35-mph limp mode.
- Test your 12-volt auxiliary battery first, as resting voltage below 12.4V is the leading trigger for false communication codes in hybrid vehicles.
- Never drive more than 5 miles with an active U0110 code, as operating in limp mode overheats the transmission and causes upwards of $3,000 in internal clutch damage.
- Demand a 60-ohm CAN bus resistance test before authorizing a $2,000+ inverter replacement, as corroded wiring or loose grounds cause the vast majority of these faults.
What Does U0110 Mean?

Code U0110 means your vehicle's main computer lost its connection to the Drive Motor Control Module 'A' (DMCM-A). This module controls the electric motor in a hybrid or EV. Without this communication, the main computer cannot command the drive motor, causing severe drivability issues or a no-start condition.
Technical definition: Lost Communication With Drive Motor Control Module "A". This is a generic, SAE-defined network communication code indicating that the serial data link between the Drive Motor Control Module 'A' (DMCM-A) and other control modules on the Controller Area Network (CAN) bus has been interrupted.
Can I Drive With U0110?
No — Do Not Drive. The vehicle enters 'limp mode' with severely reduced power, disabled shifting, and a top speed of 35-40 mph. Driving in this state overheats the transmission, causing internal damage to clutches and seals that adds thousands to your repair bill. Drive only to reach a safe location or the nearest repair facility.
Common Causes

- Low 12V auxiliary battery voltage (Very Common) — In hybrid and electric vehicles, a weak 12-volt auxiliary battery is the leading culprit for electronic communication failures. Control modules require stable voltage to operate; drops below 12.4V cause modules to shut down and drop off the network.
- Wiring harness or connector corrosion (Very Common) — Wires connecting to the drive motor control module frequently fray, melt, or corrode. Water intrusion from clogged sunroof drains, leaking windshields, or aggressive interior detailing drips onto connectors, causing shorts and blocking communication.
- Poor power or ground connection (Common) — The DMCM requires a steady supply of electricity. A loose ground wire, a blown fuse, or a corroded power terminal completely shuts down the module.
- Faulty Power Supply Relay (Common) — Condensation freezes inside the DMCM power relay in cold climates, preventing it from closing and supplying power to the module. This is a documented manufacturer defect on several Subaru hybrid models. 🎬 See how a faulty relay causes a Subaru hybrid no-start.
- Faulty Drive Motor Control Module (DMCM) / Inverter (Less Common) — The module itself fails internally due to extreme heat, vibration, or moisture breaching the casing and destroying the electronic circuit board.
- Network interference from other modules (Rare) — A different, failing module on the same CAN bus network 'chatters' and corrupts the data stream, blocking the DMCM's signals. 🎬 Watch: A guide to troubleshooting CAN bus communication issues. Poorly installed aftermarket alarms or remote starters also cause this interference.
Symptoms

- Vehicle enters 'limp mode' — The car restricts power and locks the transmission into a single gear (usually 2nd or 3rd) to protect the drivetrain, limiting top speed to 40 mph.
- Vehicle will not start or enter 'Ready' mode — The main computer prevents the vehicle from starting as a safety measure because it cannot confirm the status of the high-voltage drive motor.
- Check Engine or Hybrid System Warning Light illuminates — The dashboard displays a master warning light, often accompanied by a 'Check Hybrid System' message.
- Transmission refuses to shift — The vehicle remains stuck in Park or Neutral, or shifts violently when forced into gear.
- Whining or humming noise — An abnormal electrical whine emits from the transmission or inverter area under the hood.
Diagnostic Flowchart

Tap your situation to follow the diagnostic path that matches what you're seeing on this code.
Common Fixes & Costs
- Replace the 12V auxiliary battery
— Parts: $150-$350, Labor: $50-$100, ~0.5 hr book time
(DIY)
Toyota Prius: OEM 28800-21181 (Alt: Duralast Platinum AGM B-S46B24R)
Honda Civic Hybrid: OEM 31500-SNC-00100M (Alt: Interstate MT-51R) - Repair damaged wiring or clean corroded connectors — Parts: $10-$50, Labor: $150-$450, ~1.5 hr book time (Intermediate)
- Replace a blown fuse or faulty relay
— Parts: $5-$40, Labor: $0-$50, ~0.2 hr book time
(DIY)
Subaru XV Crosstrek Hybrid: OEM 25230AA190 (Updated Relay) (Alt: Standard Motor Products RY1793) - Replace the Drive Motor Control Module (DMCM) / Inverter
— Parts: $800-$2700, Labor: $250-$500, ~2.5 hr book time
(Professional)
Toyota Prius (2010-2015): OEM G9200-47210 (Alt: Cardone 77-6000 (Remanufactured))
Chevrolet Silverado Hybrid (2009-2013): OEM 24283920 (Alt: Dorman 599-290 (Remanufactured)) - Update or reprogram module software — Parts: $0, Labor: $100-$250, ~1.0 hr book time (Professional)
Used vs. New Parts: Buying Guide
When a used part is worth it: A remanufactured or used inverter assembly saves 50-70% over dealer prices and is the smartest choice for vehicles over 5 years old or past 80,000 miles.
Donor-vehicle mileage cap: roughly under 100000 miles for the part to have meaningful remaining life.
Donor quality checklist:
- Match the OEM part number exactly.
- Source from a specialized hybrid salvage yard offering at least a 90-day warranty.
- Reject any parts from flood-damaged donor vehicles.
- Demand a detailed testing report if buying a remanufactured unit.
Decision logic:
- If Vehicle is under the 8-year/100,000-mile federal hybrid warranty → Demand a new OEM part installed by the dealer for free.
- If Vehicle is out of warranty and budget is tight → Purchase a warrantied remanufactured inverter.
Warranty tradeoff: Used parts carry 30-90 day warranties. Remanufactured parts offer 1-year to lifetime warranties. New OEM parts carry a standard 1-year warranty.
Worst-case if a used part fails: $500-$1000 in repeated labor and towing if a cheap used module fails immediately.
What Happens If You Wait — Timeline
- Immediate: Code sets. Vehicle enters limp mode, disabling shifting and capping speed at 40 mph. (MPG impact: N/A% · Added cost: $75-$250 for a mandatory tow.)
- 1-5 drives in limp mode: Driving in a single gear generates extreme heat, degrading fluid and burning internal transmission clutches. (MPG impact: 50% reduction% · Added cost: $2000-$5000 for transmission replacement.)
- Weeks to Months: If the fault is intermittent, the root cause (like water intrusion) spreads corrosion to adjacent connectors on the CAN bus. (MPG impact: 15% reduction% · Added cost: $1000-$4000 for multi-module replacement.)
- 6+ months: Widespread corrosion destroys the CAN bus harness, permanently disabling the vehicle. (MPG impact: N/A% · Added cost: $5000+ for complete wiring loom replacement.)
Cost of Not Fixing It
- Immediate: Vehicle enters limp mode or refuses to start, posing a severe safety risk in traffic. (Added cost: $75-$250 for a mandatory tow.)
- Days to Weeks: Driving in limp mode forces the transmission to operate in a single gear, generating extreme heat that destroys internal clutches. (Added cost: $2000-$5000 for transmission replacement.)
- Weeks to Months: Ignoring water intrusion or wiring shorts allows corrosion to spread across the CAN bus, destroying adjacent control modules. (Added cost: $1000-$4000 for multi-module replacement and complete harness rewiring.)
Diagnosis Steps
- Check the 12V Battery and Connections
Ensure the 12-volt auxiliary battery is fully charged with clean terminals. Voltage must be above 12.4V at rest and hold above 10V during startup. Load test the battery, as surface voltage does not guarantee sufficient cranking amperage.
Tools: Multimeter, Battery Load Tester (Beginner) - Read All Trouble Codes from All Modules
Use an advanced scanner to read codes from the ECU, TCM, and Hybrid Control modules. Note any other 'U' codes (like U0100) or manufacturer-specific codes (like U1205). The combination of codes dictates whether the fault is isolated to the DMCM or affects the entire network.
Tools: Advanced OBD-II Scanner (Beginner) - Inspect Fuses and Relays
Locate all fuses and relays related to the DMCM, MCM, or MG ECU. Pull and test each fuse. Swap the DMCM power relay with an identical relay from a non-critical system (like the horn) to test for relay failure.
Tools: Fuse puller, vehicle-specific fuse diagram (Beginner) - Visually Inspect Wiring and Connectors
Trace the wiring harness to the Drive Motor Control Module. Look for chafing, melting, or rodent damage. Unplug the connectors and inspect for green corrosion, bent pins, or water intrusion.
Tools: Flashlight, inspection mirror (Intermediate) - Verify Power and Ground at the Module Connector
With the key on, use a multimeter to verify 12V power at the module's supply pins. Perform a voltage drop test on the ground circuit: measure voltage between the ground pin and the negative battery terminal. A reading above 0.2 volts indicates a bad ground.
Tools: Multimeter, vehicle-specific wiring diagram (Advanced) - Check CAN Bus Resistance
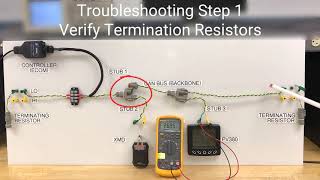
Disconnect the 12V battery. Measure resistance between the CAN High and CAN Low pins at the OBD-II port. A healthy network reads exactly 60 ohms. A reading of 120 ohms proves a broken wire or a missing terminating resistor.
Tools: Multimeter, vehicle-specific wiring diagram (Advanced) - Check CAN Bus Communication Signals
Use an oscilloscope to probe the CAN High and CAN Low pins at the module. CAN High must show a square wave switching between 2.5V and 3.5V. CAN Low must mirror it between 2.5V and 1.5V. A flatline confirms a dead module or severed wire.
Tools: Oscilloscope or advanced scan tool, wiring diagram (Advanced) - Isolate the Module
If wiring tests pass but communication fails, disconnect other modules on the network one by one. If unplugging the ABS module suddenly restores DMCM communication, the ABS module is corrupting the network.
Tools: Wiring diagram, various tools to access modules (Professional)
When This Code Triggers (Freeze-Frame Conditions)
- Vehicle Speed: 0 mph (Triggers during the initial system self-check at startup or immediately after shifting into gear.)
- Engine/Motor RPM: 0 RPM (The fault halts the startup sequence before propulsion begins.)
- 12V Battery Voltage: < 11.5V (Sets when the 12V auxiliary battery voltage drops during the high-load startup sequence.)
Related Codes
- U0100 — Lost Communication With ECM/PCM. Seeing this alongside U0110 proves the entire network is down, pointing to a central power/ground failure rather than a bad DMCM.
- U0111 — Lost Communication With Battery Energy Control Module. On Hondas, U0110 and U0111 appearing together guarantee a water-damaged shared connector in the trunk.
- U1205 — A manufacturer-specific code indicating a physical wire break on the dedicated hybrid CAN bus line. Focus diagnostics strictly on the wiring between the hybrid ECU and inverter.
- P0A0D — High Voltage System Inter-Lock Circuit High. A tripped safety interlock cuts power to hybrid components, triggering U0110 as a secondary symptom. Fix the interlock first.
Climate & Environmental Factors
- Cold Weather: Freezing temperatures turn condensation to ice inside unsealed relays, blocking electrical contact. This directly causes U0110 on startup in specific Subaru models.
- High Humidity: Coastal salt air and high humidity accelerate green corrosion on connector pins, increasing resistance until the communication signal drops entirely.
How to Talk to a Mechanic About This Code
Say this: "I have a U0110 code indicating lost communication with the Drive Motor Control Module. Before quoting a module replacement, please load-test the 12V battery, verify power and ground at the module connector, and test the CAN bus resistance."
This proves you understand the diagnostic process, preventing the shop from skipping straight to a $2,000 inverter replacement when a $50 wiring repair is the actual fix.
Avoid saying:
- 'My check engine light is on, can you look at it?'
- 'The car is in limp mode, just fix it.'
- 'I think I need a new hybrid inverter.'
Questions to ask before authorizing the repair:
- What was the voltage drop reading on the module's ground circuit?
- Did the CAN bus resistance measure exactly 60 ohms?
- Is this module replacement covered under the 8-year/100,000-mile federal hybrid warranty?
- Will you provide a written guarantee that replacing this module will permanently clear the U0110 code?
Where to Take It: Dealer vs Independent vs Chain
- Dealer:
Mandatory if the vehicle is under warranty or requires a new module programmed. Otherwise, too expensive for basic wiring diagnostics.
Best for: Vehicles under the 8-year/100,000-mile hybrid warranty., Module programming and immobilizer pairing.
Downsides: Highest labor rates., Tendency to replace entire expensive assemblies rather than repair individual wires. (Typical cost: +50% vs. baseline) - Independent Shop:
The best choice, provided you verify they have a dedicated hybrid/electrical specialist on staff.
Best for: Out-of-warranty vehicles., Shops explicitly certified in hybrid and EV diagnostics.
Downsides: General mechanics lack the oscilloscopes and training required to diagnose CAN bus networks. (Typical cost: +0% vs. baseline) - Chain Shop:
Avoid entirely. They will misdiagnose this code.
Best for: 12V battery replacement.
Downsides: Technicians cannot diagnose high-voltage systems or CAN bus networks safely. (Typical cost: -10% vs. baseline)
When to Walk Away From the Repair
If the repair cost exceeds 50% of the vehicle's private-party value, sell the car.
- Car worth $4000, fix is $2500: Walk away. A $2,500 inverter replacement on a $4,000 car is financial ruin.
- Car worth $12000, fix is $300: Fix it. A $300 wiring repair restores full value to the vehicle.
What Scan Tool You Need for This Code
Minimum: A scanner capable of reading manufacturer-specific codes from all modules (Engine, Transmission, ABS, Hybrid Controller).
A $20 generic code reader only checks the engine computer. It will completely miss U0110 if it is stored in the hybrid control module.
Budget: BlueDriver Pro (~$100) — Performs a full-system scan to identify U0110 and any related network codes across all modules.
Mid-range: Foxwell NT510 Elite (~$180) — Adds bidirectional control, allowing you to command relays and test module responses without physical disassembly.
Professional: Autel MaxiSys MS906Pro (~$1200) — Provides dealer-level network topology mapping to visually pinpoint the exact location of the communication break.
How to Clear the Code After You Fix It
- Ensure all wiring repairs are sealed and connectors are locked.
- Reconnect the 12V battery.
- Use an OBD-II scan tool to clear U0110 and all related network codes.
- Perform a manufacturer-specific drive cycle to reset readiness monitors.
Drive cycle (~30 minutes): Cold start the vehicle (sit for 8+ hours). Idle for 5 minutes. Drive at a steady 55 mph for 10 minutes. Perform 15 minutes of mixed city driving with frequent stops. Allow the vehicle to cool down completely.
Readiness monitors affected: Comprehensive Component Monitor, CAN Bus System Monitor
Before emissions retest: drive at least 50 miles to fully set monitors.
Watch out for:
- Disconnecting the 12V battery clears the code but resets all monitors to 'Not Ready', guaranteeing an emissions failure.
- The code returns instantly upon startup if the physical wiring fault or dead module is not repaired.
Will This Fail Emissions / State Inspection?
Yes — this code typically fails an OBD-II emissions inspection.
- California: An active U0110 code triggers an automatic Smog Check failure. 2001 and newer vehicles require all readiness monitors to be 'Ready' before re-testing.
- New York: The illuminated Check Engine light causes an automatic failure. After repair, 2001+ vehicles pass with exactly one monitor 'Not Ready'.
Most Commonly Affected Vehicles
- Toyota Prius, Highlander Hybrid, Camry Hybrid (2010-2019) — Triggered by internal failure of the inverter assembly or a weak 12V battery. Toyota extended warranty coverage for inverter failures on certain 2010-2014 models to 15 years.
- Honda Civic Hybrid, Accord Hybrid (2006-2012) — Highly prone to water intrusion in the trunk area, corroding hybrid module connectors and setting U0110 alongside U0111 and U1205.
- Chevrolet Silverado Hybrid, Volt (2009-2013) — Corroded connectors at the motor control module are the primary failure point, often fixable with a $150 wiring repair.
- Ford Escape Hybrid, Fusion Hybrid (2013-2017) — Intermittent U0110 codes are frequently traced to poor ground connections rather than failed modules.
- Lexus GS 450h, RX 450h (2007-2013) — Harness and connector failures between the Hybrid Vehicle Control ECU and the inverter assembly are the leading cause.
- Hyundai Sonata Hybrid, Ioniq Hybrid (2013-2018) — Internal faults in the Hybrid Power Control Unit (HPCU) trigger this code. Covered under Hyundai's 10-year/100,000-mile warranty.
- Nissan Leaf (2011-2017) — A weak 12V auxiliary battery is the overwhelming cause of U0110 in this EV. Water leaking onto the Body Control Module also disrupts the CAN bus.
- Subaru XV Crosstrek Hybrid (2014-2016) — TSB 07-98-15R addresses U0110 caused by the DMCM power supply relay freezing in cold weather. Requires an updated relay (p/n 25230AA190).
Manufacturer-Specific Notes
- Toyota/Lexus: The Drive Motor Control Module is called the 'MG ECU' and lives inside the inverter assembly. U0110 is usually secondary to inverter failure codes like P0A94.
- Honda: The combination of U0110, U0111, and U1205 on 2006-2011 Civic Hybrids is the hallmark signature of water leaking into the trunk and corroding the hybrid control connectors.
- Chrysler/Dodge/Jeep: A cascade of 'U' codes and flickering gauges points to a failing TIPM (Totally Integrated Power Module) acting as a corrupt gateway, not individual module failures.
- Subaru: TSB 07-98-15R dictates replacing the DMCM power relay with an updated part to cure cold-weather U0110 codes on 2014-2016 Crosstrek Hybrids.
Real Owner Stories
2010 Toyota Prius at 73k miles - No Start
The car refused to enter 'Ready' mode, displaying only code U0110. The dealer quoted 4 hours of diagnostic time at $110/hr for a code they had never seen.
What they tried:
- The owner checked the 12V battery and inspected wiring connectors.
- The mechanic unplugged and reconnected a wire harness to the transaxle.
Outcome: Simply reseating the transaxle connector restored communication and the car started. The owner endured 26 hours of shop time while the dealer attempted to replace inverters unnecessarily.
Lesson: Communication codes are frequently caused by loose connections. Always unplug, clean, and reseat related connectors before paying for deep diagnostics or module replacements.
2006 Honda Civic Hybrid - Stalling and Multiple Codes
The car stalled minutes after starting. The dash illuminated with U0110, U0111, and U1205 codes.
What they tried:
- Charged the 12V battery.
- Checked all fuses.
- Inspected the hybrid components in the trunk.
Outcome: The technician found a major wiring connector in the trunk heavily corroded by water damage. Cleaning the pins and reseating the connector permanently fixed the stalling, avoiding thousands in module costs.
Lesson: Multiple communication codes appearing simultaneously guarantee a shared wiring fault. Water intrusion in the trunk is the primary cause for Honda hybrids.
2014 Subaru Crosstrek Hybrid - Cold Weather No Start
The vehicle refused to start and displayed U0110 exclusively on mornings below freezing.
What they tried:
- Searched for Technical Service Bulletins (TSBs) matching the symptoms.
Outcome: The owner found TSB 07-98-15R, which identified condensation freezing inside the DMCM power relay. Replacing the relay with the updated part (p/n 25230AA190) permanently resolved the issue for under $40.
Lesson: If a fault is tied to specific weather conditions, search for TSBs immediately. Manufacturers document these environmental defects and provide cheap, updated parts.
How to Prevent This Code From Triggering
- Clean and protect electrical connectors (Every 3 years) — Spraying connectors with contact cleaner and applying dielectric grease seals out moisture, preventing the corrosion that causes 80% of communication failures.
- Replace the 12V auxiliary battery (Every 4 years) — A fresh battery guarantees stable voltage to the control modules, preventing them from shutting down and triggering false 'U' codes.
- Clear windshield plenums and sunroof drains (Annually) — Clogged drains force water into the cabin, dripping directly onto fuse boxes and control modules, causing catastrophic electrical shorts.
Frequently Asked Questions
Can I fix a U0110 code myself?
You can easily check fuses, inspect wiring, and replace a weak 12V battery yourself. However, diagnosing the CAN bus network or replacing the high-voltage control module requires specialized tools and safety training. Stop DIY and tow to a shop if basic power and ground checks fail.
What is the most common misdiagnosis for a U0110 code?
The most costly mistake is replacing the expensive Drive Motor Control Module (inverter) without testing the wiring first. Mechanics often replace the module only for the code to return because the real issue was a corroded connector pin or a bad ground wire. Always demand a full wiring test before authorizing module replacement.
How much does it cost to diagnose a U0110 code?
A professional diagnostic check typically costs between $150 and $250. This covers the labor for a technician to scan all network modules and perform initial power, ground, and CAN bus resistance tests.
Will clearing the code make it go away?
Clearing the code with a scanner turns off the warning light temporarily. If the underlying physical problem remains, the code returns immediately upon startup or shifting into gear. You must fix the root cause to keep the code away.
Is the Drive Motor Control Module part of the hybrid battery?
No, it is a separate component. On most vehicles, it is located inside the inverter assembly under the hood. It converts DC power from the rear high-voltage battery into AC power to drive the electric motor.
Is this repair covered by the hybrid system warranty?
Yes, in many cases. Federal law requires critical hybrid components, including the inverter and control modules, to carry an 8-year/100,000-mile warranty. Always check with your dealership before paying out of pocket.
Why does my U0110 code only appear when it's wet or cold?
Temperature and moisture directly affect physical electrical connections. Cold weather freezes condensation inside relays, while moisture bridges corroded connector pins to cause short circuits. This environmental sensitivity strongly indicates a wiring or relay problem rather than a failed module.
What is a CAN bus?
The Controller Area Network (CAN) bus is your vehicle's central nervous system. It is a two-wire network that allows computers like the engine module and drive motor controller to share data instantly. A break or short in these two wires triggers 'U' communication codes.
Key Takeaways
- Code U0110 indicates a total communication failure with the Drive Motor Control Module, immediately disabling the electric motor and forcing the vehicle into a 35-mph limp mode.
- Test your 12-volt auxiliary battery first, as resting voltage below 12.4V is the leading trigger for false communication codes in hybrid vehicles.
- Never drive more than 5 miles with an active U0110 code, as operating in limp mode overheats the transmission and causes upwards of $3,000 in internal clutch damage.
- Demand a 60-ohm CAN bus resistance test before authorizing a $2,000+ inverter replacement, as corroded wiring or loose grounds cause the vast majority of these faults.
Helpful Videos

Shop the Parts Behind U0110
Below are the parts most often responsible for code U0110, ranked by how frequently each one is the actual culprit (per the diagnosis above). Tap any to see what we have for your vehicle.


The information in this article is provided for general reference and educational purposes only. Vehicle specifications, procedures, and part compatibility can vary by production date, trim level, and region. Always consult your vehicle's factory service manual and verify part numbers before purchasing or performing repairs. Safety-critical components such as airbags, seat belts, and braking systems should be installed by a qualified professional.
- 🧭 Diagnostic Flowchart
- 🎬 Helpful Videos
- 🛍️ Shop This Part
- What Does U0110 Mean?
- Can I Drive With U0110?
- Common Causes
- Symptoms
- Common Fixes & Costs
- Used vs. New Parts: Buying Guide
- What Happens If You Wait — Timeline
- Cost of Not Fixing It
- Diagnosis Steps
- When This Code Triggers (Freeze-Frame Conditions)
- Related Codes
- Climate & Environmental Factors
- How to Talk to a Mechanic About This Code
- Where to Take It: Dealer vs Independent vs Chain
- When to Walk Away From the Repair
- What Scan Tool You Need for This Code
- How to Clear the Code After You Fix It
- Will This Fail Emissions / State Inspection?
- Most Commonly Affected Vehicles
- Manufacturer-Specific Notes
- Real Owner Stories
- 2010 Toyota Prius at 73k miles - No Start
- 2006 Honda Civic Hybrid - Stalling and Multiple Codes
- 2014 Subaru Crosstrek Hybrid - Cold Weather No Start
- How to Prevent This Code From Triggering
- Frequently Asked Questions
- Can I fix a U0110 code myself?
- What is the most common misdiagnosis for a U0110 code?
- How much does it cost to diagnose a U0110 code?
- Will clearing the code make it go away?
- Is the Drive Motor Control Module part of the hybrid battery?
- Is this repair covered by the hybrid system warranty?
- Why does my U0110 code only appear when it's wet or cold?
- What is a CAN bus?
- Key Takeaways
- 🎟️ Get 5% Off