
OBD-II Code U0115: Lost Communication With Engine/Powertrain Control Module 'B'
What U0115 means, why it triggers, and how to fix it
- Code U0115 indicates a critical powertrain computer lost communication, causing immediate stalling, erratic shifting, and a severe safety risk.
- Over 80% of U0115 codes stem from simple electrical faults like a blown $5 fuse, a corroded ground wire, or a weak battery dropping below 12.4V.
- Begin diagnosis by removing any aftermarket OBD-II devices, testing the battery, and visually inspecting the wiring harness for rodent damage or chafing.
- Never replace a $500+ control module until a multimeter confirms the unit receives steady 12V power, solid ground, and shows ~60 ohms of CAN bus resistance.
What Does U0115 Mean?

Code U0115 means your car's primary Powertrain Control Module (PCM) lost connection to a secondary computer, designated as module 'B'. These computers communicate constantly over the Controller Area Network (CAN bus). When communication stops, module 'B' cannot send or receive critical messages, triggering the check engine light and causing severe drivability problems.
Technical definition: The SAE/OBD-II definition is "Lost Communication With ECM/PCM 'B' 🎬 Watch: A real-world diagnostic walkthrough for the U0115 code.". This indicates the serial data network detected a complete communication loss with the secondary Engine or Powertrain Control Module, meaning its expected 'heartbeat' messages are absent from the bus.
Can I Drive With U0115?
No — Do Not Drive. Do not drive. The engine can shut off completely while driving, causing an immediate loss of power steering and braking assistance. The transmission also stalls, shifts erratically, or locks into a single gear, creating a severe safety risk.
Common Causes

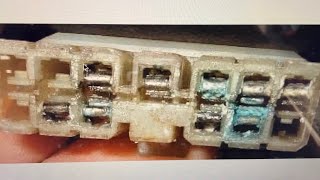
- Damaged, corroded, or loose wiring/connectors at the 'B' module. (Very Common) — Wires and pins connecting the module to the CAN bus face vibration, moisture, and heat. Corrosion, loose pins, or broken wires are the most frequent causes of communication loss.
- Loss of power or ground to the ECM/PCM 'B'. (Common) — Computers require steady power and solid ground. A blown fuse, bad relay, or corroded ground wire prevents the module from powering on.
- Interference from aftermarket OBD-II devices. (Common) — Performance tuners, insurance trackers, or cheap Bluetooth scanners disrupt network communication. Always remove these devices first when diagnosing a 'U' code.
- CAN bus network short or open circuit. (Less Common) — The communication network uses a twisted pair of wires. A short to power/ground or a broken wire isolates modules or crashes the entire network.
- Faulty ECM/PCM 'B' module. (Less Common) — Modules fail internally from electrical surges, heat, or age. While less common than wiring issues, a failed module is a significant possibility after ruling out physical connections.
- Software Glitches or Corrupted Firmware. (Uncommon) — Software glitches cause modules to stop communicating. Manufacturers often release Technical Service Bulletins (TSBs) with software updates to fix these issues.
- Faulty Gateway Module. (Uncommon) — Modules often communicate through a central gateway (like the Instrument Cluster). If the gateway fails, it severs communication between healthy modules.
- Faulty terminating resistor. (Rare) — The CAN bus uses a 120-ohm resistor at each end to prevent signal reflections. A failed resistor alters network resistance and disrupts communication.
Symptoms

- Check Engine Light is on. — The primary indicator that a communication code is stored.
- Engine stalls or will not start. — The vehicle shuts off or refuses to start because fuel, spark, and timing signals are missing.
- Erratic transmission shifting or stuck in 'limp mode'. — The transmission shifts harshly or locks into a single gear (usually 2nd or 3rd) to prevent internal damage.
- Poor engine performance and acceleration. — The engine runs rough, hesitates, or lacks power due to missing instructions from the offline module.
- Erratic gauge cluster behavior. — The speedometer, tachometer, or temperature gauge drops to zero intermittently as they lose data feeds.
- Other warning lights (ABS, Traction Control) are on. — Systems relying on powertrain data illuminate their warning lights when communication drops.
- Accessory systems failing. — Air conditioning or cruise control stop working if they require data from the offline module.
Diagnostic Flowchart
Tap your situation to follow the diagnostic path that matches what you're seeing on this code.
Common Fixes & Costs
- Repairing damaged wiring or cleaning corroded connectors. — Parts: $10-$50, Labor: $150-$560, ~2.5 hr book time (Intermediate)
- Replacing a blown fuse. — Parts: $1-$5, Labor: $0-$150, ~0.5 hr book time (DIY)
- Repairing a faulty ground connection. — Parts: $5-$20, Labor: $75-$200, ~1.0 hr book time (DIY)
- Reprogramming or updating the module's software. — Parts: $0, Labor: $100-$250, ~1.5 hr book time (Professional)
- Replacing the faulty ECM/PCM 'B' module.
— Parts: $500-$1500+, Labor: $125-$300, ~2.5 hr book time
(Professional)
2016-2017 Honda Civic (TCM): OEM 28100-5DJ-A06 (2.0L CVT), 28100-5CG-A07 (1.5L CVT) (Alt: Aftermarket options are limited; OEM replacement is recommended due to programming requirements.)
Nissan Titan, Armada, Frontier, Xterra (IPDM Relay): OEM 284B7-CW29E (Alt: Various aftermarket relays are available from brands like Bosch, Standard Motor Products (SMP).)
Used vs. New Parts: Buying Guide
When a used part is worth it: For older vehicles where a new OEM module is cost-prohibitive. A used module from a reputable salvage yard is cost-effective IF programming is addressed.
Donor-vehicle mileage cap: roughly under 100000 miles for the part to have meaningful remaining life.
Donor quality checklist:
- Verify the donor vehicle's VIN to ensure exact part number matching.
- Ask if the part is tested and includes a 30-90 day warranty.
- Avoid parts from flood-damaged vehicles.
Decision logic:
- If The fault is a known software bug fixed by a TSB. → Update software on the existing module; do not replace.
- If Vehicle is newer and under warranty, or the part cost is reasonable. → Buy a new OEM part to ensure compatibility and the latest software.
- If Budget is the primary concern and the vehicle is out of warranty. → A used or remanufactured module is acceptable, but budget for professional programming or a cloning service.
Warranty tradeoff: Used parts typically offer a 30-90 day functional warranty. New aftermarket parts may offer 1 year to a limited lifetime warranty. New OEM parts carry a 1-2 year warranty, often only if installed by a dealer.
Worst-case if a used part fails: $500-$1000 (If a used module is dead on arrival or fails post-warranty, you lose the part cost plus the labor and programming fees for two installations.)
What Happens If You Wait — Timeline
- 0-24 hours: Vehicle enters 'limp mode' or stalls completely. The Check Engine Light illuminates, and the transmission locks in one gear with harsh engagement. The car is unsafe. (MPG impact: 15-30% (due to being stuck in an inefficient gear)% · Added cost: $150-$300 (Cost of a tow and diagnostic fee))
- 1-4 weeks: Driving in limp mode causes further damage. High hydraulic line pressure creates harsh shifts that prematurely wear transmission clutches and solenoids. (MPG impact: 15-30%% · Added cost: $500-$2500 (Potential damage to transmission internal components, leading toward a future rebuild))
- 1-3 months: An intermittent wiring fault worsens into a permanent short. The vehicle becomes completely undrivable, refusing to start or communicate. (MPG impact: 100% (Vehicle is inoperable)% · Added cost: $2500-$4000 (The original wiring issue requires module replacement due to a burnt driver circuit, plus transmission damage))
- 3+ months: Catastrophic failure. A persistent short or failed module stresses other modules on the CAN bus, requiring complex, network-wide repairs. (MPG impact: 100% (Vehicle is inoperable)% · Added cost: $4000+ (Multiple modules and/or a full transmission replacement required))
Cost of Not Fixing It
- Immediate: Vehicle stalls or enters limp mode, creating a severe safety hazard. (Added cost: $0 (but high risk of accident or being stranded))
- Short-Term (Days to Weeks): Driving in limp mode causes premature wear on transmission clutches due to high line pressure. (Added cost: $1500-$4000 (Potential for accelerated transmission failure requiring a rebuild or replacement))
- Long-Term (Months): Ignoring a wiring short damages other connected modules on the network. (Added cost: $5000+ (Catastrophic failure of multiple electronic modules and/or transmission))
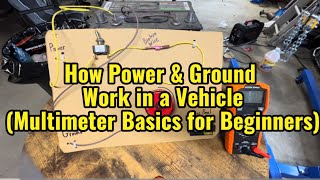
Diagnosis Steps
- Check the Battery and Fuses
A weak battery causes communication errors. Fully charge and test the battery to ensure it holds above 12.4V. Visually inspect all fuses related to the ECM/PCM and TCM.
Tools: Digital Multimeter, Battery Charger/Tester, Vehicle's Fuse Diagram (Beginner) - Scan for All Codes from All Modules
Use a full-system OBD-II scanner. Note all 'U' codes. Multiple 'U' codes suggest a network-wide problem, while an isolated U0115 points to the 'B' module's specific circuit.
Tools: Advanced OBD-II Scanner (Beginner) - Visually Inspect Wiring and Connectors
Locate ECM/PCM 'B'. Inspect its connectors and surrounding wiring harness for damage, corrosion, or loose pins. Check areas where the harness rubs against the chassis.
Tools: Flashlight, Inspection Mirror (Intermediate) - Check for Power and Ground at the Module
Identify power and ground pins using a wiring diagram. Verify the module receives 12.0V-14.5V on power pins and shows under 0.5 ohms of resistance to chassis ground.
Tools: Digital Multimeter, Vehicle-Specific Wiring Diagram (Intermediate) - Perform a 'Wiggle Test'
With the system live and a scan tool monitoring communication, wiggle the wiring harness at the module connector and along its path. If the module drops offline or returns, you found the wiring fault.
Tools: Advanced Scan Tool or Oscilloscope (Advanced) - Test the CAN Bus Network Resistance
Disconnect the battery. Measure resistance between CAN High (Pin 6) and CAN Low (Pin 14) at the OBD-II port. A healthy network reads ~60 ohms. 120 ohms indicates an open circuit; 0 ohms indicates a short.
Tools: Digital Multimeter, Vehicle-Specific Wiring Diagram (Advanced) - Check CAN Bus Voltages with a Multimeter
With the key on, measure CAN line voltage. CAN High (Pin 6) should be ~2.5V to 3.5V; CAN Low (Pin 14) should be ~1.5V to 2.5V. A 0V or 12V reading indicates a short.
Tools: Digital Multimeter (Advanced) - Monitor Live Data PIDs
Use an advanced scan tool to monitor data from the missing 'B' module (e.g., Transmission Fluid Temp). Absent or default values confirm the communication loss.
Tools: Advanced OBD-II Scanner (Advanced) - Analyze the CAN Bus with an Oscilloscope
Connect an oscilloscope to CAN High and Low. A healthy bus shows a mirror-image square wave. A flat-lined signal indicates a clear wiring fault.
Tools: Dual-Channel Oscilloscope, Wiring Diagram (Professional) - Isolate the Faulty Module
Disconnect modules one by one while monitoring network resistance. If disconnecting a module restores the network to 60 ohms, that module is internally shorted.
Tools: Digital Multimeter, Advanced Scan Tool, Wiring Diagram (Professional)
When This Code Triggers (Freeze-Frame Conditions)
- Vehicle Speed: 0-70 mph (Triggers at any time, from key-on to highway cruise, depending on whether the fault is an intermittent wire or a dead module.)
- RPM: 0-3000 (Detected during startup (no-start) or normal driving.)
- Module Voltage: 11.8V - 14.5V (Sets if primary PCM voltage is normal but the 'B' module fails to acknowledge messages.)
- Engine Load: 15-80% (Often occurs under load when communication with the transmission module is most critical.)
Related Codes
- U0100 - Lost Communication with ECM/PCM 'A' — Points to the primary engine controller. If you have ONLY U0115, the fault isolates to the 'B' module. Both codes together indicate a network-wide failure.
- U0101 - Lost Communication with TCM — If the 'B' module is the TCM, this code is functionally identical to U0115. The diagnostic process remains the same.
- U0073 - Control Module Communication Bus 'A' Off — Indicates the entire CAN bus is down. U0115 means only one module is offline. For U0073, diagnose the main network trunk first.
- U0140 - Lost Communication with Body Control Module — If present with U0115, check for a shared power feed, ground point, or network branch used by both the BCM and ECM/PCM 'B'.
Climate & Environmental Factors
- High Humidity / Salt Belt Regions: Moisture and road salt accelerate corrosion on wiring and connector pins, causing high resistance or open circuits in the CAN bus.
- Cold Weather: Low temperatures reduce battery voltage, triggering communication codes. Wiring harnesses also become brittle and susceptible to breaking.
How to Talk to a Mechanic About This Code
Say this: "I have a U0115 code. Please authorize one hour of diagnostic time to test power, ground, and communication wiring to the 'B' module before discussing module replacement."
This directs the shop to perform foundational electrical tests first, preventing an expensive misdiagnosis.
Avoid saying:
- 'Just replace the module with the code'
- 'My car has a U0115, can you give me a price to fix it?' (Impossible without diagnosis)
- 'Just do whatever it takes to fix the Check Engine Light'
Questions to ask before authorizing the repair:
- What were the results of the power and ground tests at the module connector?
- What was the CAN bus resistance reading between pins 6 and 14 at the OBD-II port?
- Did you perform a 'wiggle test' on the harness? Did the module's communication status change?
- Can you show me the damaged wire or corroded connector that needs to be repaired?
- If you are recommending a module replacement, how did you rule out a wiring or network problem?
Where to Take It: Dealer vs Independent vs Chain
- Dealer:
Best for: Vehicles still under warranty, Known TSBs or recalls related to U0115 for your specific model, Complex, manufacturer-specific network issues
Downsides: Higher labor rates (1.5-2x vs independent), Tendency to replace entire assemblies rather than perform targeted wire repairs. (Typical cost: +50% vs. baseline) - Independent Shop:
Best fit for most out-of-warranty vehicles. Skilled technicians are more flexible and cost-effective for diagnosing wiring faults.
Best for: Out-of-warranty vehicles, Shops with a strong reputation for electrical and diagnostic work (look for ASE certifications), Getting a second opinion after a dealership diagnosis
Downsides: Quality and diagnostic capability vary widely; vetting the shop is crucial., May lack access to the very latest manufacturer-specific software or tools for programming new modules. (Typical cost: +0% vs. baseline) - Chain Shop:
AVOID for U0115 diagnosis. This code requires specialized diagnostic skill beyond the scope of general service chains.
Best for: Simple, unrelated maintenance like oil changes or tires.
Downsides: Technician skill is highly variable and often not specialized in complex electrical diagnostics., Business model encourages replacing parts rather than performing time-consuming diagnostics., May lack the advanced scan tools needed to properly diagnose network faults. (Typical cost: -10% vs. baseline)
When to Walk Away From the Repair
If the estimated repair cost exceeds 50% of the car's current private-party market value, consider alternatives.
- Car worth $5000, fix is $2500: Walk away. The repair cost, which could involve a new module and extensive diagnostic labor, is too high relative to the car's value.
- Car worth $15000, fix is $450: Fix it. This cost suggests a wiring or connector repair, which is a highly cost-effective fix well below the threshold.
- Car worth $8000, fix is $1800: Borderline. This likely involves a module replacement. Get a second opinion to ensure a wiring repair isn't possible before proceeding.
What Scan Tool You Need for This Code
Minimum: A scanner capable of an 'All System Scan' to see which modules are online. Basic code readers are insufficient.
A $20 code reader only tells you the U0115 code exists. It cannot tell you if the ABS, BCM, or other modules are also offline. To diagnose a network problem, you must see the whole network.
Budget: BlueDriver Pro (~$100) — Connects to a smartphone for full system scans and live data.
Mid-range: Foxwell NT510 Elite / NT301 (~$150) — Dedicated handheld device for full-system scans and live data streams.
Professional: Autel MaxiCOM MK808S (~$450) — Offers bidirectional control and network topology to visualize offline modules.
Rent vs buy: For a one-time U0115 code, consider having a professional shop perform the diagnosis. If you plan to do your own maintenance and diagnostics regularly, buying a scanner in the mid-range or pro pick category is a worthwhile investment.
How to Clear the Code After You Fix It
- Reconnect battery if it was disconnected for the repair.
- Use a quality OBD-II scan tool to clear all Diagnostic Trouble Codes (DTCs).
- Perform a complete OBD-II drive cycle to allow readiness monitors to run.
Drive cycle (~30 minutes): A general drive cycle includes: 1) Cold start. 2) Idle 2-3 mins. 3) 10-15 mins mixed driving. 4) Steady highway cruise for 5-10 mins. 5) Cool down.
Readiness monitors affected: Comprehensive Component Monitor, Misfire Monitor, Catalyst Monitor, EVAP System Monitor
Before emissions retest: drive at least 100 miles to fully set monitors.
Watch out for:
- Disconnecting the battery clears the code but resets all readiness monitors to 'Not Ready', causing an automatic emissions failure.
- The code returns immediately if the root cause remains unaddressed.
Will This Fail Emissions / State Inspection?
Yes — this code typically fails an OBD-II emissions inspection.
- California: An illuminated Check Engine Light is an automatic failure. Most readiness monitors must be 'Ready' to pass.
- New York: Automatic failure if the Check Engine Light is on. Clearing the code just before the test results in failure due to incomplete monitors.
- Texas: An active U0115 code with the Check Engine Light on is an automatic failure during the OBD-II system scan.
Most Commonly Affected Vehicles
- Chevrolet/GMC Silverado, Sierra, Tahoe, Suburban (2007-2014) — Known for communication issues from poor connections in the transmission harness and corrosion at ground G218.
- Ford F-Series Trucks (2015-2022) — Prone to 'U' codes from wiring harness damage near the emergency brake. The instrument cluster acts as a gateway; unseated connectors trigger this code.
- Honda Pilot, Odyssey, Civic (2016-2022) — U0115 points to a loss of communication between the PCM and TCM. TSB A17060C identifies internal TCM failure on 2016-17 Civics.
- Dodge/RAM Ram Trucks (2013-2018) — Communication codes stem from exposed main wiring harnesses under the truck and Totally Integrated Power Module (TIPM) faults.
- Hyundai Sonata, Elantra (2011-2019) — U0115 triggers due to internal TCM failures or related wiring. Always check for TSBs regarding TCM software updates.
- Nissan Rogue, Altima, Titan (2013-2020) — Often related to a faulty Intelligent Power Distribution Module (IPDM). Check for recalls on IPDM relays (Part # 284B7-CW29E).
- Volkswagen Jetta, Golf, GTI (2010-2018) — The CAN Gateway module integrates into the BCM. A full system scan with VCDS is critical to diagnose the gateway.
- Subaru BRZ / Toyota 86 (2013-2017) — Intermittent communication codes frequently occur when owners use aftermarket OBD-II devices due to non-standard factory pinning.
Manufacturer-Specific Notes
- General Motors: Communication codes frequently stem from a poor ground at G218 where dash insulation traps under the ground nut. Pulling the SDM fuse for 30 seconds can reset non-communicating modules.
- Ford: Older scan tools incorrectly define U0115 as an O2 sensor circuit fault. Always use a high-quality scanner. TSBs for software updates frequently resolve communication DTCs.
- Honda: U0115 specifically relates to PCM-TCM communication over the F-CAN line. Diagnostics require checking continuity on dedicated wires between the modules.
- Nissan: Faulty IPDMs cause intermittent communication issues. Perform the IPDM self-test by pressing the driver's door switch 10 times with the key on to cycle wipers and lights.
Real Owner Stories
2014 Ford F-250 with intermittent U0115
Owner removed the instrument cluster to clean dust. Upon reinstallation, the truck displayed 'ERROR mi', the gauges were dead, and it threw an un-clearable U0115 code.
What they tried:
- Assumed a major software or security lockout had occurred.
- Disassembled the dash again to re-check the main connector to the instrument cluster.
- Wiggled and reseated the connector firmly.
Outcome: Reseating the connector solved the problem. The instrument cluster on many Ford trucks acts as a CAN bus gateway; a slightly loose connector breaks communication entirely.
Lesson: If a communication code appears immediately after a repair, suspect the recent work first. A loose connector is far more common than a spontaneously failed module.
Honda Pilot with U0115 and erratic shifting
Vehicle intermittently showed a Check Engine Light, shifted harshly, and stuck in limp mode. The persistent U0115 indicated a loss of communication with the TCM.
What they tried:
- A shop initially quoted a high price for a new Transmission Control Module (TCM).
- Owner sought a second opinion.
- A technician performed a 'wiggle test' on the wiring harness leading to the TCM while monitoring the scan tool.
Outcome: Wiggling a specific harness section near the transmission restored TCM communication. A single wire had a partial break making intermittent contact. Repairing the wire fixed the issue for a fraction of a new TCM's cost.
Lesson: Never replace an expensive control module without proving its power, ground, and communication wiring are 100% intact. A 'wiggle test' is crucial for intermittent electrical faults.
Subaru BRZ with multiple random codes, including U0115
A 2017 Subaru BRZ began throwing various codes, including P0172 (System Too Rich) and an intermittent U0115. The owner feared a serious physical issue.
What they tried:
- Posted on forums seeking advice for the complex combination of codes.
- Removed aftermarket devices plugged into the OBD-II port based on recommendations.
Outcome: Removing a cheap insurance tracking dongle from the OBD-II port resolved the U0115 code. The device caused CAN bus interference. The P0172 code was an unrelated tuning issue.
Lesson: When diagnosing any 'U' code, immediately remove aftermarket devices from the OBD-II port (insurance trackers, performance monitors). They are a primary source of network interference.
2018 Honda with sudden U0115 and no-start
The vehicle refused to start, and the dashboard lit up with multiple warnings. A scan revealed code U0115.
What they tried:
- Technician checked the battery and fuses, which were good.
- Performed a visual inspection of the engine bay.
- Noticed signs of a rodent nest near the firewall.
Outcome: Rodents chewed through several wires in the main harness, including the CAN bus lines, causing complete communication loss. The technician soldered and heat-shrunk the damaged sections to restore the network.
Lesson: If a vehicle suddenly develops major electrical issues with multiple communication codes, inspect the wiring harnesses for rodent damage, especially if parked outdoors.
How to Prevent This Code From Triggering
- Periodically Clean Battery Terminals and Chassis Grounds (Every 12 months or during oil change) — Corrosion creates resistance and low voltage. Control modules drop off the network when voltage fluctuates, triggering U0115.
- Apply Dielectric Grease to Critical Connectors (Whenever a connector is disconnected for service) — Seals out moisture and prevents pin corrosion that disrupts low-voltage CAN bus signals, especially on exposed transmission connectors.
- Inspect and Secure Wiring Harnesses (During other under-hood maintenance) — Securing harnesses away from hot exhaust and sharp edges prevents chafing and melting, which short out CAN bus wires.
- Address Fluid Leaks Promptly (As soon as noticed) — Oil, coolant, or transmission fluid degrades wiring insulation and connector seals, causing electrical shorts and corrosion.
Frequently Asked Questions
What is the difference between ECM/PCM 'A' and 'B'?
'A' is typically the primary Engine Control Module (ECM) that manages the engine. 'B' is a secondary module that can be the Transmission Control Module (TCM), Fuel Injection Control Module (FICM), or another critical powertrain computer.
Can a bad battery cause a U0115 code?
Yes. A weak battery providing low voltage is a very common cause of communication codes. Control modules require a stable voltage to operate correctly. Always test the battery and charging system before starting complex wiring diagnostics.
What are the most common misdiagnoses for U0115?
The most common mistake is immediately replacing the expensive 'B' module without proper diagnosis. Technicians often find the actual cause was a $5 blown fuse, a corroded ground wire, or a damaged wiring harness. Ignoring other 'U' codes also leads to misdiagnosing a network failure as a single module failure.
My scanner can't connect to the car at all. Is this related to U0115?
Yes. If the network gateway module fails, or if there is a short on the CAN bus wires at the OBD-II port, it prevents scanner communication. Check the fuse for the OBD-II port itself and inspect the port's pins for damage.
Will the code go away on its own?
If the cause was temporary, like a low battery that has since been charged, the code clears itself after several drive cycles. If the code stems from a physical fault like a broken wire, it remains until repaired.
How do I test the CAN bus with a multimeter?
With the battery disconnected, measure resistance between Pin 6 (CAN High) and Pin 14 (CAN Low) on the OBD-II port. A healthy network reads approximately 60 Ω. Readings of 120 Ω indicate an offline terminating resistor, while 0 Ω means the wires are shorted together.
What is a terminating resistor?
A terminating resistor is a 120-ohm resistor placed at each end of the CAN bus network to prevent electrical signal reflections. The two resistors in parallel create the standard 60-ohm network resistance. They are usually located inside the modules at the physical ends of the network, like the PCM and Instrument Cluster.
I installed an aftermarket performance tuner and now I have this code. What should I do?
Aftermarket devices plugged into the OBD-II port frequently interfere with the CAN bus network. Remove the device completely, clear the codes, and test drive the vehicle. Some devices are not fully compatible with your vehicle's network.
Is replacing the ECM/PCM a guaranteed fix?
No. Replacing the module is the most expensive option and should only be done after professional testing rules out wiring and power/ground issues. It is the final step in diagnosis, not the first.
Key Takeaways
- Code U0115 indicates a critical powertrain computer lost communication, causing immediate stalling, erratic shifting, and a severe safety risk.
- Over 80% of U0115 codes stem from simple electrical faults like a blown $5 fuse, a corroded ground wire, or a weak battery dropping below 12.4V.
- Begin diagnosis by removing any aftermarket OBD-II devices, testing the battery, and visually inspecting the wiring harness for rodent damage or chafing.
- Never replace a $500+ control module until a multimeter confirms the unit receives steady 12V power, solid ground, and shows ~60 ohms of CAN bus resistance.
Helpful Videos

Shop the Parts Behind U0115
Below are the parts most often responsible for code U0115, ranked by how frequently each one is the actual culprit (per the diagnosis above). Tap any to see what we have for your vehicle.


The information in this article is provided for general reference and educational purposes only. Vehicle specifications, procedures, and part compatibility can vary by production date, trim level, and region. Always consult your vehicle's factory service manual and verify part numbers before purchasing or performing repairs. Safety-critical components such as airbags, seat belts, and braking systems should be installed by a qualified professional.
- 🧭 Diagnostic Flowchart
- 🎬 Helpful Videos
- 🛍️ Shop This Part
- What Does U0115 Mean?
- Can I Drive With U0115?
- Common Causes
- Symptoms
- Common Fixes & Costs
- Used vs. New Parts: Buying Guide
- What Happens If You Wait — Timeline
- Cost of Not Fixing It
- Diagnosis Steps
- When This Code Triggers (Freeze-Frame Conditions)
- Related Codes
- Climate & Environmental Factors
- How to Talk to a Mechanic About This Code
- Where to Take It: Dealer vs Independent vs Chain
- When to Walk Away From the Repair
- What Scan Tool You Need for This Code
- How to Clear the Code After You Fix It
- Will This Fail Emissions / State Inspection?
- Most Commonly Affected Vehicles
- Manufacturer-Specific Notes
- Real Owner Stories
- 2014 Ford F-250 with intermittent U0115
- Honda Pilot with U0115 and erratic shifting
- Subaru BRZ with multiple random codes, including U0115
- 2018 Honda with sudden U0115 and no-start
- How to Prevent This Code From Triggering
- Frequently Asked Questions
- What is the difference between ECM/PCM 'A' and 'B'?
- Can a bad battery cause a U0115 code?
- What are the most common misdiagnoses for U0115?
- My scanner can't connect to the car at all. Is this related to U0115?
- Will the code go away on its own?
- How do I test the CAN bus with a multimeter?
- What is a terminating resistor?
- I installed an aftermarket performance tuner and now I have this code. What should I do?
- Is replacing the ECM/PCM a guaranteed fix?
- Key Takeaways
- 🎟️ Get 5% Off