
U0199 on 2006-2010 Dodge Charger: Lost Communication With Driver Door Module Fixes
On a 2006-2010 Dodge Charger, code U0199 is almost always caused by broken wires in the rubber boot between the driver's door and the car's body. The constant flexing breaks the power, ground, or CAN bus communication wires. Repairing these wires is the most common fix and costs significantly less than replacing the Driver Door Module (DDM).
- U0199 on a 2006-2010 Charger means the Driver Door Module (DDM) is offline.
- Before buying any parts, ALWAYS inspect the wires inside the rubber boot in the driver's door jamb. Broken wires are the cause over 90% of the time.
- Symptoms are isolated to the driver's door: window, lock, and mirror will not work. Sometimes the passenger door is also affected.
- Do not replace the Driver Door Module or the master window switch until you have proven the wiring is good.
- This is a common, well-documented problem on the Chrysler LX platform (Charger, 300, Magnum) that is very feasible for a DIYer to fix with basic wiring repair skills.
What's Unique About the 2006-2010 Dodge CHARGER
The first-generation Dodge Charger (LX platform) and its siblings (Chrysler 300, Dodge Magnum) are notorious for this specific failure. The wiring harness that passes through the door jamb flexes every time the door is opened, causing the internal copper wires to fatigue and break over time. This is such a common and well-documented issue that it should be the very first thing you check, as it is far more likely to be the cause than a failed module.
Diagnostic Flowchart
Tap your situation to follow the diagnostic path that matches what you're seeing on this vehicle.
Symptoms You May Notice
- Driver's side power window will not go up or down.
- Driver's side power door lock is inoperative.
- Power mirror adjustment does not work for the driver's side.
- The key fob may not lock or unlock the driver's door.
- Interior courtesy lights may not turn on when the driver's door is opened.
- A 'DOOR' message may appear on the dash display (EVIC).
- In some cases, the passenger side window and lock may also be inoperative, as noted in TSB 08-061-12, because the communication signal passes through the driver's door harness first.
- Replacing the Driver Door Module (DDM) before inspecting the door jamb wiring. This is the most common and expensive mistake.
- Replacing the master window switch. The switch is just an input device; the U0199 code indicates the module that reads the switch is offline.
- Replacing the Body Control Module (BCM). A fault code specific to one door module rarely points to a BCM failure.
Most Likely Causes
- Broken Wires in Driver's Door Jamb Harness 🔴 High Probability The constant flexing from opening and closing the door causes the wires in the flexible rubber boot to fatigue and break. This is a widely recognized design weakness on the 2006-2010 Charger and its platform mates (Chrysler 300, Dodge Magnum). The most common wires to break are the larger gauge power and ground wires, and the smaller, twisted-pair CAN bus communication wires (often White/Black and White/Light Blue).
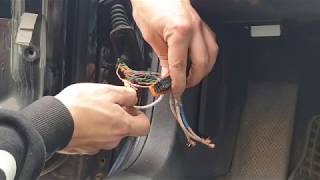
How to confirm: Peel back the rubber boot between the driver's door and the A-pillar. Visually inspect the bundle of wires for obvious breaks, chafing, or cracked insulation. Gently tug on individual wires; a broken wire may still be held in place by its insulation, so a light pull will reveal the break.
Typical fix: Repair the broken wires using butt connectors and heat shrink tubing. 🎬 See how to repair broken door jamb wiring For a more robust repair, solder the wires and insulate with heat shrink, or even add a new length of more flexible wire to bridge the gap. Mopar and aftermarket companies also sell harness repair pigtails for a more plug-and-play solution.
Est. part cost: $5-$50 - Failed Driver Door Module (DDM) ⚪ Low Probability → Shop Body Control Module While electronic modules can fail from voltage spikes or water intrusion, it is far less common than the wiring issue on this platform.
How to confirm: Only after confirming the wiring, fuses, and connectors are all intact. The module is located inside the door panel. Check for 12V power and a solid ground at the module's connector. If power and ground are present but the module won't communicate, it has likely failed.
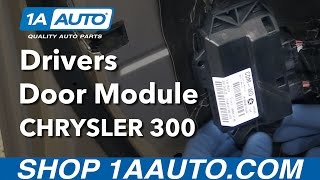
Typical fix: Replace the Driver Door Module. The new module may need to be programmed or initialized by a dealership or a shop with advanced scan tools like a wiTECH. 🎬 Watch: Step-by-step driver door module replacement guide
Est. part cost: $100-$250 - Blown Fuse or Power/Ground Issue ⚪ Low Probability
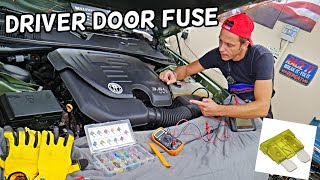
How to confirm: Check the fuse box in the trunk, next to the battery. Look for fuses related to the door modules (often labeled DDM/PDM) or the Ignition Off Draw (IOD) fuse. Use a multimeter to check for a solid ground connection at the DDM connector.
Typical fix: Replace the blown fuse. If the fuse blows again immediately, there is a short circuit in the wiring that must be found and repaired.
Est. part cost: $1-$5
Rare But Worth Checking
- Corroded or Loose Main Chassis Ground:
Diagnosis Steps
- Read the trouble codes with an OBD-II scanner to confirm U0199 is active.
- Check for related fuses in the rear power distribution center (in the trunk, next to the battery). Specifically check the DDM/PDM and IOD fuses.
- Peel back the rubber boot in the driver's door jamb and thoroughly inspect all wires for breaks or damage. This is the most critical step.
- If wires look intact, perform a 'wiggle test' by moving the harness around while an assistant tries to operate the window/locks to check for intermittent connections.
- If the wiring is confirmed to be good, remove the driver's door panel to access the Driver Door Module (DDM).
- With the key on, use a multimeter to verify 12V power (often a Pink/Red wire) and a good ground (often a Black wire) at the DDM's main electrical connector.
- If CAN bus wires were repaired, check for continuity. If power, ground, and wiring are all confirmed good, the Driver Door Module is the likely failed component and should be replaced.
Parts You'll Likely Need
- Wiring Repair Supplies — This is for fixing the most common cause: broken wires in the door jamb. You will need butt connectors, heat shrink tubing, and potentially some extra wire.
Trusted brands: 3M, Gardner Bender
OEM price range: $10-$30
Aftermarket price range: $5-$15 - Door Harness Repair Pigtail
(OEM #Varies, e.g., Mopar 68087939AA (check VIN))— If multiple wires are broken or the damage is severe, a pigtail kit provides a new section of harness with a connector, offering a more durable repair than multiple splices.
Trusted brands: Mopar, Dorman
OEM price range: $40-$80
Aftermarket price range: $25-$50 - Driver Door Module (DDM)
(OEM #Varies by VIN)— This is the part to replace only if all wiring and power/ground checks have passed. It is the control unit for the door's electronics.
Trusted brands: Mopar, Dorman
OEM price range: $150-$250
Aftermarket price range: $100-$180
Related Codes That Often Appear With This One
- U0200 — U0200 is 'Lost Communication With Passengers Door Module'. TSB 08-061-12 addresses both codes. The CAN bus wiring for the passenger door module is routed through the driver's door harness, so when wires break there, it can take both modules offline.
Technical Service Bulletins (TSBs) & Recalls
- 08-061-12: Drivers And/Or Passenger Front Power Door Locks And Windows Inoperative U0200 Lost Communication With Passengers Door Module U0199 Lost Communication With Drivers Door Module.
Platform-Specific Known Issues
- Chrysler issued Technical Service Bulletin (TSB) #08-061-12 for the 2006-2010 Charger due to inoperative front power locks and windows, specifically citing DTCs U0199 and U0200. The bulletin acknowledges the communication loss issue.
Mechanic-Grade Diagnostic Values
- CAN Bus Network Resistance — expected: Approximately 60 Ohms. Failure: A reading of 120 Ohms indicates an open circuit or a missing terminating resistor (one module is offline). A reading near 0 Ohms indicates a short between the CAN High and CAN Low wires.
- CAN-C Bus Voltage (Key On, Engine Off) — expected: CAN High (CAN-C +) should be ~2.6V. CAN Low (CAN-C -) should be ~2.4V.. Failure: Voltages that are stuck high (5V or 12V) or low (0V) indicate a short to power or ground. No voltage differential between the two lines indicates a communication failure.
- DDM Power Supply Voltage — expected: 10-16 Volts. Failure: Voltage below 10V can cause the module to stop communicating.
Scan Tool Commands That Help
- wiTECH or equivalent professional scan tool: DDM Bidirectional Controls (e.g., 'Window Up/Down Command', 'Lock/Unlock Command') — After confirming power and ground to the DDM are good. This command directly tells the module to perform an action, bypassing the physical switch. If the command works (e.g., the window moves), it proves the DDM, motor, and wiring from the module to the motor are good, pointing to a problem with the switch pack or its inputs. If the command fails, it strongly suggests the DDM itself has failed.
- wiTECH: Network Topology / Loss of Communication Test — This function performs a live 'ping test' of all modules on the network. It can be used during a wiggle test of the door harness to see if communication with the DDM drops in real-time, confirming an intermittent wiring fault.
Wiring & Ground Locations
- G302 — Behind the driver's side kick panel, near the A-pillar.. This is a primary body ground point. While the main ground for the DDM is in the door harness itself, a poor connection at G302 can cause various difficult-to-diagnose electrical issues on the driver's side of the vehicle.
- C320 — The main electrical connector in the driver's door jamb that connects the body harness to the door harness.. This is the connector where the wires flex and break. All power, ground, and CAN bus signals for the Driver Door Module (and the signals for the Passenger Door Module) pass through this connector and its associated harness boot.
- CAN-C Bus Wires — A twisted pair of wires running through the door jamb harness (C320).. These are the specific communication wires for the door modules. On Chrysler vehicles of this era, they are typically a White wire with a colored stripe and another White wire with a different colored stripe. If either of these wires breaks, communication is lost and U0199/U0200 will set.
Real Owner Repair Stories
- 300CForums.com user (2006 Chrysler 300C (LX Platform sibling)) — Driver window, locks, and mirror stopped working. Codes U0199 and U0200 were present.
❌ Tried (didn't work) Checking fuses., Considering replacing the Driver Door Module (DDM).
✅ What actually fixed it The user found multiple broken wires inside the driver's door jamb boot. Specifically, the thickest black wire (ground) and a smaller purple wire were completely severed. Splicing these wires back together fixed all issues and cleared the codes.
When the Usual Fixes Don't Work
- While the official Chrysler TSB (08-061-12) directs technicians to check for communication loss and then replace the module if communication is regained after a battery disconnect, this procedure is widely considered flawed by experienced technicians. It often misdiagnoses the issue because temporarily resetting the module can mask the underlying intermittent wiring fault, leading to the unnecessary replacement of a perfectly good Driver Door Module. The root cause is almost always the broken wires in the door jamb.
Model Year Variations Within This Range
- 2008-2010: The 2008 model year received a minor interior refresh. While the fundamental cause of U0199 (broken door jamb wires) remained the same, some interior trim pieces and connectors may differ slightly from the 2006-2007 models when accessing the door panel or kick panel grounds.
Helpful Videos

The information in this article is provided for general reference and educational purposes only. Vehicle specifications, procedures, and part compatibility can vary by production date, trim level, and region. Always consult your vehicle's factory service manual and verify part numbers before purchasing or performing repairs. Safety-critical components such as airbags, seat belts, and braking systems should be installed by a qualified professional.
- Dodge CHARGER:
- 🧭 Diagnostic Flowchart
- 🎬 Helpful Videos
- What's Unique About the 2006-2010 Dodge CHARGER
- Symptoms You May Notice
- Most Likely Causes
- Rare But Worth Checking
- Diagnosis Steps
- Parts You'll Likely Need
- Related Codes That Often Appear With This One
- Technical Service Bulletins (TSBs) & Recalls
- Platform-Specific Known Issues
- Mechanic-Grade Diagnostic Values
- Scan Tool Commands That Help
- Wiring & Ground Locations
- Real Owner Repair Stories
- When the Usual Fixes Don't Work
- Model Year Variations Within This Range
- 🎟️ Get 5% Off