
OBD-II Code U0200: Lost Communication With Door Control Module 'B'
What U0200 means, why it triggers, and how to fix it
- Inspect the flexible rubber boot in the door jamb first; broken wires here cause over 80% of U0200 codes, not a failed module.
- On 2005-2010 Chrysler 300 and Dodge Charger models, check the driver's side door jamb wiring, as passenger door communication routes through it.
- Check the passenger door module fuse before dismantling the door; a blown $3 fuse causes a total loss of communication.
- Do not replace the door control module without testing for a stable 12-volt power supply and a ground resistance below 1.0 Ohm.
What Does U0200 Mean?
The U0200 code means your vehicle's main computer (Body Control Module) lost communication with Door Control Module 'B' (the front passenger door). This module manages the door's electronic functions, including the power window, lock, and mirror. When the main computer stops receiving data from this module over the CAN bus network, it triggers the U0200 fault.
Technical definition: SAE/ISO defines U0200 as "Lost Communication With Door Control Module 'B'". It indicates a data exchange failure on the Controller Area Network (CAN) between a primary control unit and the passenger door module. The code sets when expected data messages are missing within a specified timeframe, marking the module as offline.
Can I Drive With U0200?
Yes, But With Caution. Yes, you can drive with this code, but it carries security and convenience risks. The affected door's power windows, locks, and mirrors will fail. This becomes a severe security issue if the door cannot lock, or a safety hazard if the window is stuck open in bad weather.
Common Causes
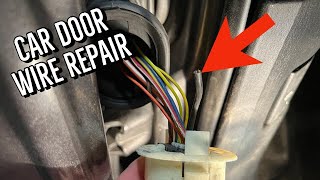
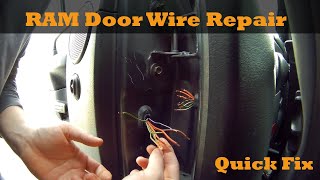
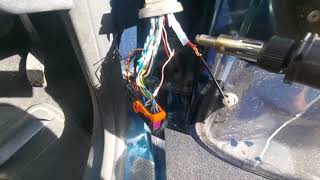
- Broken Wires in Door Jamb (Very Common) — Constant bending fatigues wires inside the flexible rubber boot between the body and door, causing them to snap. On 2005-2010 Chrysler/Dodge models, passenger door wiring routes through the driver's door jamb, making it the primary failure point. 🎬 Watch: How to find and fix broken door jamb wires.
- Blown Fuse or Power Supply Issue (Common) — The module requires a stable 12-volt power supply and solid ground. A blown fuse, rusted ground connection, or severed power wire prevents the module from booting up.
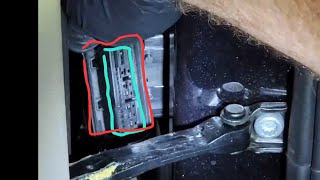
- Corroded or Loose Connectors (Common) — Moisture seeps into connectors at the door module, BCM, or inline harness points, corroding pins. On 2015-2020 Ford F-150s, a 16-pin connector near the spare tire frequently corrodes, disrupting the entire network.
- Defective Door Wiring Harness (Common) — Certain 2019-2022 Volkswagen models (Atlas, Jetta, Tiguan) have factory-defective door wiring harnesses. This triggers U0200 and erratic electrical behavior, prompting VW Safety Recall 97GF.
- Failed Door Control Module (DCM) (Less Common) — Internal components like the CAN transceiver chip or voltage regulator burn out, or solder joints crack. This prevents communication even with perfect wiring and power.
- Water Ingress into Module (Rare) — Failed window seals allow water to leak directly onto the module's circuit board, causing short circuits and permanent failure.
- CAN Bus Network Fault (Rare) — A fault in another module or a break in the main CAN bus wiring disrupts communication for multiple components simultaneously.
Symptoms
- Passenger power window stuck — The passenger-side window remains in its current position and ignores commands from both the driver's master switch and its own switch.
- Passenger power lock fails — The power lock for the passenger door ignores the key fob and interior lock buttons, requiring manual locking.
- Passenger power mirror unresponsive — The passenger-side mirror cannot be adjusted using the interior control switch.
- Intermittent door functions — The passenger window or lock works sporadically, often depending on how wide the door is open. This strongly indicates a failing wire in the door jamb.
- Check Engine or Warning Light illuminated — The vehicle's computer illuminates a dashboard warning light or displays a communication error message in the information center.
- Interior courtesy lights fail — The dome light or puddle light fails to turn on when the passenger door opens because the BCM never receives the 'door open' signal.
Diagnostic Flowchart
Tap your situation to follow the diagnostic path that matches what you're seeing on this code.
Common Fixes & Costs
- Replacing a blown fuse — Parts: $1-$5, Labor: $0-$20, ~0.2 hr book time (DIY)
- Repairing broken wires in the door jamb — Parts: $10-$30, Labor: $150-$300, ~1.5 hr book time (Intermediate)
- Cleaning or repairing a corroded connector — Parts: $5-$20, Labor: $100-$200, ~1 hr book time (Intermediate)
- Replacing the door wiring harness — Parts: $250-$450, Labor: $150-$300, ~2 hr book time (Intermediate)
- Replacing the Door Control Module — Parts: $300-$600, Labor: $150-$350, ~1.5 hr book time (Professional)
DIY vs Professional
- Replacing a blown fuse — Beginner:
- Repairing broken wires in the door jamb — Beginner:
- Cleaning or repairing a corroded connector — Beginner:
- Replacing the door wiring harness — Beginner:
- Replacing the Door Control Module — Beginner:
Used vs. New Parts: Buying Guide
When a used part is worth it: A used Door Control Module makes sense for vehicles over 10 years old where new parts are discontinued or prohibitively expensive.
Donor-vehicle mileage cap: roughly under 100000 miles for the part to have meaningful remaining life.
Donor quality checklist:
- Match the part number exactly; a single letter difference means incompatibility.
- Ensure the module is 'unlocked' from the donor vehicle's VIN to allow reprogramming.
- Favor remanufactured modules over raw salvage yard pulls.
Decision logic:
- If The problem is a wiring harness. → Do not buy used. Repair the wires or buy a new pigtail. Used harnesses suffer the same age-related fatigue.
- If A used module is less than 50% the cost of a new one and includes a warranty. → A used module is reasonable, but budget $100-$150 for dealer programming.
- If The vehicle is less than 8 years old. → Buy new (OEM or quality aftermarket) to ensure compatibility and longevity.
Warranty tradeoff: Used parts offer 30-90 day warranties. New aftermarket parts offer 1-year to lifetime warranties.
Worst-case if a used part fails: $300-$600 if a used module arrives dead, requiring repeat labor and programming fees.
What Happens If You Wait — Timeline
- 0-2 weeks: All passenger door functions cease. The door remains stuck unlocked or locked. (MPG impact: 0%% · Added cost: $0)
- 1-3 months: If the window is stuck open, rain soaks the interior door panel, destroying the speaker and window switch. (MPG impact: 0%% · Added cost: $500-$1500)
- 3-6 months: A wiring short drains the battery overnight. On VW models, the disabled side airbag sensor remains a severe safety risk. (MPG impact: 0%% · Added cost: $200-$400)
- 6+ months: An un-fused short circuit feeds back into the network, permanently damaging the main Body Control Module (BCM). (MPG impact: 0%% · Added cost: $800-$2500)
Cost of Not Fixing It
- Immediate: The passenger door window, lock, and mirror fail. The door remains stuck unlocked (theft risk) or locked (access issue). (Added cost: Negligible)
- 1-6 months: If the window is stuck open, rain destroys interior upholstery and electronics. On VW models, side airbags remain disabled. (Added cost: $500-$1500)
- 6+ months: A short-to-ground in the door harness feeds back into the network, permanently damaging the main Body Control Module (BCM). (Added cost: $800-$2500)
Diagnosis Steps
- Read the Codes
Use an OBD-II scanner to confirm the U0200 code. Check for other communication codes. The presence of U0199 (Driver's Door) alongside U0200 strongly indicates a wiring issue in the driver's door jamb on Chrysler/Dodge vehicles.
Tools: OBD-II Scanner (Beginner) - Perform a Wiggle Test
Have a helper operate the passenger window switch while you aggressively wiggle the rubber boot in the door jamb. If the window briefly works, you have located a broken wire.
Tools: Helper (Beginner) - Check the Fuses
Locate the fuse for the 'Passenger Door Module' in your owner's manual. Visually inspect the fuse and replace it if blown. A blown fuse causes an instant loss of communication.
Tools: Owner's Manual, Fuse Puller (Beginner) - Inspect the Door Jamb Wiring
Peel back the rubber boot in the passenger door jamb. On Chrysler/Dodge vehicles, inspect the driver's door jamb first. Look for snapped wires, cracked insulation, or wires that feel unusually limp inside.
Tools: Trim removal tools, Flashlight (Intermediate) - Inspect Connectors
Unplug the main electrical connector at the A-pillar and the connector at the door control module. Look for green corrosion or pushed-out pins. On 2015-2020 Ford F-150s, inspect the 16-pin connector near the spare tire.
Tools: Basic hand tools, Flashlight (Intermediate) - Test Power and Ground
Using a multimeter, check the door control module's connector with the key on. The power pin must show 11.5V-14V. The ground pin must show under 1.0 Ohm resistance to the chassis.
Tools: Multimeter, Vehicle-specific wiring diagram (Advanced) - Perform a Bi-Directional Scan
Use a professional scan tool to command the door module to roll down the window. If the scanner cannot establish communication, but power, ground, and CAN wiring are verified, the module is dead.
Tools: Bi-Directional Scan Tool (Professional) - Check CAN Bus Resistance
Disconnect the battery. Measure resistance between CAN High and CAN Low at the OBD-II port (pins 6 and 14). A healthy network reads 60 Ohms. 120 Ohms indicates a broken wire or missing terminating resistor.
Tools: Multimeter (Advanced) - Test CAN Bus Voltages
Reconnect the battery and turn the ignition on. Measure the voltage of the CAN lines to a chassis ground. CAN High should average 2.7V, and CAN Low should average 2.3V. A steady 2.5V on both indicates a short.
Tools: Multimeter (Advanced)
When This Code Triggers (Freeze-Frame Conditions)
- Vehicle State: Key On, Engine Off (KOEO) (The fault is detected during the initial power-up sequence when the BCM pings all modules.)
- Battery Voltage: 11.5-12.5V (Low voltage during startup triggers false communication codes across the network.)
- Vehicle Speed: 0 mph (Because the communication check fails at startup, the vehicle is stationary when logged.)
- Module Status: No Communication (The primary data point confirms the module is offline or missing from the CAN bus.)
Related Codes
- U0199 — Indicates 'Lost Communication With Door Control Module A' (driver's door). If both U0199 and U0200 appear on a Chrysler/Dodge, the break is in the driver's door jamb. On other cars, it points to a network-wide issue.
- U0002 — A general 'High Speed CAN Communication Bus Performance' error. Seeing this with U0200 means the wiring short in the door harness is severe enough to crash the entire network.
- B1017 / B1036 — Body codes for side airbag crash sensors. On modern Volkswagens, a U0200 code accompanied by these B-codes confirms a defective door wiring harness.
- U0252 — Indicates 'Lost Communication With Lighting Control Module Rear B'. On Ford F-150s, seeing U0200 and U0252 together points directly to the corroded 16-pin connector near the spare tire.
Climate & Environmental Factors
- Cold Climates: Freezing temperatures make plastic wire insulation brittle. The repeated stress of opening the door in the cold drastically increases the chance of wires snapping in the jamb.
- Humid / High-Precipitation Regions: Constant moisture accelerates corrosion on electrical connectors and ground points. Water wicks into unsealed connectors, causing high resistance and communication drops.
- Salt Belt Regions: Road salt aggressively corrodes copper wiring and terminals. Frame-mounted connectors, like those on the Ford F-150, are highly susceptible to salt spray failure.
How to Talk to a Mechanic About This Code
Say this: "I have a U0200 code and my passenger door functions are dead. I suspect broken wires in the door jamb. Can you estimate the cost to inspect the door jamb wiring before diagnosing the module itself?"
This directs the shop to the most likely, cheapest repair first. It prevents them from starting with a high-cost quote to replace the module.
Avoid saying:
- 'My passenger door is broken, fix it.'
- 'My check engine light is on, can you look at it?'
- 'The internet says it's the door module, how much to replace it?'
Questions to ask before authorizing the repair:
- Did you find broken wires in the door jamb?
- If the wiring is good, did you confirm the module has 12V power and a good ground?
- Before I pay for a new module, can you show me that you ruled out the wiring?
- If the module needs replacement, does the cost include programming?
Where to Take It: Dealer vs Independent vs Chain
- Dealer:
Recommended only if a recall applies or complex programming is mandatory.
Best for: Vehicles with known recalls (e.g., 2019-2022 Volkswagens)., Vehicles under warranty., When a new module requires proprietary dealer programming.
Downsides: Highest labor rates., May recommend expensive module replacement when a simple wire repair suffices. (Typical cost: +50% vs. baseline) - Independent Shop:
Best fit. An experienced auto electrical shop traces and repairs wiring faults efficiently.
Best for: Out-of-warranty vehicles with known wiring issues., Diagnosing and repairing broken wires in the door jamb.
Downsides: May lack the tools to program a new module if required. (Typical cost: +0% vs. baseline) - Chain Shop:
AVOID. Complex electrical diagnosis is not suited for chain repair shops.
Best for: Simple jobs like fuse replacement.
Downsides: Technicians lack specialized electrical diagnostic skills., High risk of misdiagnosis and unnecessary part replacement. (Typical cost: -10% vs. baseline)
When to Walk Away From the Repair
If the estimated repair cost exceeds 40-50% of the car's Kelley Blue Book private-party value, consider selling the vehicle as-is.
- Car worth $4000, fix is $800: Fix it. The repair cost is 20% of the vehicle's value.
- Car worth $3000, fix is $1500: Walk away. The repair cost is 50% of the car's value.
- Car worth $15000, fix is $1000: Fix it. This is a minor repair on a valuable vehicle.
What Scan Tool You Need for This Code
Minimum: A basic OBD-II code reader confirms the code, but a multimeter is more important for initial DIY diagnosis (checking fuses, power, and ground).
A $20 reader cannot read codes from the BCM or airbag system, missing critical clues. It also cannot perform active tests to command the module.
Budget: BlueDriver Pro (~$100) — Reads codes from all vehicle systems (Engine, ABS, Airbag, BCM). Crucial for seeing related codes like U0199 or airbag faults.
Mid-range: Foxwell NT510 Elite (~$180) — Provides bi-directional control to send commands to the door module. If the module responds to the scanner but not the switch, the module is good.
Professional: Autel MaxiCOM MK808 (~$450-800) — Offers dealer-level bi-directional control and module programming capabilities if a new module is installed.
How to Clear the Code After You Fix It
- Fix the root cause (e.g., repair broken wire, replace fuse).
- Reconnect the battery if disconnected.
- Use an OBD-II scan tool to clear the U0200 code and related codes.
- Cycle the ignition off and on, then verify door functions are restored.
Drive cycle (~15 minutes): A specific drive cycle is not required for communication codes. A 15-minute drive confirms system stability and resets readiness monitors cleared by battery disconnection.
Readiness monitors affected: None, if battery was not disconnected., All emissions monitors reset to 'Incomplete' if the battery was disconnected.
Before emissions retest: drive at least 50 miles to fully set monitors.
Watch out for:
- Clearing the code without fixing the physical broken wire causes the code to return immediately.
- Driving straight to an emissions test after reconnecting the battery results in an automatic failure due to incomplete readiness monitors.
Will This Fail Emissions / State Inspection?
Yes — this code typically fails an OBD-II emissions inspection.
- California: An illuminated Check Engine Light is an automatic failure. If the battery was disconnected, all OBD readiness monitors must be 'Ready'.
- New York: Vehicles automatically fail the emissions inspection if the Check Engine Light is on.
- Texas: In the 17 counties requiring emissions testing, an active U0200 code with the Check Engine Light on results in a failed test.
Most Commonly Affected Vehicles
- Chrysler 300 (2005-2010) — Extremely common issue due to broken wires in the driver's side door jamb harness, which routes communication for the passenger door. Addressed in TSB #08-061-12.
- Dodge Charger, Magnum (2005-2010) — Shares the same platform and wiring flaw as the Chrysler 300. Broken wires in the driver's door boot frequently trigger U0200.
- Volkswagen Atlas, Golf, Jetta, Tiguan, Taos (2019-2022) — Subject to a widespread defect in door wiring harnesses causing U0199 and U0200 codes. Covered under VW Safety Recall Code 97GF.
- Ford F-150 (2015-2020) — A corroded 16-pin connector in the rear frame near the spare tire disrupts the MS-CAN network, triggering U0200 and other communication codes.
- GMC Savana (2003-2014) — GM bulletin 08-07-30-021 notes U-codes set easily from low battery voltage. A history code without symptoms does not indicate a failed module.
- Chevrolet Silverado (2007-2013) — Similar to the GMC Savana, temporary issues like a low battery trigger false communication codes. Clear history codes and monitor.
- Toyota Various Models (2005-2015) — TSB T-SB-0210-12 notes U0200 stores as a history code if battery power is interrupted for service. It is not an active fault.
- Hyundai Tiburon / Coupe (2003-2008) — Known to log U0200 codes due to wiring fatigue in the door jambs as the vehicles age.
- Subaru Crosstrek (2013-2017) — U0200 codes typically point to wiring harness chafing inside the door panel or at the jamb transition.
Manufacturer-Specific Notes
- Chrysler/Dodge: On the 300, Charger, and Magnum, passenger door communication routes through the driver's door harness. A wire break in the driver's door jamb is the primary cause for a passenger door failure.
- Ford: On 2015-2020 F-150s, a corroded 16-pin connector in the rear frame near the spare tire disrupts the MS-CAN network, causing U0200 alongside unrelated codes like U0252.
- Volkswagen: A widespread defect in the door wiring harnesses of 2019-2022 models makes U0200 extremely common. VW issued Safety Recall 97GF for this issue, which also disables side airbags.
- General Motors: GM bulletin 08-07-30-021 advises against replacing modules based solely on history U-codes. Low batteries or disconnecting modules trigger these codes normally. Clear them if no symptoms exist.
- Toyota: TSB T-SB-0210-12 explains U0200 stores as a non-fault history code after battery disconnection. This is normal behavior on vehicles with memory systems.
Real Owner Stories
2006 Dodge Charger with U0199 & U0200
Passenger window and lock failed. Both driver (U0199) and passenger (U0200) communication codes were active.
What they tried:
- Initially suspected the passenger door module was bad.
Outcome: Inspected the DRIVER'S side door jamb and found multiple broken wires. Spliced the wires using butt connectors for $25. All functions restored.
Lesson: On Chrysler/Dodge LX platforms, always inspect the driver's door jamb wiring first for a U0200 code. This is a massive misdiagnosis trap.
2018 Ford F-150 with multiple U-codes
Truck threw U0200 and U0252 (Rear Lighting Module) simultaneously.
What they tried:
- Cleared codes, but they returned. Checked all fuses.
Outcome: Found a 16-pin connector near the spare tire heavily corroded. Cleaned the connector and repaired the wires, clearing all codes.
Lesson: If you see multiple communication codes, look for a common network point of failure, like an exposed frame connector.
2019 VW Jetta with intermittent door issues
Passenger door lock worked intermittently. Eventually failed completely, showing U0200 and an airbag sensor code (B1036).
What they tried:
- Wiggling the door harness temporarily restored function.
Outcome: Discovered VW Safety Recall 97GF. The dealer replaced the entire door wiring harness free of charge.
Lesson: For 2019-2022 VWs, check for recalls before attempting a repair. The fix is likely covered by the manufacturer.
2011 Ford F-150 with a simple fix
Passenger door controls were completely dead with an active U0200 code.
What they tried:
- Prepared to remove the door panel to check wiring.
Outcome: Checked the passenger kick panel fuse box first. The Passenger Door Module fuse was blown. A $3 fuse restored all functions.
Lesson: Always check the absolute basics first. A 5-minute fuse check saves hours of complex diagnostics.
How to Prevent This Code From Triggering
- Apply dielectric grease to main electrical connectors. (During any related repair.) — Dielectric grease seals out moisture and oxygen, drastically reducing the chance of pin corrosion.
- Lubricate the door jamb harness boot. (Annually.) — Silicone lubricant keeps the rubber boot supple, preventing it from grabbing and straining the internal wires as the door opens.
- Secure and properly route repaired wires. (During any wiring repair.) — Ensuring the repaired section has slack prevents tension. Zip-tying the harness away from the window regulator prevents chafing.
- Clean undercarriage connectors. (Annually, especially in the Salt Belt.) — Pressure washing removes corrosive road salt from exposed frame connectors (like on the F-150), preventing network-wide failures.
Frequently Asked Questions
What does the 'B' in 'Door Control Module B' mean?
In OBD-II terminology, 'A' refers to the driver's side and 'B' refers to the passenger's side. Door Control Module 'B' is the computer for the front passenger door.
What is the most common misdiagnosis for U0200?
The most common mistake is replacing the expensive Passenger Door Module when the actual problem is a broken wire in the door jamb. On Chrysler/Dodge vehicles, mechanics often miss that the break is actually in the driver's side harness.
Can I fix U0200 myself?
Yes, if the cause is a blown fuse or broken wires in the door jamb, a DIY repair is highly feasible. Repairing wires requires basic stripping and crimping skills. Replacing a module usually requires professional programming.
Will clearing the code fix the problem?
No. Clearing the code only erases the fault from memory. Because U0200 triggers from a hard physical fault like a broken wire, the code returns instantly when the system attempts communication.
Why did my passenger window, lock, and mirror all stop working at once?
A single computer, the Door Control Module, controls all these components. When it loses power or network connection, every function it manages fails simultaneously.
My mechanic found a U0200 code in 'history'. Is there a problem?
Not necessarily. A history code without active symptoms often results from a temporary voltage drop or a disconnected battery during service. Clear the code and monitor to see if it returns.
Can a problem elsewhere on the car cause the U0200 code?
Yes. On 2015-2020 Ford F-150s, a corroded network connector near the spare tire disrupts communication to the passenger door module. A fault in the main Body Control Module can also trigger this code.
Key Takeaways
- Inspect the flexible rubber boot in the door jamb first; broken wires here cause over 80% of U0200 codes, not a failed module.
- On 2005-2010 Chrysler 300 and Dodge Charger models, check the driver's side door jamb wiring, as passenger door communication routes through it.
- Check the passenger door module fuse before dismantling the door; a blown $3 fuse causes a total loss of communication.
- Do not replace the door control module without testing for a stable 12-volt power supply and a ground resistance below 1.0 Ohm.
Helpful Videos
Shop the Parts Behind U0200
Below are the parts most often responsible for code U0200, ranked by how frequently each one is the actual culprit (per the diagnosis above). Tap any to see what we have for your vehicle.


The information in this article is provided for general reference and educational purposes only. Vehicle specifications, procedures, and part compatibility can vary by production date, trim level, and region. Always consult your vehicle's factory service manual and verify part numbers before purchasing or performing repairs. Safety-critical components such as airbags, seat belts, and braking systems should be installed by a qualified professional.
- 🧭 Diagnostic Flowchart
- 🎬 Helpful Videos
- 🛍️ Shop This Part
- What Does U0200 Mean?
- Can I Drive With U0200?
- Common Causes
- Symptoms
- Common Fixes & Costs
- DIY vs Professional
- Used vs. New Parts: Buying Guide
- What Happens If You Wait — Timeline
- Cost of Not Fixing It
- Diagnosis Steps
- When This Code Triggers (Freeze-Frame Conditions)
- Related Codes
- Climate & Environmental Factors
- How to Talk to a Mechanic About This Code
- Where to Take It: Dealer vs Independent vs Chain
- When to Walk Away From the Repair
- What Scan Tool You Need for This Code
- How to Clear the Code After You Fix It
- Will This Fail Emissions / State Inspection?
- Most Commonly Affected Vehicles
- Manufacturer-Specific Notes
- Real Owner Stories
- 2006 Dodge Charger with U0199 & U0200
- 2018 Ford F-150 with multiple U-codes
- 2019 VW Jetta with intermittent door issues
- 2011 Ford F-150 with a simple fix
- How to Prevent This Code From Triggering
- Frequently Asked Questions
- What does the 'B' in 'Door Control Module B' mean?
- What is the most common misdiagnosis for U0200?
- Can I fix U0200 myself?
- Will clearing the code fix the problem?
- Why did my passenger window, lock, and mirror all stop working at once?
- My mechanic found a U0200 code in 'history'. Is there a problem?
- Can a problem elsewhere on the car cause the U0200 code?
- Key Takeaways
- 🎟️ Get 5% Off