
U1000 on 2002-2009 Chevrolet TrailBlazer: Class 2 Communication Failure Causes and Fixes
On a 2002-2009 TrailBlazer, code U1000 means there's a communication breakdown between the vehicle's computers. This is most often caused by a broken wire in the flexible boot going to the rear liftgate or a bad ground connection, particularly ground G201 under the center console. Fixing the broken wire or cleaning a ground is a low-cost DIY repair.
- U1000 on your TrailBlazer means there is a communication problem, not necessarily a single bad part.
- Before spending any money, thoroughly inspect the wiring inside the rubber boot that goes to the rear liftgate. This is the most common cause and is a cheap fix.
- Check and clean your battery terminals and major ground connections. A poor electrical foundation can cause many strange issues.
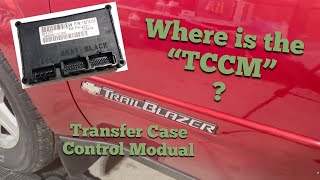
- If you have 4WD problems along with the U1000 code, the Transfer Case Control Module (TCCM) is a likely suspect.
- Diagnosing this code can be complex; if a visual inspection of wiring and grounds doesn't solve it, professional help with advanced diagnostic tools may be needed.
What's Unique About the 2002-2009 Chevrolet TrailBlazer
The GMT360 platform, which includes the TrailBlazer, is well-known for wiring problems that trigger the U1000 code. A particularly common failure point is the wiring harness that passes from the body into the rear liftgate; the constant opening and closing causes wires to fatigue and break. This can take out the entire communication network, leading to seemingly unrelated symptoms like a no-start condition or strange electrical behavior. Another known issue is a faulty Transfer Case Control Module (TCCM) or Liftgate Control Module (LCM) shorting out the data bus. Additionally, corrosion at key ground points like G201 (under the center console) is a frequent cause of widespread electrical issues, including communication failures.
Symptoms You May Notice
- Check Engine Light or Service 4WD light is on
- No communication with scan tool, or can only read certain modules
- Keyless entry (fobs) not working
- Rear liftgate will not open or rear wiper/defrost is inoperative
- 4WD system inoperative, indicator lights on the switch are off
- Instrument cluster lights flashing, gauges behaving erratically
- Intermittent no-crank, no-start condition
- Loss of other electrical functions like power windows or radio
- A/C system malfunctions or blows warm air
- Security light is on or flashing
- Replacing the ECM/PCM first. The Powertrain Control Module is a robust component and rarely the cause of a U1000 code unless other specific PCM-related codes are present.
- Replacing the ignition switch. While a faulty ignition switch can cause a host of electrical issues, it's less common than wiring or ground faults for a U1000 code on this platform and should be tested before replacement.
- Replacing random modules without proper diagnosis. The 'unplug one at a time' method is crucial. Replacing modules based on symptoms alone can be expensive and ineffective.
Most Likely Causes
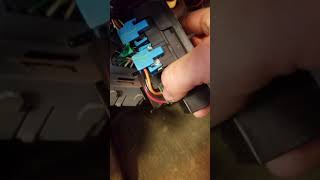
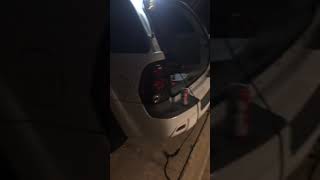
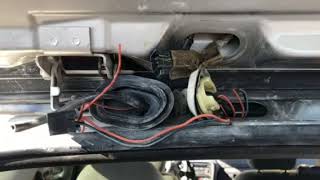
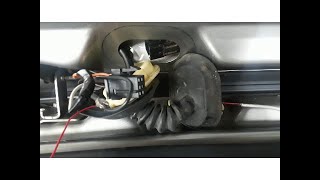
- Broken Wires in Liftgate Harness Boot 🔴 High Probability The wires in the rubber boot between the body and the rear liftgate are constantly flexed, leading to fatigue and breakage over time. The Class 2 data wire (Purple wire), as well as grounds and power for the Liftgate Module (LGM), run through this harness.
How to confirm: Peel back the rubber boot and inspect the wires for obvious breaks, chafing, or damage. A broken purple wire (the Class 2 data wire) or a broken black ground wire are common culprits. Multiple broken wires are often found.
Typical fix: Repair the broken wire(s) using solder and heat shrink tubing or a quality butt connector. It's best to splice in a new section of flexible wire to add flexibility and prevent future breaks at the same spot.
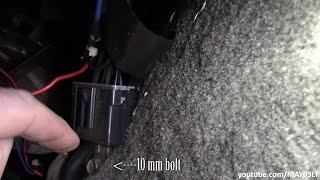
Est. part cost: $5-$15 - Poor Ground Connection (G201) 🔴 High Probability GM vehicles of this era are susceptible to ground issues. A critical ground point, G201, is located under the center console in the passenger footwell area. This ground serves numerous modules, including the Instrument Cluster, HVAC controls, TCCM switch, and the Data Link Connector (scan tool port). Corrosion or looseness at this point can cause a U1000 and a host of other bizarre electrical problems.
How to confirm: Access the ground point by removing the passenger side kick panel/console trim. Inspect the 10mm bolt and the terminals for looseness or corrosion.
Typical fix: Remove the 10mm ground bolt, clean the contact surfaces of the wire terminals and the body down to bare metal, and re-secure it tightly. Applying dielectric grease can help prevent future corrosion. Some owners add a star washer to ensure a better connection.
Est. part cost: $0-$10 - Faulty Control Module 🟡 Medium Probability Any module on the Class 2 network can fail internally and either stop communicating or 'scream' on the network, preventing other modules from talking. The Transfer Case Control Module (TCCM) and Liftgate Control Module (LGM) are common failures due to their location and function.
How to confirm: This is difficult without a high-end scan tool. The diagnostic process involves unplugging modules one by one to see if communication is restored to the rest of the network. If unplugging the TCCM, for example, allows the scan tool to talk to other modules again, the TCCM is likely the faulty part.
Typical fix: Replace the faulty module. Some modules may require programming by a dealer or a well-equipped independent shop after installation. The TCCM is often plug-and-play if replaced with an identical part number.
Est. part cost: $100-$400 - Weak or Failing Battery ⚪ Low Probability → Shop Vehicle Battery
How to confirm: Test the battery voltage with a multimeter. A healthy battery should read around 12.6V with the engine off and over 13.7V with the engine running. A voltage drop during startup can cause communication glitches.
Typical fix: Replace the vehicle's battery.
Est. part cost: $150-$250
Rare But Worth Checking
- Aftermarket Radio/Electronics: Improperly installed aftermarket radios, remote starters, or alarms can interfere with the Class 2 data line, as the factory radio is an integrated module on the network. If the code appeared after a new stereo was installed, this is a likely cause. The installer may have tapped into the purple data wire incorrectly.
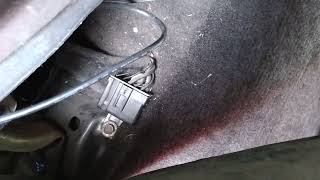
- Corrosion at Splice Packs: The Class 2 data wire is spliced together at several points in the main wiring harness. Water intrusion into the cabin, particularly near the driver's side footwell, can cause corrosion at Splice Pack SP205, disrupting communication. This splice pack joins the data lines from many different modules.
- Faulty Ignition Switch: → Shop Ignition Switch While not a primary cause, a failing ignition switch can cause intermittent power loss to various modules, leading to communication dropouts and the U1000 code. This is often accompanied by other symptoms like the engine stalling or accessories cutting out while driving.
Technical Service Bulletins (TSBs) & Recalls
- Bulletin #PIT5369A: A manufacturer service bulletin notes that vehicles may experience a crank no-start issue after sitting overnight below the freezing point, often storing code U1000. Technicians are advised to inspect the engine harness above the fuel rail and unsecure it from retainers to address the fault.
- Bulletin #PIT5369: This bulletin describes a condition where the Service Engine Soon lamp illuminates while the engine is running. Technicians may find U1000 in multiple high-speed modules and the Body Control Module.
- Bulletin #GCUS-3-423: Manufacturer records indicate that during a crank/no-start event, the Malfunction Indicator Lamp will illuminate and store codes U0100 and U1000. The recommended fix involves revising the engine harness.
Diagnosis Steps
- Check Battery Health: Ensure the battery is fully charged and the terminals are clean and tight. Low voltage can cause communication errors.
- Scan for All Codes: Use a scan tool capable of reading codes from all modules (BCM, EBCM, TCCM, etc.), not just the PCM. Note which modules are not responding. This is a critical first step.
- Inspect Liftgate Harness: This is the most common cause. Peel back the rubber boot between the liftgate and the body and carefully inspect all wires for breaks or chafing. Repair as needed.
- Inspect Ground G201: This is the second most common cause. Access the ground splice pack under the passenger side of the center console. Remove, clean, and tighten the ground connection.
- Isolate Modules (Advanced): If the above steps don't work, start unplugging non-essential modules one at a time to see if communication is restored. Common modules to check are the Liftgate Module (LGM), Transfer Case Control Module (TCCM), and any aftermarket electronics. If unplugging a specific module fixes the issue, that module is likely faulty.
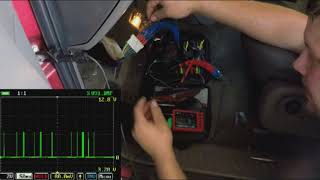
- Check Data Line Integrity: With a multimeter, 🎬 Watch: GM Class 2 network diagnostic tips and tricks you can check for continuity and shorts on the Class 2 data wire (typically purple). This requires a wiring diagram and is an advanced step.
Parts You'll Likely Need
- Wiring Repair Supplies — The most common fix is repairing a broken wire in the liftgate harness. You'll need butt connectors, solder, heat shrink, and electrical tape.
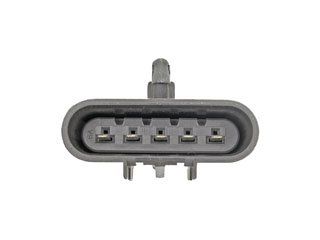
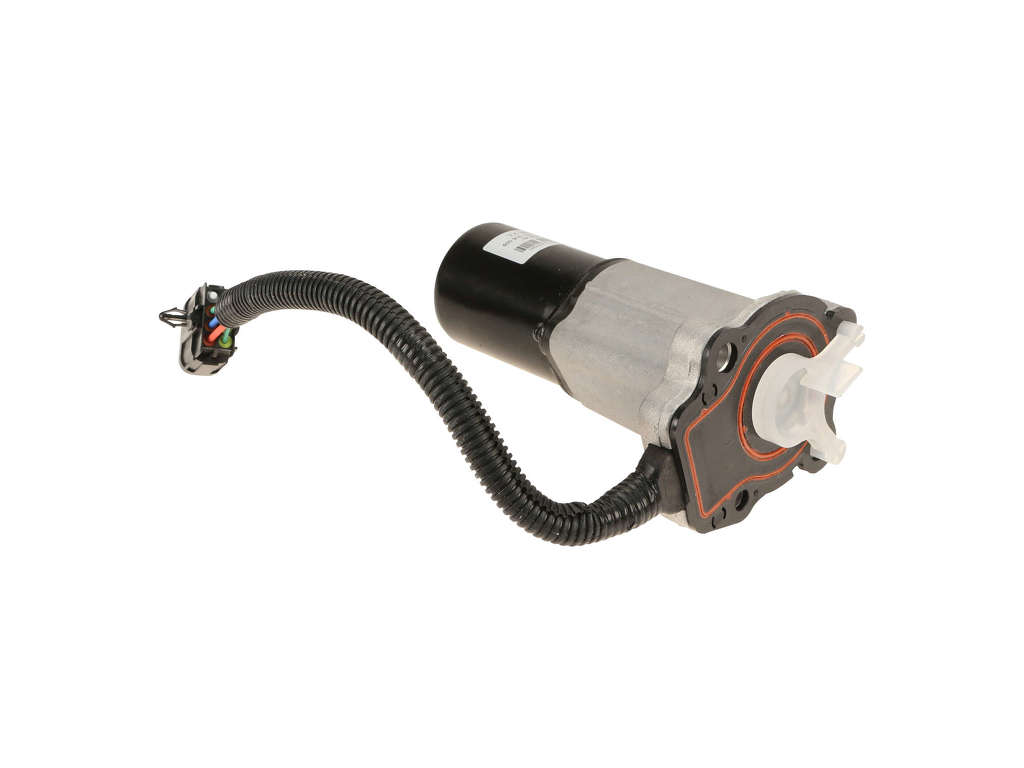
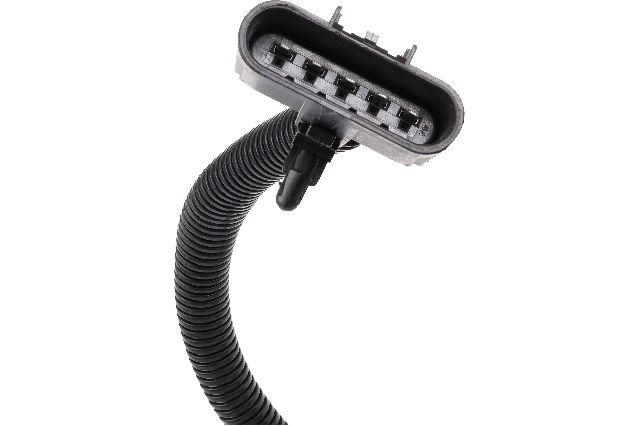
Aftermarket price range: $5-$20 - Transfer Case Control Module (TCCM)
(OEM #12590220)— This module is a known failure point that can short out the data bus, causing a U1000 code and loss of 4WD functionality. Superseded by other numbers like 12584313.
Trusted brands: ACDelco (OEM), Dorman
OEM price range: $366
Aftermarket price range: $210-$305
Related Codes That Often Appear With This One
- U-codes (various) — Since U1000 indicates a general communication failure, it's often accompanied by other U-codes from various modules (e.g., U1041, U1064, U1096) that specify which module has lost communication with another.
- C0-codes (various) — If the Transfer Case Control Module (TCCM) or Electronic Brake Control Module (EBCM) is the source of the problem or is offline, you may see codes like C0374 or C0550 related to the 4WD or ABS systems.
- B-codes (various) — If the Body Control Module (BCM) or Liftgate Module (LGM) is involved, you may see B-series codes related to body functions like lighting, locks, or windows.
Platform-Specific Known Issues
- A well-documented issue is the failure of wires inside the flexible rubber boot for the rear liftgate, which directly causes a U1000 code by breaking the Class 2 data line.
- The original Transfer Case Control Modules (TCCM) were prone to software glitches and failure, causing them to stop communicating. An updated module and programming are often required.
Mechanic-Grade Diagnostic Values
- Class 2 Data Line Voltage (Pin 2 at DLC) — expected: A toggling square wave between ~0V (inactive/recessive) and ~7V (active/dominant). The bus should idle near 0V.. Failure: A line stuck high (at 7V or battery voltage) or stuck low (at 0V) indicates a shorted module or wire. No activity at all points to a network-wide failure.
- Class 2 Data Line Resistance to Ground — expected: There is no standard single Ohm value. Instead, technicians compare resistance readings between the data line pins of different modules at a splice pack. All modules should show similar, high resistance.. Failure: If one module's data line pin reads very low resistance or near zero ohms to ground, that module is likely internally shorted.
Scan Tool Commands That Help
- GM Tech 2: Diagnostic Circuit Check > Class 2 Message Monitor — This function allows a technician to see a live list of all modules on the Class 2 network and their status (Active/Inactive). It's used to quickly identify which module has stopped sending its 'state of health' message, pointing directly to the source of the communication loss without having to unplug modules one by one.
Wiring & Ground Locations
- SP205 — Located behind the driver's side left I/P kick panel, near the main fuse block. It's a black connector with multiple purple (or light green on some models) wires and a grey comb holding them together.. This is the main splice pack where the data lines from most of the front-of-vehicle modules (PCM, BCM, Instrument Cluster, etc.) are joined. Corrosion from water entry or a bad pin connection here can take down the entire network.
- SP306 — Located under the rear passenger seat, beneath a flap in the carpet on SWB (short wheelbase) models.. This splice pack connects the rear-of-vehicle modules (like the Liftgate Module) to the rest of the network. A short in the wiring between SP205 and SP306 can be a hidden cause of U1000 codes.
- G201 — Under the passenger side of the center console, accessible by removing the side trim panel in the passenger footwell.. This is a major ground point for many modules that communicate on the Class 2 network. Corrosion here is a very common cause of U1000 and other strange electrical issues.
- DLC (Data Link Connector) Pin 2 — The OBD-II port under the driver's side dashboard.. This is the Class 2 Serial Data pin. It's the primary access point for a scan tool to communicate with the network and for testing the data line's voltage/signal with a multimeter or oscilloscope.
Real Owner Repair Stories
- GMTNation Forum user 'Williamjarvis26' (2005 Trailblazer 4.2L) — No-crank, no-start, no radio, no power windows/locks. Rough running when it did start.
❌ Tried (didn't work) Initial checks were inconclusive.
✅ What actually fixed it The user isolated the fault by testing each pin at splice pack SP205. They found that connecting pin H, which leads to splice pack SP306 under the rear seat, would cause the entire network to fail. The final fix was running a new bypass wire for the Class 2 data line between SP205 and SP306, correcting a short in the original harness that ran under the carpet. - YouTube user 'x298racer' (2002 Trailblazer) — U1000 code present, 4WD system inoperative with no lights on the selector switch. No communication with a Snap-on scanner.
❌ Tried (didn't work) Replacing the 4WD selector switch, checking fuses.
✅ What actually fixed it The Transfer Case Control Module (TCCM) had failed and was shorting out the Class 2 data bus. Replacing the TCCM restored communication and 4WD function. The video also notes that with the bad TCCM installed, there was no voltage present at the splice pack comb, confirming the module was pulling the whole network down. - NHTSA ODI #10171770 — An owner reported that when their vehicle stalled, it lost ignition input. Diagnostic codes included U1000, U1016, U1152, B1372, and U1088. The issue was resolved by replacing the ignition switch.
- NHTSA ODI #11244385 — A report describes a vehicle throwing codes P0700, U0073, and U1000, resulting in a loss of engine power, the Stabilitrak light illuminating, and the vehicle bucking while the odometer and gauges behaved erratically.
OEM Part Supersession History
Various (e.g., 15085588 for 2002 models)→12590220 (common replacement for many years)— Early TCCM units, particularly from 2002, had a high failure rate causing communication issues. GM redesigned the module for better reliability.
Heads up: TCCMs from AWD models (Saab 9-7x, Buick Rainier) are not compatible with 4WD models (TrailBlazer, Envoy) as they are programmed for a different transfer case system. While a used TCCM from an identical vehicle is often plug-and-play, a new module or one from a different year may require programming by a dealer.
Model Year Variations Within This Range
- 2002 only: The 2002 models have a redundant Class 2 data wire that runs directly from the BCM to the PCM, bypassing the main splice packs. This can sometimes allow the engine to run even if there is a major network failure at SP205, which can confuse diagnosis.
Diagnostic Flowchart
Other Known Issues on This Vehicle
Issues unrelated to this code that are worth knowing about as an owner of this generation:
- Faulty Instrument Cluster Gauges 🟠 Medium → Shop Instrument Cluster — Very common, especially on 2003-2006 models. Gauges (speedometer, tachometer, fuel, etc.) become erratic or stop working due to failed stepper motors inside the cluster. (Ref: GM had a special coverage adjustment (now expired) for some 2003-2005 models, but not a full recall for Trailblazer.)
- Failing Fan Clutch 🔴 High — Extremely common across all years. The electronically controlled viscous fan clutch fails, leading to a loud roaring noise (stuck on) or engine overheating (stuck off).
- Erratic Fuel Gauge / Failing Fuel Level Sensor 🟡 Low — Very common. The fuel level sensor inside the gas tank fails, causing the fuel gauge to read empty, full, or fluctuate wildly. (Ref: GM offered a special policy for some 2005-2007 models, covering 50% of the repair cost for a limited time/mileage.)
- Failing A/C Blower Motor Resistor 🟡 Low — Common issue where the blower fan only works on the highest setting or not at all. The resistor module, located in the passenger footwell, overheats and fails.
- Cracked Exhaust Manifold 🟠 Medium — The cast iron exhaust manifold on the 4.2L I6 engine is prone to cracking, causing an exhaust leak and a ticking noise, especially when cold.
- 4WD System Faults (Service 4WD Light) 🟠 Medium — Commonly caused by a faulty front axle disconnect actuator or the selector switch on the dash, in addition to the TCCM issues that can also cause U1000.
Used vs. New Parts: Buying Guide for This Vehicle
When a used part is the smart pick: For this repair, obtaining a used control module like the Transfer Case Control Module (TCCM) or Liftgate Control Module (LGM) from a junkyard is a very common and cost-effective strategy. Since the issue is often a failed module pulling down the network, a functional used part is a direct fix.
Donor-vehicle mileage cap: roughly under 180000 miles for the part to have meaningful remaining life.
What to inspect on the donor part:
- Match the part number EXACTLY. For the TCCM, there are different versions for 4WD vs. AWD systems.
- Inspect connectors for any signs of corrosion, bent pins, or heat damage.
- If possible, source from a vehicle in a dry climate to reduce the risk of internal moisture damage.
- Check the donor vehicle's RPO codes (in the glove box) to ensure it has the same options (e.g., NP1 for 2-speed electronic shift transfer case).
OEM-only on this vehicle (don't cheap out):
- Ignition Switch - While aftermarket switches are available, the OEM ACDelco part is strongly recommended due to its critical role in powering up modules correctly. Poor quality aftermarket switches are a known source of intermittent electrical problems on this platform.
Aftermarket brands forum-validated for this vehicle:
- ACDelco (For any module, this is the OEM supplier and preferred choice)
- Dorman (Offers remanufactured TCCMs like p/n 599-100, which are a common, cost-effective alternative to OEM).
Brands owners have reported issues with on this vehicle:
- No-name, unbranded electronic modules from online marketplaces. These often have high failure rates and can introduce new, unpredictable problems to the data network.
Real Owner Stories
Aggregated from forums and TSBs cited above. Mileages and costs reflect what owners reported in those sources.
2002 Chevrolet TrailBlazer
Symptoms: The 4WD system was inoperative and the indicator lights on the switch were completely off. The scan tool was unable to communicate with the vehicle modules.
What fixed it: The Transfer Case Control Module (TCCM) was faulty and shorting out the communication bus. Replacing the TCCM restored communication and 4WD function.
Source hint: YouTube: '02 Trailblazer U1000 code no 4 wheel drive'
2005 Chevrolet TrailBlazer
Symptoms: Keyless entry fobs stopped working, the tailgate wiper was dead, and the tailgate release would not function, accompanied by a U1000 code.
What fixed it: Repaired broken wiring inside the flexible rubber boot for the rear liftgate.
Source hint: GMTNation: 'NEED HELP - U1000 code, Class 2 Serial Communication Problem'
2004 Chevrolet TrailBlazer
Symptoms: Intermittent no-crank, no-start condition with multiple U1000 codes and Class 2 serial communication problems.
What fixed it: Diagnosis focused on the liftgate module harness and splice packs; repairing the damaged wiring in the liftgate boot or cleaning the ground splice packs are the documented resolutions for these symptoms.
Source hint: GMTNation: 'No Start, Multiple U1000 codes, Class 2 Serial Communication Problem'
Frequently Asked Questions
Why is my TrailBlazer's 4WD switch light off and the scan tool won't connect?
My rear wiper and liftgate release stopped working on my 2004 TrailBlazer; could this cause a U1000?
Where is the G201 ground located on the Chevrolet TrailBlazer?
Can a bad battery cause communication codes on a 2002-2009 TrailBlazer?
Is the Transfer Case Control Module (TCCM) on the TrailBlazer plug-and-play?
What color is the Class 2 data wire I should look for when diagnosing a U1000?
Helpful Videos
We Have This Part in Stock


The information in this article is provided for general reference and educational purposes only. Vehicle specifications, procedures, and part compatibility can vary by production date, trim level, and region. Always consult your vehicle's factory service manual and verify part numbers before purchasing or performing repairs. Safety-critical components such as airbags, seat belts, and braking systems should be installed by a qualified professional.
- Chevrolet TrailBlazer:
- 🧭 Diagnostic Flowchart
- 🎬 Helpful Videos
- 🛍️ Shop This Part
- What's Unique About the 2002-2009 Chevrolet TrailBlazer
- Symptoms You May Notice
- Most Likely Causes
- Rare But Worth Checking
- Technical Service Bulletins (TSBs) & Recalls
- Diagnosis Steps
- Parts You'll Likely Need
- Related Codes That Often Appear With This One
- Platform-Specific Known Issues
- Mechanic-Grade Diagnostic Values
- Scan Tool Commands That Help
- Wiring & Ground Locations
- Real Owner Repair Stories
- OEM Part Supersession History
- Model Year Variations Within This Range
- Other Known Issues on This Vehicle
- Used vs. New Parts: Buying Guide for This Vehicle
- Real Owner Stories
- 2002 Chevrolet TrailBlazer
- 2005 Chevrolet TrailBlazer
- 2004 Chevrolet TrailBlazer
- Frequently Asked Questions
- 🎟️ Get 5% Off