
U1000 on 1999-2004 Oldsmobile Alero: Class 2 Communication Failure Causes and Fixes
Code U1000 on a 1999-2004 Oldsmobile Alero indicates a Class 2 network communication failure. This is most often caused by faulty aftermarket radio wiring, a bad ground connection (especially ground splice pack G105 on the transmission), or a failing Body Control Module (BCM). Diagnosis can be complex, but checking these common culprits first can save time and money.
- U1000 is a network code, not a part failure code. It means modules aren't communicating.
- Before any complex diagnosis, check for an aftermarket radio and inspect the main ground connection on the transmission.
- A weak battery can cause communication codes; always test it first.
- Diagnosing this code often requires a process of elimination by disconnecting modules one by one to see which one is bringing the network down.
- The Body Control Module (BCM) is a common point of failure and often the root cause if wiring and grounds are good.
What's Unique About the 1999-2004 Oldsmobile Alero
The Oldsmobile Alero and its GM N-body platform mates (like the Pontiac Grand Am) are known for electrical issues that can trigger a U1000 code. The single-wire Class 2 data bus is sensitive; a short or open circuit anywhere on that wire can bring the entire network down. A very common issue on this platform is faulty aftermarket radio installation, where the installer mistakenly taps into the Class 2 data wire (typically a dark green wire at pin A1 of the radio connector), causing constant communication errors. Additionally, these vehicles have known failure points with ground splice packs (specifically G105/G103 on the transmission) and the Body Control Module (BCM) itself, which can fail from internal faults or water damage.
Symptoms You May Notice
- Check Engine Light or 'Service Vehicle Soon' light is on
- Erratic or dead instrument panel gauges (speedometer, tachometer, etc.)
- Multiple warning lights illuminated (ABS, Security, Traction Control)
- Flashing 'SECURITY' light, often accompanying a no-start condition
- Electrical glitches like malfunctioning power windows, locks, or radio
- Intermittent no-start condition, where the engine cranks but won't fire, or won't crank at all
- Scan tool has trouble communicating with one or more modules
- Replacing the Powertrain Control Module (PCM) without proper diagnosis. While the PCM can fail, it's less common than BCM, wiring, or ground issues for this specific code on this platform.
- Replacing individual sensors (like ABS sensors) when warning lights are on, without realizing the root cause is a network-wide communication failure.
Most Likely Causes
- Faulty Aftermarket Radio Installation or Wiring 🔴 High Probability The factory radio is a module on the Class 2 network. Aftermarket installers often mistakenly use the data wire for power or illumination, which disrupts the entire network. The switched power wire is not present in the factory harness; it is sent over the data bus, confusing installers.
How to confirm: Visually inspect the wiring behind the radio. The Class 2 data wire is typically a Dark Green wire. Look for taps or splices. The easiest test is to completely disconnect the aftermarket radio and its adapter harness and see if the symptoms disappear and the code can be cleared.
Typical fix: Correct the radio wiring using a proper wiring harness adapter (e.g., Metra IBR-WHGM3) that correctly interprets the Class 2 signal for switched power and does not interfere with the data line. Remove any splices from the data wire.
Est. part cost: $20-$60 for a proper wiring harness adapter - Poor or Corroded Ground Connections 🔴 High Probability A specific ground splice pack, designated G105 or G103 (for the 3.4L V6), bolted to a stud on the transmission housing is a notorious failure point on the Alero/Grand Am platform. It's exposed to the elements and prone to corrosion, causing unstable voltage and disrupting module communication.
How to confirm: Locate the ground splice pack on the top of the transmission, near the bellhousing. It will be a black plastic block with multiple black wires leading to it, secured by a single bolt. Inspect it for corrosion, looseness, or broken wires. Clean the connection point on the transmission stud and the ring terminal with a wire brush until shiny. Ensure the bolt is tight.
Typical fix: Disassemble, clean, and tighten the corroded ground connection. If the splice pack or terminals are severely corroded, they may need to be cut out and replaced with new ring terminals bolted directly to the stud.
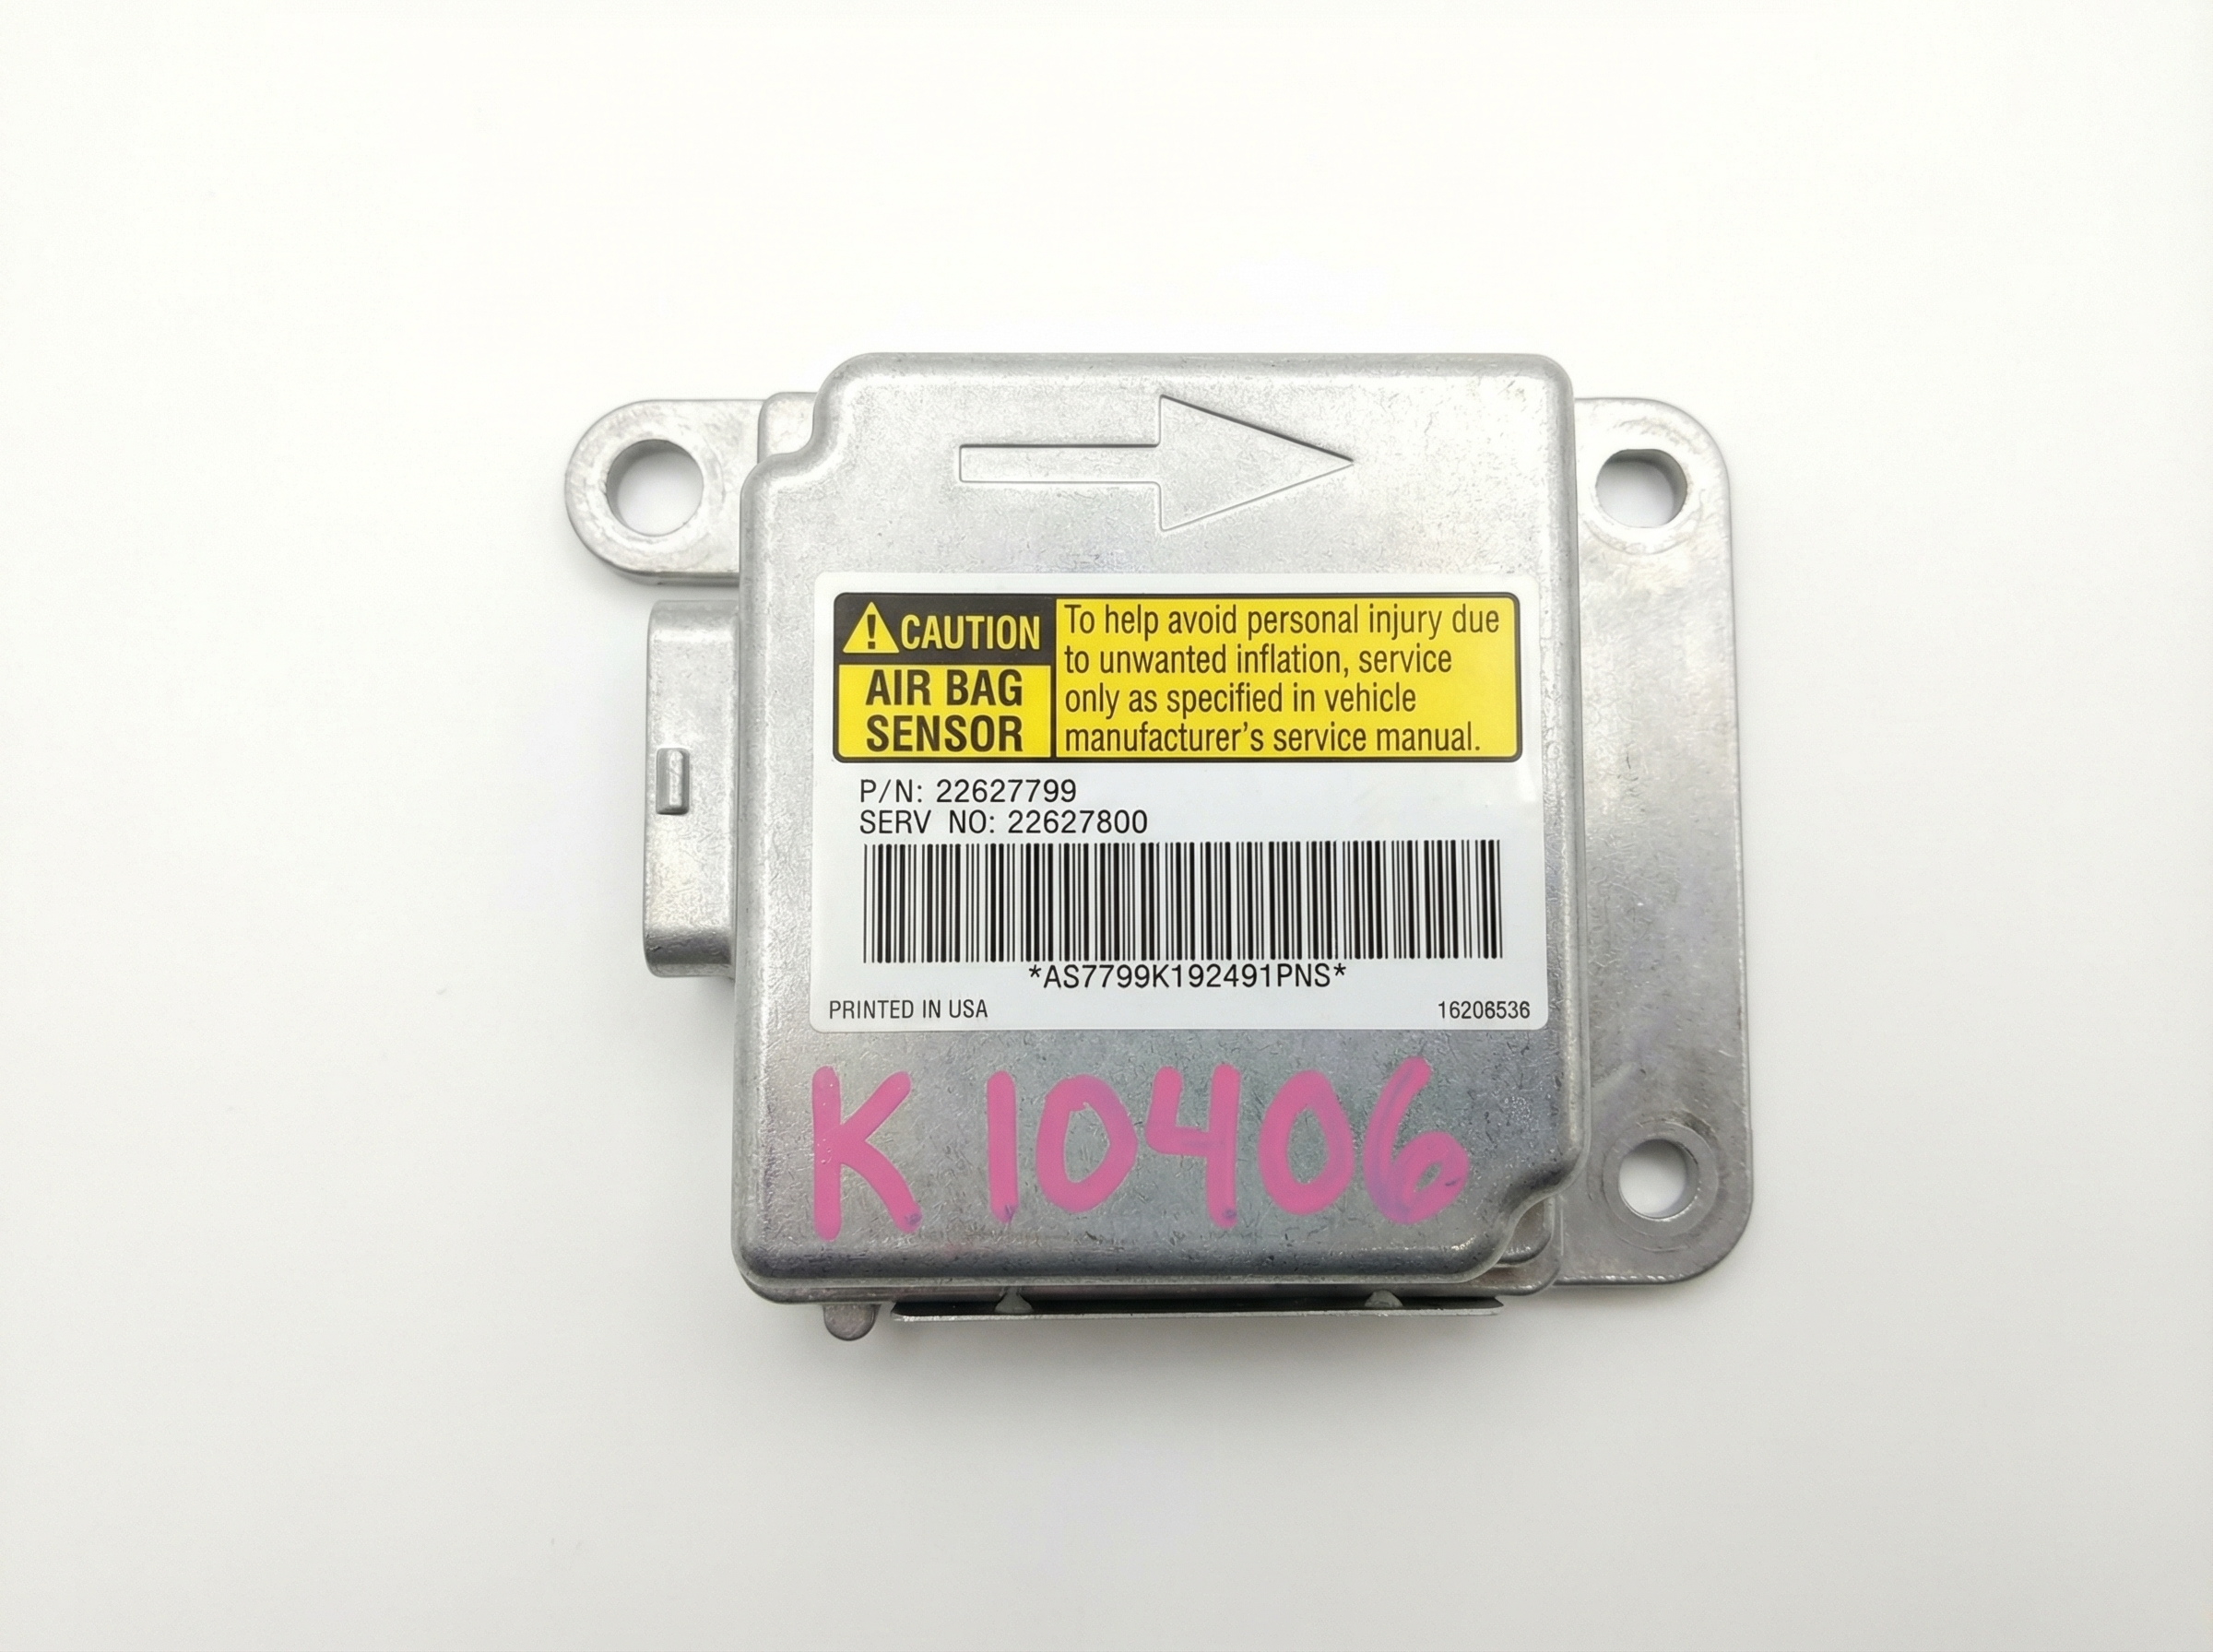
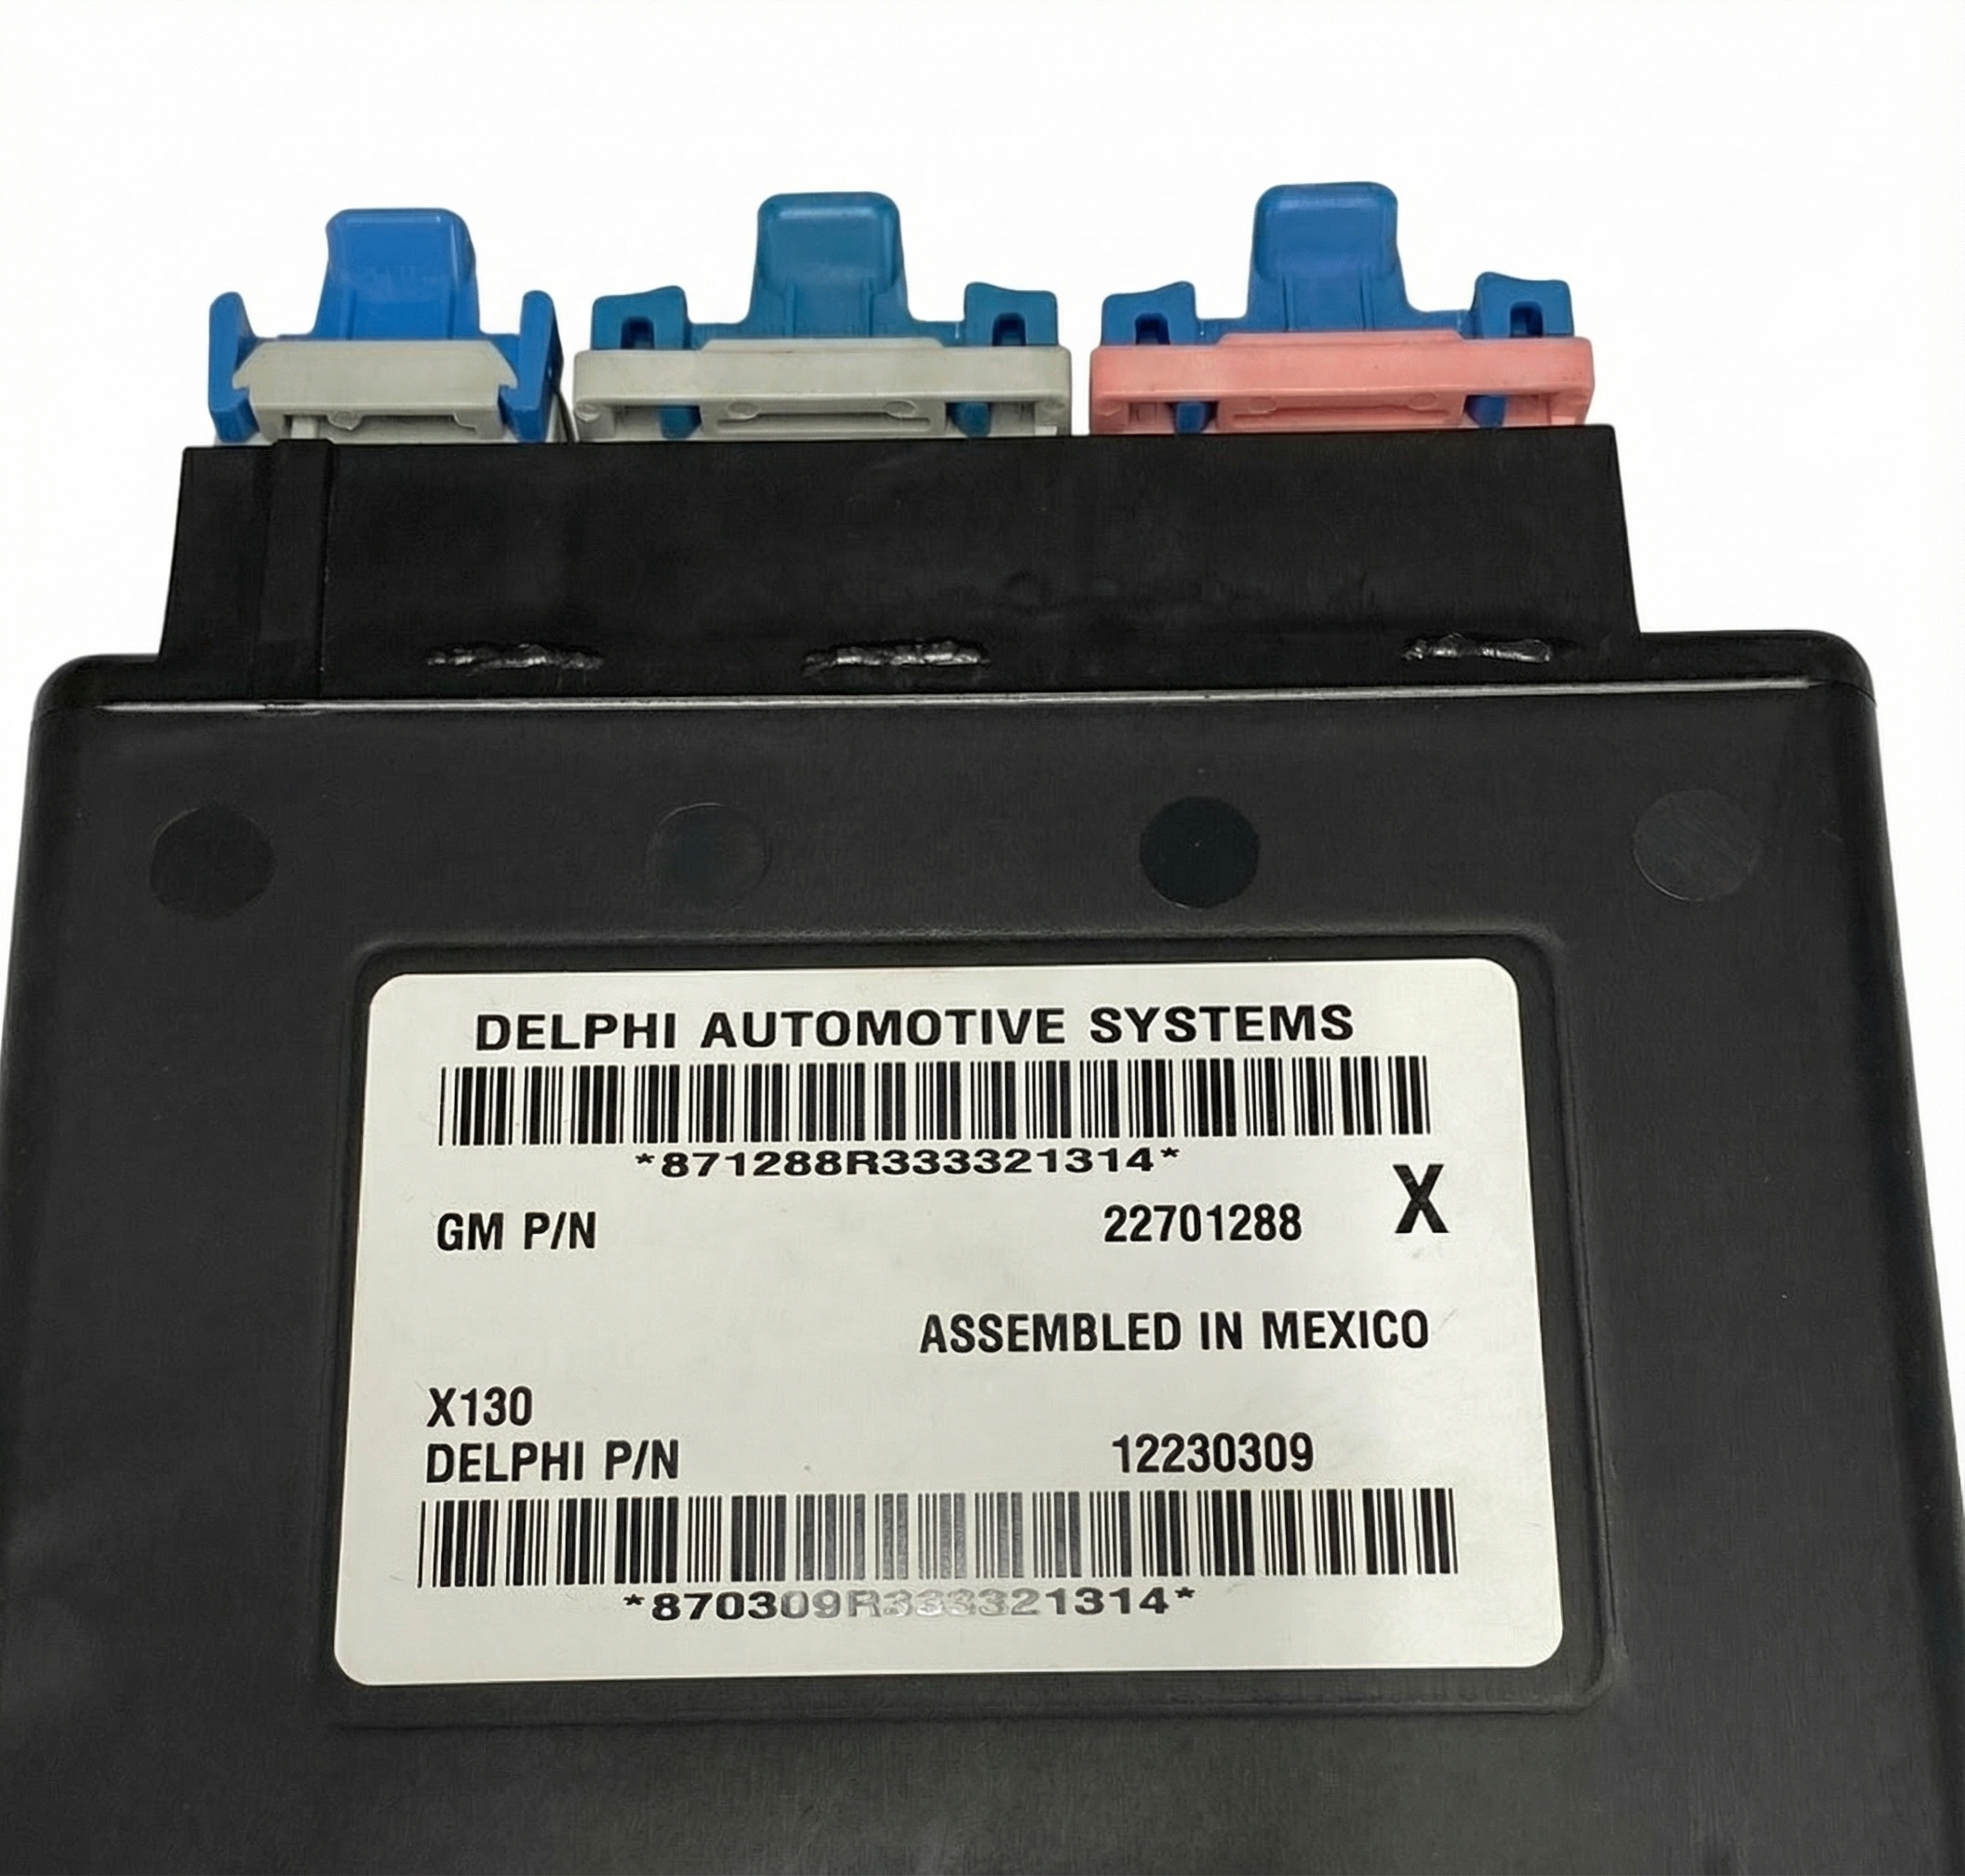
Est. part cost: $5-$20 for cleaning supplies or new hardware - Failing Body Control Module (BCM) 🟡 Medium Probability → Shop Body Control Module The BCM on the Alero is a central hub for the Class 2 network and is known to fail due to internal issues (cold solder joints, component failure) or water intrusion from windshield or sunroof leaks. Its failure can cause widespread, bizarre electrical problems and communication failures.
How to confirm: This is difficult without a professional scan tool that can attempt to communicate directly with the BCM. If the BCM is unresponsive but has good power and ground inputs, it has likely failed. Look for signs of water damage (stains, corrosion) on the BCM and its connectors, which is located behind the right side of the dashboard/glove box area.
Typical fix: Replace the Body Control Module. A replacement BCM must be programmed to the vehicle's VIN and options using a GM Tech 2 or similar professional scan tool. This is often called a 'VIN relearn' or 'New BCM Setup' procedure.
Est. part cost: $70-$200 for a used or remanufactured BCM, plus programming costs - Damaged Class 2 Serial Data Wire ⚪ Low Probability
How to confirm: Perform a visual inspection of the wiring harness in common chafe spots (behind the dash, in door jambs, near the steering column). With a multimeter, check for continuity on the data wire (Pin 2 of the OBD-II port, typically dark green) and check for shorts to power or ground.
Typical fix: Repair the broken or shorted section of the wire.
Est. part cost: $5-$25 for wiring repair supplies
Rare But Worth Checking
- Failing Instrument Panel Cluster (IPC): → Shop Instrument Cluster The instrument cluster is another module on the Class 2 network. An internal failure, such as a bad solder joint, can disrupt communication for all other modules. If gauges are acting erratically or are completely dead while other electrical components work, the IPC could be the source.
- Weak or Failing Battery: → Shop Vehicle Battery Low system voltage (below 11.5V) during startup or operation can cause modules to drop offline randomly and set communication codes. Always ensure the battery and charging system are healthy before diagnosing network faults.
- Obsolete OnStar Module: Some Aleros were equipped with an analog OnStar module. These modules are now obsolete and can fail, causing communication issues or battery drain. If equipped, disconnecting the OnStar module (often located in the trunk behind the trim) can sometimes resolve network problems.
Diagnosis Steps
- Check the Battery and Charging System: Ensure the battery has a full charge (12.4V+ with engine off) and the alternator is charging correctly (13.5-14.5V with engine running). Low voltage can cause random module communication errors.
- Scan for All Codes: Use a scan tool capable of reading manufacturer-specific codes from all modules (BCM, IPC, ABS, etc.), not just the PCM. Note which modules are not responding.
- Inspect for Aftermarket Devices: Check for an aftermarket radio, remote start, or alarm system. If present, disconnect it completely and re-test. This is the highest probability cause.
- Inspect Grounds: Visually inspect and clean the main battery ground, engine-to-chassis grounds, and especially the ground splice pack G103/G105 on the transmission housing stud. This is the second highest probability cause.
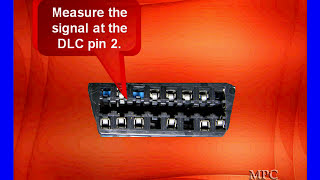
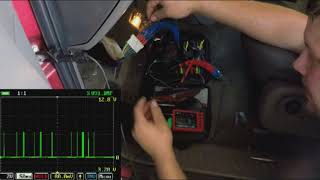
- Check the Class 2 Data Line: With the key on, use a multimeter to check for voltage on Pin 2 of the OBD-II port. A healthy Class 2 bus should show fluctuating voltage, generally between 0V and 7V. If it's stuck high (at battery voltage) or low (at 0V), there is a short on the data line.
- Isolate Modules: If the data line is shorted, the most effective way to find the culprit is to disconnect modules one by one until communication is restored. Start with the most likely offenders: the radio, the BCM, and the Instrument Cluster (IPC).
Parts You'll Likely Need
- Body Control Module (BCM)
(OEM #12204969)— This module is a common failure point on the Alero and acts as a central hub for the Class 2 network. Its failure can bring down the entire system.
Trusted brands: ACDelco (OEM), Dorman (502-000), Cardone (73-4971)
OEM price range: $200-$350 (New, may be discontinued)
Aftermarket price range: $70-$200 (Remanufactured) - Radio Wiring Harness Adapter — Essential for properly installing an aftermarket radio without cutting factory wires or disrupting the Class 2 data line. It provides the necessary switched power signal that is otherwise absent from the harness.
Trusted brands: Metra, Scosche
Aftermarket price range: $20-$60
Related Codes That Often Appear With This One
- U1016 — This code specifically indicates a loss of communication with the PCM. It often appears with U1000 when a ground issue or data line short is preventing multiple modules from talking.
- B-codes or C-codes — Various Body (B) or Chassis (C) codes may be present, indicating faults in systems like ABS, airbags, or security. These are often symptoms of the U1000 network failure, as those modules cannot communicate their status.
Technical Service Bulletins (TSBs) & Recalls
- GM TSB 03-06-01-010B: While not directly for U1000, this TSB addresses the common 3.4L V6 lower intake manifold gasket failure. Severe vacuum leaks from this issue can sometimes contribute to drivability problems and secondary electrical codes.
- TSB Bulletin #PIC3557: This manufacturer bulletin provides preliminary information regarding Class 2 communication diagnostics. It notes that a U1000 code may not always lead to a final repair and advises technicians that they may need to disregard the code if it is set as a current or history code in certain diagnostic scenarios.
Platform-Specific Known Issues
- The Aftermarket Radio Trap: A common story on Alero/Grand Am forums involves an owner installing a new stereo, either by themselves or by a shop unfamiliar with older GM systems. They connect wires color-to-color, only to find the car won't start or has numerous warning lights. This is because the factory harness lacks a traditional 12V switched ignition wire; that signal is sent over the Dark Green Class 2 data wire. Splicing into this wire corrupts the entire vehicle network, causing a U1000 code. The fix is always to remove the incorrect wiring and install a proper adapter that interprets the data signal.
- The Corroded Transmission Ground: → Shop Transmission Assembly Owners experiencing a sudden onset of multiple warning lights, erratic gauges, and a U1000 code are frequently pointed towards the ground splice pack (G105) on the transmission stud. One owner on a GM forum described cleaning this single, heavily corroded ground point and having all electrical gremlins disappear instantly. The bolt can look tight, but corrosion underneath prevents a solid connection, making disassembly and cleaning essential.
Mechanic-Grade Diagnostic Values
- Class 2 (J1850 VPW) Data Line Voltage — expected: Fluctuating voltage between 0V and 7V with key on, engine off. The bus is active at a nominal 7V and inactive at ground.. Failure: A line stuck at 0V indicates a short to ground. A line stuck high (e.g., 5V, 11V, or battery voltage) indicates a short to power from a faulty module or wire.
- Module State of Health (SOH) Message — expected: On a healthy network, each module sends an SOH message every 2 seconds. This is not directly measured but is what a scan tool monitors.. Failure: When a module stops sending its SOH message, other modules will set a 'Loss of Communication' code for that specific module. A general U1000 means the entire bus is disrupted.
Scan Tool Commands That Help
- GM Tech 2 / Tech2Win: NEW BCM SETUP — This function must be used after installing a new or used Body Control Module to program the vehicle's specific RPO codes (options) into the module. Failure to do so will result in incorrect operation of various body features.
- GM Tech 2 / Tech2Win: Diagnostic Circuit Check / Class 2 Message Monitor — This function polls all modules on the Class 2 network and shows which ones are actively communicating. It's a primary step to identify which module(s) are offline and potentially causing the U1000 code.
- GM Tech 2 / Tech2Win: Theft Deterrent Relearn Procedure — After replacing the BCM or PCM, the Passlock theft deterrent system must be relearned. This involves a specific 30-minute procedure of cycling the key. Without this, the vehicle will not start.
Wiring & Ground Locations
- G103 / G105 — Bolted to a stud on the top of the transmission housing, near the dipstick tube (for the 3.4L V6).. This is the infamous ground splice pack for multiple modules, including the PCM. It is highly prone to corrosion, which creates high resistance and is a leading cause of U1000 and intermittent no-start issues on this platform.
- BCM (Body Control Module) — Behind the right (passenger) side of the dashboard, located between the blower motor and the passenger kick panel.. The BCM is a central node on the Class 2 network. All data passes through it. Physical access is required to test its power/ground connections or to replace it if it has failed internally or suffered water damage.
- SP205 — A Class 2 data line splice pack located under the left side of the instrument panel, near the steering column and Data Link Connector (DLC).. This splice pack connects many of the interior modules to the data bus. By removing its shorting bar, a technician can isolate individual circuits to find which module or wire is shorting the network without having to unplug each module individually.
- G101 — On the driver-side front shock tower in the engine bay.. This is a primary chassis ground point. A poor connection here can cause a variety of electrical issues, including communication faults.
- G102 — On the left side of the engine block.. This is a primary engine ground. A poor connection can affect the PCM and other engine-related modules, leading to communication codes.
Real Owner Repair Stories
- iATN (International Automotive Technicians Network) Forum Post (2006 Chevrolet Silverado (similar GM Class 2 system)) — Dash inoperative, numerous warning lights, no communication with any module via scan tool.
❌ Tried (didn't work) Initial scan tool connection failed completely.
✅ What actually fixed it The technician located the Class 2 splice pack (SP205) and tested each circuit individually. One circuit showed a steady 11V, indicating a short to power. Tracing that wire led to a harness near the underhood fuse box where rodents had chewed the insulation off the data wire, causing it to short against an adjacent power wire. Repairing the chewed wires restored all communication.
OEM Part Supersession History
09360629, 9360629, 09361429, 9361429→19241005— Part revision and consolidation by GM.
Heads up: When replacing the BCM, it must be programmed with the vehicle's specific options (RPO codes) and the Passlock security system must be relearned. A used module from another car will not work correctly without being reprogrammed.
Model Year Variations Within This Range
- 2003-2005: A GM Preliminary Information bulletin states that some Alero models from these years were built without oil level monitoring hardware, but the PCM software still looks for a signal from the non-existent sensor. This can cause a U1000 code to be stored in history with no actual fault present. The bulletin advises technicians to disregard the U1000 code in this specific scenario if no other symptoms are present.
Diagnostic Flowchart
Other Known Issues on This Vehicle
Issues unrelated to this code that are worth knowing about as an owner of this generation:
- No Start Due to Failed Passlock Sensor 🔴 High — Extremely common. The sensor in the ignition lock cylinder fails, triggering the anti-theft system and preventing the car from starting. Often presents with a flashing 'SECURITY' light.
- Lower Intake Manifold Gasket (LIMG) Leak (3.4L V6) 🔴 High — A near-universal failure point on the 3.4L LA1 V6 engine. The original plastic/silicone gaskets degrade from Dex-Cool coolant, causing coolant to leak externally or internally into the oil. (Ref: GM TSB 03-06-01-010B)
- Premature Front Wheel Bearing/Hub Assembly Failure 🟠 Medium — Front wheel hubs often fail earlier than expected, causing a humming or grinding noise that changes with speed. Since the ABS sensor is integrated, this failure also commonly triggers ABS and Traction Control warning lights.
- Turn Signal / Hazard Switch Failure 🟡 Low — The multi-function switch in the steering column can fail, causing turn signals or hazard lights to work intermittently or not at all. Sometimes accompanied by a clicking noise from the flasher relay.
- Front Window Regulator Failure 🟠 Medium — The plastic clips that hold the window glass to the regulator are prone to breaking, causing the window to fall down into the door and become inoperable.
- A/C Blower Motor Resistor Failure 🟡 Low — A common issue where the blower fan only works on the highest setting. This is due to the failure of the blower motor resistor pack, which is relatively simple to replace.
Used vs. New Parts: Buying Guide for This Vehicle
When a used part is the smart pick: A used Body Control Module (BCM) from a junkyard can be a cost-effective option, BUT ONLY if you have access to a GM Tech 2 or equivalent professional scan tool. The used BCM is essentially a paperweight until it is reprogrammed with your car's VIN and specific options (RPO codes), and the security system is relearned.
Donor-vehicle mileage cap: roughly under 150000 miles for the part to have meaningful remaining life.
What to inspect on the donor part:
- Check for any signs of water damage on the case or connectors (white or green crusty residue).
- Ensure the donor vehicle is the same model and has similar options if possible, although reprogramming is still required.
- Ask for a warranty, even if it's just 30 days, to protect against a dead-on-arrival unit.
OEM-only on this vehicle (don't cheap out):
- Body Control Module (BCM): While aftermarket remanufactured units from brands like Dorman exist, they can sometimes have quality control issues. An OEM or a properly tested used OEM unit that is then correctly programmed is often the most reliable path.
Aftermarket brands forum-validated for this vehicle:
- Dorman (for remanufactured BCMs, though professional programming is still mandatory)
- Metra / Scosche (for radio wiring harness adapters to prevent this issue)
Brands owners have reported issues with on this vehicle:
- No-name, ultra-cheap radio wiring adapters that lack the proper circuitry to interface with the Class 2 data bus.
Real Owner Stories
Aggregated from forums and TSBs cited above. Mileages and costs reflect what owners reported in those sources.
2003 Oldsmobile Alero
Symptoms: Owner was seeking guidance on replacing the factory stereo and was warned about the unique wiring requirements to avoid electrical issues.
What fixed it: Using the correct dash kits and wiring harnesses specifically designed for the Alero's Class 2 data system.
Source hint: Reddit thread titled '2003 Oldsmobile Alero stereo replacement' in r/CarAV
2003 Pontiac Grand Am SE 3.4L
Symptoms: Intermittent no-start condition and a U1000 code on a platform-mate vehicle.
What fixed it: Finding and repairing a damaged wire leading to the ignition switch that was affecting the Class 2 circuit.
Source hint: iATN professional technician discussion: '2003 Pontiac Grand Am SE 3.4L no start'
1999-2004 Oldsmobile Alero (General Report)
Symptoms: Sudden onset of multiple warning lights, erratic gauges, and a U1000 code.
What fixed it: Cleaning the heavily corroded ground splice pack (G105) on the transmission stud; all electrical gremlins disappeared instantly.
Source hint: Vehicle-specific issues: 'The Corroded Transmission Ground'
1999-2004 Oldsmobile Alero (General Report)
Symptoms: Aftermarket radio installation resulted in the car not starting and multiple warning lights appearing on the dash.
What fixed it: Removing the incorrect 'color-to-color' wiring and installing a proper adapter that correctly interprets the Class 2 data signal for switched power.
Source hint: Vehicle-specific issues: 'The Aftermarket Radio Trap'
Related OBD-II Codes
Frequently Asked Questions
I just installed a new stereo in my Alero and now the 'SECURITY' light is flashing and it won't start. Did I trip an alarm?
My 3.4L V6 Alero has erratic gauges and a U1000 code. Is there a specific ground I should check?
Can a leaking windshield cause a U1000 communication code on this car?
Does GM TSB 03-06-01-010B explain why I have a U1000 code?
I'm replacing my BCM to fix a U1000; can I just plug in a used one from a salvage yard?
Where is the data wire located if I want to test the bus voltage with a multimeter?
Is it possible that a U1000 code is stored but doesn't require a repair?
Helpful Videos
We Have This Part in Stock


The information in this article is provided for general reference and educational purposes only. Vehicle specifications, procedures, and part compatibility can vary by production date, trim level, and region. Always consult your vehicle's factory service manual and verify part numbers before purchasing or performing repairs. Safety-critical components such as airbags, seat belts, and braking systems should be installed by a qualified professional.
- Oldsmobile Alero:
- 🧭 Diagnostic Flowchart
- 🎬 Helpful Videos
- 🛍️ Shop This Part
- What's Unique About the 1999-2004 Oldsmobile Alero
- Symptoms You May Notice
- Most Likely Causes
- Rare But Worth Checking
- Diagnosis Steps
- Parts You'll Likely Need
- Related Codes That Often Appear With This One
- Technical Service Bulletins (TSBs) & Recalls
- Platform-Specific Known Issues
- Mechanic-Grade Diagnostic Values
- Scan Tool Commands That Help
- Wiring & Ground Locations
- Real Owner Repair Stories
- OEM Part Supersession History
- Model Year Variations Within This Range
- Other Known Issues on This Vehicle
- Used vs. New Parts: Buying Guide for This Vehicle
- Real Owner Stories
- 2003 Oldsmobile Alero
- 2003 Pontiac Grand Am SE 3.4L
- 1999-2004 Oldsmobile Alero (General Report)
- 1999-2004 Oldsmobile Alero (General Report)
- Related OBD-II Codes
- Frequently Asked Questions
- 🎟️ Get 5% Off