
OBD-II Code U1006: Loss of Communication with a Network Module
The Ultimate Guide to What U1006 Means, Why It Triggers, and How to Fix It
- Code U1006 indicates a communication breakdown between vehicle modules, most frequently caused by a battery voltage drop below 9.6V during cranking.
- Before replacing expensive computers, test the CAN bus resistance at the OBD-II port; a healthy network reads exactly 60 Ohms with the battery disconnected.
- Expect to pay $150 to $300 in diagnostic labor to find the root cause, even if the fix is a $0 ground wire cleaning.
- Do not ignore a U1006 code accompanied by a 'Christmas tree' dashboard; driving with intermittent transmission module communication causes permanent clutch damage within months.
What Does U1006 Mean?
The U1006 code means one or more of your car's computers (modules) stopped talking to each other. Your car relies on a network to control everything from the engine to the power windows. This code triggers when a module fails to receive an expected message, indicating a breakdown in that communication network.
Technical definition: SCP (J1850) Invalid or Missing Data for Primary Id. Manufacturers use this generic definition to indicate a loss of communication with a specific module or a timeout on the CAN (Controller Area Network) bus.
Can I Drive With U1006?
Yes, But With Caution. You can drive short distances, but it carries significant risks. Depending on which computer is offline, you will experience sudden stalling, dead gauges, or no throttle response. Ignoring an intermittent communication fault causes cascading failures. For example, driving with a transmission module communication error causes harsh shifting and permanent internal clutch damage. Ignoring the code turns a $150 wiring fix into a multi-thousand dollar repair involving module replacement.
Common Causes
- Poor Electrical Grounds or Low Battery Voltage (Very Common) — A weak battery, loose terminals, or corroded ground wires are the most frequent culprits. Modules require stable voltage to communicate. A drop below 9.6V during startup causes them to lose connection and trigger this code.
- Blown Fuse (Common) — A module that loses power due to a blown fuse immediately drops off the network. This is often the easiest fault to check, though it indicates an underlying short circuit.
- Damaged Wiring Harness or Connectors (Common) — Communication wires get damaged from vibrations, moisture, rodent activity, or previous repairs. A single broken wire or corroded pin in a connector takes down the entire network.
- Faulty Control Module (Common) — A single module, like the Body Control Module (BCM) or Engine Control Module (ECM), fails internally and stops communicating, or broadcasts garbage data that disrupts the entire bus.
- Aftermarket Accessories (Less Common) — Improperly installed remote starters, alarms, or stereo systems interfere with the vehicle's communication network, causing voltage spikes or data corruption.
- Internal Short in an External Component (Less Common) — Modern components like NOx sensors or security alarm sirens act as modules on the data bus. An internal short circuit within one of these components disrupts network communication.
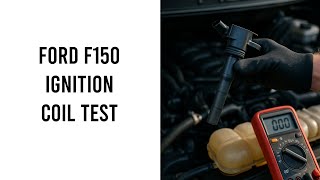
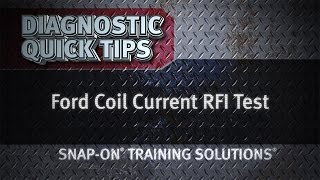
- Radio Frequency Interference (RFI) (Less Common) — High-energy electrical components, most notably failing ignition coils, emit electromagnetic interference that disrupts sensitive data signals on the CAN bus. 🎬 See how to test if ignition coils are causing interference.
- Software/Firmware Corruption (Rare) — A software anomaly within a module causes it to stop communicating. This happens after a vehicle software update fails or becomes corrupted, requiring reprogramming.
Symptoms
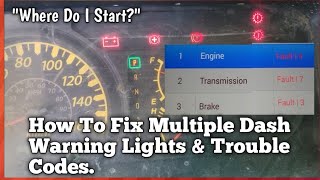
- Multiple, Unrelated Warning Lights — ABS, Airbag, and Traction Control lights illuminate simultaneously. This 'Christmas tree' effect is the classic sign of a network failure. 🎬 Watch: How to fix multiple dashboard warning lights and codes.
- Erratic Gauge Behavior — The speedometer, tachometer, or temperature gauge drops to zero, freezes, or sweeps unpredictably.
- Electrical Features Not Working — The radio dies, power windows fail, or the climate control system stops responding.
- Engine Performance Issues — The vehicle cranks but does not start, stalls unexpectedly, or exhibits zero throttle response due to lost communication with the ECM. 🎬 Watch this guide on diagnosing reduced power and stalling issues.
- Check Engine Light is On (also visible on scanner) — The primary and sometimes only indicator of a stored network code.
Diagnostic Flowchart
Tap your situation to follow the diagnostic path that matches what you're seeing on this code.
Common Fixes & Costs
- Clean or Repair Ground Connections — Parts: $0-$15, Labor: $150-$300, ~1.5 hr book time (DIY)
- Replace a Blown Fuse and Fix Underlying Short — Parts: $1-$15, Labor: $150-$450, ~2.0 hr book time (Intermediate)
- Repair Damaged Wiring Harness — Parts: $10-$50, Labor: $300-$900, ~4.0 hr book time (Professional)
- Replace a Faulty Control Module (e.g., BCM, ECM)
— Parts: $300-$1500, Labor: $200-$500, ~2.0 hr book time
(Professional)
: OEM
: OEM - Replace Ignition Coils to eliminate RFI
— Parts: $150-$400, Labor: $100-$200, ~1.5 hr book time
(Intermediate)
: OEM
Used vs. New Parts: Buying Guide
When a used part is worth it: A used module makes sense for vehicles over 10 years old where a new part's cost is a significant fraction of the car's value. Buy from a specialized recycler that tests electronics and guarantees functionality.
Donor-vehicle mileage cap: roughly under 100000 miles for the part to have meaningful remaining life.
Donor quality checklist:
- Match the part number exactly. Superseded numbers often fail to communicate.
- Visually inspect connectors for corrosion, bent pins, or water damage.
- A used module always requires professional programming to your car's VIN and security system.
Decision logic:
- If Vehicle is less than 8 years old or has under 100k miles → Buy a new or professionally remanufactured module. The warranty justifies the cost.
- If The part is a safety-critical module like the Airbag or ABS controller → Buy new. The risk of a faulty used safety part is too high.
- If The vehicle is over 15 years old and the budget is tight → Buy a used module, but factor in the $150-$250 cost of professional programming.
Warranty tradeoff: Salvage yard parts offer a 30-90 day warranty covering only the part. Remanufactured modules offer a 1-year or lifetime warranty. New OEM parts carry a 1-2 year warranty.
Worst-case if a used part fails: $500-$1200 if a used module is faulty or cannot be programmed, wasting the part cost and repeat diagnostic labor.
What Happens If You Wait — Timeline
- 0-1 month: Intermittent 'Christmas tree' effect on the dashboard. Radio or gauges cut out and return. The U1006 code is stored intermittently. (MPG impact: 0-2%% · Added cost: $0, but high risk of a towing bill ($100-$300) if the car stalls.)
- 1-4 months: The fault becomes frequent. If the TCM is affected, harsh shifting occurs, causing premature wear on transmission clutches. (MPG impact: 2-5%% · Added cost: $150-$450 in diagnostic fees. Potential for future transmission damage is high.)
- 4-8 months: An intermittent wiring issue becomes a permanent short circuit. Unstable voltage causes software corruption or permanent damage to control modules. (MPG impact: 5-10%% · Added cost: $800-$2000. A simple wiring repair now requires replacing a control module plus programming.)
- 8+ months: Cascading failure. The initial short damages other modules on the network. The car will not start. Repair involves replacing multiple computers. (MPG impact: N/A (Vehicle likely undrivable)% · Added cost: $2,500-$5,000+ for multiple modules, programming, and extensive labor.)
Cost of Not Fixing It
- 0-1 month: Intermittent electrical issues, such as gauges dropping out or warning lights flashing. High risk of being stranded if the fault affects the engine module. (Added cost: $100-$300 for an unexpected towing bill.)
- 1-6 months: If the fault affects the Transmission Control Module (TCM), it causes harsh shifting and premature wear on transmission clutches and solenoids. (Added cost: $800-$3500 for avoidable transmission repairs.)
- 6+ months: Constant voltage fluctuations and data network instability cause permanent damage to sensitive control modules, turning a wiring repair into a multi-module replacement. (Added cost: $1500-$4000 for replacing multiple control modules and programming.)
Diagnosis Steps
- Check the Battery and Charging System
Ensure the battery is fully charged (above 12.4 volts at rest) and terminals are tight. Test the cranking voltage; a healthy battery must not drop below 9.6V while starting the engine. A drop below this threshold causes modules to shut down.
Tools: Digital Multimeter, Battery Terminal Brush (Beginner) - Inspect All Fuses
Check all under-hood and cabin fuse boxes. Look for blown fuses related to control modules (BCM, TCM, IPC, ECM, Radio). A blown fuse takes a module offline instantly.
Tools: Fuse Puller, Test Light or Multimeter (Beginner) - Perform a Thorough Visual Inspection
Look for wiring harnesses rubbing against sharp edges, unplugged connectors, green/white corrosion on pins, or chewed wires. Inspect major ground points on the engine block and chassis.
Tools: Flashlight, Mirror (Beginner) - Clear Codes and Test Drive
Use an OBD-II scanner to clear the code and drive the vehicle. If it does not return immediately, the issue is an intermittent glitch caused by a one-time voltage drop.
Tools: OBD-II Scanner (Beginner) - Check for Technical Service Bulletins (TSBs)
Search your vehicle's make, model, year, and 'U1006'. Manufacturers frequently release TSBs for known ground locations, wiring harness chafe points, or software updates.
Tools: Internet Access (Intermediate) - Pro Tip: Perform a Voltage Drop Test
With the engine running, connect the multimeter's positive lead to the battery's negative post and the negative lead to a clean metal point on the engine block. A reading above 0.3 volts indicates excessive resistance in the ground path, requiring cable replacement or cleaning.
Tools: Digital Multimeter (Advanced) - Pro Tip: Check CAN Bus Resistance
Disconnect the vehicle's battery. Set a multimeter to Ohms (Ω). At the OBD-II port, measure resistance between Pin 6 (CAN High) and Pin 14 (CAN Low). A healthy network reads exactly 60 Ohms. A reading of 120 Ohms means a terminating resistor is offline. A reading near 0 Ohms indicates a short circuit.
Tools: Digital Multimeter, OBD-II Breakout Box (Advanced) - Pro Tip: Check CAN Bus Voltage
With the battery connected and ignition ON (engine off), measure DC Volts between Pin 6 and chassis ground (should be ~2.6V). Measure Pin 14 to ground (should be ~2.4V). If both are 0V, there is a short to ground.
Tools: Digital Multimeter, OBD-II Breakout Box (Advanced) - Isolate the Faulty Module or Circuit
Use an advanced scan tool to identify unresponsive modules. Disconnect suspect modules one by one. Re-check CAN bus resistance (Step 7). If resistance returns to 60 Ohms after unplugging a module, that module is internally shorted.
Tools: Advanced Scan Tool, Vehicle-Specific Wiring Diagram, Digital Multimeter (Advanced)
When This Code Triggers (Freeze-Frame Conditions)
- Module Voltage: 9.5V - 11.5V (During engine crank / startup sequence)
- Vehicle Speed: 0 mph (Key-On, Engine-Off (KOEO) network check)
- RPM: Variable (Triggered intermittently by vibration or high electrical load causing a momentary voltage drop or wiring short.)
- Engine Coolant Temp: Any (The fault is electrical and independent of engine temperature, though sub-freezing temps exacerbate battery voltage drops.)
Related Codes
- U1000 — A generic 'CAN Communication Line Error'. U1006 is slightly more specific, indicating a particular expected message was not received. They appear together and share the exact same diagnostic procedure.
- U0100 — Means 'Lost Communication With ECM/PCM'. If seen alongside U1006, the ECM is the offline module. Focus diagnosis entirely on the ECM's power, grounds, and connectors.
- U0140 — Means 'Lost Communication With Body Control Module'. The BCM acts as a gateway between networks. Seeing U0140 indicates the BCM itself is the root cause of the general U1006 code.
- P1000 — A manufacturer-specific code indicating onboard diagnostic checks have not completed. It appears after clearing codes or disconnecting the battery and is not a fault.
Climate & Environmental Factors
- High Humidity / Coastal Regions: Salt-laden air accelerates corrosion on wiring, connectors, and ground points. This leads to increased resistance and communication failures. The green crust seen on battery terminals forms inside connectors, disrupting data signals.
- Cold Weather: Cold temperatures reduce a battery's cranking power. A weak battery drops below the required 9.6V threshold during a cold start, causing modules to fail their initialization sequence.
- Road Salt (Winter Climates): Corrosive de-icing brines splashed onto the undercarriage eat away at exposed wiring harnesses and ground straps, a leading cause of U1006 codes in 'salt belt' regions.
How to Talk to a Mechanic About This Code
Say this: "I have a U1006 network communication code with intermittent electrical issues. I authorize two hours of diagnostic time for a technician to perform foundational checks: battery tests, voltage drop tests on main grounds, and a CAN bus resistance check. Do not replace any modules until the root cause is confirmed."
This focuses the technician on efficient diagnosis rather than guessing, sets a clear budget, and prevents the premature replacement of expensive computers.
Avoid saying:
- 'Just fix whatever's wrong'
- 'My check engine light is on, can you look at it?'
- 'I think it's the computer, can you replace it?'
Questions to ask before authorizing the repair:
- Can you show me the measurement that confirms the failure (e.g., the voltage drop reading or out-of-spec resistance)?
- What were the results of the battery and charging system tests?
- If a module needs replacement, is programming required and is that included in the estimate?
- What is the warranty on the diagnostic work and the recommended repair?
Where to Take It: Dealer vs Independent vs Chain
- Dealer:
A reliable but expensive choice. Best if you suspect a complex module failure requiring programming.
Best for: Vehicles under warranty, Complex, brand-specific issues (e.g., VW TIPM, Subaru BIU), When manufacturer-specific software for programming new modules is required
Downsides: Highest labor rates and parts costs., May replace a whole module/harness rather than perform a detailed wiring repair. (Typical cost: +50% vs. baseline) - Independent Shop:
The best-value choice. Look for an 'auto electric specialist' or ASE L1 certified technicians willing to trace wiring.
Best for: Out-of-warranty vehicles where cost is a factor., Diagnosing common electrical faults like bad grounds and wiring issues.
Downsides: Quality varies greatly. Must find a shop that specializes in electrical diagnostics., May lack expensive manufacturer-specific programming tools. (Typical cost: +0% vs. baseline) - Chain Shop:
AVOID. Complex electrical diagnosis is outside their expertise and results in misdiagnosis.
Best for: Simple, high-volume jobs like oil changes and tires.
Downsides: Technicians are not equipped for complex network diagnostics., Business model encourages quick parts replacement, which is the wrong approach for a U1006. (Typical cost: -10% vs. baseline)
When to Walk Away From the Repair
If the estimated repair cost for the U1006 code exceeds 50% of your car's private-party value, seriously consider not fixing it.
- Car worth $4000, fix is $2200: Walk away. The repair cost is over half the car's value. Put this money toward a replacement vehicle.
- Car worth $12000, fix is $1500: Fix it. The repair is a reasonable percentage of the car's value and restores its function.
- Car worth $2500, fix is $800: Borderline. If the rest of the car is in excellent shape, the repair is worth it. If it has other major issues, walk away.
What Scan Tool You Need for This Code
Minimum: A scanner that reads manufacturer-specific codes (ABS, Airbag, BCM) and views live data. A basic code reader is insufficient.
A $20 code reader only tells you the U1006 code exists. It cannot see which modules are offline or access the body modules where the fault originates.
Budget: BlueDriver Pro (~$100) — Reads codes from all vehicle systems (Engine, ABS, Airbag, BCM), providing a clue as to which module is offline. Shows live data to spot erratic voltage.
Mid-range: Foxwell NT510 Elite / Innova 5610 (~$150-350) — Offers bidirectional control, allowing you to command modules to activate. You can see which modules respond and which do not.
Professional: Autel MaxiCOM MK808S / XTOOL D7 (~$450-700) — Provides full-system diagnostics and a 'network topology' map that visually shows which modules are online or offline. This is the most powerful feature for solving U-codes.
Rent vs buy: Rent a basic scanner to confirm the code, but you must buy at least a budget-pick scanner with all-system access to diagnose it. Otherwise, take it to a professional.
How to Clear the Code After You Fix It
- Reconnect the battery.
- Use an OBD-II scan tool to formally clear the U1006 and any related fault codes.
- Perform a complete drive cycle to allow the vehicle's readiness monitors to run.
Drive cycle (~20 minutes): Start with a cold engine (below 122°F). 1. Idle for 3 minutes with A/C and rear defrost on. 2. Drive in stop-and-go traffic for 10 minutes. 3. Drive at a steady 55-60 mph for 10 minutes. 4. Let the vehicle cool down completely.
Readiness monitors affected: Comprehensive Component Monitor, Misfire Monitor, All other monitors are blocked from running until communication is stable.
Before emissions retest: drive at least 50 miles to fully set monitors.
Watch out for:
- Disconnecting the battery clears the dashboard light but resets all readiness monitors to 'Not Ready', causing an immediate emissions test failure.
- The code returns immediately if the underlying electrical fault (bad ground, shorted wire) is not fixed.
Will This Fail Emissions / State Inspection?
Yes — this code typically fails an OBD-II emissions inspection.
- California: An illuminated Check Engine Light is an automatic failure. After repair, the vehicle must complete a drive cycle to set readiness monitors before re-testing.
- New York: NYS DMV automatically fails vehicles with an active Check Engine Light. Clearing the code right before the test results in a failure due to 'not ready' monitors.
- Texas: In emissions-testing counties, an illuminated Malfunction Indicator Lamp causes an automatic failure. The vehicle cannot be registered until repaired.
Most Commonly Affected Vehicles
- Chevrolet / GMC Silverado, Sierra, Trailblazer, Tahoe (2003-2007) — Prone to issues from bad grounds (G100, G104) and faulty instrument panel clusters (IPCs) taking down the Class 2 data line.
- Nissan / Infiniti Rogue, Altima, Titan, G35 (2005-2018) — Frequently experiences U1000/U1006 due to corroded ground connections for the Engine Control Module (ECM). Cleaning the main ECM ground strap is the primary fix.
- Ford F-150, Explorer (2007-2018) — Triggered by faulty ignition coils creating radio frequency interference (RFI) that disrupts the CAN bus. Also caused by failing to reset the Battery Monitoring System (BMS) after a battery replacement.
- Dodge / Chrysler / Jeep Grand Cherokee, Ram 1500, Grand Caravan (2007-2014) — Failure of the Totally Integrated Power Module (TIPM) causes a flood of communication codes and random electrical problems.
- Volkswagen Passat, Jetta (TDI models) (2012-2015) — Often stored alongside a 'No Communication with NOx Sensor' fault. The NOx sensor is a module on the CAN bus, and its internal failure disrupts the network.
- Subaru Legacy, Outback, Forester (2010-2019) — A failing Body Integrated Unit (BIU) causes network communication codes, parasitic battery drain, and immobilizer no-start conditions.
- Mitsubishi Outlander (2010-2024) — Points specifically to a communication timeout with the theft-alarm siren on the LIN bus. The siren shorts internally and disrupts the network.
- Hyundai Genesis (2012-2015) — Indicates low voltage detected at the head unit (radio/infotainment system), causing it to lose communication. Check the radio fuse first.
Manufacturer-Specific Notes
- General Motors (GM): On older GM trucks, the instrument cluster is a module. When its internal board fails, it takes down the entire Class 2 data line.
- Nissan: Nissan TSBs point directly to poor ECM ground connections as the primary cause for communication codes. Cleaning these grounds fixes the issue without parts replacement.
- Ford: Failing ignition coils produce electromagnetic interference (RFI) that disrupts CAN bus wiring. Also, failing to reset the Battery Monitoring System (BMS) causes chronic low-voltage U-codes.
- Chrysler/Dodge/Jeep: The Totally Integrated Power Module (TIPM) is a frequent source of U-codes. Internal TIPM failures cause widespread communication faults.
- Volkswagen: For TDI models, the U1006 code is frequently caused by a failing NOx sensor shorting out the CAN bus.
Real Owner Stories
2006 Chevrolet Trailblazer with multiple random issues
Vehicle had intermittent electrical problems and communication faults on the Class 2 data line.
What they tried:
- Replaced the Body Control Module (BCM) without programming, which failed.
- Used an oscilloscope to monitor data line voltage.
- Isolated circuits by pulling a splice pack comb connector.
Outcome: A corroded wire splice was found under the driver's side sill plate. The corrosion melted wires together, shorting the network. Repairing the splice fixed all issues.
Lesson: Communication issues originate in unexpected places. Check common areas for corrosion, like under door sill plates, before replacing expensive modules.
2016 VW Jetta with recurring dead battery
The battery kept dying. After replacing the battery and alternator, the car died again, showing communication codes (U100800, U112200) and a low voltage code (P056200).
What they tried:
- Replaced the battery.
- Replaced the alternator for over $1000.
- Scanned for codes after the problem persisted.
Outcome: The owner spent significant money on parts that were not the root cause. The codes pointed to a systemic parasitic drain depleting the new battery.
Lesson: Do not replace alternators or batteries for communication codes without diagnosing the root cause. Persistent low voltage indicates a parasitic draw.
2013 VW Passat TDI with no-start and flashing glow plug light
The car stopped running, displaying a flashing glow plug light and storing a U100600 fault code.
What they tried:
- Towed to a dealer for diagnosis.
- Performed a Guided Fault Finding scan.
Outcome: The test plan revealed the NOx Sensor 1 was internally shorted. Because the sensor is a module on the data bus, its short took down the network. Replacing the sensor resolved the no-start condition.
Lesson: External emissions components like NOx sensors act as network modules. Their internal failure disrupts the entire communication system.
How to Prevent This Code From Triggering
- Perform regular battery maintenance (Every 6 months) — Clean battery terminals of corrosion and ensure they are tight. This prevents voltage drops and ensures modules receive stable power.
- Apply protective coatings to terminals and connectors (During battery service or when a connector is unplugged) — Apply dielectric grease to the rubber gaskets of electrical connectors. This seals out moisture, preventing corrosion that causes signal loss.
- Routinely wash the vehicle's undercarriage (Monthly during winter in 'salt belt' regions) — Removes corrosive road salt and de-icing brines that eat away at exposed wiring harnesses and ground straps.
- Visually inspect wiring harnesses (During every oil change) — Look for harnesses rubbing against engine components. Securing a loose harness with a zip tie prevents it from chafing and shorting the network.
- Avoid overloading electrical circuits (Ongoing) — Improperly installed high-power accessories create voltage spikes, leading to blown fuses or damage to sensitive control modules.
Frequently Asked Questions
Can a bad battery cause a U1006 code?
Yes. A weak battery is the most common cause. Modules require stable voltage to communicate, and a drop below 9.6V during cranking immediately sets this code.
What is the most common misdiagnosis for a U1006?
The biggest mistake is replacing an expensive control module without performing basic electrical checks. Always rule out a weak battery, corroded grounds, and blown fuses first.
My scanner says 'No Communication' but also found a U1006. What's the difference?
'No Communication' means your scan tool cannot connect to the vehicle's diagnostic gateway. A U1006 code is stored inside a module that is still communicating, indicating it lost contact with a different module.
I got a U1006 code after installing a new radio. What should I do?
The new radio wiring is interfering with the car's data network. Verify you used the correct vehicle-specific wiring interface adapter. Ensure no factory data wires were improperly spliced or grounded.
Is it expensive to fix a U1006 code?
The cost lies primarily in diagnostic labor, not parts. Expect to pay $150 to $300 for a shop to trace the wiring fault. The actual fix is often a simple wire repair or ground cleaning costing less than $20 in materials.
My car has a U1006 code but drives fine. Can I ignore it?
No. A communication problem is the first sign of a developing issue like a corroding wire. The fault will worsen over time, potentially leaving you stranded or causing permanent damage to other modules.
What is the difference between a U-code and a P-code?
'P' codes (Powertrain) indicate a problem with the engine or emissions system. 'U' codes (Network) indicate a communication failure between the vehicle's computers.
Can a bad ground wire cause all these problems?
Yes. A bad ground creates an unstable return path for electricity. This confuses sensors and modules, causing random warning lights, false codes, and stalling.
Key Takeaways
- Code U1006 indicates a communication breakdown between vehicle modules, most frequently caused by a battery voltage drop below 9.6V during cranking.
- Before replacing expensive computers, test the CAN bus resistance at the OBD-II port; a healthy network reads exactly 60 Ohms with the battery disconnected.
- Expect to pay $150 to $300 in diagnostic labor to find the root cause, even if the fix is a $0 ground wire cleaning.
- Do not ignore a U1006 code accompanied by a 'Christmas tree' dashboard; driving with intermittent transmission module communication causes permanent clutch damage within months.
Helpful Videos


Shop the Parts Behind U1006
Below are the parts most often responsible for code U1006, ranked by how frequently each one is the actual culprit (per the diagnosis above). Tap any to see what we have for your vehicle.


The information in this article is provided for general reference and educational purposes only. Vehicle specifications, procedures, and part compatibility can vary by production date, trim level, and region. Always consult your vehicle's factory service manual and verify part numbers before purchasing or performing repairs. Safety-critical components such as airbags, seat belts, and braking systems should be installed by a qualified professional.
- 🧭 Diagnostic Flowchart
- 🎬 Helpful Videos
- 🛍️ Shop This Part
- What Does U1006 Mean?
- Can I Drive With U1006?
- Common Causes
- Symptoms
- Common Fixes & Costs
- Used vs. New Parts: Buying Guide
- What Happens If You Wait — Timeline
- Cost of Not Fixing It
- Diagnosis Steps
- When This Code Triggers (Freeze-Frame Conditions)
- Related Codes
- Climate & Environmental Factors
- How to Talk to a Mechanic About This Code
- Where to Take It: Dealer vs Independent vs Chain
- When to Walk Away From the Repair
- What Scan Tool You Need for This Code
- How to Clear the Code After You Fix It
- Will This Fail Emissions / State Inspection?
- Most Commonly Affected Vehicles
- Manufacturer-Specific Notes
- Real Owner Stories
- 2006 Chevrolet Trailblazer with multiple random issues
- 2016 VW Jetta with recurring dead battery
- 2013 VW Passat TDI with no-start and flashing glow plug light
- How to Prevent This Code From Triggering
- Frequently Asked Questions
- Can a bad battery cause a U1006 code?
- What is the most common misdiagnosis for a U1006?
- My scanner says 'No Communication' but also found a U1006. What's the difference?
- I got a U1006 code after installing a new radio. What should I do?
- Is it expensive to fix a U1006 code?
- My car has a U1006 code but drives fine. Can I ignore it?
- What is the difference between a U-code and a P-code?
- Can a bad ground wire cause all these problems?
- Key Takeaways
- 🎟️ Get 5% Off