
2017-2025 Tesla Model 3 & Model Y Overhead Console: Lights, Mics, and Replacement
This guide covers common failures, replacement procedures, and what to check when buying a used overhead console for your 2017-2023 Tesla Model 3 or 2020-2025 Tesla Model Y.
- This overhead console fits both the 2017-2023 Model 3 and 2020-2025 Model Y.
- Common failures include flickering dome lights, non-working microphones for calls and voice commands, and dead buttons.
- Replacement is extremely easy, requiring only a plastic pry tool and about 10-15 minutes. It is a plug-and-play part with no programming needed.
- A used OEM unit is the most cost-effective repair, often costing under $75.
Known Issues and Common Problems
The overhead console in the 2017-2023 Tesla Model 3 and 2020-2025 Tesla Model Y is generally reliable, but some issues can occur. Unlike the center console, which has seen several design revisions for storage and aesthetics, the overhead console's problems are typically electronic. There are no major recalls or Technical Service Bulletins (TSBs) specifically targeting the overhead console for these models. Most reported recalls for these vehicles involve software updates for systems like Autosteer, seat belt chimes, or issues unrelated to this specific part.
Symptoms of Failure
Failures in the overhead console usually manifest in one of its specific functions. You might experience:
- Flickering or Inoperative Dome Lights: The LED lights may flicker, fail to turn on, or stay on permanently.
- Microphone Malfunctions: People you call may complain that you sound distant or muffled, or voice commands may not work reliably. This points to a failure of the integrated microphones.
- Unresponsive Buttons: The physical hazard light or SOS buttons may not activate when pressed.
- SOS System Errors: While often related to the car's main computer or cellular connection, a fault within the console's circuitry can sometimes trigger an SOS system error message on the main screen.
Pro Tip: Before assuming the console is bad, perform a vehicle reboot by holding both scroll wheels on the steering wheel. This can often resolve temporary software glitches affecting the console's functions.
Buying a Used Overhead Console
A used OEM overhead console is an excellent, cost-effective solution for a faulty unit. Since these parts are shared between the Model 3 and Model Y, there is a good supply available. Here’s what to inspect before buying:
- Verify Compatibility: While the console is used across many years for both the Model 3 and Model Y, it's wise to match the part number if possible. Key OEM part numbers include 1500237-00-E and 1500237-00-H. The letter at the end often signifies a minor revision, but functionality is generally consistent.
- Inspect the Lens and Housing: Check for any cracks, deep scratches, or yellowing on the light lenses. Ensure the plastic housing is free from cracks and that all mounting clips are intact. The console is held in by two main clips, and if they are broken, it will not sit securely in the headliner.
- Check the Buttons: Press the hazard and SOS buttons. They should have a firm, tactile click and return to their original position without sticking.
- Examine the Microphone Grilles: Look at the small grilles for the microphones. They should be clean and free of debris, which can muffle sound.
- Connector Pins: Look inside the electrical connector port. The pins should be straight, clean, and free of any corrosion.
Replacement Procedure
Replacing the overhead console is a straightforward DIY job that requires only basic tools.
Installation Difficulty: 1/5
Estimated Time: 10-15 minutes
Tools Needed: Plastic trim removal tool (pry tool)
Step-by-Step Guide
- Prepare the Vehicle: It's a good practice to disconnect the 12V power, though for a simple component swap like this, many do it with the power on. Tesla's official service manual recommends disconnecting the 12V battery.
- Lower the Console: Using a plastic trim tool, carefully pry downwards on the edge of the console housing. Tesla's service manual suggests inserting the tool near the dome light and pulling down to release the first clip, then moving to the other side. There are two main clips holding it to the headliner. Be gentle to avoid damaging the headliner.
- Disconnect the Connector: Once the console is loose, let it hang by its wiring harness. Depress the tab on the single electrical connector and pull it out.
- Install the New Console: Connect the electrical harness to the replacement console. You should hear a click. Test the lights and buttons before proceeding.
- Secure the New Console: Align the console with the opening in the headliner and push it firmly upwards until the two clips snap securely into place.
- Final Steps: If you disconnected the 12V battery, reconnect it now. Some service documents note that a firmware reinstall may be necessary after reconnecting power, but this is often not required for a simple component swap.
Caution: Do not use a metal screwdriver or other sharp metal tool to pry the console out. This will almost certainly damage the plastic console or the soft headliner surrounding it.
Cost of Replacement
Replacing the overhead console is relatively inexpensive, especially if you opt for a used part and perform the labor yourself.
| Part Type | Estimated Cost |
|---|---|
| New OEM | $70 - $120 |
| New Aftermarket | $60 - $80 |
| Used OEM | $25 - $75 |
| Shop Labor | $50 - $100 |
Frequently Asked Questions
Is the overhead console the same for the Tesla Model 3 and Model Y?
Yes, for the specified model years (2017-2023 Model 3 and 2020-2025 Model Y), the front overhead console is the same part and is interchangeable between the two vehicles.
My voice commands aren't working. Is the overhead console the problem?
It could be. The microphones for voice commands and hands-free calling are located in the overhead console. If the microphones fail, you will need to replace the console assembly. However, first try a system reboot, as software issues can also cause this symptom.
Do I need to have the new console programmed by Tesla?
No, the overhead console is a simple plug-and-play component. It does not require any special programming or calibration after installation.
Can I just replace the bulbs if my lights don't work?
No, the dome lights in the console use integrated LEDs that are part of the console's circuit board. They are not individual, replaceable bulbs. If the lights fail, the entire console module must be replaced.
Technical Specifications
OEM Part Numbers: 1500237-00-D 1500237-00-E 150023700E 1500237-00-H 1547671-00-A 1092573-00-L
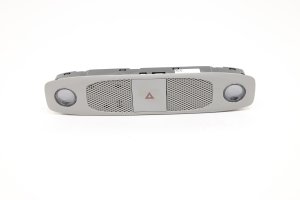
Houses dome lights, hazard button, SOS button, and microphones. Attaches to headliner with two clips. Single electrical connector.
We Have This Part in Stock

The information in this article is provided for general reference and educational purposes only. Vehicle specifications, procedures, and part compatibility can vary by production date, trim level, and region. Always consult your vehicle's factory service manual and verify part numbers before purchasing or performing repairs. Safety-critical components such as airbags, seat belts, and braking systems should be installed by a qualified professional.
- TESLA TESLA MODEL 3:
- TESLA TESLA MODEL Y: