
Chevrolet Blazer Headlight Switch Guide: 1969-1986 Models
Having trouble with your lights? Your Blazer's headlight switch might be the problem.
- Verify your Blazer's year and the switch's pin count (7 or 8) before ordering; they are not all the same.
- Symptoms like flickering lights or a burning smell are serious safety issues that require immediate attention.
- For reliability, choose a premium brand like ACDelco or a trusted aftermarket name like Standard Ignition over budget options.
- If replacement switches fail repeatedly, the root cause is likely high current draw from upgraded headlights or a wiring issue, not the switch itself.
Signs of a Failing Headlight Switch
When a headlight switch starts to go bad in these classic Blazers, the signs are usually obvious. Because this single part controls multiple lighting functions, a failure can show up in several ways.
- Lights Won't Turn On: The most serious symptom is when your headlights or parking lights don't turn on at all. This could be a complete failure of the switch.
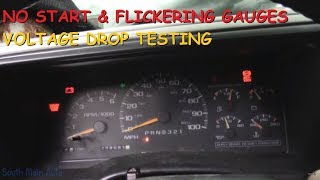
- Flickering or Intermittent Headlights: Your headlights may flicker or cut out while driving, especially on bumpy roads. This often points to a worn internal contact or a tripping circuit breaker inside the switch. This issue was common enough that GM issued a recall in 1986 for similar problems on its trucks and vans.
- Dash Lights Don't Work or Dim: If you can't adjust the brightness of your dashboard lights with the knob, or if they don't turn on at all, the rheostat part of the switch has likely failed.
- Stuck in One Mode: The switch might get stuck on one setting, like high beams, or you may not be able to switch between low and high beams. Note that this can also be caused by a separate dimmer switch, often located on the floor or steering column.
- Burning Plastic Smell: A faint burning smell from the dashboard area when the lights are on is a critical warning sign. It means the switch or its connector is overheating and could be a fire hazard.
Choosing the Right Aftermarket Headlight Switch
For a vehicle as old as the 1969-1986 Blazer, you won't be walking into a dealer for a factory part. Aftermarket is your main option. Quality varies, so it's important to choose wisely.
Aftermarket Brand Tiers
| Brand Tier | Brands | Quality & Cost Assessment |
|---|---|---|
| Premium Aftermarket (OE-Style) | ACDelco | ACDelco is GM's own parts brand and is considered the original equipment equivalent. For electrical parts, this is the top choice for reliability and fit, though it is also the most expensive option. |
| Quality Aftermarket | Standard Ignition (SMP) | Standard Motor Products is a well-respected brand that produces reliable electrical components. Many professional mechanics trust SMP parts, and they offer a good balance of quality and cost. |
| Economy / Budget | Replacement, Store Brands (e.g., Duralast) | These are the most affordable options. While they will work, their long-term durability can be a gamble. Given the safety function of a headlight switch, a budget part may fail sooner, especially if you are running higher-wattage halogen headlights which draw more power. |
Important: Check Your Year and Pin Count!
The headlight switch is NOT the same for all 1969-1986 Blazers. There was a significant design change with the introduction of the "Square Body" generation.
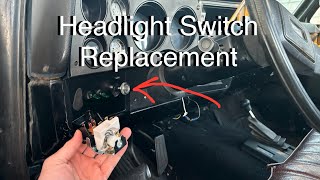
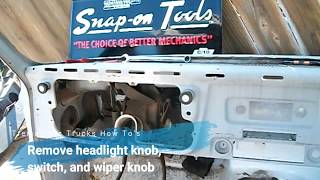
- 1969-1972 (1st Gen): These models use a specific switch. 🎬 Watch: How to remove 1967-1972 headlight and wiper knobs.
- 1973-1986 (2nd Gen): These models use a different switch, often referred to as the "Square Body" switch. 🎬 See this step-by-step Square Body headlight switch replacement guide.
Furthermore, some years have 7-pin connectors while others have 8-pin. Before ordering, it is highly recommended to remove your old switch to confirm the pin count and match it to the product photos and descriptions.
Frequently Asked Questions (FAQ)
Can I just clean my old switch instead of replacing it?
Sometimes, yes. If your only issue is flickering dash lights when you turn the dimmer knob, the problem might be dirt or corrosion on the rheostat coil. Some owners have had success spraying electrical contact cleaner into the switch and working the knob back and forth. However, if your headlights are cutting out completely, it's a safety issue and replacement is the best course of action.
Is the dimmer switch the same as the headlight switch?
No. The main headlight switch is in the dashboard. The dimmer switch, which selects high or low beams, is a separate part. On many of these older Blazers, it's a button on the floor, to the left of the clutch or brake pedal. On later models, it's integrated into the turn signal lever on the steering column. A bad dimmer switch can also cause headlight problems, so it's worth checking too.
Why do my new aftermarket switches keep failing?
If you are going through multiple replacement switches, the switch itself may not be the root cause. The problem is likely too much electrical current running through the circuit. This can be caused by a short in the wiring, a bad ground, or from using upgraded, high-wattage headlights that the stock wiring wasn't designed for. Another common issue is a melted or high-resistance connector plug, which creates heat and destroys the new switch. Consider installing a headlight relay harness to take the load off the switch if you have upgraded headlights.
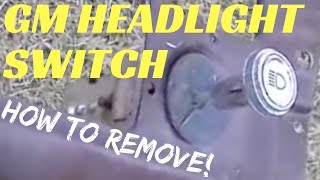
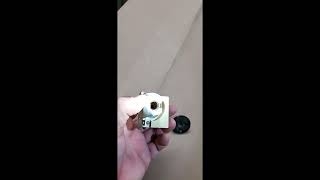
How do I remove the knob to get the switch out?
This is a common question for first-timers. Pull the headlight knob all the way out, as if you were turning the headlights on. Reach under the dash and feel the body of the switch. You will find a small, spring-loaded button. Press this button in, and while holding it, the knob and shaft will pull all the way out of the switch. After that, you can unscrew the retaining nut on the dash and unplug the switch from behind.
🎬 Watch: A quick demonstration of the spring-loaded release button.Helpful Videos

Technical Specifications
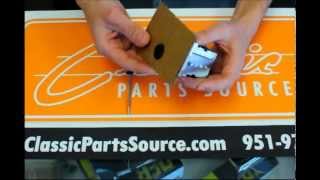
OEM Part Numbers: 1995222 1995276 1995195 1995217 D6252D
7-pin or 8-pin electrical connector. Controls headlights, parking lights, and instrument panel dimmer.
We Have This Part in Stock


The information in this article is provided for general reference and educational purposes only. Vehicle specifications, procedures, and part compatibility can vary by production date, trim level, and region. Always consult your vehicle's factory service manual and verify part numbers before purchasing or performing repairs. Safety-critical components such as airbags, seat belts, and braking systems should be installed by a qualified professional.