
Chevrolet C10 Headlight Switch Guide for 1975-1986 Models
Having trouble with flickering or dead headlights on your Square Body Chevy? Your headlight switch might be the culprit.
- A failing headlight switch is a common issue causing flickering lights, total light failure, or dead dash lights.
- Replacement is a simple DIY job that takes less than an hour and requires no special tools.
- Choose a quality aftermarket brand like ACDelco or Standard Ignition for better reliability.
- Always inspect the wiring connector for heat damage or corrosion when replacing the switch.
Is Your C10 Headlight Switch Failing?
The headlight switch in these classic trucks is a common failure point due to age and the electrical load it carries. Over time, the internal contacts can wear out, corrode, or overheat, leading to a range of frustrating and dangerous lighting problems. A complete failure can leave you without headlights at night, while intermittent issues can be a sign of a switch that's about to go out completely.
Common Symptoms of a Bad Headlight Switch
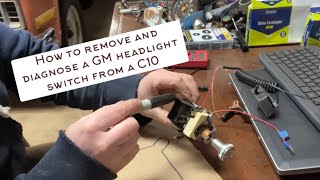
🎬 Watch: How to diagnose and test a common 7-pin GM switch.- Headlights or Taillights Don't Turn On: The most obvious sign is when your lights fail to illuminate at all, even after checking bulbs and fuses.
- Flickering Lights: Headlights, dash lights, or taillights may flicker or cut out intermittently, especially on bumpy roads. This is often caused by worn internal contacts.
- Dash Lights Not Working or Dimming: If you can't adjust the brightness of your instrument panel lights or they don't come on at all, the rheostat (dimmer) inside the switch has likely failed.
- Dome Light Issues: Sometimes a faulty switch can cause the dome light to stay on, flicker, or not turn on when you rotate the knob.
- Repeated Switch Failure: If you are replacing headlight switches frequently, it could point to a larger electrical issue like a bad ground or high-resistance connection that is causing the new switches to burn out.
Choosing the Right Aftermarket Headlight Switch
For a 1975-1986 C10, you won't find a "new" OEM switch from a GM dealer, but high-quality aftermarket options are readily available. The quality can vary, so it's important to choose a reputable brand.
Brand Quality Tiers
- Premium Aftermarket (ACDelco): ACDelco is a trusted name and often considered the original equipment supplier for GM. An ACDelco switch is generally your best bet for fit, finish, and longevity, closely matching the original part's quality. Customer reviews often praise its OEM-like feel and reliability.
- Quality Aftermarket (Standard Motor Products / Standard Ignition): Standard is a well-respected brand in the aftermarket world. Their parts are known for being reliable and a solid alternative to ACDelco, often at a slightly lower price point. They are a go-to choice for many professional mechanics.
- Value / Budget (Replacement): These are the most affordable options. While they will get the job done, their long-term durability and the feel of the switch might not match the higher-tiered brands. They can be a good choice for a budget-conscious repair, but be aware that quality can be inconsistent.
| Part Type | Estimated Cost |
|---|---|
| New Aftermarket (Value) | $15 - $30 |
| New Aftermarket (Premium) | $31.80 - $78.47 |
| Shop Labor | $75 - $150 |
Pro Tip: Check Your Connectors!
When replacing the switch, always inspect the wiring connector. If it looks melted, brittle, or corroded, it should be replaced as well. A bad connector can cause high resistance, generating heat that will quickly destroy your new switch.
Frequently Asked Questions (FAQ)
Is replacing the headlight switch a DIY job?
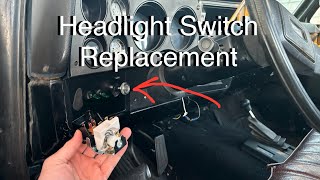
Yes, for most owners with basic tools, this is a very feasible DIY repair. The process involves disconnecting the battery, removing the dash bezel, pressing a small spring-loaded button on the switch body to release the knob and shaft, unscrewing a retaining nut, and unplugging the electrical connector. The entire job can typically be done in under an hour.
🎬 See this step-by-step walkthrough for replacing your Squarebody headlight switch.Do I need a special tool to remove the headlight knob?
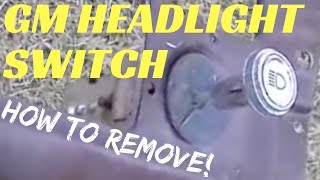
No special tool is required. You pull the headlight knob out to the "on" position, then reach under the dash and press a small, spring-loaded button on the body of the switch itself. While pressing the button, the knob and shaft will slide right out.
Why do my headlights and dash lights flicker?
Flickering is a classic symptom of a failing headlight switch. The internal contacts that complete the electrical circuit wear out over time, causing an intermittent connection. It can also be a sign of a poor ground connection or a problem with the floor-mounted dimmer switch, which is also a common failure point.
🎬 Watch: How to fix headlights by replacing the floor dimmer switch.My headlights don't work, but my taillights do. Is it the switch?
It's very likely the headlight switch. The switch has separate internal circuits for the headlights and the parking/tail lights. It's common for the headlight portion to fail while the taillight portion continues to work. However, you should also check the floor-mounted dimmer switch, as it is a critical part of the headlight-only circuit.
Helpful Videos

Technical Specifications
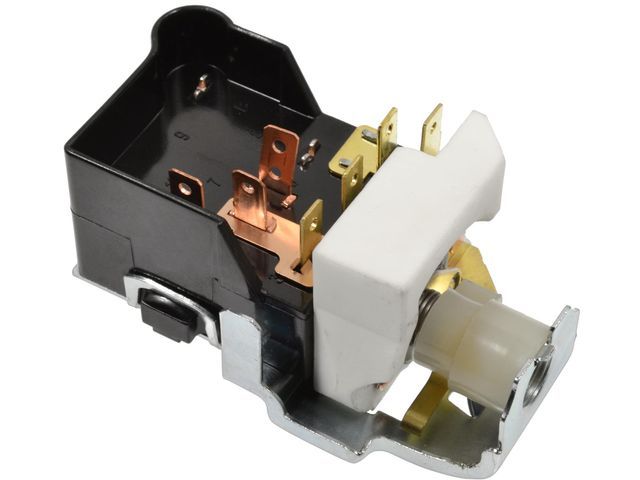
OEM Part Numbers: 19245093 D6252D
Push/pull switch with integrated rotating rheostat for dash light dimming. Typically features 7 or 8 terminal pins.
We Have This Part in Stock


The information in this article is provided for general reference and educational purposes only. Vehicle specifications, procedures, and part compatibility can vary by production date, trim level, and region. Always consult your vehicle's factory service manual and verify part numbers before purchasing or performing repairs. Safety-critical components such as airbags, seat belts, and braking systems should be installed by a qualified professional.