
2013-2018 Nissan Altima Trunk Finisher: Camera vs. No-Camera and Model Year Splits
This guide covers the key compatibility differences, common cosmetic failures, and how to choose the right used trunk trim for your 2013-2018 Nissan Altima.
- The panel is NOT interchangeable between 2013-2015 and 2016-2018 Altima models due to a body style refresh.
- You must verify if your vehicle requires the version with a backup camera cutout or the version without one.
- When buying used, the most critical inspection points are the condition of the chrome finish and ensuring all rear mounting tabs are intact.
- The panel itself is cosmetic; if your backup camera is failing, the problem is likely the camera or its wiring, not the panel.
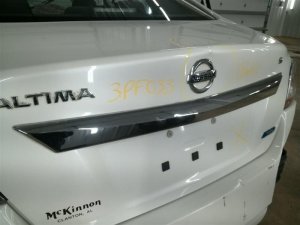
Key Differences and Compatibility
Before purchasing a replacement rear finish panel for a 2013-2018 Nissan Altima, you must correctly identify your vehicle. There are two major variations of this part that are not interchangeable.
1. Model Year Split: 2013-2015 vs. 2016-2018
The Nissan Altima received a significant mid-generation refresh for the 2016 model year. This update included changes to the trunk lid and taillights. As a result, the shape and mounting points of the rear finish panel are different.
- 2013-2015 Altima Finish Panel: These panels are designed to fit the pre-facelift models. They will not physically fit on a 2016 or newer Altima. OEM part numbers for this range typically begin with 84810-3TA....
- 2016-2018 Altima Finish Panel: These panels are for the post-facelift models and will not fit the earlier 2013-2015 cars. OEM part numbers for this range often start with 84810-9HS....
Warning: The panels for 2013-2015 and 2016-2018 models are not interchangeable. Always verify the year of your vehicle before ordering.
2. Backup Camera Provision
Within both year ranges, the finish panel was available in two configurations: one for vehicles with a factory backup camera and one for those without. The camera-equipped version has a specific cutout and mounting bracket to hold the camera assembly. The non-camera version has a smooth, uninterrupted surface.
- With Camera: Features a square or rectangular opening where the camera lens is mounted.
- Without Camera: No opening is present.
It is crucial to order the correct version for your car's features. While you could install a camera-version panel on a non-camera car, it would leave an unsightly empty hole.
Symptoms of Failure
Failure of this panel is almost always cosmetic or due to physical damage.
- Peeling or Flaking Chrome: The most common issue is the delamination of the chrome layer from the underlying plastic base. This can start as bubbling and progress to flaking, exposing the plastic underneath.
- Cracks or Breakage: Physical impact from a minor rear-end collision or from closing the trunk on an object can cause the plastic to crack or shatter.
- Loose Fit or Rattling: The panel is held on by nuts and clips. Over time, or due to improper installation, these fasteners can loosen, causing the panel to rattle or have a noticeable gap against the trunk lid. Broken mounting tabs on the back of the panel are a common cause of this.
- Fading or Discoloration: Exposure to sun and environmental contaminants can cause the chrome finish to become dull, hazy, or discolored over time.
Known Issues, TSBs, and Recalls
While there are no direct recalls for the finish panel itself, there are related recalls and known issues for the 2013-2018 Altima that are relevant.
- Backup Camera Harness Recall (NHTSA 23V628000): Some 2019-2021 Altimas were recalled because damage to the camera harness could cause a distorted or blank rearview image. While this recall applies to a later generation, similar issues of harness damage from trunk operation can occur on 2013-2018 models, leading to camera failure. If your backup camera is malfunctioning, the problem may be the wiring, not the finish panel itself.
- Rear Lower Suspension Link Warranty Extension: Nissan extended the warranty for rear lower suspension links on 2013-2018 Altimas due to corrosion issues. This is unrelated to the finish panel but is a notable issue for this vehicle generation.
- Chrome Peeling: Peeling chrome on trim pieces is a widely discussed issue among Nissan owners. This is generally considered a cosmetic defect and not covered by a recall, but it is a common reason for replacement.
Buying a Used Rear Body Panel Finish Panel
A used OEM panel is often the best value, offering superior fit and finish compared to cheap aftermarket alternatives. Here’s what to check before buying.
- Confirm Compatibility: Double-check that the part is from the correct year range (2013-2015 or 2016-2018) and has the correct provision (or lack thereof) for a backup camera.
- Inspect the Chrome Finish: Look closely at high-resolution photos or inspect the part in person. Pay special attention to the edges and corners, as this is where peeling often begins. Avoid any panels with existing bubbles, flakes, or deep scratches.
- Check All Mounting Tabs: Flip the panel over and inspect the back. Ensure all plastic mounting tabs and studs are present and free of cracks. A single broken tab can prevent the panel from sitting flush and may lead to rattling.
- Verify Inclusions: A used finish panel typically does not include the backup camera, trunk release switch, or emblems. You will need to transfer these components from your old panel. Confirm what is included before purchase.
Pro Tip: Aftermarket panels are available, but they often use a lower-quality chrome plating that may peel or fade much faster than the original OEM part. For long-term durability and a perfect fit, a quality used OEM panel is the recommended choice.
Replacement Guide
Replacing the rear finish panel is a straightforward job suitable for a DIYer with basic tools.
Tools Needed:
- Trim removal tool (or a flathead screwdriver wrapped in tape)
- Socket set (typically 8mm or 10mm)
Step-by-Step Process:
- Open the Trunk: Access the interior of the trunk lid.
- Remove the Trunk Lid Liner: Use a trim removal tool to carefully pop out the plastic push-clips holding the carpeted liner to the trunk lid.
- Disconnect Electrical Components: Once the liner is off, you will see the wiring for the trunk release switch and the backup camera (if equipped). Carefully disconnect these electrical connectors.
- Remove Fasteners: Locate the nuts (usually 2 to 4) that secure the finish panel to the trunk lid. Use a socket to remove them.
- Remove the Panel: With the nuts removed, the panel is held in by clips. Gently and evenly pull the panel straight off the trunk lid. Be careful not to pry on one side, which could break the remaining clips or the panel itself.
- Transfer Components: If your replacement panel does not include them, carefully remove the trunk release switch, backup camera, and any emblems from your old panel and install them onto the new one.
- Install the New Panel: Align the clips on the new panel with the holes in the trunk lid and press it firmly into place. Re-install the nuts from the inside, being careful not to over-tighten them. Reconnect the electrical connectors and reinstall the trunk lid liner.
Cost Comparison
| Part Type | Estimated Cost |
|---|---|
| New OEM | $150 - $250 |
| New Aftermarket | $60 - $120 |
| Used OEM | $40 - $100 |
| Shop Labor | $75 - $150 |
Frequently Asked Questions (FAQ)
Will a finish panel from a 2017 Altima fit my 2014 Altima?
No. The trunk lid was redesigned in 2016, so parts from 2016-2018 models are not physically compatible with 2013-2015 models.
Does the replacement trunk finisher include the backup camera or Nissan emblem?
Typically, no. Whether you buy new or used, the finish panel is almost always sold as a bare part. You will need to transfer the camera, trunk release switch, and emblems from your original panel.
My backup camera screen is flickering. Is the finish panel the problem?
It is unlikely. A flickering or blank camera display is usually caused by a faulty camera, a bad electrical connection, or a damaged wiring harness. The harness can become worn from the repeated opening and closing of the trunk. You should diagnose the electrical system before replacing the cosmetic panel.
Can I paint or vinyl wrap the chrome finish panel?
Yes. Many owners who dislike the chrome look choose to vinyl wrap or paint the panel. Proper surface preparation is key for adhesion, especially when painting over chrome. Using plasti-dip is another popular, reversible option.
Technical Specifications
OEM Part Numbers: 84810-3TA0A 84810-3TA2A 84810-3TA2B 848103TA0B 84810-9HM0A 84810-9HS1A 84810-9HS1C 84810-9HS2A 84810-9HS2C
Material: Plastic base with chrome plating. Variations exist for models with and without a factory backup camera.
We Have This Part in Stock


The information in this article is provided for general reference and educational purposes only. Vehicle specifications, procedures, and part compatibility can vary by production date, trim level, and region. Always consult your vehicle's factory service manual and verify part numbers before purchasing or performing repairs. Safety-critical components such as airbags, seat belts, and braking systems should be installed by a qualified professional.
- Nissan Altima: