
Tesla Model S, 3, X, Y Subwoofer Guide: Fixing Rattles, No-Bass Issues, and Replacement
Your definitive guide to diagnosing and replacing the Premium Audio trunk subwoofer in the 2016-2027 Tesla Model S, Model X, Model 3, and Model Y.
- A major audio system redesign in 2021 means Model S/X subwoofers are NOT interchangeable between pre- and post-2021 vehicles.
- Rattling is the most common issue and is often caused by vibrating trim or the enclosure, not a blown speaker. Investigate with foam before buying a replacement.
- You MUST verify your car has the Premium Audio package before buying this part; it will not work in a car with the standard system.
- Replacement is a straightforward DIY job that involves removing trunk trim panels, making a used OEM assembly a great value repair.
Critical Compatibility Warning: Standard vs. Premium & Model Redesigns

Warning: Tesla has used several different audio systems and subwoofers across these models. Compatibility is not straightforward. Before purchasing, you MUST verify two things: your vehicle's audio package and its build date, especially for Model S and Model X.
- Standard vs. Premium Audio: This subwoofer is ONLY used in vehicles equipped with the Premium Audio system. Base models do not have the wiring or the amplifier channel for it. You can verify your system in the 'Software' tab on your vehicle's touchscreen.
- Model S & Model X Redesign (2021): The Model S and Model X received a major interior and systems update (known as 'Palladium' or 'Refresh') in early 2021. The audio system was completely changed. Subwoofers from pre-2021 cars are NOT compatible with 2021-and-newer cars, and vice-versa.
Symptoms of a Failing Subwoofer

A problem with the rear subwoofer can manifest in several ways, ranging from annoying rattles to a complete lack of bass.
1. Rattling, Buzzing, or Vibration
This is the most common complaint, particularly on the Model 3 and Model Y. At certain frequencies or volumes, a loud rattle or buzz may come from the rear trunk area. This is not always a 'blown' speaker. Common causes include:
- The plastic subwoofer enclosure vibrating against the car's metal body.
- A loose interior trim panel near the subwoofer.
- A hairline crack in the plastic speaker enclosure itself.
- The speaker driver itself failing.
Some owners have had success getting Tesla Service to fix this under warranty by adding foam or sound-deadening material between the enclosure and the body. A good diagnostic step is to use a tone generator app to play low-frequency sounds (30-60 Hz) to reliably reproduce the rattle while you press on various trim panels to isolate the source.
2. No Bass or Weak Output
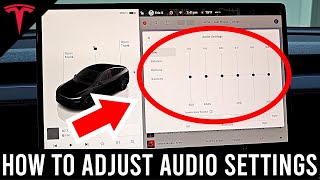
If your music suddenly sounds 'thin' and lacks all low-end punch, the subwoofer may have failed completely. You can confirm this by going to the EQ settings on the touchscreen and turning the 'Subwoofer' level all the way up and down. 🎬 Watch: How to adjust your Tesla audio and EQ settings. If you hear no change in sound, the subwoofer is not working. This can be caused by a few things:
- Blown Speaker: The speaker driver itself has failed electrically or mechanically.
- Amplifier Issue: The dedicated amplifier channel that powers the subwoofer has failed.
- Software Glitch: Some owners have reported that a system reboot (holding both scroll wheels on the steering wheel) or a software update has restored subwoofer function, suggesting a possible software issue. Before assuming the hardware is bad, always try a reboot first.
3. Distorted, Popping, or Scratching Sounds
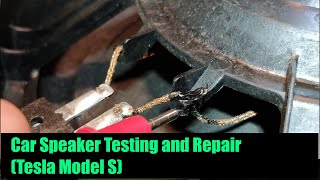
If you hear distorted, popping, or fuzzy sounds from the bass notes, even at moderate volumes, this is a classic sign of a blown speaker. This usually means the voice coil inside the speaker is damaged or the speaker cone has a tear. This type of damage is permanent and requires replacing the speaker.
🎬 See this guide on repairing a damaged Tesla speaker.Buying a Used Tesla Subwoofer

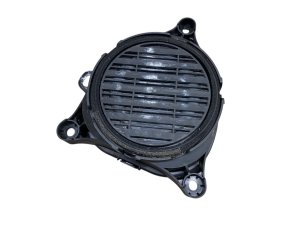
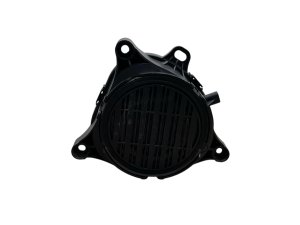
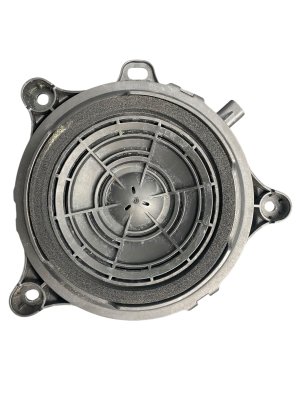
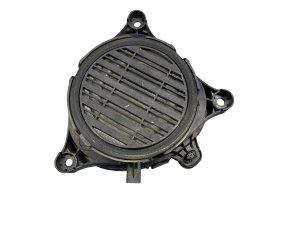
A used OEM subwoofer is an excellent, cost-effective replacement. The custom-molded enclosure is essential for a factory fit, something aftermarket solutions often struggle with. Here’s what to look for.
1. Verify Compatibility by Part Number
This is the most important step. Due to the system redesigns, you must match the part to your vehicle's model and year. Do not trust a seller's title alone; always confirm the part number.
| Part Number | Vehicle Fitment | Notes |
|---|---|---|
| 1050085-00-E | Model S & Model X (Approx. 2016-2020) | For pre-refresh cars with Premium Audio. |
| 1631731-00-A | Model S & Model X (Approx. Feb/Mar 2021+) | For 'Refresh'/'Palladium' cars with the 22-speaker system. |
| 1079745-00-A | Model 3 & Model Y (Approx. 2017+) | Used in Premium Audio for these models. |
Part Number Alert: The part number 1114984-00-B is often incorrectly listed as a speaker. Search results confirm this is the part number for the HomeLink garage door opener module, not a subwoofer.
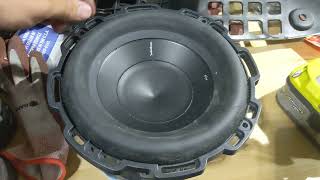
2. Physical Inspection
Before buying, carefully inspect the photos or the part in person:
- Speaker Cone and Surround: Look for any rips, tears, or holes in the paper/plastic cone. Check the flexible rubber or foam ring (the 'surround') that connects the cone to the frame. It should be intact with no cracks or signs of rot.
- Enclosure Integrity: Inspect the plastic housing for any cracks, especially around the mounting tabs where it bolts to the car. A cracked enclosure will vibrate and cause rattles.
- Test Movement: If possible, gently and evenly press down on the center of the speaker cone. It should move smoothly without any scraping or grinding noises. A scratching sound indicates a damaged voice coil, and the speaker is bad.
Replacement Procedure Overview
Replacing the subwoofer is a manageable DIY project for those comfortable with removing interior panels. While specifics vary slightly between models, the general process is the same.
- Power Down Vehicle: For safety, power down the vehicle through the touchscreen menu before disconnecting any electronics.
- Remove Trunk Trim: You will need to remove the trunk floor, the rear sill plate, and the large molded carpeted panel on the right side of the trunk to access the subwoofer assembly. This is typically held in with a series of plastic clips and a few bolts. A set of plastic trim removal tools is highly recommended to avoid damage. 🎬 Watch: Step-by-step subwoofer removal and replacement for Model X.
- Unbolt the Subwoofer: The subwoofer enclosure is held to the vehicle body with two or three 10mm bolts/nuts. The amplifier may also need to be unbolted and set aside to gain access.
- Disconnect and Replace: Disconnect the single electrical connector from the subwoofer, remove the old unit, and install the new one.
- Reassemble and Test: Reinstall all trim panels in the reverse order of removal. Power the vehicle back on and test the audio system.
Pro Tip: While you have the subwoofer out, it's a great time to add sound-deadening material (like Dynamat or Kilmat) to the sheet metal behind it. This can significantly reduce vibrations and potential rattles, even with a perfectly good speaker.
Cost of Replacement
Costs can vary significantly depending on the source of the part and whether you perform the labor yourself.
| Item | Estimated Cost | Notes |
|---|---|---|
| New OEM Subwoofer | $300 - $500+ | May need to be ordered through Tesla Service. Price can be high. |
| Used OEM Subwoofer | $150 - $270 | A common price range on sites like eBay. Offers the best value. |
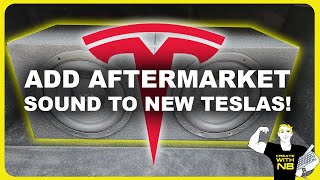
| New Aftermarket Upgrade | $900 - $1,300+ | Includes a custom enclosure, higher-power subwoofer, and a dedicated amplifier. |
| Shop Labor | $100 - $200 | Tesla's service manual quotes around 0.4-0.7 hours for this job. An independent shop would likely charge for 1-1.5 hours of labor. |
Frequently Asked Questions (FAQ)
How do I know if my Tesla has the Premium Audio system?
The easiest way is to check your car's configuration. On the touchscreen, go to 'Software' and look for 'Additional Vehicle Information'. It will list your audio system type. Visually, cars with Premium Audio will have a speaker grille in the right-side trunk trim where the subwoofer is located.
My subwoofer rattles. Does that mean it's blown?
Not necessarily. Rattling is a very common issue and is often caused by the plastic enclosure or a nearby trim panel vibrating against the car's body. Before replacing the part, try to isolate the noise by pressing on the trim around the subwoofer while music is playing. Many rattles can be fixed with strategically placed foam tape or sound-deadening material.
Can I just replace the speaker inside the plastic box?
Yes, this is possible for advanced DIYers. Some owners replace the factory 8-inch driver with a higher-quality aftermarket one. However, this requires finding a speaker with the correct impedance and mounting depth, and you may need to create a custom mounting adapter or modify the enclosure. For most people, replacing the entire used OEM assembly is much simpler.
Will a subwoofer from a Model 3 fit in a Model Y?
Physically, the enclosures are very similar as the cars share a platform. Part numbers are also very close or identical. While cross-compatibility is highly likely, it is always best to match the part number from your original unit to the replacement to guarantee a perfect fit and correct electrical impedance.
Helpful Videos
Technical Specifications
OEM Part Numbers: 1050085-00-E 1631731-00-A 1079745-00-A 1114984-00-B (Note: This is a HomeLink module, not a speaker)
System: Premium Audio (Ultra High Fidelity Sound) Location: Right side of trunk/cargo area Driver Size: 8-inch (200mm)
We Have This Part in Stock


The information in this article is provided for general reference and educational purposes only. Vehicle specifications, procedures, and part compatibility can vary by production date, trim level, and region. Always consult your vehicle's factory service manual and verify part numbers before purchasing or performing repairs. Safety-critical components such as airbags, seat belts, and braking systems should be installed by a qualified professional.
- Tesla Model X:
- Tesla Model S:
- TESLA MODEL 3:
- Tesla Model Y:
- 🎬 Helpful Videos
- 🛍️ Shop This Part
- Critical Compatibility Warning: Standard vs. Premium & Model Redesigns
- Symptoms of a Failing Subwoofer
- 1. Rattling, Buzzing, or Vibration
- 2. No Bass or Weak Output
- 3. Distorted, Popping, or Scratching Sounds
- Buying a Used Tesla Subwoofer
- 1. Verify Compatibility by Part Number
- 2. Physical Inspection
- Replacement Procedure Overview
- Cost of Replacement
- Frequently Asked Questions (FAQ)
- 🎟️ Get 5% Off