
2009-2017 Ford Expedition Sun Visor: Fixing Droop, Lights, and Matching Options
Your complete guide to diagnosing common failures and choosing the correct replacement sun visor for your Expedition.
- Verify features before buying: Check for an illuminated mirror and/or HomeLink buttons on your original visor.
- Match the interior color code from the VIN sticker in the driver's door jamb to ensure a perfect match.
- For 2009 models, the part is only for vehicles built on or after 3/30/2009.
- Electrical failures are common, often due to broken wires in the pivot arm from normal use.
Symptoms of a Failing Sun Visor

Sun visor problems on the 2009-2017 Ford Expedition are common and can range from simple mechanical wear to electrical faults. Here are the most frequent issues owners encounter.
Drooping or Sagging Visor
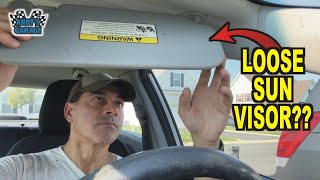
The most common failure is a visor that won't stay up against the headliner. This is usually caused by wear and tear inside the pivot mechanism at the mounting point. Constant use weakens the internal friction components, causing the visor to droop down and obstruct the driver's view. In some cases, the mounting screws may simply be loose 🎬 Watch: How to fix a loose sun visor mounting base and can be tightened.
Vanity Mirror Light or HomeLink Failure
If the vanity mirror lights and/or the HomeLink garage door opener stop working, the problem is almost always electrical. Forum discussions frequently point to a few causes. A wire inside the visor's pivot arm can break or short out from the repeated motion of moving the visor. This can cause intermittent power—for example, the lights might only work when the visor is moved to the side window. In other cases, a blown fuse can be the culprit, though this often affects other components on the same circuit, like the glove box light. The switch activated by the mirror cover can also fail, or the bulbs themselves can burn out.
Broken Vanity Mirror Cover
The small plastic door or cover for the vanity mirror is another common point of failure. The tiny plastic pins that act as hinges can become brittle and break, causing the door to fall off when opened. Owners have successfully repaired this using methods like epoxying a small nail or metal pin in place of the broken plastic one.
Compatibility Warning: For 2009 models, replacement sun visors are only compatible with vehicles manufactured on or after March 30, 2009. Check your vehicle's door jamb sticker for the production date before ordering.
Buying a Used 2009-2017 Expedition Sun Visor

Because of the many variations, buying a used sun visor requires careful attention to detail. A used OEM visor is often the best choice, as it guarantees a perfect match for color, fabric, and fit, which can be a problem with aftermarket options.
Step 1: Identify Your Visor's Features
Before you buy, you must know exactly what you have. Check your existing visor (or the one on the opposite side) for these features:
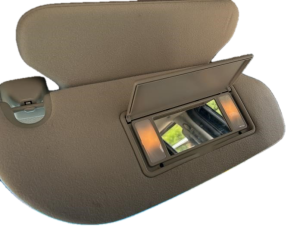
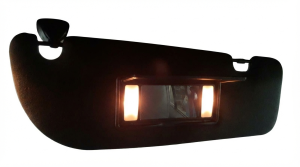
- Illuminated Mirror: Does the mirror have lights that turn on when you open the cover?
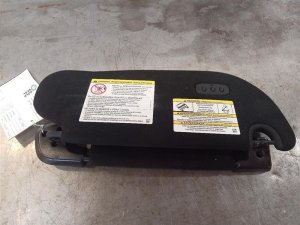
- Universal Garage Door Opener (UGDO/HomeLink): Does the driver's side visor have three buttons for programming garage doors?
- Sunroof: While less critical for the visor itself, some part descriptions mention compatibility with or without a sunroof, which can affect the headliner and wiring.
Step 2: Match Your Interior Color Code
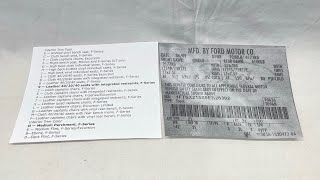
Ford used several interior colors for this generation of Expedition, such as Ebony (black), Stone (gray), and Camel (tan). Do not guess the color. The correct interior trim code is printed on the vehicle identification sticker located in the driver's side door jamb. Look for the label "INT TR". The code underneath will tell you the exact color of your interior trim.
🎬 See this guide to finding your Ford interior trim codeStep 3: Physical Inspection
When inspecting a used sun visor, check the following:
- Hinge Stiffness: Move the visor up and down. It should feel firm and hold its position without drooping.
- Mirror and Cover: Open and close the vanity mirror cover. Make sure it snaps shut and that the hinge pins are intact.
- Fabric Condition: Check for any peeling, bubbling, or stains on the cloth material.
- Electrical Connector: Ensure the wiring and plastic connector at the base are not damaged.
Step-by-Step Replacement Guide

Replacing the sun visor on a 2009-2017 Expedition is a simple DIY task that usually takes less than 15 minutes.
Difficulty: 1/5 (Very Easy)
Time: 0.2 hours
Tools Needed:
- Phillips screwdriver or a Torx bit driver (T20 or T25, depending on the vehicle)
- Small flathead screwdriver or trim removal tool
Instructions:
- Expose the Mounting Screws: The mounting base of the sun visor is typically covered by a plastic flap. Use a small flathead screwdriver to gently pry this cover open to reveal the screws underneath.
- Disconnect Electrical Connector (if equipped): Before fully removing the screws, it's often easier to first disconnect the electrical plug. Carefully pull the visor down enough to access the small wiring harness connector and unplug it.
- Remove the Screws: Using the appropriate Phillips or Torx driver, remove the screws holding the visor to the roof. Support the visor with one hand as you remove the last screw.
- Remove the Old Visor: With the screws out and the wiring disconnected, the old visor will come free.
- Install the New Visor: Installation is the reverse of removal. Connect the electrical plug on the new visor, position it against the headliner, and secure it with the screws. Do not overtighten the screws. Snap the plastic cover closed.
- Test Functionality: Test the visor's movement, the vanity lights, and the HomeLink buttons (if equipped) to ensure everything is working correctly.
Pro Tip: If your vanity lights or HomeLink stop working after installation, double-check that the electrical connector is fully seated. A loose connection is a common cause of failure.
Cost Comparison
Sun visor prices vary significantly based on features and source.
| Part Source | Estimated Cost |
|---|---|
| New OEM (Ford) | $140 - $450+ |
| New Aftermarket (Dorman, etc.) | $75 - $100 |
| Used OEM | $50 - $150 |
| Shop Labor for Installation | $40 - $80 |
Frequently Asked Questions (FAQ)
My visor droops. Do I have to replace the whole thing?
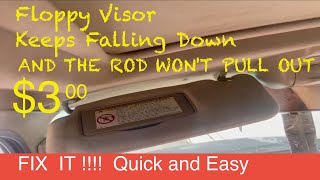
Not always. First, check if the mounting screws are loose and tighten them. If that doesn't work, the internal pivot is worn out. While some DIY fixes exist (like inserting zip ties into the mechanism to add friction), the most reliable and long-lasting solution 🎬 Watch: Quick and easy fix for a floppy sun visor is to replace the visor assembly.
Why did my vanity lights and HomeLink stop working?
This is usually caused by a broken wire inside the visor's pivot arm or a blown fuse. If power is intermittent and works only in certain positions, it's almost certainly a broken wire. If it doesn't work at all, check the fuse first. In some cases, a pinched wire from the factory installation can cause a short.
Can I add a visor with HomeLink if my original one didn't have it?
This is generally not a simple plug-and-play swap. The vehicle's wiring harness may not have the necessary connections to power the HomeLink module, even if the connector for the vanity light is present. It would likely require custom wiring.
Are there any recalls for the 2009-2017 Expedition sun visor?
No, there are no specific recalls for the sun visor itself. There was a recall for some Expedition models concerning the front blower motor located behind the glove box, but it is unrelated to the sun visor. There are also no Technical Service Bulletins (TSBs) directly addressing common sun visor failures for this model range.
Helpful Videos
Technical Specifications
OEM Part Numbers: CL1Z-7804104-AE FL1Z-7804105-AB 9L1Z-7804105-BE
Varies by options. Available with or without illuminated vanity mirror and with or without Universal Garage Door Opener (HomeLink).
We Have This Part in Stock

The information in this article is provided for general reference and educational purposes only. Vehicle specifications, procedures, and part compatibility can vary by production date, trim level, and region. Always consult your vehicle's factory service manual and verify part numbers before purchasing or performing repairs. Safety-critical components such as airbags, seat belts, and braking systems should be installed by a qualified professional.
- Ford Expedition:
- 🎬 Helpful Videos
- 🛍️ Shop This Part
- Symptoms of a Failing Sun Visor
- Drooping or Sagging Visor
- Vanity Mirror Light or HomeLink Failure
- Broken Vanity Mirror Cover
- Buying a Used 2009-2017 Expedition Sun Visor
- Step 1: Identify Your Visor's Features
- Step 2: Match Your Interior Color Code
- Step 3: Physical Inspection
- Step-by-Step Replacement Guide
- Tools Needed:
- Instructions:
- Cost Comparison
- Frequently Asked Questions (FAQ)
- 🎟️ Get 5% Off