
2017-2024 Jeep Compass Sun Visor: Solving Droop, Light Failures, and Compatibility
This guide covers common failures, replacement steps, and how to choose the correct visor, especially for the confusing 2017 model year.
- For 2017 models, you MUST verify if you have the 'New Style' (horizontal rear door handle) as 'Classic' visors are not compatible.
- The most common failure is a worn internal hinge, causing the visor to droop; replacement is the only permanent solution.
- Before buying a used visor, verify the color, side (left/right), and features (illuminated mirror, HomeLink) to ensure a match.
- Replacement is a very easy DIY job, requiring only a T20 Torx driver and about 15 minutes.
The Critical 2017 Model Year Split: 'Classic' vs. 'New Style'

Warning: Before purchasing a sun visor for a 2017 Jeep Compass, you must identify which version of the vehicle you own. Two distinct body styles were sold during this model year, and their sun visors are not interchangeable.
- 2017 Jeep Compass 'Classic' (MK Platform): This is the first-generation body style, carried over from previous years. The easiest way to identify it is by the vertical rear door handles located high up on the door frame. Sun visors for this model are not compatible with the parts discussed in this guide.
- 2017 Jeep Compass 'New Style' (MP Platform): This is the completely redesigned second-generation model, which this guide covers. You can identify it by its conventional, horizontal rear door handles. Sun visors for this model are compatible with those from the 2018-2024 model years.
Always check your rear door handles before buying a sun visor for a 2017 model. Ordering without this check will likely result in receiving a part that does not fit.
Symptoms of a Failing Sun Visor

Sun visor failures are typically straightforward to diagnose. While not usually a critical safety issue, a drooping visor can obstruct the driver's vision and become a significant annoyance.
- Drooping or Won't Stay Up: This is the most common failure. The internal friction mechanism in the hinge wears out, and the visor will no longer hold its position against the headliner. It may sag slightly or fall down completely, especially when driving over bumps.
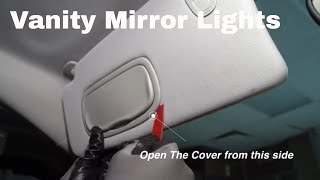
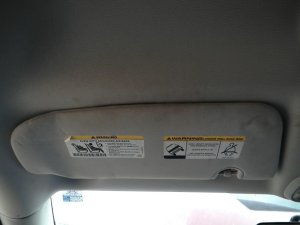
- Vanity Mirror Light Failure: The light(s) around the vanity mirror may flicker or fail to turn on when the mirror cover is opened. This is often due to a burnt-out bulb, 🎬 Watch: How to change the vanity mirror light bulbs. a faulty switch in the mirror cover mechanism, or a problem with the wiring. In some cases, a faulty switch can cause the light to stay on, potentially draining the battery.
- Cracked or Broken Hinge/Mount: The plastic mounting point where the visor attaches to the roof can become brittle from heat and age, leading to cracks or complete breakage. This can cause the visor to feel loose or fall off entirely.
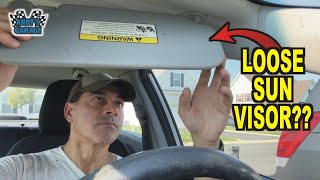
- Loose or Rocking Visor: The visor may feel loose or rock back and forth at its mounting point, even when the screws are tight. 🎬 See this guide on how to fix a loose visor. This can be caused by wear in the mounting base itself.
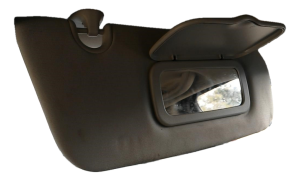
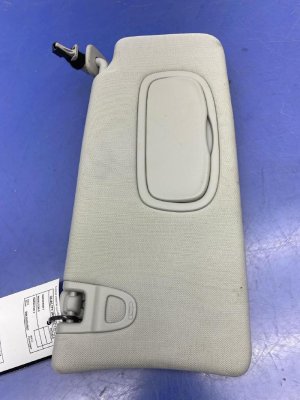
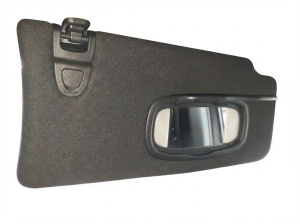
Buying a Used Sun Visor: What to Inspect

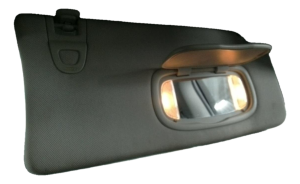
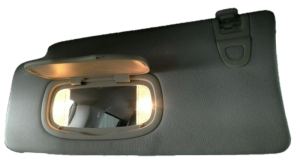
A used OEM sun visor is an excellent, cost-effective replacement for a broken original. Because these parts are largely cosmetic and have simple electronics, a visual inspection is usually sufficient to determine their condition.
- Verify Compatibility: This is the most important step. Use the checklist below to ensure the donor vehicle matches your needs: Left (Driver) or Right (Passenger) side? Is the color correct (e.g., Gray, Black)? Does it have an illuminated mirror? Does it have HomeLink buttons? Answering these questions before you buy is essential.
- Check Hinge Stiffness: Hold the visor by its mounting base and swing the visor arm. It should move smoothly but with enough resistance to hold any position. If it feels loose or swings freely, it will likely droop in your vehicle.
- Inspect the Mirror and Cover: Open and close the vanity mirror cover several times. It should move without binding and snap securely closed. Check the mirror for cracks or dark spots. If it's an illuminated model, the light should turn on and off with the cover's movement.
- Examine the Fabric and Body: Check for stains, tears, or sagging fabric. Look for cracks or stress marks in the plastic body, especially around the mounting hinge.
- Check the Electrical Connector: If it's an illuminated or HomeLink visor, ensure the electrical connector and a few inches of wiring are intact and undamaged. A broken connector can make installation difficult.
Pro Tip: Some base model Compass trims come with non-illuminated visors that have plastic inserts where the lights would be. If you are upgrading to an illuminated visor, you must ensure your vehicle has the necessary wiring in the headliner. If not, the lights on the new visor will not work 🎬 Watch: How to upgrade to LED vanity mirror bulbs. without custom wiring.
Sun Visor Replacement Guide

Replacing a sun visor on a 2017-2024 Jeep Compass is a simple DIY task that typically takes less than 15 minutes.
- Tools Needed: T20 Torx driver or bit, small flathead screwdriver (for prying).
- Expose the Screws: Swing the sun visor towards the side window. At the base where it mounts to the roof, you will see a small plastic cover. Use a small flathead screwdriver to gently pry this cover off, revealing two T20 Torx screws.
- Remove the Screws: Use the T20 Torx driver to remove the two screws holding the visor in place. Support the visor with one hand as you remove the second screw.
- Disconnect Electrical Connector: If your visor has an illuminated mirror or HomeLink, gently pull it down from the headliner. You will see a small wiring harness. Depress the tab on the connector and pull it apart to disconnect it.
- Installation: Installation is the reverse of removal. Connect the electrical harness on the new visor, tuck the wiring into the headliner, and align the mounting base with the screw holes. Insert and tighten the two T20 Torx screws until snug. Do not overtighten, as this can strip the mounting points. Snap the plastic cover back into place.
- Test Functionality: Test the visor's movement, the vanity light, and the HomeLink buttons (if equipped) to ensure everything is working correctly.
Known Issues, Recalls, and Technical Service Bulletins (TSBs)
While there are no major recalls specifically for drooping or failing sun visors on the Compass, a related recall and TSB are worth noting.
- NHTSA Recall 19V-246 (FCA V35): This recall was issued for some 2019 vehicles because the airbag warning labels on the sun visors did not conform to federal safety standards. The remedy was for dealers to replace both the driver and passenger side sun visors free of charge. While not a functional defect, it's possible some vehicles received new visors under this campaign.
- TSB for Loose Visors: While not for the Compass specifically, FCA has issued TSBs for other models like the Wrangler (TSB 23-027-23) for visors that feel loose or rock at the mount. The fix involves adding a small foam pad to the mounting point to create a tighter fit. This indicates a known issue with the mounting design on similar vehicles.
Cost Comparison
| Part Type | Estimated Cost |
|---|---|
| New OEM (Mopar) | $150 - $250 |
| New Aftermarket | $50 - $90 |
| Used OEM | $40 - $100 |
| Shop Labor Cost | $50 - $100 |
Prices are estimates and can vary based on features (illuminated, HomeLink), supplier, and location.
Frequently Asked Questions (FAQ)
My visor is drooping. Can it be repaired, or do I need to replace it?
In most cases, a drooping visor cannot be effectively repaired. The internal friction mechanism is not serviceable. While some DIY fixes involving zip ties or clips exist, they are temporary solutions. The most reliable and long-lasting fix is to replace the entire sun visor assembly.
How do I find my interior color code to match a new visor?
The interior color code for your Jeep is typically found on the vehicle identification sticker, located inside the driver's side door jamb. The code will be labeled as 'INTERIOR TRIM'. Common colors for the Compass include Black and Gray. For example, 'DV' is a code for Dark Slate Gray.
Can I install an illuminated visor in my Compass that came with a non-illuminated one?
Maybe. Some vehicles that shipped with non-illuminated visors still have the wiring harness tucked into the headliner. You would need to remove the old visor or the overhead console to check for the presence of the electrical connector. If the connector is there, it's a simple plug-and-play upgrade. If not, it would require custom wiring to make the light functional.
The clip that holds the end of the visor broke. Do I need a whole new visor?
No. The stationary clip on the outboard side of the visor (opposite the hinge) is a separate part. It is called a 'sun visor clip' or 'retainer' and can be purchased and replaced independently from the main visor assembly. These are typically inexpensive and easy to replace.
Helpful Videos

Technical Specifications
OEM Part Numbers: 1WK21DX9AB 1WK21DX9AC 1WK21DX9AD 1WK21DX9AE 1WK21DX9AF 5SY75PS4AA 5SY75PS4AB 5SY75PS4AC 5SY76DX9AD 5SY76DX9AE 5SY89PS4AA 5SY89PS4AB 5SY89PS4AC 5SY89PS4AD 6TQ15PS4AA 5SY90PS4AA 5SY90PS4AB
Vanity Light Bulb Type: 6614F or TS-14V1CP. Mounting Hardware: T20 Torx screws.
We Have This Part in Stock

The information in this article is provided for general reference and educational purposes only. Vehicle specifications, procedures, and part compatibility can vary by production date, trim level, and region. Always consult your vehicle's factory service manual and verify part numbers before purchasing or performing repairs. Safety-critical components such as airbags, seat belts, and braking systems should be installed by a qualified professional.
- Jeep Compass:
- 🎬 Helpful Videos
- 🛍️ Shop This Part
- The Critical 2017 Model Year Split: 'Classic' vs. 'New Style'
- Symptoms of a Failing Sun Visor
- Buying a Used Sun Visor: What to Inspect
- Sun Visor Replacement Guide
- Known Issues, Recalls, and Technical Service Bulletins (TSBs)
- Cost Comparison
- Frequently Asked Questions (FAQ)
- 🎟️ Get 5% Off