
2011-2025 Grand Cherokee & Durango Sun Visor: Fire Recall, Drooping Fixes & Replacement Guide
This guide covers the critical fire risk recall, common drooping issues, and how to choose the correct replacement sun visor for your Jeep Grand Cherokee, Grand Cherokee L, or Dodge Durango.
- A critical fire recall (NHTSA 14V-391 & 15V-879) affects 2011-2014 Grand Cherokee and Durango models with illuminated visors; verify recall completion immediately.
- The most common failure is drooping, which requires full replacement as the internal mechanism is not serviceable.
- Compatibility is complex; you must match side (left/right), color, and features (illuminated mirror, HomeLink) when buying a replacement.
- Replacement is a simple DIY task for most owners, requiring only basic tools and about 15 minutes.
Symptoms of a Failing Sun Visor
A failing sun visor can present several distinct symptoms, ranging from mechanical annoyances to serious electrical hazards. Understanding these signs can help you diagnose the problem correctly.
Sun Visor Droops or Won't Stay Up
This is the most common failure. You position the visor against the headliner, but it slowly sags down or falls completely, often obstructing your view. This is caused by wear and tear on the internal friction mechanism within the visor's pivot arm. Over thousands of cycles of being moved, the internal components lose their ability to hold the visor's weight.
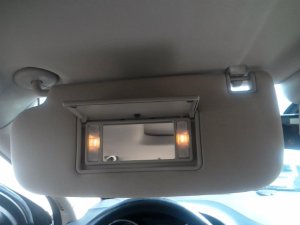
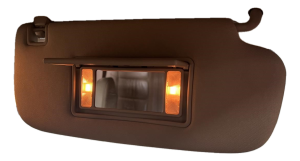
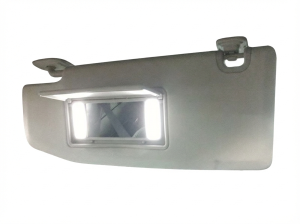
Vanity Mirror Light or HomeLink Doesn't Work
If the light in your vanity mirror flickers or fails to turn on, it could be a burnt-out bulb, but it can also indicate a more serious wiring problem. A key safety concern for these vehicles is the wiring for the vanity lamp, which was the subject of a major recall. If the vanity light and/or the HomeLink buttons stop functioning, it's essential to inspect the wiring for damage.
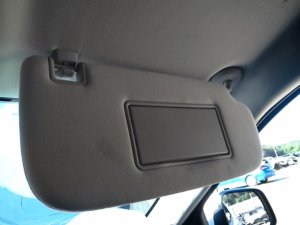
Visible Damage or Broken Components
Years of use and sun exposure can make the visor's plastic and fabric brittle. You might notice cracks in the plastic housing, a broken vanity mirror cover, or the fabric covering peeling away. The clip on the outboard side of the visor can also break, meaning the visor can no longer be secured against the side window.
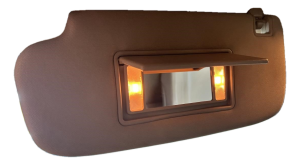
Smoke, Burning Smell, or Fire
This is the most critical symptom and is directly related to a safety recall on 2011-2014 models. A short circuit in the vanity mirror wiring can generate enough heat to melt the plastic, cause a burning smell, and in some cases, lead to an open flame in the headliner area. If you experience any of these signs, you should stop driving the vehicle and have it inspected immediately.
Safety Recall Warning: Chrysler (FCA) issued recalls (NHTSA 14V-391 / P36 and 15V-879 / R71) for millions of 2011-2014 Jeep Grand Cherokee and Dodge Durango models equipped with illuminated vanity mirrors. The wiring could short circuit, creating a fire risk. The recall remedy involves installing new wire routing guides and, in some cases, replacing the sun visors entirely. Even if a vehicle was serviced under the first recall, a second one was issued because the initial fix was found to be insufficient.
Variant & Compatibility Guide
Choosing the correct sun visor is critical, as there are many variations. Ordering the wrong one will result in features not working or the part not fitting at all. Always verify these features on your original part before buying a replacement.
- Vehicle Model & Year: While the visors are shared across the Grand Cherokee (WK2), Grand Cherokee L (WL), and Durango, be mindful of the 2021 model year. Jeep produced both the older Grand Cherokee 'WK' and the new 'WL' body style. This guide primarily covers the 2011-2025 Durango, 2011-2021 Grand Cherokee (WK2), and 2021-2025 Grand Cherokee L/WL. The fire recall only applies to 2011-2014 WK2/Durango models.
- Side: Visors are specific to the Left (Driver) and Right (Passenger) side.
- Illuminated vs. Non-Illuminated: Some base models came without a light in the vanity mirror. A visor with an electrical connector for a light will not work in a vehicle that wasn't wired for it from the factory, and vice-versa. The fire recall only affects vehicles with illuminated visors (sales code GNC).
- HomeLink Garage Door Opener: Higher trim levels often include three buttons on the visor to control garage doors and gates. If your vehicle has this feature, you must get a replacement visor that also has it.
- Color and Material: These vehicles came with several interior colors, such as black, gray, and beige/tan. The material can also vary, from standard cloth to a premium suede-like material in SRT or Summit models.
How to Find Your Interior Color Code
To ensure a perfect match, find your vehicle's interior trim code. This is located on the VIN sticker, which is typically found on the driver's side door jamb. Look for a code labeled "TRM" on the sticker. Providing this code to a parts supplier can help guarantee you get the right color.
Buying a Used Sun Visor
Given the high cost of a new OEM visor, a used part is an excellent value. However, you must inspect it carefully.
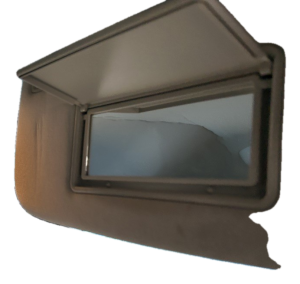
- Test the Pivot: This is the most important check. Hold the visor by its mounting base and move the arm. It should be stiff and hold its position. If it feels loose or floppy, it will droop in your car.
- Verify Features: Double-check that the features match your original. Is it for the correct side? Does it have the vanity light? Does it have the HomeLink buttons you need?
- Inspect the Wiring: Look at the electrical connector and the short wire pigtail. Ensure there are no cuts, frays, or signs of overheating/melting.
- Check for Physical Damage: Look for cracks in the plastic, especially around the mounting points. Open and close the vanity mirror door to ensure the hinge isn't broken.
- Why Used OEM is a Good Choice: An original Mopar visor is designed to match your vehicle's interior color and texture perfectly. Aftermarket visors often use slightly different colors or materials that look out of place. As long as you find a used OEM visor with a solid pivot mechanism, it offers the best combination of quality and value.
Replacement Guide
Replacing the sun visor is a straightforward DIY job that usually takes less than 15 minutes per side.
Tools Needed:
- Small flathead screwdriver or trim removal tool
- 5/16" or 8mm socket with a small ratchet
Step-by-Step Instructions:
- Use the small flathead screwdriver to carefully pry open the plastic cover on the visor's base where it meets the headliner. The cover is hinged; pry from the side opposite the windshield.
- With the cover open, you will see three 5/16" (or 8mm) bolts. Remove these three bolts. Be ready to support the visor as you remove the last bolt.
- Gently pull the visor down from the headliner. It may be held in by a couple of alignment clips in addition to the bolts.
- If your visor has a vanity light or HomeLink, there will be an electrical wire. Find the connector, press the release tab, and disconnect it. Do not pull on the wires themselves.
Pro Tip: Some early 2011 models may not have a disconnect plug. In these rare cases, the wires must be cut and spliced to the new visor. It is wise to check for a plug before purchasing your replacement part.
- Connect the new visor's electrical plug, ensuring it clicks into place.
- Align the new visor with the bolt holes and the alignment clips in the roof.
- Start all three bolts by hand to avoid cross-threading. Snug them down with your socket, but do not overtighten, as you can crack the plastic base.
- Snap the plastic trim cover closed. Test the visor's movement and the function of the light/HomeLink.
Cost Comparison
| Part Type | Estimated Cost |
|---|---|
| New OEM (Mopar) | $200 - $350+ per side |
| New Aftermarket | $70 - $150 per side |
| Used OEM | $40 - $120 per side |
| Shop Labor | $50 - $100 |
Frequently Asked Questions (FAQ)
Why did my sun visor catch fire?
This is a known defect addressed by NHTSA recalls 14V-391 and 15V-879. On 2011-2014 models with illuminated mirrors, the wiring can be pierced by a mounting screw or chafe over time, causing a short circuit and fire risk. If your vehicle falls in this range and has not had the recall performed, contact a dealer immediately.
Can I fix a drooping sun visor without replacing it?
Temporary fixes exist, like wrapping the pivot arm with material to increase friction, but they are not permanent solutions. The internal mechanism is not designed to be serviced. The most reliable and safest repair is to replace the entire visor assembly.
Can I upgrade to a visor with lights and HomeLink if my car didn't have them?
It is not a simple plug-and-play upgrade. Your vehicle's wiring harness will be missing the necessary circuits to power the light and HomeLink system. While it is technically possible with extensive custom wiring, it is not practical for most owners. It's best to replace your visor with the same features it came with from the factory.
Is the replacement process the same for the Grand Cherokee L (WL)?
Yes, the basic replacement process for the newer WL generation (2021-2025 Grand Cherokee and Grand Cherokee L) is functionally identical to the previous WK2 generation and the Dodge Durango. It involves removing the same style of trim cover and three mounting bolts.
Technical Specifications
OEM Part Numbers: 1LS23DX9AH 1LS24HDAAH 1LS25DX9AE 1LS25DX9AF 1LS25DX9AG 1LS25DX9AH 1LS27HDAAH 1LS27HL1AG 1WK20DX9AF 1WK20HL1AF 1WK20LU5AB 1WK20LU5AC 1WK20LU5AD 1WK20LU5AE 1WK20LU5AF
Mounting uses three 5/16-inch (8mm) bolts. Electrical connector varies based on options (illuminated mirror, HomeLink).
We Have This Part in Stock

The information in this article is provided for general reference and educational purposes only. Vehicle specifications, procedures, and part compatibility can vary by production date, trim level, and region. Always consult your vehicle's factory service manual and verify part numbers before purchasing or performing repairs. Safety-critical components such as airbags, seat belts, and braking systems should be installed by a qualified professional.
- Jeep Grand Cherokee:
- Dodge Durango:
- Jeep Grand Cherokee L:
- 🛍️ Shop This Part
- Symptoms of a Failing Sun Visor
- Sun Visor Droops or Won't Stay Up
- Vanity Mirror Light or HomeLink Doesn't Work
- Visible Damage or Broken Components
- Smoke, Burning Smell, or Fire
- Variant & Compatibility Guide
- How to Find Your Interior Color Code
- Buying a Used Sun Visor
- Replacement Guide
- Cost Comparison
- Frequently Asked Questions (FAQ)
- 🎟️ Get 5% Off