
2004 Lexus ES330 Sun Visor: Fixing the Common Sagging and Drooping Issue
This guide covers the common failure points, replacement costs, and step-by-step instructions for the 2004 Lexus ES330 sun visor.
- The most common failure is a sagging visor that won't stay up; this requires replacement as it cannot be tightened.
- When buying a replacement, you must match the side (left/right), color (Gray or Ivory), and confirm if your ES330 has a sunroof.
- Replacement is a very easy DIY job, requiring only a screwdriver and about 15 minutes.
- A used OEM visor offers the best value, costing significantly less than a new dealer part while ensuring a perfect color and material match.
Symptoms of a Failing Sun Visor
The most common problem with the 2004 Lexus ES330 sun visor is a gradual loss of tension in the pivot mechanism. This leads to a few obvious and annoying symptoms.
1. Sagging or Drooping
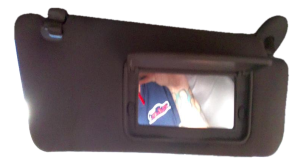
The primary sign of failure is a visor that will not stay in its fully stowed position against the headliner. It may sag slightly or drop down completely, obstructing the driver's or passenger's view. This is caused by wear and tear on the internal friction mechanism that is supposed to hold it in place. Many Toyota and Lexus vehicles of this era experience the same issue.
2. Vanity Light Malfunction
If the light for the vanity mirror stops working, it can be due to a burnt-out bulb or a failure in the small switch activated by the mirror's sliding cover. Less commonly, the wiring in the visor arm or the connector in the headliner could be damaged, though this is rare unless the visor has been improperly removed before.
3. Cracked or Broken Mount
The plastic base where the visor mounts to the roof can become brittle over time and crack. While not as common as sagging, a broken mount will cause the entire visor assembly to become loose and wobbly.
Pro Tip: Some owners have attempted temporary fixes for a sagging visor using Velcro strips or magnets glued to the visor and headliner. While this can work as a stop-gap measure, it does not fix the internal problem and the only long-term solution is replacement.
🎬 Watch: A quick demonstration of why these floppy visors fail.Known Issues, TSBs, and Recalls
There are no active recalls or Technical Service Bulletins (TSBs) from Lexus or the NHTSA specifically for a sagging sun visor on the 2004 ES330. The only safety recall for this vehicle concerns the front seat belt buckle assembly.
Buying a Used Sun Visor: What to Look For
Due to the high cost of a new OEM sun visor, a used part is an excellent value. However, careful inspection and verification are essential to ensure you get the right part that works correctly.
1. Verify Compatibility (The 3 Key Factors)
Before purchasing, you must confirm three things:
- Side: Is it for the driver (left) or passenger (right) side? They are not interchangeable.
- Sunroof Option: The visors for cars with a sunroof are different from those without. The provided OEM part number, 74310-33A00-B1, is for a vehicle with a sunroof.
- Color: The 2004 ES330 was available with a few interior colors. The most common are Gray and Ivory. You must match the color to your interior.
Warning: To find your interior color code, check the manufacturer's sticker on the driver's side door jamb. Look for "C/TR" followed by codes for the exterior paint and interior trim. For example, the part number 74310-33A00-B1 corresponds to the Gray interior, while 74310-33A00-A1 is for the Ivory interior.
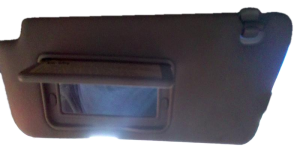
2. Physical Inspection
- Test the Pivot: This is the most critical check. Hold the visor by its mounting base and rotate it. It should feel firm and hold its position at any angle. If it feels loose or swings freely, it has the same sagging issue you're trying to fix.
- Check the Fabric: Inspect the cloth for stains, tears, or separation, especially around the edges.
- Inspect the Mirror: Slide the mirror cover open and closed. Ensure it moves smoothly and isn't cracked.
- Examine the Mount: Look closely at the plastic mounting base for any hairline cracks or stress marks.
Cost of Replacement
The cost to replace a 2004 Lexus ES330 sun visor varies significantly depending on the source of the part.
| Part Source | Estimated Cost |
|---|---|
| New OEM (Dealer) | $305 - $445 |
| New Aftermarket | $50 - $120 |
| Used OEM | $60 - $125 |
| Shop Labor | $50 - $100 |
Sun Visor Replacement Guide
Replacing the sun visor is a straightforward DIY job that typically takes less than 15 minutes.
Difficulty: 1/5 (Beginner)
Time: 0.25 hours
Tools Needed:
- Phillips head screwdriver
- Small flathead screwdriver or trim removal tool
Step-by-Step Instructions:
- Expose the Mounting Screws: Use a small flathead screwdriver or a trim tool to gently pry open the plastic cover at the base of the sun visor mount where it meets the headliner. This cover is hinged and will pop open to reveal two Phillips head screws.
- Remove the Screws: While holding the sun visor with one hand to prevent it from falling, use the Phillips screwdriver to remove both screws.
- Disconnect the Wiring: Carefully pull the visor down from the headliner. You will see a small electrical wire connecting the visor to a plug in the roof. Press the small tab on the connector and pull to unplug it.
- Install the New Visor: Plug the electrical connector from the new visor into the harness in the roof. Before proceeding, slide the mirror cover open to test that the vanity light works.
- Secure the New Visor: Align the new visor's mounting base with the screw holes in the roof. Hand-start both screws to prevent cross-threading, then tighten them until they are snug. Do not overtighten, as this can crack the plastic base.
- Close the Cover: Snap the plastic trim cover shut. The job is now complete. 🎬 See this step-by-step walkthrough for replacing Toyota and Lexus visors.
Frequently Asked Questions
Can I just tighten my old sun visor to fix the sagging?
No, the sagging is caused by internal wear, not loose screws. There is no external adjustment to tighten the pivot mechanism. The only permanent fix is to replace the entire visor assembly.
Will a sun visor from a Toyota Camry fit my ES330?
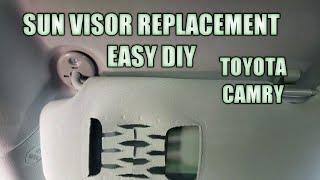
While the ES330 is based on the Toyota Camry platform of the same era, compatibility is not guaranteed. The shape, mounting points, electrical connector, and material may be different. It is always best to use a part specifically listed for the 2004 Lexus ES330 to ensure a perfect fit and finish.
🎬 Watch: This Camry visor replacement guide shows a similar process.Is it safe to drive with a sagging sun visor?
While it won't leave you stranded, a sun visor that droops into your field of vision is a safety hazard. It can create a significant blind spot and should be repaired or replaced as soon as possible.
Do I need to disconnect the car battery to replace the sun visor?
While it is always the safest practice to disconnect the battery when working on any electrical component, the voltage for the vanity light is very low. Most people replace the visor without disconnecting the battery. Simply ensure the ignition is off before you begin.
Helpful Videos
Technical Specifications
OEM Part Numbers: 74310-33A00-B1 (Right, Gray, With Sunroof) 74310-33A00-A1 (Right, Ivory, With Sunroof)
Features an illuminated vanity mirror with an integrated electrical connector.
We Have This Part in Stock

The information in this article is provided for general reference and educational purposes only. Vehicle specifications, procedures, and part compatibility can vary by production date, trim level, and region. Always consult your vehicle's factory service manual and verify part numbers before purchasing or performing repairs. Safety-critical components such as airbags, seat belts, and braking systems should be installed by a qualified professional.
- Lexus ES330:
- 🎬 Helpful Videos
- 🛍️ Shop This Part
- Symptoms of a Failing Sun Visor
- 1. Sagging or Drooping
- 2. Vanity Light Malfunction
- 3. Cracked or Broken Mount
- Known Issues, TSBs, and Recalls
- Buying a Used Sun Visor: What to Look For
- 1. Verify Compatibility (The 3 Key Factors)
- 2. Physical Inspection
- Cost of Replacement
- Sun Visor Replacement Guide
- Tools Needed:
- Step-by-Step Instructions:
- Frequently Asked Questions
- 🎟️ Get 5% Off