
2014-2018 Mazda 3 Sun Visor: Why It Droops and How to Replace It
This guide covers the common failure points of the 2014-2018 Mazda 3 sun visor, how to choose the correct used replacement, and a step-by-step installation walkthrough.
- The most common failure is the internal pivot mechanism wearing out, causing the visor to droop; replacement is the only fix.
- The biggest compatibility trap is the vanity mirror light; you must match your original visor (lighted vs. non-lighted).
- Replacement is a very easy DIY job, requiring only a screwdriver and about 10-15 minutes.
- Used OEM visors offer the best value, providing a perfect fit and color match for significantly less than a new part.
Symptoms of a Failing 2014-2018 Mazda 3 Sun Visor


When a sun visor begins to fail, the symptoms are usually obvious and annoying. The most common issue is related to the internal pivot mechanism wearing out, often accelerated by heat and frequent use.
- Visor Droops or Won't Stay Up: The most frequent complaint is a visor that sags or falls down on its own, refusing to stay flush against the headliner. This is caused by a failure of the internal spring or friction mechanism inside the pivot point.
- Cracking or Crunching Noises: When you try to move the visor, you may hear crunching or cracking sounds. This indicates that the internal plastic structure of the hinge has broken.
- Loose and Floppy Movement: Instead of a firm, smooth motion, the visor may feel loose and wobbly at the mounting point.
- Vanity Mirror Light Failure: For models equipped with a lighted mirror, the light may flicker or fail to turn on. This can be due to a bad bulb, a faulty switch in the mirror cover, or a problem with the electrical connection.
- Broken Retaining Clip: The small clip on the headliner that holds the outer end of the visor can become brittle and break, leaving the visor unable to be secured.
Pro Tip: High cabin temperatures, especially in sunny climates, can cause the internal plastics and adhesives of the visor to degrade faster, leading to premature failure. Using a windshield sunshade can help prolong the life of your interior components, including the sun visors.
Known Issues, TSBs, and Recalls
As of early 2026, there are no specific recalls or Technical Service Bulletins (TSBs) from Mazda or the NHTSA for sun visor failure on the 2014-2018 Mazda 3. However, Mazda did issue a TSB for the next generation (2019+) Mazda 3 for the exact same drooping issue, where the repair is to replace the visor with an improved part. This indicates that the failure is a known pattern for Mazda vehicles, even if this specific generation doesn't have an official service bulletin.
Buying a Used 2014-2018 Mazda 3 Sun Visor
A used OEM sun visor is often the best value, offering a perfect fit and color match at a fraction of the cost of a new part. Here’s what to look for when buying a recycled visor.
1. Verify Compatibility: Lighted vs. Non-Lighted
This is the most important step. The 2014-2018 Mazda 3 was available with two types of sun visors:
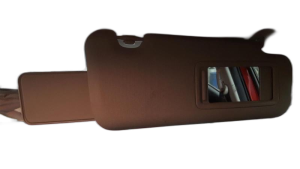
- Without Vanity Light: These are found on lower trim levels. They have a mirror but no light and no electrical wires. The OEM part number for the passenger side is BHN9-69-270A-75 (which supersedes BHN9-69-270-75).
- With Vanity Light: Found on higher trim levels, these visors have a small light that illuminates when you open the mirror cover. They will have a wiring harness coming out of the mounting base.
Warning: You cannot install a lighted visor in a car that was not originally equipped with one without significant custom wiring. Always check your original visor for an electrical connection at the base before buying a replacement.
2. Check the Interior Color
The 3rd generation Mazda 3 came with a few interior color schemes, primarily Black and Sand/Beige. Sun visors are typically a light gray or black fabric. Make sure the used visor you are buying is listed with the correct color to match your headliner and other interior trim.
3. Inspect for Physical Damage
When inspecting photos or the part in person, check these key areas:
- The Pivot Point: Ask the seller to confirm that the visor's pivot is stiff and holds its position. This is the primary failure point.
- Fabric Condition: Look for stains, tears, or fabric that is shrinking or peeling away from the visor board.
- Mirror and Cover: Ensure the vanity mirror is not cracked and that the cover (if equipped) opens, closes, and stays shut properly.
Cost Comparison for a 2014-2018 Mazda 3 Sun Visor
| Part Type | Estimated Cost |
|---|---|
| New OEM (Dealer) | $80 - $140 |
| New Aftermarket | $40 - $80 |
| Used OEM (Recycled) | $30 - $75 |
| Shop Labor Cost | $25 - $50 |
Sun Visor Replacement Guide (DIY)

Replacing the sun visor is a simple job that most owners can do in under 15 minutes with basic tools.
Tools Required:
- Phillips Head Screwdriver
- Small Flathead Screwdriver or Trim Removal Tool
Step-by-Step Instructions:
- Position the Visor: Unclip the visor from its retaining hook and let it hang down.
- Remove the Screw Cover: At the base of the visor where it mounts to the roof, there is a small plastic cover over the screw. Use a small flathead screwdriver or a trim tool to gently pry this cover open.
- Remove the Mounting Screw: Using a Phillips screwdriver, remove the single screw that holds the visor bracket to the roof. Keep the screw in a safe place.
- Detach the Visor: With the screw removed, rotate the entire visor assembly about 90 degrees. This will align the tabs on the bracket with the slots in the headliner, allowing you to pull it straight down and out.
- Disconnect Electrical Connector (if applicable): If you have a lighted visor, you will see a small electrical plug. Carefully press the release tab on the connector and pull it apart. Do not pull on the wires themselves.
- Install the New Visor: Installation is the reverse of removal. Connect the electrical plug (if present), insert the mounting bracket into the headliner, rotate it 90 degrees to lock it in place, and reinstall the Phillips screw. Do not overtighten the screw. Snap the screw cover shut.
- Test the Visor: Test the visor's movement and clip it into the retaining hook. If you have a lighted model, check that the vanity light works correctly.
Frequently Asked Questions (FAQ)
Is the sun visor the same for the sedan and hatchback?
Yes, for the 2014-2018 model years, the sun visors are the same for both the sedan and hatchback body styles.
My visor won't stay up. Can it be repaired or does it need to be replaced?
The drooping is caused by a failure of the internal pivot mechanism. This part is not sold separately and is not designed to be serviced. The only reliable, long-term solution is to replace the entire sun visor assembly.
Will a sun visor from a 2019 Mazda 3 fit my 2016 model?
No. The 2019 model year marked the beginning of a new generation (Gen 4) for the Mazda 3. The interior components, including the sun visors, are not interchangeable with the 2014-2018 generation (Gen 3).
How do I know if I need the lighted or non-lighted version?
The easiest way is to look at your current visor. Open the vanity mirror cover. If there is a light next to the mirror, you need the lighted version. You can also look at the mounting point where the visor meets the headliner; a lighted visor will have a visible wire harness.
Technical Specifications
This information applies to the passenger side sun visor for models without a vanity light.
| Specification | Value |
|---|---|
| Vehicle Fitment | 2014, 2015, 2016, 2017, 2018 Mazda 3 (Sedan & Hatchback) |
| Side | Right (Passenger) |
| Features | Without Vanity Mirror Illumination |
| OEM Part Number | BHN9-69-270A-75 |
| Superseded Part Number | BHN9-69-270-75 |
Technical Specifications
OEM Part Numbers: BHN9-69-270A-75 BHN9-69-270-75
Fits 2014-2018 Mazda 3, Sedan and Hatchback. Right (Passenger) side. For models without vanity mirror light.
We Have This Part in Stock

The information in this article is provided for general reference and educational purposes only. Vehicle specifications, procedures, and part compatibility can vary by production date, trim level, and region. Always consult your vehicle's factory service manual and verify part numbers before purchasing or performing repairs. Safety-critical components such as airbags, seat belts, and braking systems should be installed by a qualified professional.
- Mazda MAZDA 3:
- 🛍️ Shop This Part
- Symptoms of a Failing 2014-2018 Mazda 3 Sun Visor
- Known Issues, TSBs, and Recalls
- Buying a Used 2014-2018 Mazda 3 Sun Visor
- 1. Verify Compatibility: Lighted vs. Non-Lighted
- 2. Check the Interior Color
- 3. Inspect for Physical Damage
- Cost Comparison for a 2014-2018 Mazda 3 Sun Visor
- Sun Visor Replacement Guide (DIY)
- Step-by-Step Instructions:
- Frequently Asked Questions (FAQ)
- Technical Specifications
- 🎟️ Get 5% Off