
Tesla Model S & Model X Control Arm Failure (2012-2026): Decoding Clunks and Compatibility
This guide covers the common clunking noises, replacement costs, and critical part differences for front suspension control arms on the 2012-2026 Tesla Model S and 2016-2026 Tesla Model X.
- A clunking or creaking noise over bumps is the number one sign of control arm failure on these models.
- There is a critical suspension redesign for 2021+ 'Refresh' models; control arms are NOT interchangeable with pre-2021 vehicles.
- A full four-wheel alignment is mandatory after replacement to prevent poor handling and rapid tire wear.
- Ask your Tesla Service Center about a 'goodwill' repair; they may cover labor costs for this known issue even if you are out of warranty.
Symptoms of a Failing Control Arm

A bad control arm isn't just one part failing; it's usually the rubber bushings or the integrated ball joint that wears out. This wear introduces unwanted play into the suspension, leading to several distinct symptoms.
Noises: Clunking, Popping, and Creaking
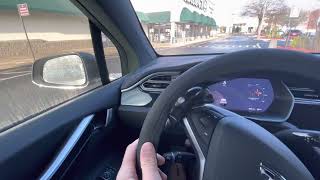
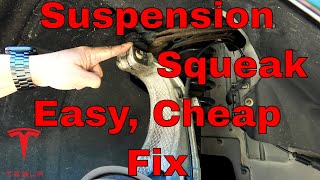
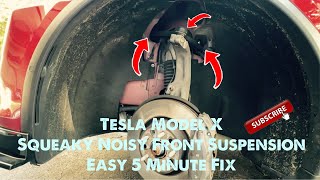
The most widely reported symptom of control arm failure on the Model S and Model X is noise from the front suspension. Owners typically describe it as a 'clunking' or 'popping' sound, most noticeable when driving at low speeds over bumps, speed bumps, or uneven roads. You may also 🎬 Watch: Hear the clunking sound caused by failing suspension components. hear a creaking or groaning sound, similar to an old door hinge, when making sharp turns, like when pulling into a parking spot. These sounds are caused by worn-out bushings or a failing ball joint, which allows metal components to make contact as the suspension articulates.
Steering and Handling Issues
- Steering Wheel Vibration: A continuous vibration or shimmy felt in the steering wheel, which can change or worsen with speed, often points to a worn ball joint.
- Wandering or Loose Steering: The car may feel vague or less responsive, requiring constant small steering corrections to stay in a straight line. This happens because the worn arm can no longer hold the wheel assembly securely in its proper alignment.
- Pulling to One Side: A bad control arm can cause the vehicle's alignment to shift, making the car pull to the left or right.
Uneven Tire Wear
A classic sign of any suspension or alignment issue is accelerated tire wear. A worn control arm allows the wheel's angle (camber) to change, often causing the inside or outside edges of the front tires to wear down much faster than the rest of the tread. If you see this pattern, failing control arms are a likely cause.
Known Issues, TSBs, and NHTSA Investigation

Front control arm issues on early Model S and Model X vehicles are common. In November 2020, the National Highway Traffic Safety Administration (NHTSA) opened an investigation into failures of the front suspension fore links on 2015-2017 Model S and 2016-2017 Model X vehicles.
After review, NHTSA closed the investigation without issuing a formal recall. The agency found 426 instances of fore link failure but noted that the majority occurred at very low speeds (1-15 mph) in driveways or parking lots, and did not result in a loss of vehicle control. However, NHTSA did recommend that Tesla expand its service bulletin (SB-17-31-001) to cover more vehicles with the potentially affected parts. This history confirms that premature wear on these components is a well-documented issue.
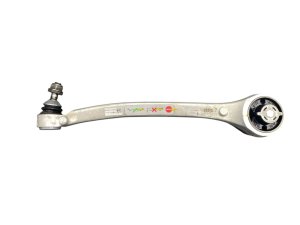
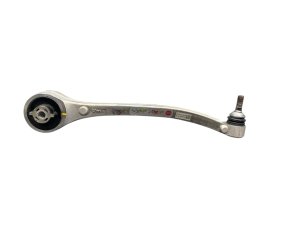
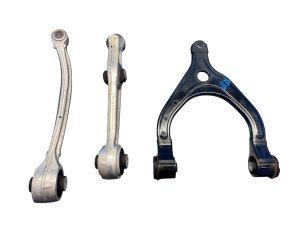
Buying a Used Suspension Control Arm

A recycled OEM control arm can be an excellent value, offering original factory quality for less than a new part. However, careful inspection and verification are key, especially with the significant design changes Tesla has made.
Compatibility Warning: Tesla completely redesigned the front suspension for the Model S and Model X starting in the 2021 model year with the 'Refresh' (also known as 'Palladium') generation. Control arms for 2012-2020 models are NOT compatible with 2021 and newer vehicles, and vice-versa. You must verify your vehicle's production date before purchasing.
Physical Inspection Checklist
When inspecting a used control arm, look for the following:
- Bushings: Check the rubber bushings for any signs of tearing, cracking, or deterioration. The rubber should be firm and intact.
- Ball Joint: Inspect the rubber boot around the ball joint. If it is torn, ripped, or missing, the joint is likely contaminated with dirt and moisture and should be considered failed. Try to move the ball joint stud by hand; there should be no discernible play or looseness.
- Arm Body: Inspect the aluminum arm itself for any cracks, deep gouges, or signs of being bent. Pay close attention to the areas around the bushings and ball joint.
- Corrosion: While the arms are aluminum, check for heavy corrosion or bubbling paint, which could indicate the part has been exposed to harsh road salt environments.
Why Used OEM is Often Better Than New Aftermarket
While inexpensive aftermarket control arms are available, they often use lower-grade materials for the bushings and ball joints. This can lead to a much shorter service life, with the same clunking noises and steering issues returning prematurely. A quality used OEM part was manufactured to Tesla's original specifications for material durability and fitment, often providing a longer-lasting and more reliable repair than a cheap new alternative.
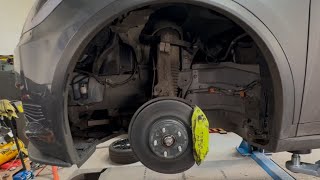
Replacement Overview & Special Procedures
Replacing a control arm is a job for an experienced DIY mechanic or a professional shop. It requires 🎬 See this walkthrough for replacing front upper control arms. proper tools and a clear understanding of the safety procedures involved, especially when working with an air suspension system.
Key Installation Steps & Procedures
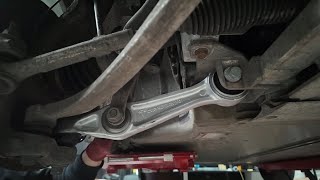
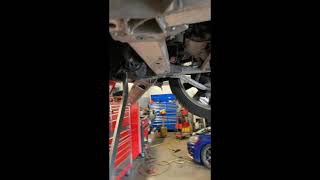
- Engage Jack Mode: Before lifting a Model S or Model X with air suspension, you must enable 'Jack Mode' via the touchscreen (Controls > Service > Jack Mode). This disables the automatic self-leveling system, which could otherwise activate unexpectedly and cause the vehicle 🎬 Watch: Step-by-step guide to replacing lower control arms. to fall.
- Tighten at Ride Height: Critical suspension fasteners, like the main control arm bolts, must be tightened to their final torque specification while the vehicle is at its normal ride height. Do not torque these bolts while the suspension is hanging in the air, as this will preload the bushings incorrectly and cause them to fail very quickly. This usually requires lifting the vehicle on a drive-on lift or using a floor jack to raise the knuckle to simulate ride height.
- Use New Hardware: It is best practice to use new nuts for all suspension components, as many are single-use torque-to-yield or nyloc nuts.
- Mandatory Wheel Alignment: A full four-wheel alignment is required after replacing any control arm. Skipping this step will result in poor handling, crooked steering, and rapid, uneven tire wear.
Torque Specifications
These values are for reference only. Always consult the official Tesla service manual for your specific model year and part.
| Fastener | Torque Value (Nm) | Notes |
|---|---|---|
| Upper control arm ball joint to knuckle | 60 Nm | |
| Forward lower control arm to subframe | 130 Nm | |
| Rearward lower control arm to subframe | 130 Nm | |
| Lower control arm ball joints to knuckle | 195 Nm | |
| Wheel Lug Nuts | 175 Nm |
Cost of Replacement
The cost to replace Tesla control arms can vary significantly based on who does the work and what parts are used.
Pro Tip: Because this is a widely known issue, many owners have reported that Tesla Service Centers will sometimes perform the replacement as a 'goodwill' gesture, even if the vehicle is out of warranty. In these cases, the owner may only be charged for the parts (around $180-$200) while the labor is covered by Tesla. It is always worth getting a quote directly from Tesla and asking about this possibility.
| Part/Service | Estimated Cost |
|---|---|
| New OEM Part (from Tesla) | $90 - $250 per arm (parts only) |
| New Aftermarket Part | $100 - $250 per arm |
| Used OEM Part | $75 - $150 per arm |
| Shop Labor (Independent) | $400 - $800 (for a pair) |
| Total (Dealer/Shop) | $1,000 - $2,500 (for a pair, including alignment) |
Frequently Asked Questions (FAQ)
What's the difference between the pre-2021 and 2021+ control arms?
The 2021 'Refresh' models feature a completely different front suspension geometry. The control arms have different shapes, lengths, and mounting points. They are not interchangeable in any way. You must buy the correct part for your vehicle's specific production year.
Can I just replace the bad bushing or ball joint?
While technically possible with special tools, it is not common practice. The control arms are typically supplied as a complete assembly with new bushings and a ball joint pre-installed. This saves significant labor time and ensures all related components are new. Given the cost of labor, replacing the entire arm is almost always the most cost-effective repair.
Do I need to replace control arms in pairs?
It is highly recommended. If the control arm on one side has failed due to mileage and wear, the arm on the other side has been subjected to the same conditions and is likely to fail soon. Replacing them in pairs ensures balanced handling and saves you from having to pay for a second repair and alignment in the near future.
What is 'Jack Mode' and why is it important?
Jack Mode is a setting on Tesla vehicles with air suspension that disables the automatic ride height adjustments. You must enable it before lifting the car. If you don't, the suspension may try to level itself while on a jack or lift, creating an extremely dangerous situation where the vehicle could shift or fall.
Helpful Videos

Technical Specifications
OEM Part Numbers: 1027322-00-F 1027322-00-G 1027327-00-B 1027327-00-C 1027327-00-D 1027327-00-E 1027327-00-F 1027351-00-C 1027351-00-D 1027351-00-E 1041570-00-B 1048951-00-A 1048951-00-C 1420321-00-B 1420341-00-b
Key Torque Specs: Upper control arm to knuckle: 60 Nm. Lower control arm to subframe: 130 Nm. Lower control arm ball joints to knuckle: 195 Nm. Wheel Lug Nuts: 175 Nm.
We Have This Part in Stock


The information in this article is provided for general reference and educational purposes only. Vehicle specifications, procedures, and part compatibility can vary by production date, trim level, and region. Always consult your vehicle's factory service manual and verify part numbers before purchasing or performing repairs. Safety-critical components such as airbags, seat belts, and braking systems should be installed by a qualified professional.
- Tesla Model X:
- Tesla Model S:
- 🎬 Helpful Videos
- 🛍️ Shop This Part
- Symptoms of a Failing Control Arm
- Noises: Clunking, Popping, and Creaking
- Steering and Handling Issues
- Uneven Tire Wear
- Known Issues, TSBs, and NHTSA Investigation
- Buying a Used Suspension Control Arm
- Physical Inspection Checklist
- Why Used OEM is Often Better Than New Aftermarket
- Replacement Overview & Special Procedures
- Key Installation Steps & Procedures
- Torque Specifications
- Cost of Replacement
- Frequently Asked Questions (FAQ)
- 🎟️ Get 5% Off