
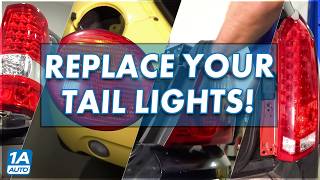
2012-2017 Buick Verano Tail Light: Bulb Failure TSB and Replacement Guide
This guide covers common failure symptoms, a known technical service bulletin, how to inspect a used assembly, and a step-by-step replacement for the 2012-2017 Buick Verano outer tail light.
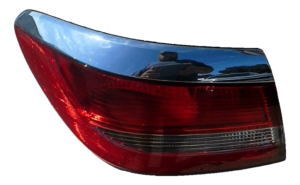
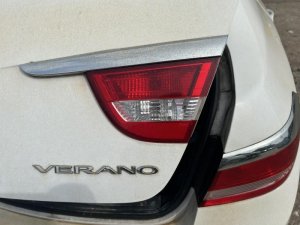
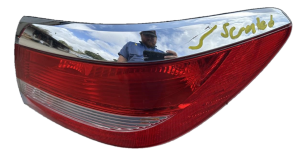
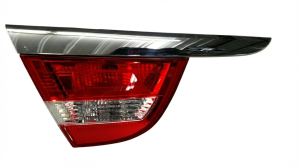
- This guide is for the outer tail light on the quarter panel, not the inner light on the trunk lid.
- On 2012 models, frequent bulb failure may be caused by a factory software issue that can be fixed by a dealer BCM reprogram (TSB PI0683).
- When buying a used tail light, the most important inspection is to check for broken or cracked mounting tabs on the back of the housing.
- Replacement is a very easy DIY job that requires only basic hand tools and can be completed in under 20 minutes.
Symptoms of a Failing Tail Light
A failing tail light on your Buick Verano can present several symptoms, ranging from minor annoyances to serious safety concerns. Identifying these signs early can help you address the problem before it leads to a ticket or an accident.
Common Symptoms:
- One or More Bulbs Not Working: The most obvious symptom is when a specific function, like the brake light or turn signal, stops working. This is often due to a simple burnt-out bulb.
- Dim or Flickering Lights: Bulbs that appear dimmer than usual or flicker intermittently can indicate a poor electrical connection, a failing bulb, or a problem with the wiring.
- Rapidly Blinking Turn Signal: If your turn signal blinks much faster than normal on one side, it's a classic sign that a bulb in that circuit (either front or rear) has burned out.
- Condensation or Water Inside the Lens: Moisture inside the tail light housing is a common problem caused by a failed seal or a crack in the lens or housing. This can lead to corroded bulb sockets and premature bulb failure.
- Frequent Bulb Burnout: If you find yourself replacing the same tail light bulb repeatedly, it could point to an underlying issue like moisture in the housing or a voltage problem. For early 2012 models, this is a known issue addressed by a TSB.
Known Issues, TSBs, and Recalls
While there are no specific safety recalls for the tail light assemblies on the 2012-2017 Buick Verano, there is an important Technical Service Bulletin (TSB) for the 2012 model year.
TSB PI0683: Premature Bulb Burnout (2012 Models)
Some owners of 2012 Buick Veranos built before VIN C4156940 may experience the stop and tail lamp bulbs burning out prematurely. General Motors identified that the original Body Control Module (BCM) calibration was the cause. The official fix involves replacing the burnt-out bulb and reprogramming the BCM with an updated calibration designed to extend bulb life. If you have an early 2012 model and experience frequent bulb failures, a dealership or qualified shop can perform this BCM update.
Exterior Lamp Condensation (TSB #01-08-42-001K)
General Motors also issued a general informational bulletin regarding condensation in exterior lamps. This TSB helps technicians distinguish between normal condensation and a water leak that requires part replacement. A small amount of fogging that clears up in warm, dry weather may be considered normal, but standing water inside the lens indicates a failed seal and the assembly should be repaired or replaced.
Pro Tip: Before assuming you have a major electrical problem, always start with the simplest solution. Check the bulb first, then the fuse, before inspecting wiring or the assembly itself.
Buying a Used 2012-2017 Verano Tail Light
Purchasing a used OEM tail light is an excellent way to save money while getting a part that fits perfectly. However, a careful inspection is crucial to ensure you're getting a quality, long-lasting component.
What to Inspect:
- Check All Mounting Tabs: This is the most critical inspection point. Carefully examine the back of the housing for any cracked, broken, or repaired mounting tabs. A tail light with a broken tab will not sit flush against the body, may vibrate, and will eventually allow water to leak into the trunk.
- Inspect the Lens for Damage: Look for any cracks, even hairline fractures, in the lens. Also, check for deep scratches or scuffs that can't be polished out. Minor surface scratches are normal, but deep gouges will be noticeable.
- Look for Signs of Moisture: Check the inside of the lens for a foggy film, water stains, or mineral deposits left by standing water. These are clear signs the seal has failed, and the unit will likely cause bulb corrosion issues down the road.
- Examine the Bulb Sockets: If possible, twist out the bulb sockets and inspect the metal contacts for any green or white corrosion. A corroded socket may not provide a reliable electrical connection.
- Confirm the Correct Side and Location: Ensure you are buying the correct part for your needs. Verify if it's for the driver (left) or passenger (right) side. Crucially, confirm it is the outer tail lamp that mounts on the quarter panel, not the inner lamp that mounts on the trunk lid.
Choosing a used original equipment (OEM) part is often a better choice than a cheap aftermarket alternative. OEM parts are made to the manufacturer's exact specifications, ensuring a perfect fit, correct color match, and superior durability of the plastic and seals compared to many aftermarket copies.
Cost Comparison
| Part Type | Estimated Cost |
|---|---|
| New OEM | $190 - $290 |
| New Aftermarket | $70 - $180 |
| Used OEM | $60 - $160 |
| Shop Labor | $40 - $80 |
Replacement Guide (Difficulty: 1/5)
Replacing the outer tail light on a 2012-2017 Buick Verano is a straightforward job that most DIYers can complete in under 20 minutes with basic tools.
🎬 Watch this video for a simple walkthrough of the replacement process.Tools Needed:
- Socket wrench or nut driver (typically 8mm or 10mm)
- Trim removal tool (optional, but helpful)
Step-by-Step Instructions:
- Open the Trunk: Access the rear of the tail light assembly from inside the trunk.
- Remove the Access Cover: There is typically a small plastic cover or a section of the trunk liner that needs to be removed to expose the nuts holding the tail light. This may be held by small clips or knobs.
- Unscrew the Retaining Nuts: You will see two or three nuts securing the tail light studs to the vehicle's body. Use your socket wrench to remove them. Keep them in a safe place.
- Disconnect the Wiring Harness: Before pulling the light out, reach behind it and locate the main electrical connector. Press the release tab and pull the connector straight off.
- Remove the Tail Light Assembly: With the nuts removed and the harness disconnected, carefully pull the tail light assembly straight back, away from the car. It may be snug due to alignment pins, so a gentle, even pull is required.
- Install the New Assembly: Position the new tail light, ensuring the alignment pins and mounting studs go into their respective holes. Reconnect the wiring harness, making sure it clicks into place. Hand-tighten the retaining nuts and then snug them down with your wrench. Do not overtighten, as this can crack the plastic housing.
- Test All Functions: Before closing everything up, have a helper confirm that the running lights, brake lights, and turn signal all work correctly.
- Reinstall the Access Cover: Put the trunk liner or access panel back into place.
OEM Part Numbers
| Position | Part Number | Supersedes |
|---|---|---|
| Right / Passenger Side (Outer) | 22908910 | 22853307, 22879047 |
| Left / Driver Side (Outer) | 22908909 | N/A |
Frequently Asked Questions (FAQ)
Is this the tail light on the trunk lid?
No, this guide and the part numbers listed are for the main, outer tail light assembly that is mounted on the car's body (the quarter panel). The Buick Verano has a separate, smaller light assembly on the trunk lid which houses the reverse lights.
Do I have to replace the whole assembly if just one bulb is out?
No. If a single bulb like the brake light or turn signal burns out, you can simply replace the individual bulb. You only need to replace the entire assembly if the lens is cracked, the housing is damaged, or it has a persistent water leak that is causing electrical issues.
Why is there water or condensation inside my tail light?
Water gets inside a tail light when the seal between the lens and the housing fails, or if there is a crack in the unit. The constant heating and cooling from the bulbs and weather can cause the housing to expand and contract, eventually breaking the seal. This allows moisture in, which can cause bulbs to fail and sockets to corrode.
Will a tail light from a 2013 Verano fit my 2016 Verano?
Yes, the outer tail light assemblies are the same for all model years from 2012 through 2017. You can use a part from any vehicle within this year range as a direct replacement.
Helpful Videos
Technical Specifications
OEM Part Numbers: 22908910 22908909 22853307 22879047
N/A
We Have This Part in Stock

The information in this article is provided for general reference and educational purposes only. Vehicle specifications, procedures, and part compatibility can vary by production date, trim level, and region. Always consult your vehicle's factory service manual and verify part numbers before purchasing or performing repairs. Safety-critical components such as airbags, seat belts, and braking systems should be installed by a qualified professional.
- Buick Verano:
- 🎬 Helpful Videos
- 🛍️ Shop This Part
- Symptoms of a Failing Tail Light
- Common Symptoms:
- Known Issues, TSBs, and Recalls
- TSB PI0683: Premature Bulb Burnout (2012 Models)
- Exterior Lamp Condensation (TSB #01-08-42-001K)
- Buying a Used 2012-2017 Verano Tail Light
- What to Inspect:
- Cost Comparison
- Replacement Guide (Difficulty: 1/5)
- Tools Needed:
- Step-by-Step Instructions:
- OEM Part Numbers
- Frequently Asked Questions (FAQ)
- 🎟️ Get 5% Off