
2003-2015 Cadillac CTS Tail Light: A Guide to Mid-Year Changes and Common Failures
This guide covers the critical mid-2004 design change, common moisture issues, and how to choose the correct used tail light for your CTS Sedan.
- For 2003-2004 models, you must verify if your tail light has a 'black square' in the lower lens; a mid-year design change makes them incompatible.
- Tail lights for Sedan, Coupe, and Wagon models are completely different and cannot be interchanged.
- Moisture and condensation inside the lens is a very common failure; inspect any used part for signs of past water intrusion.
- On 2008 and newer models, failed LEDs are not individually replaceable; the entire tail light assembly must be replaced.
Key Variants and Compatibility Warnings

Sourcing a tail light for a 2003-2015 Cadillac CTS can be complex due to several mid-generation changes. Ordering the wrong part is a common and frustrating mistake. Pay close attention to your vehicle's model year, body style, and production date before purchasing.
Critical Compatibility Notes:
- Body Style: Tail lights for Sedan, Coupe, and Wagon models are NOT interchangeable. They have completely different shapes and mounting points. This guide primarily focuses on the more common Sedan models.
- 2014 V-Series Exception: For the 2014 model year, the older second-generation body style was carried over for the V-Series trim ONLY. A tail light for a standard 2014 CTS will not fit a 2014 CTS-V.
First Generation (2003-2007): The 'Black Square' Change
The most significant change occurred during the 2004 model year. Please inspect your current tail lamp carefully before buying a replacement.
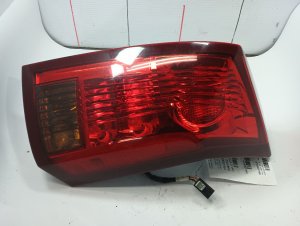
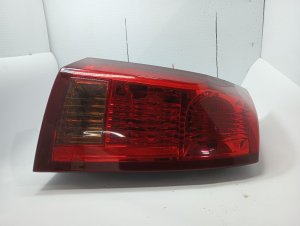
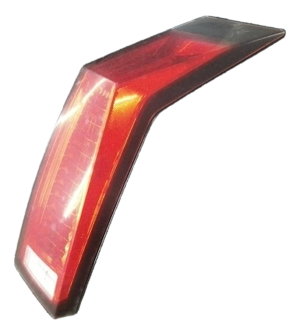
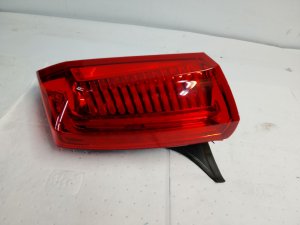
- Early Style (2003 & Early 2004): These models, produced on or before January 3rd, 2004, feature a distinct black square in the lower portion of the lens.
- Late Style (Late 2004-2007): Models built on or after January 4th, 2004, do NOT have the black square in the lower lens. The design is a solid red or clear pattern.
Second Generation (2008-2014): LED Integration
The second-generation CTS moved to a more modern design featuring LED lighting for the brake and running lights. Unlike the first generation, individual LED elements cannot be replaced. If a section of the LEDs fails, the entire tail light assembly must be replaced.
Common Symptoms of Failure

Tail light issues on the CTS can range from simple bulb changes to more complex problems. Here are the most common symptoms owners experience.
- Condensation or Water Inside Lens: This is a very common issue across all model years. A fine mist may be considered normal and can clear on its own, but visible water droplets or pooling water indicates a failed seal. This moisture can cause corrosion on bulb sockets and short out LED circuit boards over time.
- One or More Lights Not Working: On 2003-2007 models, this is typically a burnt-out incandescent bulb. On 2008-2014 models, it usually means a failed LED segment, requiring replacement of the whole unit.
- Rapidly Blinking Turn Signal (Hyperflash): This is the car's way of telling you a turn signal bulb is out or there's a bad connection. The reduced electrical resistance in the circuit causes the flasher relay to blink faster than normal.
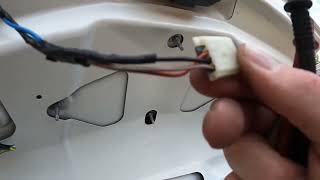
- Broken Wiring in Trunk Harness: On some first-generation models, the wires that run along the trunk hinge can fatigue and break from repeated opening and closing of the trunk. This can cause intermittent or total failure of the tail lights or trunk release mechanism. 🎬 Watch: How to troubleshoot broken trunk and brake light wiring
Known Issues, TSBs, and Recalls

While no major safety recalls have been issued specifically for the tail lights on the 2003-2015 CTS, General Motors has released Technical Service Bulletins (TSBs) related to water intrusion.
- TSB PI1378: This bulletin addresses water leaking into the trunk and battery compartment on 2014-2015 CTS Sedans. The cause is identified as a potentially creased foam seal around the tail lamp's electrical connector or guide pins, allowing a path for water to enter. The fix involves applying specific adhesive-backed shim stock to build up the seal.
- TSB 01-08-42-001K: This general GM bulletin provides guidelines for dealers to distinguish between normal condensation (a fine mist that comes and goes) and an actual water leak (pooling water that doesn't clear). It advises against replacing lamps for minor, temporary condensation.
Buying a Used Tail Light: What to Check

Purchasing a used OEM tail light is a cost-effective way to maintain your vehicle's original appearance and quality. However, careful inspection is key to getting a good part.
Pro Tip: Used OEM (Original Equipment Manufacturer) parts are often superior to cheap aftermarket alternatives. They guarantee a perfect fit, correct color matching, and compatibility with the vehicle's electrical system, avoiding the common issues of warning lights or poor sealing found with low-quality copies.
- Verify Compatibility: Double-check the year, body style (Sedan, Coupe, Wagon), and for 2003-2004 models, the presence or absence of the 'black square'.
- Inspect for Cracks and Scratches: Examine the lens surface for any cracks, which will allow moisture to enter. Minor surface scratches can often be polished out, but deep gouges cannot.
- Check for Moisture Stains: Look for a 'water line' or dried mineral deposits on the inside of the lens. This is a clear sign the seal has failed in the past and will likely leak again.
- Examine All Mounting Points: Carefully inspect the plastic mounting studs and tabs on the back of the housing. These can become brittle and break during removal. Ensure all are intact for a secure fit.
- Inspect the Wiring Connector: Look at the electrical connector pins for any signs of green or white corrosion, or melted plastic, which indicates a past electrical issue.
- For LED Models (2008+): Ask the seller for confirmation that all LED functions (running light, brake light, turn signal) were tested and are fully operational before the part was removed.
Installation Guide (2003-2007 Sedan)
Replacing the tail light on a first-generation CTS is a straightforward DIY job.
- Difficulty: 1/5 (Very Easy)
- Estimated Time: 15-20 minutes
- Tools Needed: 10mm socket with ratchet 🎬 See this step-by-step walkthrough for replacing the assembly and bulbs
Steps:
- Open the trunk and remove the spare tire cover to get it out of the way.
- Remove the plastic trim clips holding the trunk liner in place on the side you are working on. You may need to remove a few plastic nuts that hold the rear trim panel as well.
- Carefully pull back the trunk liner and insulation to expose the back of the tail light assembly.
- Locate the electrical harness connector. Press the release tab and disconnect it from the tail light.
- You will see two 10mm nuts holding the tail light studs to the car's body. Remove these nuts.
- Gently push the wiring harness grommet through the body panel.
- From the outside, carefully pull the tail light assembly straight back and out of the vehicle.
- Installation is the reverse of removal. Hand-tighten the 10mm nuts to avoid cracking the plastic housing.
Cost Comparison
| Part Type | Estimated Price Range | Notes |
|---|---|---|
| New OEM | $450 - $700+ | Highest cost, but guaranteed fit and quality from the original manufacturer. |
| New Aftermarket | $115 - $300 | Varying quality. May have fitment issues or premature failure of seals. |
| Used OEM | $75 - $250 | Excellent value. Provides original quality and fit at a significant discount. Price depends on condition. |
| Shop Labor | $50 - $100 | Typically less than one hour of labor. Bulb-only replacement is cheaper, around $95 for labor. |
Frequently Asked Questions (FAQ)
Can I just replace the LED bulbs in my 2009 CTS tail light?
No. On the 2008-2014 models, the LEDs are integrated into a non-serviceable circuit board. If any of the LEDs fail, the entire tail light assembly must be replaced.
My turn signal is blinking really fast. What does that mean?
This is called 'hyperflashing' and it's designed to alert you that a turn signal bulb has burned out. On 2003-2007 models, simply replace the burnt-out bulb. If the bulb is good, check for corrosion in the socket or a bad ground connection.
How can I fix my foggy or leaky tail light?
The best long-term solution is to replace the assembly. A temporary fix is to remove the assembly, drain any water, and let it dry out completely in the sun. You can then try to find the source of the leak (often the seal between the lens and the housing) and apply a bead of clear automotive silicone sealant. However, this repair is often not permanent.
Will a tail light from a CTS Coupe fit my Sedan?
No, absolutely not. The Coupe, Sedan, and Wagon body styles all use uniquely shaped tail lights that are not interchangeable. You must buy the correct part for your specific body style.
Helpful Videos
Technical Specifications
OEM Part Numbers: 15930597 22806054 25746426 25773005 15930596 20921574 22787025 22787026 22795548 22841729 22841730 25746425
Bulb Type (2003-2007): 3157
We Have This Part in Stock


The information in this article is provided for general reference and educational purposes only. Vehicle specifications, procedures, and part compatibility can vary by production date, trim level, and region. Always consult your vehicle's factory service manual and verify part numbers before purchasing or performing repairs. Safety-critical components such as airbags, seat belts, and braking systems should be installed by a qualified professional.
- Cadillac CTS:
- 🎬 Helpful Videos
- 🛍️ Shop This Part
- Key Variants and Compatibility Warnings
- First Generation (2003-2007): The 'Black Square' Change
- Second Generation (2008-2014): LED Integration
- Common Symptoms of Failure
- Known Issues, TSBs, and Recalls
- Buying a Used Tail Light: What to Check
- Installation Guide (2003-2007 Sedan)
- Cost Comparison
- Frequently Asked Questions (FAQ)
- 🎟️ Get 5% Off