
2012-2019 Honda CR-V Tail Light: Fitment, Leaks, and Replacement Guide
This guide covers common failure symptoms, critical generation-specific differences, and how to choose the correct used tail light for your CR-V.
- Tail lights are NOT interchangeable across the three key year ranges: 2012-2014, 2015-2016, and 2017-2019.
- You must correctly identify if you need the inner (liftgate-mounted) or outer (body-mounted) assembly, as they are different parts.
- On 2017-2019 models, the main lights are LED; if they fail, the entire assembly must be replaced, not just a bulb.
- When buying a used tail light, prioritize checking for cracks, signs of past moisture intrusion, and intact mounting tabs.
Key Differences: 4th Gen (2012-2016) vs. 5th Gen (2017-2019)
The 2012-2019 period covers two distinct generations of the Honda CR-V, and their tail lights are not interchangeable. Understanding these differences is the most important step in buying the correct part.
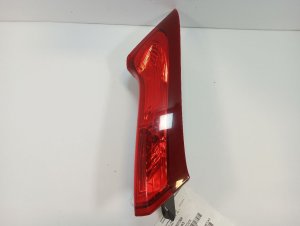
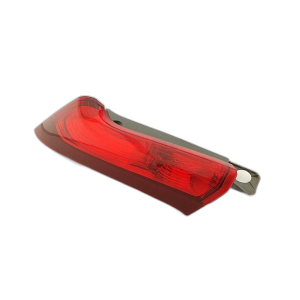
Fourth Generation (2012-2016)
The 4th generation CR-V features a tall, vertical tail light design. However, there was a significant mid-cycle refresh in 2015.
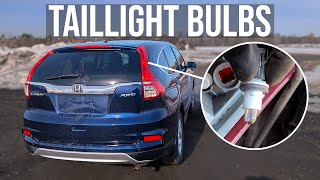
- 2012-2014: These models use a more traditional design with incandescent bulbs for all functions. The assembly is split 🎬 Watch: How to replace a 2012-2016 tail light bulb. into an upper and lower section.
- 2015-2016: The tail lights were restyled for a more modern look, though they retain the same basic shape. They may feature different internal reflectors and lens designs. Parts are generally not interchangeable between the 2012-2014 and 2015-2016 models without modification.
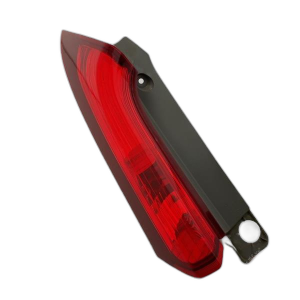
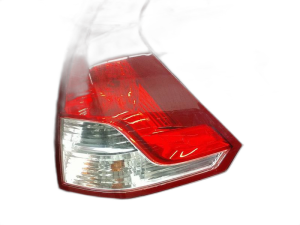
Fifth Generation (2017-2019)
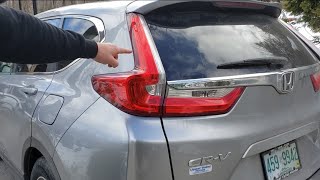
The 5th generation CR-V, introduced in 2017, has a completely different L-shaped tail light design that extends onto the liftgate. These models predominantly use LED lighting for the main brake and running lights, which means individual bulbs cannot be replaced. If an LED segment fails, the entire assembly must be replaced. The assembly is split into an inner section on the liftgate and an outer section on the quarter panel.
Symptoms of a Failing Tail Light
- Dim or Flickering Light: Before a bulb or LED fails completely, it may appear dim or flicker intermittently. This can be due to a failing bulb filament or a poor electrical connection.
- "Bulb Out" Warning on Dash: Some vehicles will display a warning message on the instrument cluster when they detect a non-functioning exterior light.
- Rapidly Blinking Turn Signal (Hyperflash): If a turn signal bulb burns out, the corresponding indicator on your dash will often blink much faster than normal. This is a built-in warning to the driver.
- Condensation or Water Inside the Lens: Moisture inside the housing is a clear sign that the seal has failed. This can lead to corrosion of bulb sockets, short circuits, and premature failure of bulbs and LED components.
- Blown Fuses: If a tail light fuse repeatedly blows, it could indicate a short circuit within the assembly or its wiring.
Known Issues, Recalls, and Technical Service Bulletins (TSBs)
While there are no widespread, major recalls specifically for tail light failure on the 2012-2019 CR-V, some related issues have been noted. A recall (NHTSA ID: 16V-526) was issued for some 2016 models where the LED side marker light circuit board could be damaged during shipping, making the marker light inoperable. Dealers were instructed to inspect and, if necessary, replace the affected tail light assembly. Owners of all generations frequently report issues with condensation forming inside the tail light housings, which points to potential seal degradation over time. 🎬 See this guide on fixing moisture and condensation issues. No other specific TSBs for tail light assemblies were found during research.
Warning: Always verify part numbers and visual style before purchasing. The differences between years and mounting locations (body vs. liftgate) are subtle but critical for correct fitment.
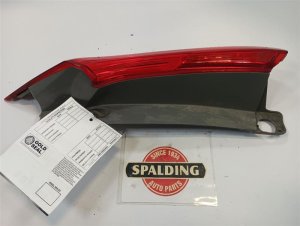
Buying a Used 2012-2019 CR-V Tail Light: What to Check
Purchasing a used OEM tail light is an excellent way to save money while retaining factory quality and fit. However, a careful inspection is essential.
- Confirm the Exact Year Range: The most critical check. Is it for a 2012-2014, 2015-2016, or 2017-2019 model? They are not interchangeable.
- Verify Mounting Location: Is it for the quarter panel (outer) or the liftgate (inner)? They are different shapes and have different part numbers. Also, confirm if it's for the driver (Left) or passenger (Right) side.
- Inspect the Lens: Look for cracks, even small hairline fractures. These will allow moisture in. Also check for deep scratches, scuffs, or hazing that can't be polished out.
- Check All Mounting Points: Carefully examine the back of the assembly. Ensure all plastic mounting tabs and threaded studs are intact and not cracked or broken. A light with a broken tab will not sit flush and will eventually fail.
- Look for Signs of Moisture: Check for a "water line" or mineral deposits on the inside of the lens. This indicates the seal has previously failed and the internal electronics or reflective surfaces may be compromised.
- Examine the Electrical Connector: The pins in the connector should be straight and free of any green or white corrosion.
- Why Used OEM is Often Better: Cheap aftermarket tail lights often use lower-quality plastic that can fade or become brittle, and seals that fail prematurely. A good-condition used OEM part will typically fit better and last longer than a new, non-certified aftermarket equivalent.
Installation Guide and Difficulty
- Difficulty Rating: 1.5 out of 5
- Estimated Time: 0.5 hours
- Tools Needed: 8mm socket with ratchet or a Phillips head screwdriver, plastic trim removal tool (for inner lights).
Replacing a CR-V tail light is a straightforward process suitable for most DIYers.
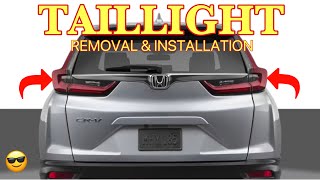
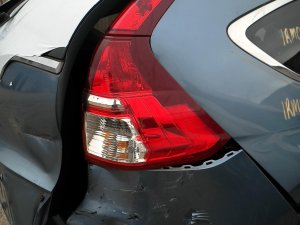
For Outer (Quarter Panel) Lights:
- Open the liftgate to access the bolts.
- Remove the two or three 8mm bolts holding the assembly in place.
- Gently pull the assembly straight back to release it from the plastic guide clips on the side of the vehicle. A firm, steady pull is needed; don't be afraid of the popping sound as the clips release.
- Disconnect the main electrical connector by pressing the release tab.
- Installation is the reverse of removal. Be sure to align the guide pins before pushing 🎬 Watch: Full walkthrough for 2017-2019 tail light replacement. the assembly into place.
For Inner (Liftgate) Lights (2017-2019):
- Open the liftgate.
- Use a trim removal tool or flathead screwdriver to carefully pry open the small access cover on the interior trim panel behind the light.
- Disconnect the electrical connector and twist the bulb socket to remove it.
- The process for removing the entire assembly may require removing more of the liftgate's interior trim panel.
Pro Tip: When reinstalling, hand-tighten the bolts first to avoid cross-threading. Then, snug them down gently. Over-tightening can crack the plastic housing.
Cost Comparison
| Part Type | Estimated Cost |
|---|---|
| New OEM | $230 - $400+ |
| New Aftermarket | $40 - $180 |
| Used OEM | $70 - $200 |
| Shop Labor | $75 - $150 |
Frequently Asked Questions (FAQ)
Will a tail light from a 2016 CR-V fit my 2013 model?
No. While they are both 4th generation models, Honda restyled the tail lights for the 2015-2016 model years. The shape is similar, but the mounting points and internal design are different, so they are not directly interchangeable.
Why is there moisture inside my tail light?
Condensation occurs when the seal between the lens and the housing has failed, allowing humid air to enter. This can be caused by age, impact, or a manufacturing defect. It's important to address this, as the moisture can cause electrical shorts and corrosion.
Do I have to replace the whole assembly if one LED is out on my 2018 CR-V?
Yes. On the 2017-2019 models, the main tail light and brake light functions are integrated LEDs. Unlike a traditional bulb, these cannot be replaced individually. The entire tail light assembly must be replaced if any of the main LEDs fail.
Is the liftgate light the same as the body-mounted light?
No. The inner light mounted on the liftgate is a completely different part from the outer light mounted on the quarter panel. They have different shapes, sizes, and part numbers. You must specify which one you need when ordering.
OEM Part Number Reference
This list includes common part numbers but is not exhaustive. Always verify the correct part number for your specific vehicle's year, trim, and position (left/right, inner/outer).
- 33500-T0A-A01 (Right, Lower, 2012-2014)
- 33500-T1W-A01
- 33500-TLA-A01
- 33500-TLA-A11
- 33550-T1W-A01
- 33550-TLA-A01
- 34175-T1W-A01 (Left, Upper, 2015-2016)
Helpful Videos

Technical Specifications
OEM Part Numbers: 33500-T0A-A01 33500-T1W-A01 33500-TLA-A01 33500-TLA-A11 33500T1WA01 33550-T1W-A01 33550-TLA-306 33550-TLA-A01 33550-TLA-A11 34150-TLA-A01 34155-TLA-A01 34170-T0A-A01 34175-T0A-A01 34175-T1W-A01
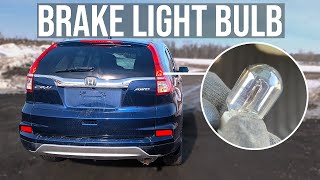
Bulb Types (2012-2016 models): 7443 (Brake/Tail), 7440/W21W (Turn Signal/Reverse). 2017-2019 models use integrated LED modules for primary functions.
We Have This Part in Stock

The information in this article is provided for general reference and educational purposes only. Vehicle specifications, procedures, and part compatibility can vary by production date, trim level, and region. Always consult your vehicle's factory service manual and verify part numbers before purchasing or performing repairs. Safety-critical components such as airbags, seat belts, and braking systems should be installed by a qualified professional.
- Honda CR-V:
- 🎬 Helpful Videos
- 🛍️ Shop This Part
- Key Differences: 4th Gen (2012-2016) vs. 5th Gen (2017-2019)
- Fourth Generation (2012-2016)
- Fifth Generation (2017-2019)
- Symptoms of a Failing Tail Light
- Known Issues, Recalls, and Technical Service Bulletins (TSBs)
- Buying a Used 2012-2019 CR-V Tail Light: What to Check
- Installation Guide and Difficulty
- Cost Comparison
- Frequently Asked Questions (FAQ)
- OEM Part Number Reference
- 🎟️ Get 5% Off