
2003-2007 Saturn Ion Tail Light: Sedan vs. Coupe Fitment Explained
This guide covers the critical differences between sedan and coupe tail lights, common failure symptoms, and how to inspect a used assembly before you buy.
- The most critical factor is compatibility: tail lights for the 4-door sedan and 2-door Quad Coupe are NOT interchangeable.
- Failure is most often caused by moisture entering through a cracked lens or failed seal, leading to corrosion and burnt-out bulbs.
- Replacement is extremely easy and DIY-friendly, requiring only a T15 Torx screwdriver and about 15 minutes.
- When buying a used part, prioritize inspecting for hairline cracks, signs of internal moisture, and intact mounting tabs.
Compatibility Warning: Sedan vs. Quad Coupe
Warning: The single most important thing to know when buying a replacement tail light for a 2003-2007 Saturn Ion is that the parts are body-style specific. Tail lights for the 4-door sedan will NOT fit the 2-door Quad Coupe, and vice-versa. They have different shapes and mounting points. Always verify you are purchasing the correct assembly for your specific model.
Symptoms of a Failing Tail Light
Tail light issues on the Saturn Ion are typically straightforward and easy to spot. Here are the most common signs of failure:
- Dim or Burnt-Out Bulbs: One or more functions (running light, brake light, or turn signal) will stop working. This is often the first and most common issue, usually solved with a simple bulb replacement.
- Condensation Inside the Lens: Seeing moisture, fog, or water droplets inside the tail light assembly is a clear sign that the seal has failed. This moisture will cause corrosion on the bulb sockets and reflective surfaces, leading to intermittent light function and eventual failure of the entire unit. One owner noted their bulbs kept burning out because of a crack that let moisture in.
- Cracked or Hazy Lens: The outer plastic lens can become cracked from a minor impact or develop a cloudy, hazy appearance from UV sun damage over time. A cracked lens will allow water to enter, and a hazy lens reduces light output, making your vehicle harder to see at night.
- Flickering or Intermittent Lights: Lights that flicker can be caused by a failing bulb, a loose connection, or corrosion in the bulb socket or wiring connector. Sometimes, if multiple lights fail at once, it could point to a larger electrical issue like a bad fuse or relay.
Known Issues, TSBs, and Recalls
While there are no recalls specifically for the rear tail light assemblies on the 2003-2007 Saturn Ion, there are some related items to be aware of:
- NHTSA Recall 04V531000: This safety recall was for certain 2003-2004 Ion sedans concerning the front turn signal and daytime running lamp (DRL), which could stop working due to poor contact between the bulb and socket. While this doesn't affect the rear tail lights directly, it points to a pattern of potential socket-related issues in the vehicle's lighting system.
- General Motors TSB #01-08-42-001O: GM issued a general technical service bulletin for dealers regarding exterior lamp condensation and water leaks. It provides guidelines for determining whether condensation is normal or the sign of a failed seal requiring part replacement. This is relevant given that moisture intrusion is a primary cause of tail light failure.
- Ignition Switch Recalls: The 2003-2007 Saturn Ion was part of the massive GM ignition switch recall (e.g., NHTSA 14V047000). This issue could cause the car to shut off while driving, disabling all electronics, including lights. While not a tail light failure itself, it's a critical safety issue for all owners to be aware of.
Pro Tip: If you experience flickering or non-working lights and have already replaced the bulbs, the next step is to inspect the bulb sockets for corrosion (a white or greenish powder) and check the main electrical connector for any loose or damaged pins.
Buying a Used Tail Light: What to Check
A used OEM tail light is often a great value compared to a new part from the dealer or a cheap aftermarket copy. Here’s what to inspect before you buy:
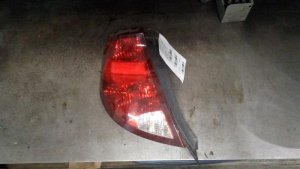
- Confirm the Body Style: Double-check that the part came from a 4-door sedan. Look at photos and compare the shape to your existing light. Do not purchase a light from a 2-door coupe.
- Inspect the Lens Thoroughly: Look for any cracks, even hairline fractures. Hold the light up to a bright light source to reveal small stress cracks. Check for any signs of hazing or yellowing from sun exposure.
- Check for Moisture Stains: Look inside the lens for any dried water lines, mineral deposits, or a foggy film on the reflective surfaces. These are all signs the unit has had a water leak in the past and may have internal corrosion.
- Examine All Mounting Tabs: The assembly is held on by three screws. Ensure all three plastic mounting points are intact and not cracked or broken. A broken tab will prevent the light from seating securely, leading to vibrations and potential water leaks.
- Check the Bulb Sockets and Harness: If the tail light comes with the bulb sockets and wiring pigtail, inspect them closely. Look for any signs of melting, discoloration, or corrosion on the metal contacts. A clean socket is a good indicator of a healthy part.
Cost Comparison
| Part Type | Estimated Price Range |
|---|---|
| New OEM (GM) | $150 - $250 |
| New Aftermarket (TYC, Depo, etc.) | $45 - $95 |
| Used OEM | $25 - $80 |
| Shop Labor | $40 - $80 |
Replacement Guide
Replacing the tail light assembly on a 2003-2007 Saturn Ion sedan is a very simple DIY task. It requires minimal tools and can be completed in under 15 minutes.
- Difficulty: 1 out of 5 (Very Easy)
- Tools Needed: T15 Torx screwdriver or bit driver. Some guides mention a T10, but T15 is more commonly cited.
Step-by-Step Instructions:
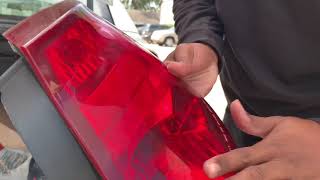
🎬 Watch this quick video walkthrough of the replacement process.- Open the Trunk: Access the inside of the trunk area behind the tail light.
- Remove the Screws: Locate and remove the three T15 Torx screws holding the assembly in place.
- Pull the Assembly Out: Carefully pull the tail light housing straight back, away from the vehicle.
- Disconnect the Wiring: Unplug the single main electrical connector from the back of the housing. There is a small tab you may need to lift to release the plug.
- Transfer Bulbs (If Needed): If your new assembly doesn't include bulbs and sockets, twist your old sockets counter-clockwise to remove them from the old housing and install them into the new one.
- Install the New Assembly: Plug the main electrical connector into the new tail light, position the assembly into the body, and reinstall the three Torx screws. Do not overtighten.
- Test All Functions: Before closing the trunk, have a helper confirm that the running lights, brake lights, and turn signals all work correctly.
Frequently Asked Questions (FAQ)
Will a tail light from a Saturn Ion Quad Coupe fit my sedan?
No. The tail lights for the 2-door Quad Coupe and 4-door sedan are completely different shapes and are not interchangeable. You must buy the specific part for the sedan model.
Do I have to replace the whole assembly if just the lens is cracked?
Yes. The lens and housing are manufactured as a single, sealed unit. A crack in the lens compromises the seal and cannot be effectively repaired. The entire assembly must be replaced to prevent moisture from damaging the internal electronics.
Why are my tail lights foggy or have water inside?
This is caused by a failure of the seal between the plastic lens and the rear housing. This allows humid air and water to enter, which then condenses on the inside of the cool lens. It's a clear sign the assembly needs to be replaced.
Is it difficult to replace a Saturn Ion tail light myself?
No, this is one of the easiest repairs you can do. It only involves removing three screws and one electrical connector, requiring only a single Torx screwdriver. Most people can complete the job in less than 15 minutes.
Technical Specifications
This information applies to the tail light assembly for the 4-door sedan model.
| Specification | Value |
|---|---|
| Vehicle Fitment | 2003, 2004, 2005, 2006, 2007 Saturn Ion (4-Door Sedan Only) |
| Body Style | Sedan |
| Lighting Technology | Halogen/Incandescent |
| Known OEM Part Numbers | 22723024, GM2800163, 15258858, 22631169 |
Helpful Videos
Technical Specifications
OEM Part Numbers: 22723024 GM2800163 15258858 22631169
Fits 4-door sedan models only. Uses incandescent/halogen bulbs. Held in place by three T15 Torx screws.
We Have This Part in Stock

The information in this article is provided for general reference and educational purposes only. Vehicle specifications, procedures, and part compatibility can vary by production date, trim level, and region. Always consult your vehicle's factory service manual and verify part numbers before purchasing or performing repairs. Safety-critical components such as airbags, seat belts, and braking systems should be installed by a qualified professional.
- Saturn Ion:
- 🎬 Helpful Videos
- 🛍️ Shop This Part
- Compatibility Warning: Sedan vs. Quad Coupe
- Symptoms of a Failing Tail Light
- Known Issues, TSBs, and Recalls
- Buying a Used Tail Light: What to Check
- Cost Comparison
- Replacement Guide
- Step-by-Step Instructions:
- Frequently Asked Questions (FAQ)
- Technical Specifications
- 🎟️ Get 5% Off