
2015-2016 Hyundai Genesis Front Camera: ADAS Failure, Replacement, and Calibration
This guide covers common failures, replacement procedures, and the critical calibration requirements for the front-facing ADAS video camera in your 2015-2016 Hyundai Genesis.
- After replacing the front camera, professional ADAS calibration is mandatory for the system to function safely and correctly.
- The part number on the replacement camera must exactly match the original, as compatibility is tied to vehicle options like the heads-up display (HUD).
- The provided OEM part number, 94310B1400, is for the Head-Up Display unit itself, not the camera. You must verify the number on the camera.
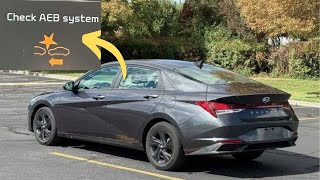
- Failure symptoms typically involve multiple warning lights for systems like AEB and LKAS, and the disabling of those features.
- Before suspecting a failed camera, always ensure the windshield area in front of the camera is perfectly clean.
Symptoms of a Failing Front Camera
When the front-facing ADAS camera begins to fail, the vehicle will typically disable the associated safety systems and display warning messages on the instrument cluster. You will not lose the ability to drive the car, but key safety features will be inactive.
- Warning Lights: The most common symptom is the illumination of multiple warning lights on the dashboard. You may see messages like "Check AEB System," "Check LDWS," "Forward collision-avoidance assist system disabled," or "Lane keep assist system disabled."
- Disabled Safety Features: Features like Automatic Emergency Braking (AEB), Lane Keeping Assist (LKA), Smart Cruise Control, and automatic high beams will become unavailable.
- Dirty Windshield Warnings: Sometimes, the issue is not a failed camera but an obstructed view. The system may display a message like "Driver assistance system limited. Camera obscured." if the windshield in front of the camera is dirty, foggy, or covered in snow or ice. Always clean the windshield area in front of the rearview mirror as a first troubleshooting step.
Known Issues, Recalls, and Technical Service Bulletins (TSBs)
While no recalls specifically target the front video camera (part number 94310B1400) for the 2015-2016 Genesis, related systems have been subject to recalls and owner complaints.
- NHTSA Recall 21V-160: This recall affects 2015-2016 Genesis models and involves a risk of an electrical short in the Anti-Lock Brake System (ABS) module, which could lead to a fire. While not a camera issue, the ABS system is linked to the AEB function.
- NHTSA Recall 17V-354: This recall was for a faulty parking brake switch that could fail to illuminate the warning light.
- Instrument Cluster Recall (NHTSA Campaign 16V508000): Some 2015 Genesis sedans were recalled for instrument cluster software issues that could cause various warning lights to illuminate or the cluster to become inoperative.
- Owner Complaints: Owners have reported spontaneous "Check AEB System" warnings 🎬 Watch: Understanding the common Check AEB System warning lights that can sometimes be intermittent. These can be caused by internal camera failure, wiring issues, or problems with related sensors like wheel speed sensors.
Warning: The part number provided in the initial data, 94310B1400, is listed by Hyundai parts catalogs as the "Unit Assembly-Head Up Display," not the forward camera. The forward camera is a separate component that works in conjunction with the HUD. It is crucial to verify the part number on your original camera before ordering a replacement.
Buying a Used 2015-2016 Genesis Video Camera
Purchasing a used OEM camera can be a cost-effective solution, but careful inspection is key. Since these are sensitive electronic components, buying from a reputable recycler is important.
What to Check Before You Buy:
- Verify the Part Number: The most critical step. The part number must match your original camera exactly. Compatibility is tied to the specific features of your car, especially the presence of a heads-up display (HUD). Using the wrong camera will result in system errors.
- Inspect the Lens: Look for any scratches, chips, or hazing on the camera lens. Even minor damage can distort the camera's view and prevent proper calibration or function.
- Check the Housing and Connectors: Inspect the plastic housing for any cracks or signs of damage from an accident. Ensure the electrical connector pins are straight, clean, and free of corrosion.
- Ask About the Donor Vehicle: If possible, get the VIN or mileage from the vehicle the part was removed from. A camera from a lower-mileage, non-accident vehicle is always a better bet.
- Why Used OEM is Often Better: For ADAS components, a used OEM camera is generally preferable to a new aftermarket one. The OEM part is designed and tested to work seamlessly with your vehicle's software. Aftermarket cameras may have compatibility issues or fail to calibrate correctly with the vehicle's systems.
Replacement and Calibration
Physically replacing the camera is relatively straightforward, but the required calibration process is complex and requires specialized equipment.
Installation Difficulty: 2/5 for physical installation, 5/5 for required calibration.
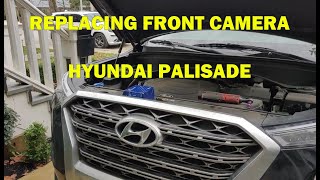
The camera is located in a plastic housing behind the rearview mirror. The replacement process generally involves:
- Carefully removing the plastic covers around the rearview mirror mount.
- Disconnecting the electrical connector from the camera.
- Unclipping the old camera from its mounting bracket.
- Snapping the new camera into place and reconnecting the electrical harness.
- Re-installing the plastic covers. 🎬 See this walkthrough of the front camera replacement process
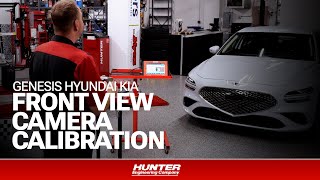
CRITICAL: Calibration is Mandatory. After the camera is replaced, it MUST be calibrated. This process tells the camera its exact position and alignment relative to the vehicle's centerline and the road. Without calibration, the ADAS features will not work correctly and may behave erratically, creating a serious safety risk. Calibration must be performed by a dealership or a qualified auto shop with specialized ADAS calibration tools, which include specific targets and diagnostic software. This is not a DIY procedure.
🎬 Watch: How professional ADAS calibration is performed on Genesis vehiclesCost Comparison
Prices can vary significantly based on the source and condition of the part. The largest cost is often the mandatory calibration.
| Part/Service | Estimated Cost |
|---|---|
| New OEM Camera (Part Only) | $700 - $800+ |
| New Aftermarket Camera | Not commonly available; not recommended |
| Used OEM Camera | $50 - $200 |
| Shop Labor (Installation) | $60 - $100 |
| Shop Labor (ADAS Calibration) | $250 - $500+ |
Frequently Asked Questions (FAQ)
Can I replace the camera myself to save money?
You can perform the physical swap of the camera, which is relatively simple. However, you cannot complete the job without professional calibration. The vehicle must be taken to a dealer or a shop with ADAS calibration equipment to make the new camera functional and ensure the safety systems work correctly.
My windshield was just replaced and now I have camera errors. What happened?
Any time the windshield is replaced on an ADAS-equipped vehicle, the front camera must be removed and reinstalled. This process requires a new calibration to ensure the camera is perfectly aligned with the new glass. If the installer did not perform a calibration, you will need to have it done.
Why do I have to get a camera from a car with a heads-up display (HUD)?
The camera's software and functionality are often tied to the specific options package of the vehicle. A car with a HUD may use a different camera or have different software programming than one without. Using the wrong part will likely lead to incompatibility errors. Always match the part number from your original camera.
Can a dirty windshield really cause my safety systems to turn off?
Yes. The camera needs a clear view to function. Heavy rain, snow, fog, ice, or even dirt and bug splatter can obstruct the lens and cause the system to temporarily disable itself. It will usually display a message indicating the camera view is blocked. Cleaning the windshield in front of the camera is the first and easiest troubleshooting step.
Helpful Videos
Technical Specifications
OEM Part Numbers: 94310B1400 (This is for the Head-Up Display Unit, not the camera itself. Original camera part number must be verified visually.)
The camera is located behind the windshield, integrated with the rearview mirror mount. It serves as the primary sensor for Lane Keeping Assist, Forward Collision-Avoidance, and High Beam Assist.

The information in this article is provided for general reference and educational purposes only. Vehicle specifications, procedures, and part compatibility can vary by production date, trim level, and region. Always consult your vehicle's factory service manual and verify part numbers before purchasing or performing repairs. Safety-critical components such as airbags, seat belts, and braking systems should be installed by a qualified professional.
- Hyundai Genesis: