
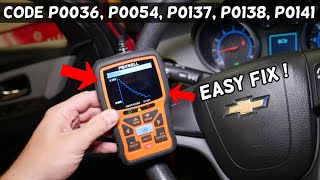
P0036 on 2010-2015 Chevrolet Camaro 3.6L V6: O2 Sensor Heater Fault Causes and Fixes
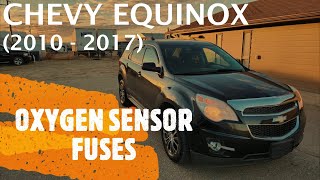
On a 2010-2015 Camaro with the 3.6L V6, code P0036 almost always means the heater element inside the passenger-side downstream oxygen sensor has failed. Replacing the Bank 1, Sensor 2 O2 sensor is the most common fix. Expect to pay ~$30-$60 for an aftermarket sensor or ~$50-$90 for an OEM ACDelco part. Before replacing, it is wise to check the 'EMISSIONS 1' fuse in the underhood fuse box.
- P0036 on your Camaro V6 points to the passenger-side O2 sensor located after the catalytic converter.
- The most likely fix is to replace the sensor itself, which is a common wear item. The job is DIY-friendly with an O2 sensor socket.
- Before buying a new sensor, it's wise to quickly check the F8 fuse in the underhood fuse box and inspect the sensor's wiring for obvious damage like melting or fraying.
- Driving with this code is not harmful to the engine, but it should be fixed to ensure proper emissions and to pass any required inspections.
- Ensure you purchase the correct sensor, as part numbers differ between the 2010-2011 (LLT) and 2012-2015 (LFX) engines.
What's Unique About the 2010-2015 Chevrolet Camaro
For the 5th generation Camaro V6, this code is a straightforward and common issue, typically indicating a worn-out sensor. It's important to note the engine change within this year range: 2010-2011 models have the LLT engine, while 2012-2015 models have the updated LFX engine. However, the diagnosis and repair for P0036 are virtually identical for both, as they share the same basic exhaust and sensor layout. Bank 1 is consistently the passenger side for these longitudinally mounted V6 models. A key difference is the OEM part numbers for the sensors may differ between the LLT and LFX engines.
Symptoms You May Notice
- Check Engine Light is on.
- Inability to pass an emissions test.
- No other noticeable drivability symptoms are common with this specific code.
- In some cases, an owner reported the dashboard going blank while driving in conjunction with P0036 and other sensor codes (NHTSA ODI #11221744).
- Replacing the wrong O2 sensor. It is critical to identify Bank 1 (passenger side) and Sensor 2 (downstream, after the catalytic converter) correctly.
- Replacing the sensor without checking the fuse or wiring first. If a wiring short caused the original sensor's heater to fail, it might damage the new sensor as well.
- Assuming the sensor is bad without testing. While it's the most likely cause, a 5-minute check of the fuse and wiring can save money and time.
Most Likely Causes
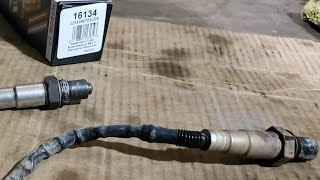
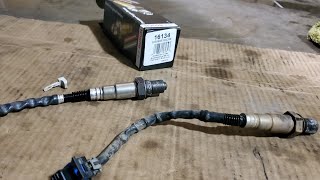
- Failed Bank 1, Sensor 2 Oxygen Sensor 🔴 High Probability → Shop Oxygen Sensor The internal heater element is a common failure point on oxygen sensors due to constant, rapid heat cycles. Over time, the element simply burns out like a light bulb filament.
How to confirm: Disconnect the sensor and measure the resistance across the two heater circuit pins (usually the two same-colored wires, often black) with a multimeter. A good heater should have a low resistance (typically 3-15 ohms). An open circuit (infinite resistance) or very high resistance confirms the heater has failed.
Typical fix: Replace the Bank 1, Sensor 2 (passenger side, downstream) oxygen sensor. An O2 sensor socket (22mm or 7/8") is highly recommended for removal. 🎬 Watch: How to remove the Bank 1 Sensor 2 oxygen sensor.
Est. part cost: $30 - $90 - Damaged Wiring or Connector 🟡 Medium Probability The sensor wiring is routed near the hot exhaust system. The harness can become brittle, melt, or chafe against the chassis or heat shields, causing a short or open circuit. This is especially common after installing aftermarket components like long-tube headers.
How to confirm: Visually inspect the entire wiring harness from the O2 sensor back to the main loom. Check for melted plastic, exposed wires, or corrosion inside the connector pins. Check for 12V power at the harness connector with the key on, engine off.
Typical fix: Repair the damaged section of wiring or replace the connector pigtail.
Est. part cost: $15 - $40 - Blown Fuse ⚪ Low Probability
How to confirm: Locate the fuse for the O2 sensor heaters in the underhood fuse block. On the Camaro, this is typically fuse F8, labeled 'Post-Catalytic Converter Oxygen Sensor' or similar in the owner's manual. A GM TSB for other 3.6L vehicles also points to a fuse labeled 'EMISSION 1' as a potential culprit for multiple O2 sensor codes.
Typical fix: Replace the blown fuse. If the new fuse blows immediately, it indicates a short circuit in the wiring that must be found and repaired.
Est. part cost: $1 - $5
Rare But Worth Checking
- Faulty Engine Control Module (ECM): → Shop Engine Control Module (ECM) This is extremely rare. The ECM's internal driver for the heater circuit can fail, but all other possibilities should be exhaustively ruled out before considering ECM replacement. One Camaro5 forum user with multiple O2 heater codes (including P0036) ultimately traced the issue to a bad ECM after replacing sensors did not solve the problem. This is expensive and requires programming.
Diagnosis Steps
- Read the code with an OBD-II scanner to confirm P0036 is present.
- Visually inspect the Bank 1, Sensor 2 (passenger side, downstream) oxygen sensor and its wiring harness. Look for any signs of melting, chafing, or corrosion. Ensure the connector is securely plugged in.
- Check the fuse for the O2 sensor heater circuit in the underhood fuse box. This is likely fuse F8. 🎬 Watch: How to locate the O2 sensor fuse on GM vehicles. Inspect it and replace if blown.
- If the wiring and fuse are okay, test the sensor itself. Disconnect the sensor and use a multimeter set to Ohms to measure the resistance between the two heater pins 🎬 See this walkthrough on testing and fixing the P0036 code. (typically the two wires of the same color). A good heater should have a low resistance (typically 3-15 ohms). An open circuit (infinite resistance) confirms the sensor has failed.
- If the sensor's resistance is good, check for power at the harness connector. With the key on (engine off), one pin of the harness-side connector should have 12V power. If not, there is a break in the power supply wire from the fuse block.
- If power is present, the other heater wire is the control wire (ground-side switched) from the ECM. A problem on this side could point towards a wiring issue or, rarely, a faulty ECM driver.
- The most probable outcome is a failed sensor. Replace the Bank 1, Sensor 2 O2 sensor, clear the code with a scanner, and perform a drive cycle to confirm the fix.
Parts You'll Likely Need
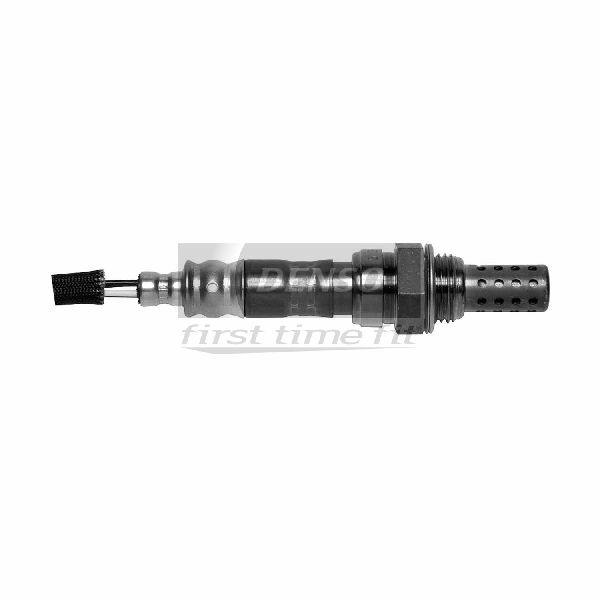
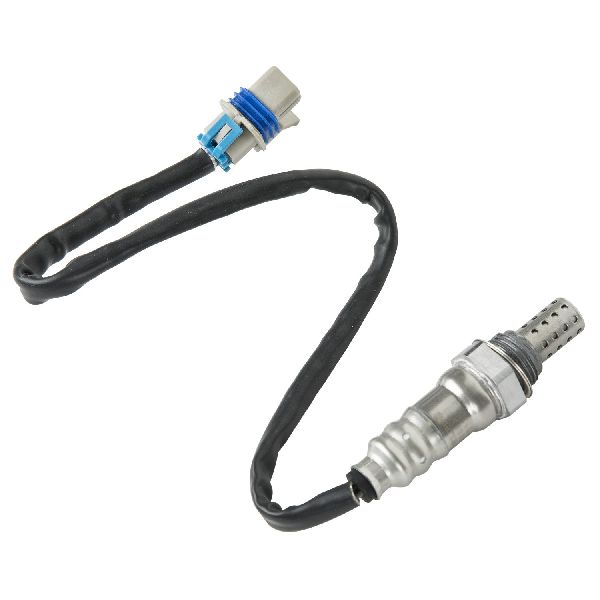
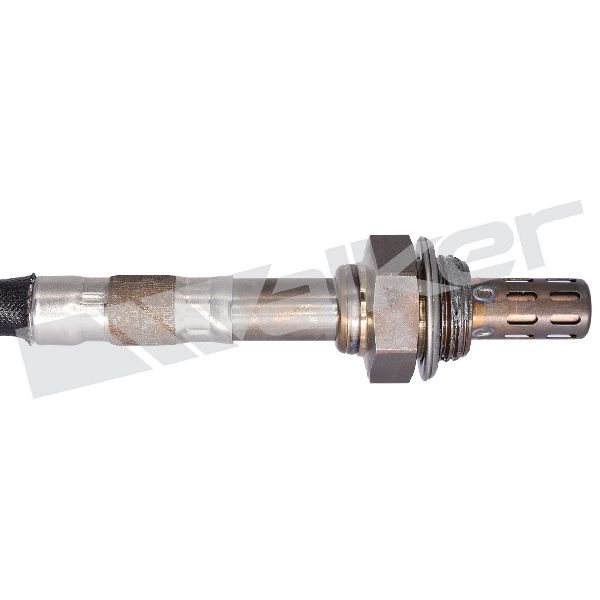
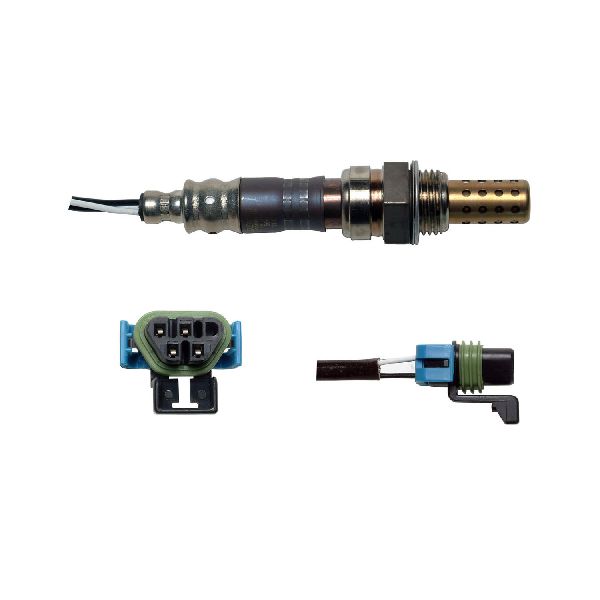
- Downstream Oxygen Sensor (Bank 1, Sensor 2)
(OEM #ACDelco 213-4229 (fits many 2010-2011 LLT), ACDelco 12634063 (fits many 2012-2015 LFX))— The internal heater element fails from age and heat cycles, which is the direct cause of the P0036 code.
Trusted brands: ACDelco, Denso, Bosch, NTK
OEM price range: $50-$90
Aftermarket price range: $30-$60
Related Codes That Often Appear With This One
- P0054 — This code specifically indicates 'HO2S Heater Resistance (Bank 1, Sensor 2)' is out of spec. It's a more specific version of the heater circuit fault and often appears with P0036, pointing directly to a bad sensor heater element.
- P0141 — This is another generic code for 'O2 Sensor Heater Circuit Malfunction (Bank 1 Sensor 2)'. It is functionally identical to P0036 and may be set simultaneously depending on the specific conditions detected by the ECM.
- P0056, P0057, P0158, P0161 — These are all codes for the Bank 2 (driver's side) downstream O2 sensor. Seeing them alongside P0036 could indicate a common problem like a blown fuse that powers both sensors, or a systemic wiring issue.
Technical Service Bulletins (TSBs) & Recalls
- PIT5336: This Preliminary Information bulletin from GM addresses multiple O2 sensor DTCs (including P0036) and/or an open 'Emission 1' fuse on 2013-2015 vehicles with the 3.6L engine, including platform mates like the Traverse and Acadia. It suggests investigating wiring shorts as a potential cause.
- Bulletin #PIT5336 also notes that technicians may find a long list of related codes such as P0030, P0031, P0037, P0053, P0054, and P0056 when diagnosing the Malfunction Indicator Lamp.
Platform-Specific Known Issues
- ECM Failure in Rare Cases: A thread on Camaro5.com documented a 2012 V6 that threw multiple O2 heater codes, including P0036. After replacing sensors did not fix the issue, a dealer diagnosed and replaced a faulty ECM, which resolved the problem. This indicates that while a bad sensor is the most common cause, a faulty ECM driver circuit is a rare but possible root cause if multiple heater codes persist.
Mechanic-Grade Diagnostic Values
- O2 Sensor Heater Element Resistance — expected: 4-10 Ohms at ambient temperature. Some GM documentation specifies a range of 3.13 to 9.3 Ohms.. Failure: An open circuit (OL or infinite resistance) or a reading outside the specified range. Note: Some aftermarket sensors may have higher resistance (e.g., ~17 Ohms) and still function correctly.
- Heater Circuit Power Supply — expected: Battery voltage (approx. 12.6V with key on, engine off) at one of the heater circuit pins on the harness-side connector.. Failure: 0V indicates a blown fuse (F8 'EMISSIONS 1' in underhood block) or an open in the power wire.
- Heater Control Circuit (ECM side) — expected: This is a ground-side switched circuit. With a lab scope, you should see the ECM pulse the ground, showing a square wave. With a multimeter, the voltage may appear to pulse or average out.. Failure: A constant ground or constant 12V (when checked against battery positive) indicates a shorted wire or a failed ECM driver.
- Heater Circuit Current Draw — expected: Between 0.3125 amps and 1.426 amps when the heater is commanded on by the ECM.. Failure: Current draw outside this range indicates a faulty heater element or excessive resistance in the circuit.
- Engine Block Ground Continuity — expected: Less than 1.0 Ohm of resistance between the main engine ground points and the battery negative terminal.. Failure: Resistance higher than 1.0 Ohm indicates a corroded or loose ground connection that can cause intermittent circuit faults.
Hidden / Shadow Codes Worth Checking
- Mode $06, TID $42, CID $81: This refers to the onboard diagnostic monitor for the Bank 1 Sensor 2 heater element impedance. Advanced scan tools can read this data to see the resistance value (in Ohms) that the ECM has measured, which can confirm a failed heater without manual testing. (see via A professional scan tool capable of displaying Mode $06 data.)
Scan Tool Commands That Help
- GDS2 / Tech2 / Professional Scan Tool with Oscilloscope: Live Data Graphing for O2 Heater Control — This is used to verify the ECM is actively trying to control the heater circuit. By graphing the duty cycle of the ground-side control wire, a technician can confirm if the ECM driver is functioning. A flat line at 0% or 100% when the heater should be active points towards an ECM or wiring problem, whereas a pulsing signal confirms the ECM is working and the fault is likely the sensor itself.
Wiring & Ground Locations
- G107 — On the left (driver's) side rear of the 3.6L V6 engine block.. This is a primary engine ground. A poor connection here can cause a variety of sensor and module communication issues, including erratic O2 sensor readings or heater circuit faults.
- Engine Ground (Passenger Side) — Underneath the passenger side exhaust manifold, near the starter. A ground cable runs from here to the chassis near the underhood fuse block.. A user on a Camaro forum reported this specific ground bolt is often not fully tightened from the factory. A loose connection here can cause intermittent electrical issues, including O2 sensor codes that are difficult to diagnose as the connection can vary with engine vibration and temperature.
- B1S2 Connector Heater Pins — On the 4-wire oxygen sensor connector for the passenger-side downstream sensor.. The two wires for the heater circuit are typically the same color (e.g., two black wires or two white wires). These are the pins to probe with a multimeter to measure the heater element's resistance.
Real Owner Repair Stories
- Camaro5.com forum thread (2012 Chevrolet Camaro 3.6L V6) — Stalling at idle and multiple O2 sensor heater codes, including P0036, P0056, P0135, P0155, etc.
❌ Tried (didn't work) A third-party repair shop replaced the oxygen sensors, but the codes returned.
✅ What actually fixed it A Chevrolet dealership diagnosed a faulty Engine Control Module (ECM). Replacing and programming the ECM resolved all the trouble codes and the stalling issue. - NHTSA ODI #11221744 — An owner reported an ongoing issue where the dashboard goes blank while driving, accompanied by a string of codes including P0036, P0037, P0138, and P0141.
When the Usual Fixes Don't Work
- While most diagnostic guides specify a heater resistance of roughly 3-15 Ohms, there is forum evidence of new, functioning aftermarket sensors measuring higher, such as 17.6 Ohms. This suggests that a reading slightly outside the 'standard' textbook range may not definitively condemn a brand-new sensor, and brand-specific specifications can vary.
OEM Part Supersession History
GM 12609457→ACDelco 213-4229— Standard part number update and branding change from GM to ACDelco.
Heads up: These parts are directly interchangeable for the 2010-2011 LLT V6 engine.
Model Year Variations Within This Range
- 2010-2011 vs 2012-2015: The primary difference affecting this repair is the engine change from the LLT (2010-2011) to the LFX (2012-2015). This results in different OEM part numbers for the oxygen sensors. The LLT uses ACDelco 213-4229, while the LFX uses ACDelco 12634063. The diagnostic procedure remains the same.
Diagnostic Flowchart
Other Known Issues on This Vehicle
Issues unrelated to this code that are worth knowing about as an owner of this generation:
- Premature Timing Chain Stretch (LLT Engine) 🔴 High — Very common on 2010-2011 models, typically appearing between 60,000 and 120,000 miles. Often triggers codes P0008, P0009, P0017. (Ref: TSB #12-06-01-009G)
- Intake Valve Carbon Buildup 🟠 Medium — An inherent issue for all direct-injection engines (both LLT and LFX). Becomes problematic after 60,000-100,000 miles, causing cold start misfires, rough idle, and power loss. (Ref: TSB PIP5029E)
- Torque Converter Shudder (LFX w/ Auto Trans) 🟠 Medium — Common on 2012-2015 models with the 6L50 automatic transmission, causing a vibration or shudder at low speeds (typically 40-50 mph). (Ref: TSB PI0700A)
- Excessive Oil Consumption 🟠 Medium — Can affect both LLT and LFX engines, often linked to PCV system issues or piston ring wear. Can contribute to premature timing chain wear if oil levels are not monitored closely. (Ref: TSB 10-06-01-008E (for V8, but similar issues reported on V6))
Used vs. New Parts: Buying Guide for This Vehicle
When a used part is the smart pick: A used part is only recommended for the wiring harness connector pigtail if the original is physically damaged (melted, broken clip). The oxygen sensor itself and the ECM should be purchased new.
Donor-vehicle mileage cap: roughly under 100000 miles for the part to have meaningful remaining life.
What to inspect on the donor part:
- For a connector pigtail, inspect for brittle or cracked plastic.
- Ensure the locking tab is intact and functional.
- Check for any signs of corrosion or discoloration on the pins.
- Verify there is at least 4-6 inches of wire attached for easier splicing.
OEM-only on this vehicle (don't cheap out):
- Engine Control Module (ECM) - While not strictly OEM-only, using a new OEM or professionally remanufactured unit is critical due to the need for precise, vehicle-specific programming.
Aftermarket brands forum-validated for this vehicle:
- For the oxygen sensor itself, Denso, NTK, and Bosch are reputable brands with a history as OEM suppliers and are known to perform reliably in this application.
Brands owners have reported issues with on this vehicle:
- Unbranded, 'white-box' sensors sold on online marketplaces should be avoided. They often have incorrect heater resistance values or use lower-quality sensing elements, leading to premature failure or incompatibility, even if they physically fit.
Real Owner Stories
Aggregated from forums and TSBs cited above. Mileages and costs reflect what owners reported in those sources.
2012 Chevrolet Camaro V6
Symptoms: Multiple O2 heater codes including P0036, P0056, P0155, P0142, and P0135, along with stalling at idle.
What fixed it: Replacement of the ECM (Engine Control Module) after sensor replacements failed to fix the issue.
Source hint: Camaro5.com - '2012 V6, stalling on idle... O2 Sensor (P0056, P0036, P0155, P0142, P0135, etc...)'
2011 Chevrolet Camaro SS
Symptoms: Received code P0036 among several others on a modified vehicle.
What fixed it: The discussion highlights that aftermarket tunes and modifications can reveal or cause O2 sensor circuit issues.
Source hint: Camaro5.com - 'O2 Sensor Problems :/ Help!!'
Chevrolet Owner Report
Symptoms: Ongoing issues including the dashboard going blank while driving and multiple codes: P0036, P0037, P0138, P0141, P2097, P2122, P2127, and P2138.
What fixed it: The owner reported replacing the accelerator pedal three times within a two-month timeframe while dealing with these electrical faults.
Source hint: NHTSA ODI #11221744
Related OBD-II Codes
Frequently Asked Questions
Where is the fuse for the O2 sensor heater located on my 2010-2015 Camaro?
Does GM TSB PIT5336 apply to my 2014 Camaro 3.6L?
Which oxygen sensor do I need to replace for a P0036 code on my V6 Camaro?
Can installing long-tube headers on my Camaro cause this code?
I replaced the sensor but P0036 and other heater codes won't go away. Could it be the computer?
What resistance should I see when testing the O2 sensor heater on my LLT engine?
Helpful Videos

We Have This Part in Stock


The information in this article is provided for general reference and educational purposes only. Vehicle specifications, procedures, and part compatibility can vary by production date, trim level, and region. Always consult your vehicle's factory service manual and verify part numbers before purchasing or performing repairs. Safety-critical components such as airbags, seat belts, and braking systems should be installed by a qualified professional.
- Chevrolet Camaro:
- 🧭 Diagnostic Flowchart
- 🎬 Helpful Videos
- 🛍️ Shop This Part
- What's Unique About the 2010-2015 Chevrolet Camaro
- Symptoms You May Notice
- Most Likely Causes
- Rare But Worth Checking
- Diagnosis Steps
- Parts You'll Likely Need
- Related Codes That Often Appear With This One
- Technical Service Bulletins (TSBs) & Recalls
- Platform-Specific Known Issues
- Mechanic-Grade Diagnostic Values
- Hidden / Shadow Codes Worth Checking
- Scan Tool Commands That Help
- Wiring & Ground Locations
- Real Owner Repair Stories
- When the Usual Fixes Don't Work
- OEM Part Supersession History
- Model Year Variations Within This Range
- Other Known Issues on This Vehicle
- Used vs. New Parts: Buying Guide for This Vehicle
- Real Owner Stories
- 2012 Chevrolet Camaro V6
- 2011 Chevrolet Camaro SS
- Chevrolet Owner Report
- Related OBD-II Codes
- Frequently Asked Questions
- 🎟️ Get 5% Off