
P0191 on 2011-2023 Dodge Charger 3.6L: Fuel Pressure Sensor Range/Performance Causes and Fixes
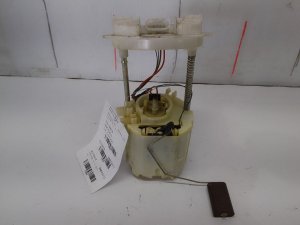
On a 3.6L Dodge Charger, code P0191 is most often caused by a failing in-tank fuel pump assembly, not the sensor itself. The vehicle has a two-part fuel pump system in a saddle tank; the main pump and a secondary transfer unit that contains the fuel filter. Both should be replaced together. Symptoms include long crank times, hesitation, and stalling. Expect to pay $250-$450 for a new fuel pump assembly.
- For code P0191 on a 3.6L Charger, suspect the fuel pump before the fuel pressure sensor.
- Key symptoms pointing to a weak fuel pump are long cranking times after the car has been parked, hesitation when accelerating, and stalling.
- Always confirm the actual fuel pressure with a mechanical gauge before replacing any parts.
- The fuel filter is part of the fuel pump assembly and is replaced along with it.
- The repair is DIY-friendly for those comfortable with relieving fuel pressure and working inside the vehicle cabin to access the fuel tank.
What's Unique About the 2011-2023 Dodge Charger
While P0191 points to the fuel rail pressure sensor, on the 2011-2023 Charger platform, the root cause is frequently a weak or failing in-tank fuel pump assembly. This is especially well-documented on 2011-2016 models. The internal motor of the fuel pump can wear out, specifically the carbon brushes, struggling to build and maintain adequate pressure, which triggers the sensor to report an out-of-range condition. One technician noted replacing 17 such pumps on similar platforms in a six-month period, with all failed units reading well below the 55-60 psi specification. Owners often first notice symptoms like extended cranking before the Check Engine Light 🎬 Watch: Troubleshooting a long crank or no-start condition. and code P0191 appear.
Generation note: This covers the second generation (LD) of the Dodge Charger, which includes the 2011-2014 models and the 2015-2023 facelifted models. The fuel pump failure is a widely noted issue on the earlier 2011-2016 models, but the fundamental design is similar across the entire year range, so the issue can still occur on later models. The 3.6L Pentastar engine itself was updated in 2016, but the fuel delivery system principles remain the same.
Symptoms You May Notice
- Check Engine Light is on
- Extended engine crank time, especially after sitting for a few hours
- Hesitation or stumbling during acceleration
- Loss of engine power, especially when merging or under load
- Engine stalling, sometimes intermittently
- No-start or hard start condition
- Rough idle
- Faint whining noise from the rear of the vehicle (fuel tank area)
- Replacing the fuel rail pressure sensor without first verifying the actual fuel pressure with a mechanical gauge. Since a weak fuel pump is the most common cause, this often fails to fix the problem.
- Replacing only the primary fuel pump on the driver's side and not the passenger-side transfer unit, which contains the fuel filter. A clogged old filter can quickly cause the new pump to fail.
Most Likely Causes
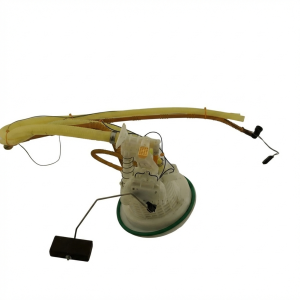
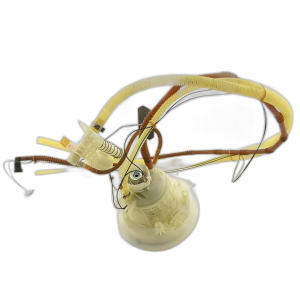
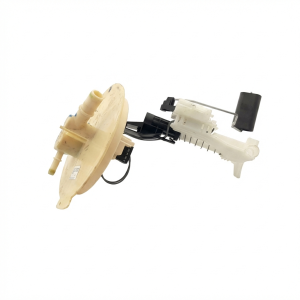
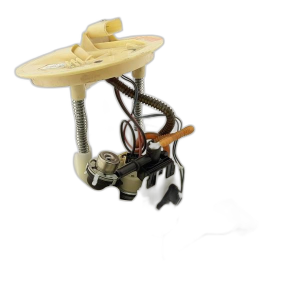
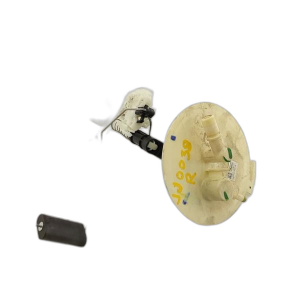
- Failing In-Tank Fuel Pump Assembly 🔴 High Probability → Shop Fuel Pump The brushes in the electric motor inside the factory fuel pump are a known wear item, leading to reduced pump output and eventual failure. The vehicle uses a saddle tank with two units: a primary pump and a secondary transfer unit containing the non-serviceable fuel filter. A clogged filter in the transfer unit can overwork and destroy a new pump, so both units should be replaced together.
How to confirm: Perform a fuel pressure test using a mechanical gauge connected to the fuel rail's Schrader valve. Start the engine and observe the pressure. The specification is approximately 58 psi (400 kPa). Failing pumps often read between 38-48 psi. Also, listen for the pump to prime (a 2-3 second hum) when turning the key to 'On'. Absence of this sound points to a dead pump or electrical issue.
Typical fix: Replace both the primary fuel pump module (driver's side) and the fuel transfer/filter unit (passenger's side). The fuel tank must be accessed from under the rear seat.
Est. part cost: $250-$450 - Faulty Fuel Rail Pressure Sensor (FRPS) 🟡 Medium Probability → Shop Fuel Pressure Sensor
How to confirm: If a mechanical fuel pressure test shows that pressure is correct and stable (around 58 psi), but the scan tool's live data for fuel pressure is erratic or incorrect, the sensor itself is likely faulty. You can test the sensor's voltage output to see if it corresponds correctly to the measured pressure.
Typical fix: Replace the fuel rail pressure sensor, which is located on the engine's fuel rail.
Est. part cost: $50-$150 - Damaged Wiring or Connector ⚪ Low Probability
How to confirm: Visually inspect the wiring harness and connector for the fuel rail pressure sensor for any signs of damage, corrosion, or loose pins. Perform a continuity test on the wires between the sensor and the PCM.
Typical fix: Repair the damaged section of the wiring harness or replace the connector pigtail.
Est. part cost: $20-$60
Rare But Worth Checking
- Clogged Fuel Injectors: → Shop Fuel Injector Leaking or severely clogged injectors could potentially cause pressure fluctuations in the rail, but this is less common than a pump or sensor failure.
- Faulty Powertrain Control Module (PCM): → Shop Engine Control Module (ECM) In very rare instances, the PCM's internal circuit for interpreting the fuel pressure sensor signal can fail. This should only be considered after all other possibilities have been exhausted.
Diagnosis Steps
- Scan the PCM for any stored trouble codes. Note all codes present, especially P0087 or P0171.
- Using a scan tool with live data capability, monitor the 'Fuel Rail Pressure' and 'Desired Fuel Rail Pressure' PIDs. Observe if the actual pressure is erratic, slow to respond, or significantly different from the desired pressure.
- Turn the ignition to 'On' (without starting) and listen for a 2-3 second humming sound from the rear seat area, indicating the fuel pump is priming.
- Crucial Step: Relieve fuel system pressure, then connect a mechanical fuel pressure gauge to the Schrader valve on the fuel rail. Start the engine and compare the gauge reading to the scan tool data and the manufacturer's specification (approx. 58 psi / 400 kPa).
- If the mechanical pressure gauge shows low or fluctuating pressure, the fuel pump assembly is the primary suspect. The fuel filter is integrated into the secondary (passenger side) assembly. It is highly recommended to replace both the driver's side pump and passenger side transfer unit.
- If mechanical pressure is stable and within spec, but the scan tool reading is incorrect or the code persists, suspect the fuel rail pressure sensor or its wiring.
- Inspect the fuel rail pressure sensor connector and wiring harness for any visible damage, corrosion, or loose connections. Test wiring for continuity if damage is suspected.
- If the wiring is intact, the fuel rail pressure sensor is the most likely cause and should be replaced.
Parts You'll Likely Need
- Fuel Pump and Sender Assembly (Primary, Driver Side)
(OEM #5136022AM (supersedes 5136022AD, AE, AF, AG, AH, AI, AJ, AK, AL))— This is the most frequent cause of P0191 on this platform due to a common failure mode of the internal pump motor. This is the main pump unit.
Trusted brands: Mopar, Bosch, Delphi, Spectra Premium
OEM price range: $350-$500
Aftermarket price range: $200-$350 - Fuel Transfer Unit / Filter Assembly (Secondary, Passenger Side) — This unit contains the non-serviceable fuel filter. It is critical to replace this along with the primary pump, as a clogged filter will cause a new pump to fail prematurely.
Trusted brands: Mopar, Spectra Premium
OEM price range: $150-$250
Aftermarket price range: $80-$150 - Fuel Rail Pressure Sensor
(OEM #5142345AA (May be listed as Fuel Injection Pressure Regulator))— This is the second most likely component to fail. It is replaced when fuel pressure is confirmed to be good, but the code persists.
Trusted brands: Mopar, Bosch, Standard Motor Products
OEM price range: $100-$180
Aftermarket price range: $50-$120
Related Codes That Often Appear With This One
- P0087 — Stands for 'Fuel Rail/System Pressure - Too Low'. This code often appears with P0191 because the most common cause, a weak fuel pump, results in low system pressure.
- P0171 — Stands for 'System Too Lean (Bank 1)'. Low fuel pressure can prevent the injectors from supplying enough fuel, leading to a lean air-fuel mixture.
- P0300-P0306 — Misfire codes can be triggered when low fuel pressure leads to a lean condition, preventing consistent and proper combustion in one or more cylinders.
Technical Service Bulletins (TSBs) & Recalls
- TSB 18-020-10: Mentions a PCM software update to address improvements for erroneous MIL illumination for several DTCs, including P0191. This indicates Chrysler is aware of the system's sensitivity.
- TSB 06053: An older TSB for a 2007 Dodge Ram that specifically addresses 'DIAGNOSTIC TROUBLE CODE (DTC) P0191, FUEL PRESSURE SENSOR RATIONALITY', showing a history of this issue type within Chrysler products.
- STAR Case S2014000001: While not for P0191, this docume
Platform-Specific Known Issues
- A high rate of fuel pump failures has been documented by owners and technicians, particularly on 2011-2016 models. The failure is often gradual, starting with long crank times before progressing to stalling and setting pressure-related codes like P0191 and P0087.
- The vehicle uses a saddle-style fuel tank with two access ports under the rear seat. The driver's side houses the main pump, while the passenger's side houses the fuel transfer unit and integrated filter. Both must be accessed for a complete repair.
Mechanic-Grade Diagnostic Values
- Fuel Rail Pressure Sensor (FRPS) Signal Voltage — expected: Approximately 0.5V at 0 PSI (Key On, Engine Off) and rises proportionally to a max of ~4.5V at maximum pressure. Should increase smoothly with RPM.. Failure: Voltage is stuck at 0V, 5V, or does not change with engine load. Jumps or drops out during a wiggle test of the harness.
- FRPS Reference Voltage — expected: 5.0V supplied by the PCM to the sensor.. Failure: Voltage is significantly lower or higher than 5.0V, or is absent, indicating a PCM or wiring issue.
- FRPS Ground Circuit — expected: Near 0V with good continuity to chassis ground.. Failure: Voltage is present on the ground wire, or high resistance to ground, indicating a bad ground connection.
- Fuel Pump Power at Connector — expected: 12V+ for 2-3 seconds when the key is turned to 'On' (priming), and constant 12V+ when the engine is running.. Failure: No voltage during priming or while cranking, or intermittent voltage, points to a relay, fuse, or TIPM issue.
Scan Tool Commands That Help
- wiTECH (OEM) or advanced aftermarket scanner: Fuel Pump Relay Actuation / Fuel Pump Override — To manually command the fuel pump on without starting the engine. This allows for checking pump operation and performing pressure tests without the variable of a running engine. It helps isolate a faulty pump from a relay or wiring issue.
- Any scan tool with live data: Monitor 'Commanded Fuel Rail Pressure' vs. 'Actual Fuel Rail Pressure' PIDs — This is the primary diagnostic data for P0191. A large, persistent discrepancy between commanded and actual pressure is the trigger for the code. If actual pressure is low while commanded is high, it points to a weak pump or leak. If actual pressure is stable but the sensor reading is erratic, it points to a faulty sensor or wiring.
Wiring & Ground Locations
- Fuel Pump Fuse (Main) — In the trunk fuse box (next to the battery), position F21, typically a 30A fuse.. This is the primary power source for the fuel pump. If this fuse is blown, the pump will not run at all.
- Fuel Pump Relay Power Fuse — In the engine compartment fuse box, position F39, typically a 10A fuse.. This fuse provides power to the control side of the fuel pump relay in the trunk. If this fuse is blown, the relay will not activate, and the pump will not receive power.
- Fuel Pump Relay — In the trunk fuse box. The exact position can vary by year, but it is often labeled as R72 or shown in diagrams as the main fuel pump relay.. This relay is the switch that sends high-amperage power to the fuel pump. A faulty relay can cause intermittent or no power to the pump, mimicking pump failure.
- Fuel Pump Connector Wires — At the top of the fuel pump assembly under the driver's side rear seat.. The power wire is typically Dark Blue/Orange, and the ground is Black/Orange. Verifying power and ground here is the final step before condemning the pump. Crucially, some aftermarket pump harnesses have different pinouts and must be re-pinned to match the vehicle's harness.
- G120 — Under the driver's seat.. This is a major ground point located in close proximity to the fuel pump access panel. A corroded or loose ground here could potentially affect the fuel pump's ground circuit, causing intermittent issues.
Real Owner Repair Stories
- YouTube video by 'The Mobile Mechanic 757' (Dodge Charger (year not specified, but within the generation)) — No start after fuel pump replacement. Customer had two previous mechanics fail to fix it.
❌ Tried (didn't work) Replacing the fuel pump with a new aftermarket unit.
✅ What actually fixed it The new aftermarket fuel pump came with a wiring harness that had a different pinout than the factory harness. The power and ground pins were in different locations. The fix was to identify the correct power and ground wires on the vehicle side and re-pin the new connector to match before plugging it into the new pump.
OEM Part Supersession History
5136022AD, AE, AF, AG, AH, AI, AJ, AK, AL→5136022AM— Standard revisions and improvements by the manufacturer to address reliability or manufacturing changes.
Heads up: All previous part numbers are superseded by 5136022AM, which is the current correct OEM replacement for the primary (driver's side) fuel pump module.
Model Year Variations Within This Range
- 2011-2023: The specific location and numbering of the fuel pump relay in the rear fuse box can vary slightly between model years and installed options. For example, on some models it may be relay R72, while on others it may be a different number. It is critical to consult the diagram on the fuse box cover or the owner's manual for the specific vehicle being serviced.
Diagnostic Flowchart
Other Known Issues on This Vehicle
Issues unrelated to this code that are worth knowing about as an owner of this generation:
- Rocker Arm Failure ('Pentastar Tick') 🔴 High — Very common across all 3.6L Pentastar applications, often appearing after 60,000 miles. It presents as an audible ticking noise from the engine that can lead to camshaft damage. (Ref: Subject of class-action lawsuits; no official recall, but extensive documentation exists.)
- Cracked Oil Filter Housing / Cooler Assembly 🔴 High — Extremely common failure. The factory plastic housing becomes brittle from heat cycles and cracks, causing significant oil and/or coolant leaks down the back of the engine. Often occurs between 50,000 and 100,000 miles. (Ref: No recall has been issued, despite widespread complaints. Many owners proactively replace the plastic unit with a more durable aftermarket aluminum version.)
- Left Cylinder Head Failure (Early Models) 🔴 High — Affected 2011-2013 model year 3.6L engines. Excessive valve guide wear on the left-side cylinder head would cause misfires (P0302, P0304, P0306) and require head replacement. (Ref: Chrysler issued extended warranty X56 (TSB 09-002-14) to cover repairs for this specific issue for 10 years/150,000 miles.)
Used vs. New Parts: Buying Guide for This Vehicle
When a used part is the smart pick: For this specific repair, using a used part is strongly discouraged for the fuel pump itself, as it is a primary wear item with a finite lifespan. The labor involved is significant enough that installing a part with unknown history is a major risk. A used Fuel Rail Pressure Sensor from a low-mileage, verified running vehicle could be a cost-effective option.
Donor-vehicle mileage cap: roughly under 40000 miles for the part to have meaningful remaining life.
What to inspect on the donor part:
- For a sensor, verify the donor vehicle was not in a front-end collision.
- Check for corrosion on the electrical connector pins.
- If possible, get the VIN to check the donor vehicle's history.
OEM-only on this vehicle (don't cheap out):
- Fuel Pump Assembly: While not strictly 'OEM-only', using a Mopar pump or a direct OEM supplier like Bosch or Delphi is highly recommended to avoid performance, longevity, and wiring harness compatibility issues.
Aftermarket brands forum-validated for this vehicle:
- Delphi
- Bosch
- Spectra Premium (A commonly available, decent quality option)
Brands owners have reported issues with on this vehicle:
- Unbranded, low-cost 'white box' units from online marketplaces. These are frequently cited in forums as having high failure rates and can have incorrect wiring harnesses that lead to significant diagnostic confusion.
Real Owner Stories
Aggregated from forums and TSBs cited above. Mileages and costs reflect what owners reported in those sources.
2018 Dodge Charger 3.6L V6
Symptoms: The owner dealt with the complex saddle tank system and emphasized the difficulty of moving hoses across the tank 'hump'.
What fixed it: Replaced both the driver-side primary pump and the passenger-side transfer unit (which contains the filter) at the same time, using a wire to pull new hoses across the tank.
Source hint: DIY Fuel Pump Replacement Tips on YouTube (The Wheel Fix It Team)
2011-2016 Dodge Charger 3.6L V6
Symptoms: Gradual failure starting with long crank times before progressing to stalling and setting pressure-related codes.
What fixed it: Replacement of the fuel pump module (P/N 5136022AD).
Source hint: AliExpress (Article/Blog) regarding common failure of fuel pump module 5136022AD
Dodge Charger R/T
Symptoms: Owner described the passenger-side unit as the 'octopus one' due to the numerous hoses involved in the saddle tank design.
What fixed it: Replaced both fuel pumps using a proper fuel tank lock ring tool rather than a punch and hammer.
Source hint: Fuel Pump Replacement Walkthrough on YouTube (David Vlogs)
Related OBD-II Codes
Frequently Asked Questions
Is there a TSB for the P0191 code on my Dodge Charger?
Why does my Charger have two fuel pump units under the rear seat?
Can I just replace the fuel filter to fix the P0191 code?
What is the correct fuel pressure specification for the 3.6L Pentastar V6?
My Charger takes a long time to start after sitting. Is this related to P0191?
How can I tell if the issue is the sensor or the actual fuel pump?
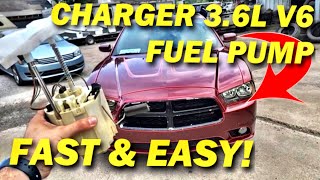
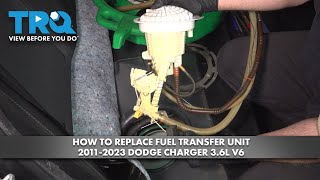
Helpful Videos

Used OEM Parts in Stock
New Aftermarket Parts Available


The information in this article is provided for general reference and educational purposes only. Vehicle specifications, procedures, and part compatibility can vary by production date, trim level, and region. Always consult your vehicle's factory service manual and verify part numbers before purchasing or performing repairs. Safety-critical components such as airbags, seat belts, and braking systems should be installed by a qualified professional.
- Dodge Charger:
- 🧭 Diagnostic Flowchart
- 🎬 Helpful Videos
- 🛍️ Shop This Part
- What's Unique About the 2011-2023 Dodge Charger
- Symptoms You May Notice
- Most Likely Causes
- Rare But Worth Checking
- Diagnosis Steps
- Parts You'll Likely Need
- Related Codes That Often Appear With This One
- Technical Service Bulletins (TSBs) & Recalls
- Platform-Specific Known Issues
- Mechanic-Grade Diagnostic Values
- Scan Tool Commands That Help
- Wiring & Ground Locations
- Real Owner Repair Stories
- OEM Part Supersession History
- Model Year Variations Within This Range
- Other Known Issues on This Vehicle
- Used vs. New Parts: Buying Guide for This Vehicle
- Real Owner Stories
- 2018 Dodge Charger 3.6L V6
- 2011-2016 Dodge Charger 3.6L V6
- Dodge Charger R/T
- Related OBD-II Codes
- Frequently Asked Questions
- 🎟️ Get 5% Off