
P0234 on 2011 Chevrolet Silverado 3500 6.6L Duramax: Overboost Causes and Fixes
On the 2011 LML Duramax, code P0234 is almost always caused by a problem with the Variable Geometry Turbo (VGT) system. The most common culprits are a faulty Turbo Vane Position Sensor or sticking turbo vanes due to carbon buildup. Expect to start with sensor replacement before considering a more intensive turbo cleaning or VGT solenoid replacement.
- P0234 on a 2011 Duramax points directly to a problem with the Variable Geometry Turbo (VGT) system.
- The most likely causes, in order, are: sticking VGT vanes from soot, a bad Turbo Vane Position Sensor, or a faulty VGT solenoid.
- Do not immediately assume the entire turbocharger needs replacement. Diagnosis of the individual control components can save thousands of dollars.
- If you have an aftermarket tune, returning the truck to its stock programming is a critical first diagnostic step.
- Driving with an active P0234 code is risky and can lead to catastrophic engine or turbocharger damage, especially under load.
What's Unique About the 2011-2011 Chevrolet Silverado 3500
The 2011 Silverado uses the 6.6L LML Duramax engine, which is equipped with a Garrett Variable Geometry Turbocharger (VGT). Unlike a traditional turbo with a simple wastegate, the LML's VGT uses adjustable vanes inside the turbine housing to control boost pressure dynamically. While this design provides excellent response and efficiency, it's also prone to specific failures. Code P0234 on this truck is rarely about the turbocharger 'failing' in a catastrophic way, but rather a failure in the complex control system—either the vanes are physically stuck due to soot, or the sensors and solenoids that monitor and control them have failed.
Symptoms You May Notice
- Check Engine Light is on
- Reduced engine power (limp mode)
- Noticeable decrease in acceleration
- Audible whooshing or a high-pitched siren-like whine from the engine bay
- Black or bluish-white smoke from the exhaust under acceleration or deceleration.
- Vehicle may defuel or cut power abruptly when climbing a hill or towing.
- Poor fuel economy
- Replacing the entire turbocharger assembly without first diagnosing the individual components. Often, a thorough cleaning or replacing a much cheaper sensor (Vane Position Sensor) or solenoid is all that is required.
Most Likely Causes
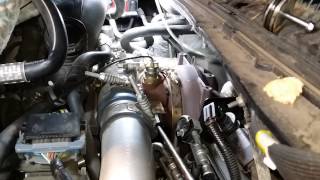
- Faulty Turbocharger Vane Position Sensor 🔴 High Probability → Shop Turbocharger This sensor is a well-documented, high-failure item on the LML Duramax due to intense heat cycles. It sits directly on top of the turbocharger and its job is to report the exact position of the VGT vanes back to the ECM. When it fails or gives inaccurate readings, the ECM cannot properly control boost, often leading to an overboost or underboost condition.
How to confirm: Often seen with code P2563 or P003A. Using a scan tool, monitor the 'Turbocharger Vane Position Sensor' data. If the reading is erratic, stuck at a certain percentage regardless of engine load, or doesn't change when the plunger is manually depressed (with the sensor removed), it has failed. The sensor can be tested for proper voltage signal changes.
Typical fix: Replace the Turbo Vane Position Sensor. The OEM part number is GM 12643471 🎬 Watch: How to locate, test, and replace the vane position sensor (which supersedes 12635324, 98061570, and others). A special 1-inch slotted socket (like Schley SCH12400) is highly recommended for removal. The ECM will need to perform a 'relearn' procedure, which often occurs automatically over several drive cycles or can be forced with a capable scan tool.
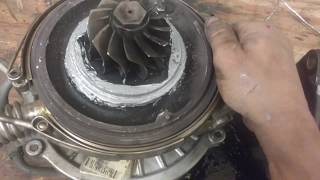
Est. part cost: $250-$400 for an OEM sensor. - Sticking/Sooted VGT Vanes or Unison Ring 🔴 High Probability The LML Duramax's emissions system (EGR) and driving cycles (especially short trips or excessive idling) can lead to heavy soot and carbon buildup in the turbine housing. This buildup causes the delicate VGT vanes and the unison ring that moves them to bind or stick, preventing them from opening to regulate boost pressure. Manufacturer Bulletin #PIP6058A notes that wastegate binding can also lead to P0234 and P0299 codes.
How to confirm: A technician can use a scan tool to command the VGT actuator and watch for the desired vs. actual vane position. If the actual position doesn't match the command, or if the actuator arm doesn't move smoothly through its full range of motion, the vanes are likely sticking. This often requires physical inspection after turbo removal.
Typical fix: The turbocharger must be removed, disassembled, and the turbine housing, unison ring, and vanes must be meticulously cleaned of all carbon deposits. This is labor-intensive but often saves the cost of a full turbo replacement. Some owners report success with in-situ chemical cleaners, but removal and manual cleaning is the most reliable method. 🎬 See how to clean sticky VGT vanes using Easy Off
Est. part cost: $50-$150 for gaskets and cleaning supplies if doing it yourself; a replacement turbo is much more. - Faulty VGT Solenoid / Actuator 🟡 Medium Probability The VGT solenoid is an electro-mechanical valve that uses engine oil pressure to move the VGT actuator arm. It can become sluggish or fail electrically. Contaminated or old engine oil can cause the solenoid's internal passages to clog, hindering its ability to react to the ECM's commands. This part is shared across many Duramax and even Powerstroke applications, indicating a wide service life variance.
How to confirm: With a scan tool, command the VGT solenoid to cycle while observing the actuator arm on the side of the turbo. If there is no movement or it is jerky (and the vanes are known to be free), the solenoid may be at fault. The solenoid's electrical resistance can also be tested.
Typical fix: Replace the VGT solenoid. It is mounted externally on the turbocharger. A common replacement part is Garrett 792593-0001. Ensure clean engine oil and a fresh oil filter are used, as oil quality is critical for VGT operation.
Est. part cost: $150-$250 - Aftermarket Engine Tuning 🟡 Medium Probability Many owners install aftermarket tuners to increase power. An aggressive tune that requests higher boost levels without correctly modifying the VGT control tables or overboost limits can easily cause the system to exceed the factory threshold, triggering P0234, especially under heavy load like towing.
How to confirm: Check if the vehicle has an aftermarket tuner installed or if the ECM has been custom-tuned. The code will typically appear only during high-demand situations, like pulling a heavy trailer up a grade.
Typical fix: Return the vehicle to the stock tune or contact the tuning company for a revised file that is less aggressive on boost control. Some tuners, like EFILive, allow for direct adjustment of the overboost pressure limits.
Est. part cost: $0
Rare But Worth Checking
- Faulty Manifold Absolute Pressure (MAP) Sensor: → Shop Manifold Absolute Pressure Sensor While not as common as VGT component failure, a MAP sensor that is heavily clogged with soot from the EGR system can send inaccurate pressure readings to the ECM. If it reads lower than actual pressure, the ECM may command the turbo to build more boost than necessary, causing an overboost condition. Cleaning the MAP sensor is a common maintenance item on LMLs.
- Boost Leak in Charge Air System: Typically, a boost leak (cracked intercooler, torn boot, loose clamp) will cause an underboost code (P0299). However, a significant leak can sometimes cause erratic turbo behavior and momentary overboost spikes as the turbo tries to compensate for the pressure loss. Manufacturer Bulletin #21-NA-293 and Bulletin #22-NA-007 note that Charge Air Cooler (CAC) icing in extremely cold weather can lead to P0234 and P0299 codes.
- Restricted Exhaust: A clogged Diesel Particulate Filter (DPF) or catalytic converter can increase exhaust backpressure, preventing the turbo from regulating boost effectively. This can lead to overboost conditions, though other DPF-related codes would likely be present as well.
Diagnosis Steps
- Retrieve all stored DTCs with an OBD-II scanner. Note any other codes that are present with P0234 🎬 Watch: How to diagnose and fix a P0234 overboost code, especially P2563 or P003A.
- Check if the vehicle has any aftermarket performance tuning. If so, return it to the stock tune as a primary diagnostic step.
- Using a scan tool with live data capabilities, monitor 'Desired Vane Position' vs. 'Actual Vane Position' and 'Desired Boost' vs. 'Actual Boost' during a test drive under various loads. A large, persistent deviation between desired and actual values points to a control system problem.
- Inspect the charge air cooler system for any signs of leaks, such as oil residue, torn boots, or loose clamps. A pressure test is recommended.
- With the engine off, use the scan tool to command the VGT actuator through its full range of motion (Vane Sweep Test). Visually inspect the actuator arm on the turbo for smooth, complete travel. Any binding or hesitation points to sticking vanes.
- Inspect the Turbo Vane Position Sensor (GM P/N 12643471). Check its wiring and connector. If suspected, remove and test the sensor or replace it. This is the most common point of failure.
- Inspect the VGT solenoid. Check its wiring and test its resistance. If it fails the resistance test or does not actuate when commanded (and vanes are free), it needs replacement.
- Inspect and clean the MAP sensor. A sensor clogged with soot can give false readings.
- If all sensors and actuators appear to be working but the vanes are confirmed to be sticking, the turbocharger must be removed for cleaning or replacement.
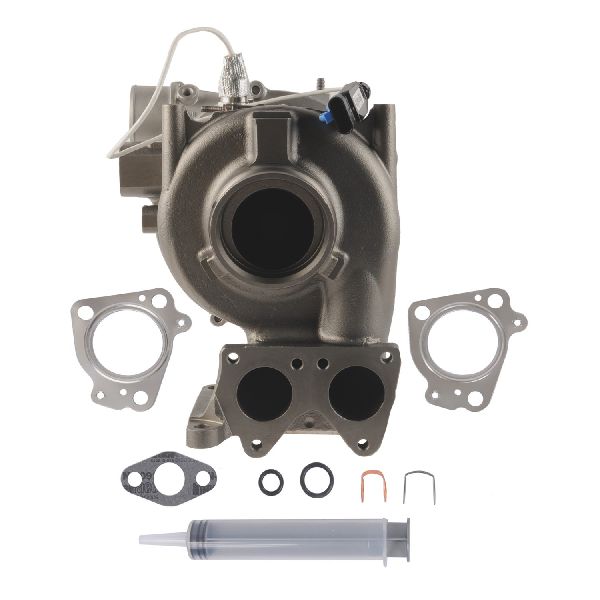
Parts You'll Likely Need
- Turbocharger Vane Position Sensor
- Turbocharger VGT Solenoid
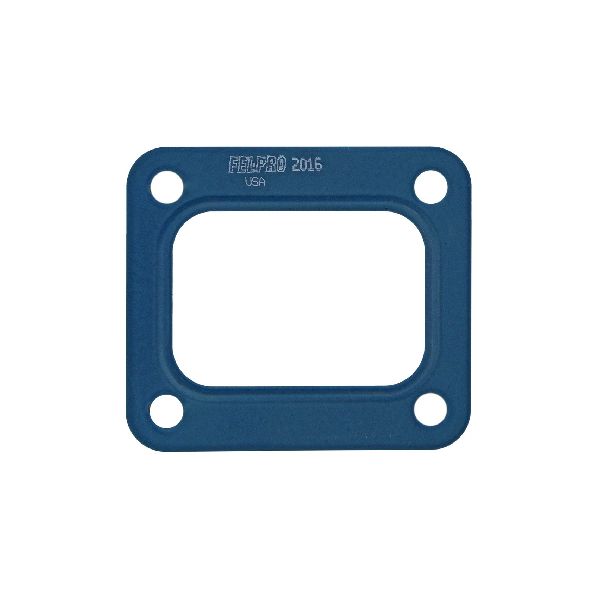
- Turbocharger Gasket Kit
Related Codes That Often Appear With This One
- P2563 — This code for 'Turbocharger Boost Control Position Sensor Circuit Range/Performance' directly points to a problem with the Vane Position Sensor, a primary cause of P0234.
- P003A — This code for 'Turbocharger Boost Control 'A' Position Exceeded Learn Limit' indicates the VGT actuator has had to move beyond its expected range to achieve the desired boost, often due to sticking vanes or a sensor issue.
- P0299 — This is the 'Underboost' code. Seeing both P0299 and P0234 can indicate a very erratic turbo, often caused by sticking vanes that are intermittently in the wrong position at both ends of the spectrum, or a failing Vane Position Sensor giving erratic readings.
Technical Service Bulletins (TSBs) & Recalls
- PIP5092A: This TSB is often mentioned in forums in relation to P0234 and other turbo codes, addressing diagnostic procedures for sticking turbo vanes on LML engines.
- Special Coverage #15511 (NHTSA 10151302): While not for P0234 directly, this covers a leak at the turbo downpipe on 2011-2015 LML engines, showing the area is a focus for GM service actions.
- PIP5217: Addresses glow plug system issues, a common LML problem but not directly related to P0234.
- PI1214A / PIP5007E: Related to DEF system and NOx sensor diagnostics, which are common LML issues but separate from P0234.
- Bulletin #PIP5892B: Provides guidance for technicians regarding P0234 (Engine Overboost) setting current or in history post-turbocharger replacement, advising a clear of the DTC and an Intake System Learned Values Reset using GDS2.
Mechanic-Grade Diagnostic Values
- VGT Solenoid Coil Resistance — expected: 3.42 to 4.18 Ω (Ohms) at 73°F (23°C). Failure: A resistance reading outside of this range indicates a failed solenoid.
- Turbo Vane Position Sensor Voltage — expected: Receives a 5V reference. Return signal is ~0V with vanes fully open and ~4.0V with vanes fully closed (or in turbine braking position).. Failure: Voltage that is stuck, erratic, or does not sweep smoothly between the high and low values when commanded by a scan tool indicates a faulty sensor or sticking vanes.
- Manifold Absolute Pressure (MAP) Sensor Range — expected: The OEM sensor for the LML Duramax is a 4-Bar sensor, capable of reading up to 44 psi of boost pressure.. Failure: While a specific voltage test is less common than cleaning, a sensor that reads atmospheric pressure incorrectly at key-on, engine-off or provides erratic readings under boost may be faulty.
Scan Tool Commands That Help
- GDS2 / Professional Scan Tool (e.g., Autel): Turbocharger (TC) Vane Position Control / Vane Sweep Test — This bidirectional test commands the VGT vanes to sweep from 0% to 100% (or open to closed). It is used to visually and electronically confirm the full range of motion. Any hesitation, binding, or failure to match the commanded vs. actual position on the scan tool data points to sticking vanes or a faulty actuator/solenoid.
- GDS2 / Professional Scan Tool: Turbocharger (TC) Learn — After replacing the Turbo Vane Position Sensor, the ECM needs to learn the new sensor's baseline voltage readings for the fully open and closed vane positions. This function forces the recalibration process. If not performed, codes P003A or P2563 may set, and the system may not control boost correctly. The system may also 'relearn' on its own over several drive cycles.
Wiring & Ground Locations
- Cab-to-Engine Ground Strap — A braided ground strap connecting the firewall/cab to the rear of the driver's side cylinder head.. A corroded or broken main ground strap can cause unstable voltage and floating grounds for various sensors, including those in the engine management system. While not a direct cause, poor grounding can lead to erratic sensor readings, potentially confusing the ECM's turbo control logic.
- Battery-to-Engine Ground — The main ground cable from the negative battery terminal typically connects to the engine block or passenger side cylinder head.. This is the primary ground path for the entire engine electrical system. A loose or corroded connection here can cause a wide range of issues, including problems with the ECM and its ability to accurately read sensors and control actuators like the VGT solenoid.
- Lower Engine Block Grounds — Multiple ground wires from the main wiring harness attach to studs on the lower portion of the engine block on both the driver and passenger sides.. These grounds are critical for the various sensors and components bundled in the engine harness. A loose ground on one of these studs could directly impact the reference voltage for a key sensor in the turbo control system.
"I Checked Everything" — The Actual Cause
- A common pattern for P0234 on the LML Duramax is not a failed smoke test, but a failed parts-swap. Technicians or owners will often replace the Turbo Vane Position Sensor first because it is a known high-failure part. When the code returns, the assumption is the new sensor is bad. However, the actual root cause is frequently mechanical binding of the VGT vanes or unison ring inside the turbo due to soot. The sensor was correctly reporting that the vanes were not moving to the commanded position, but the underlying cause was mechanical, not electrical. This leads to unnecessarily replacing the sensor multiple times before addressing the sticking vanes.
OEM Part Supersession History
12635324, 98061570, 12630145, 98011739, 98039595→12643471— Standard part revision and consolidation by GM.
Heads up: The newer part number (12643471) is the correct and most current replacement for all previous versions on the LML Duramax.792593-0001→792593-0002— Part revision by Garrett.
Heads up: Both part numbers are often listed for the VGT Solenoid. 792593-0001 is the most commonly cited part, but -0002 may be a later revision. They are generally considered interchangeable for this application. This solenoid is also shared with some Ford Powerstroke engines.
Model Year Variations Within This Range
- 2011-2012: Early production LML engines, including the 2011 model year, are noted by some sources to have a higher incidence of CP4 high-pressure fuel pump failures. While this is not directly related to the P0234 overboost code, it is a critical reliability issue for the platform that owners should be aware of.
Diagnostic Flowchart
Other Known Issues on This Vehicle
Issues unrelated to this code that are worth knowing about as an owner of this generation:
- CP4.2 High-Pressure Fuel Pump Failure 🔴 High — The most notorious LML engine problem. Can occur at any mileage, often without warning. Failure sends metal debris throughout the entire fuel system, leading to repairs costing $8,000-$15,000+. (Ref: Numerous TSBs exist, and it's the subject of class-action lawsuits. No formal recall was issued, but it's a widely acknowledged catastrophic failure point.)
- DEF System Failures (Heater, Sensors, Pump) 🟠 Medium — Very common, especially in colder climates. The DEF tank heater is a frequent failure point, causing a 'Service Emissions System' warning and limp mode. Failures can occur as early as 30,000-50,000 miles. (Ref: Multiple TSBs (e.g., related to codes P20B9, P20BB) exist for diagnosing DEF heater and sensor issues.)
- NOx Sensor Failures 🟠 Medium — Common failure item. The LML has two NOx sensors that can fail, often leading to 'Bad DEF Quality' or 'Service Emissions System' messages and limp mode, even if the DEF fluid is fine. (Ref: TSBs exist for diagnosis (e.g., PI1214A). Early 2011 models had specific calibration issues.)
- Cracked #8 Piston 🔴 High — Less common than CP4 or DEF issues, but a known catastrophic failure. Often attributed to cooling stack inefficiencies and high cylinder pressures, sometimes exacerbated by aggressive tuning. Can occur in stock trucks as well. (Ref: TSB PI1394A provides information on piston installation but does not directly address the cracking issue.)
- Clogged MAP Sensor 🟡 Low → Shop Manifold Absolute Pressure Sensor — Extremely common maintenance issue due to the EGR system routing. Soot builds up on the sensor every 15,000-30,000 miles, causing poor performance, reduced fuel economy, and more frequent DPF regens.
Used vs. New Parts: Buying Guide for This Vehicle
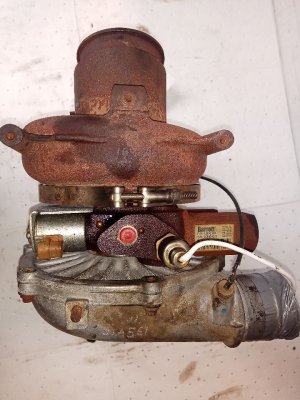
When a used part is the smart pick: A complete, used turbocharger assembly can be a cost-effective option ONLY if the failure of your current turbo is confirmed to be an external electronic component (like the Vane Position Sensor or VGT solenoid) and the turbo itself is being replaced as a precaution or for a minor issue. It is not recommended if your original turbo failed due to internal bearing or wheel damage.
Donor-vehicle mileage cap: roughly under 80000 miles for the part to have meaningful remaining life.
What to inspect on the donor part:
- Check for shaft play. There should be almost no in-and-out (axial) play. A very small amount of side-to-side (radial) play is normal, but it should not allow the wheels to touch the housing.
- Spin the compressor wheel by hand. It should spin freely and smoothly with no grinding or scraping noises.
- Inspect the compressor and turbine wheel fins for any signs of chipping, bending, or impact damage from foreign objects.
- Ensure the actuator arm for the VGT vanes moves freely without binding (if accessible).
OEM-only on this vehicle (don't cheap out):
- Turbocharger Vane Position Sensor: This is a critical, high-failure sensor. Due to the labor involved in replacement and the need for a 'relearn' procedure, using a low-quality aftermarket part is a significant risk. Stick with Genuine GM (ACDelco) parts.
Aftermarket brands forum-validated for this vehicle:
- Garrett: Garrett is the original equipment manufacturer for the turbocharger and related components like the VGT solenoid. Using Garrett-branded replacement parts is equivalent to OEM quality.
Brands owners have reported issues with on this vehicle:
- Unbranded 'Amazon/eBay' sensors: While tempting due to low cost, generic, unbranded vane position sensors are notorious for premature failure or being out-of-spec from the start, leading to a repeat diagnosis and repair.
Real Owner Stories
Aggregated from forums and TSBs cited above. Mileages and costs reflect what owners reported in those sources.
2011 Chevrolet Silverado 3500 6.6L Duramax
Symptoms: The vehicle would defuel or cut power abruptly when climbing a hill or towing a 5th wheel trailer.
What fixed it: The discussion suggested the issue was related to aftermarket tuning requesting boost levels that exceeded factory thresholds.
Source hint: DuramaxDiesels.com: 'P0234 overboost'
2011 Chevrolet Silverado 3500 6.6L Duramax
Symptoms: The owner experienced a P0234 code while towing heavily uphill at high RPMs and load.
What fixed it: The code cleared itself after several key cycles, though the community discussed high load as the primary trigger.
Source hint: DuramaxDiesels.com: 'LMM: - Code p0234 help'
2011 Chevrolet Silverado 3500 6.6L Duramax
Symptoms: An overboost condition was logged in the freeze frame data, but it did not immediately trigger a check engine light.
What fixed it: The condition was identified as an intermittent overboost that was logged without immediate driver notification.
Source hint: EFILive Forum: 'P0234 Overboost'
NHTSA Report #11442734
Symptoms: An owner reported experiencing reduced power due to code P0234 (turbocharge overboost). The issue persisted for a week until the weather warmed up.
What fixed it: The report suggests the condition was weather-dependent, aligning with documented issues regarding charge air cooler icing.
Source hint: NHTSA ODI #11442734
Related OBD-II Codes
Frequently Asked Questions
Does TSB PIP5092A apply to my 2011 Silverado 3500 with the LML Duramax engine?
Is there a specific part number I should look for if I need to replace the Turbo Vane Position Sensor?
I heard there is a special tool needed to change the sensor on the LML Duramax. What is it?
Could my aftermarket tuner be causing the P0234 code when I'm towing?
Does the 2011 Silverado 3500 require a 'relearn' after replacing the turbo sensor?
Is the VGT solenoid a common failure point on the 2011 LML engine?
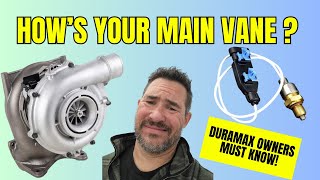
Helpful Videos
Used OEM Parts in Stock
New Aftermarket Parts Available


The information in this article is provided for general reference and educational purposes only. Vehicle specifications, procedures, and part compatibility can vary by production date, trim level, and region. Always consult your vehicle's factory service manual and verify part numbers before purchasing or performing repairs. Safety-critical components such as airbags, seat belts, and braking systems should be installed by a qualified professional.
- Chevrolet Silverado 3500:
- 🧭 Diagnostic Flowchart
- 🎬 Helpful Videos
- 🛍️ Shop This Part
- What's Unique About the 2011-2011 Chevrolet Silverado 3500
- Symptoms You May Notice
- Most Likely Causes
- Rare But Worth Checking
- Diagnosis Steps
- Parts You'll Likely Need
- Related Codes That Often Appear With This One
- Technical Service Bulletins (TSBs) & Recalls
- Mechanic-Grade Diagnostic Values
- Scan Tool Commands That Help
- Wiring & Ground Locations
- "I Checked Everything" — The Actual Cause
- OEM Part Supersession History
- Model Year Variations Within This Range
- Other Known Issues on This Vehicle
- Used vs. New Parts: Buying Guide for This Vehicle
- Real Owner Stories
- 2011 Chevrolet Silverado 3500 6.6L Duramax
- 2011 Chevrolet Silverado 3500 6.6L Duramax
- 2011 Chevrolet Silverado 3500 6.6L Duramax
- NHTSA Report #11442734
- Related OBD-II Codes
- Frequently Asked Questions
- 🎟️ Get 5% Off