
P0462 on 2012-2016 Honda CR-V: Fuel Level Sensor Circuit Low Input Causes and Fixes
On a 2012-2016 Honda CR-V, code P0462 is almost always caused by a failed fuel level sending unit. This sensor is part of the in-tank fuel pump assembly. Replacing the entire fuel pump module is the most common fix, costing around $200-$350 for an OEM part. The PCM triggers this code when it sees voltage from the sensor below the normal operating range (typically under 0.5V) for a set period.
- P0462 on a 2012-2016 CR-V points to a low voltage signal from the fuel level sensor, almost always due to a failed sending unit within the fuel pump module.
- The repair requires replacing the entire fuel pump module (Honda P/N 17045-T0A-020 or equivalent), as the sensor is not sold separately.
- Before replacing the expensive module, it's wise to test the sensor's resistance (approx. 30-300Ω) and verify the wiring harness is not shorted to ground.
- The fuel gauge will be inoperative, so manually tracking mileage is essential to avoid running out of fuel until the repair is made.
What's Unique About the 2012-2016 Honda CR-V
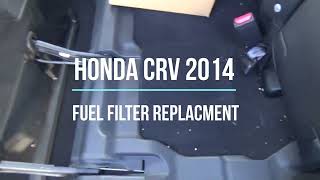
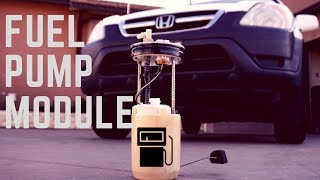
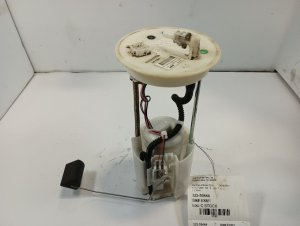
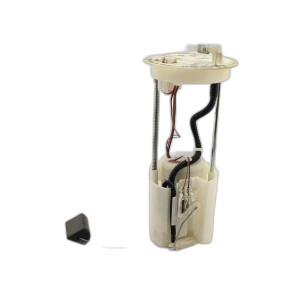
For the fourth-generation Honda CR-V (2012-2016), the fuel level sensor (also called the sending unit, Honda Part No. 17047-T0A-000) is not sold as a separate component by Honda. Instead, it is integrated into the complete fuel pump module located inside the fuel tank. While the root cause is a small sensor, the repair involves replacing the entire assembly. Accessing the unit is relatively straightforward by removing the rear seat cushion (driver's side), making it a manageable job for an experienced DIYer.
🎬 Watch: A helpful walkthrough for changing a Honda fuel pumpSymptoms You May Notice
- Check Engine Light is on
- Fuel gauge reads empty, regardless of the actual fuel level
- Fuel gauge fluctuates erratically or is stuck in one position
- Low fuel warning light stays on even with a full tank
- Trip computer's 'Miles to Empty' or 'Range' display is inaccurate or shows dashes.
- Replacing only the fuel pump motor when the issue is the integrated sending unit.
- Assuming the instrument cluster is bad before properly testing the sending unit and its wiring.
- Replacing the fuel pump assembly without first checking for a short to ground in the wiring harness, leading to the new part not fixing the code.
Most Likely Causes
- Faulty Fuel Level Sending Unit 🔴 High Probability → Shop Fuel Tank Sending Unit The variable resistor on the sending unit can wear out or develop an internal short over time, causing it to send a constant low voltage signal. On this CR-V, the sender is integrated with the fuel pump module.
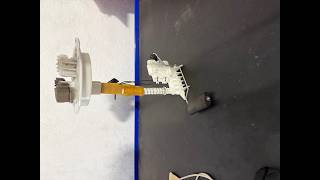
How to confirm: Access the fuel pump connector under the rear seat. Use a multimeter to test the resistance across the signal and ground pins 🎬 See this step-by-step guide on testing a fuel level sensor (pins 1 and 3 of the 4-pin or 5-pin connector). A good sensor should read approximately 808-812 Ohms when the float is in the empty position and around 5-7 Ohms when in the full position. The resistance should change smoothly as you manually move the float arm (if the unit is removed). If the resistance is near zero when it should be high, or doesn't change, the unit has failed.
Typical fix: Replace the entire fuel pump module assembly, which includes the new sending unit, float, and fuel pump.
Est. part cost: $200-$400 - Wiring Harness or Connector Issue 🟡 Medium Probability The wiring harness leading to the fuel pump module runs under the rear seat and can be susceptible to damage or corrosion at the connector, causing a short to ground.
How to confirm: Visually inspect the wiring and connector for the fuel pump module for any signs of corrosion, frayed wires, or loose pins. Perform a continuity test on the signal wire (typically a Yellow/Blue wire) between the pump connector and the gauge control module to check for a short to ground. A reading of near 0 ohms between the signal wire and a chassis ground indicates a short.
Typical fix: Repair the damaged section of the wire or clean/replace the corroded connector. Apply dielectric grease to protect the connection.
Est. part cost: $5-$50 - Stuck Fuel Level Float Arm ⚪ Low Probability A physical jolt to the vehicle (like hitting a large pothole or being handled by a forklift at an auction) can sometimes cause the float arm to get stuck in its lowest position, mimicking an empty tank.
How to confirm: After gaining access to the fuel pump module, observe the position of the float arm. If it appears stuck, try to gently free it. A video on a newer CR-V shows this exact issue and how to resolve it by simply dislodging the arm.
Typical fix: Carefully free the stuck float arm. If the arm is bent or damaged, the entire fuel pump module will need to be replaced.
Est. part cost: $0-$400
Rare But Worth Checking
- Faulty Gauge Control Module or Instrument Cluster: → Shop Instrument Cluster This is uncommon. The PCM or the instrument cluster itself could have an internal fault preventing it from correctly reading the signal from the sensor. This should only be considered after the sending unit and wiring have been confirmed to be in good working order.
Diagnosis Steps
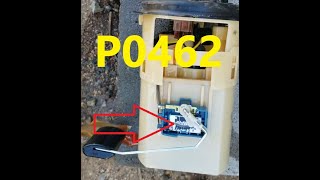
- Scan the vehicle for DTCs to confirm P0462 is the primary code. 🎬 Watch: Understanding the causes and fixes for the P0462 code
- Gain access to the fuel pump module by removing the rear seat cushion (driver's side) and the metal access panel.
- Disconnect the electrical connector from the fuel pump module.
- Inspect the connector and wiring harness for any visible damage, corrosion, or signs of a short circuit.
- Using a multimeter set to Ohms, measure the resistance between the sending unit pins on the fuel pump module side of the connector (typically pins 1 and 3). A good unit should read approx. 5-7Ω (Full) to 808-812Ω (Empty). If the reading is near zero or infinite, the sending unit is bad.
- If the sending unit tests good, check for a short to ground on the signal wire in the vehicle's harness. Measure resistance between the signal wire pin on the harness connector and a good chassis ground. The reading should be infinite (open circuit); if it's near zero ohms, there is a short in the harness that must be found and repaired.
- If wiring and the sending unit are good, consider running the instrument cluster self-diagnostic test to check for gauge or module faults. If the cluster passes its self-test, the problem may lie with the PCM, which is a rare failure.
Parts You'll Likely Need
- Fuel Pump Module Assembly
(OEM #17045-T0A-020 (supersedes 17045-T0A-010 and 17045-T0A-000))— This is the most common cause of failure. For this CR-V, the fuel level sending unit (Honda Part No. 17047-T0A-000) is integrated into the complete fuel pump module assembly and is not typically sold separately by the OEM. Buying the complete module is the standard repair.
Trusted brands: Honda (Genuine), Denso, Bosch, Delphi
OEM price range: $250-$400
Aftermarket price range: $150-$250
Related Codes That Often Appear With This One
- P0463 — This code means 'Fuel Level Sensor Circuit High Input.' It's the opposite of P0462 and can sometimes appear intermittently if the wiring has a loose connection rather than a direct short.
Technical Service Bulletins (TSBs) & Recalls
- No specific Technical Service Bulletins (TSBs) for the P0462 code on the 2012-2016 Honda CR-V were found during extensive research. This suggests the issue is addressed through standard diagnostic procedures rather than a dedicated service campaign.
Platform-Specific Known Issues
- A notable characteristic of this platform is Honda's decision not to sell the fuel level sender (17047-T0A-000) as a standalone part. While the sender is the component that fails, owners are required to purchase the entire fuel pump module (17045-T0A-020), increasing the repair cost.
Mechanic-Grade Diagnostic Values
- Fuel Level Sensor Resistance — expected: Approx. 5-7 Ω at Full, Approx. 808-812 Ω at Empty.. Failure: A reading near 0 Ω, infinite (OL), or a value that does not change when moving the float arm.
- Fuel Level Sensor Signal Voltage at PCM/Gauge Module — expected: Typically > 0.5V. Varies with fuel level, with higher voltage indicating a lower fuel level on some systems and vice-versa.. Failure: A voltage signal that is consistently below 0.5V, often near 0V.
Scan Tool Commands That Help
- Honda HDS (or compatible advanced scanner): Gauge Control Module Functional Tests -> Self-Diagnostic Function — To command a full sweep of all instrument cluster gauges, including the fuel gauge. This helps verify if the gauge itself and its driver in the cluster are functional, isolating the problem to the sender or wiring if the gauge sweeps correctly.
- Instrument Cluster (No Scan Tool Required): → Shop Instrument Cluster Instrument Cluster Self-Diagnostic Mode — This is a built-in test to check the gauge cluster without a scan tool. By pressing the trip button and toggling the headlight switch in a specific sequence, you can initiate a gauge sweep test. This is a crucial first step to rule out a bad instrument cluster before accessing the fuel tank.
Wiring & Ground Locations
- G551 — Under the driver's seat area, near the fuel pump access panel.. This is a primary ground point for components in that area of the vehicle, including potentially the fuel pump assembly. A corroded or loose G551 ground can cause various electrical issues, including an incorrect signal from the fuel level sender.
- Fuel Tank Unit Connector — On top of the fuel pump module, under the access panel beneath the driver's side rear seat.. This 4 or 5-pin connector is the single point of failure for the entire fuel pump assembly's electrical system. Corrosion or a loose pin here is a common cause for P0462. The sender signal and ground are on pins 1 and 3.
Real Owner Repair Stories
- CR-V Owners Club Forum (2014 Honda CR-V) — Check Engine Light with code P0462, fuel gauge reading empty.
❌ Tried (didn't work) Replaced the original fuel pump assembly with a new aftermarket unit.
✅ What actually fixed it The code and symptoms persisted after installing the aftermarket pump. The problem was only resolved after replacing the aftermarket pump with a genuine Honda OEM fuel pump assembly. This suggests some aftermarket units may have incorrect resistance ranges or quality issues that prevent them from working correctly with the CR-V's gauge control module. - Reddit r/MechanicAdvice (2006 Honda CR-V (similar issue)) — Loud fuel pump and inaccurate fuel readings. Previous owner replaced the pump annually with a cheap 'Spectra' brand unit.
❌ Tried (didn't work) Multiple replacements with cheap, low-quality aftermarket fuel pump assemblies.
✅ What actually fixed it The consensus from technicians was to stop using low-quality aftermarket pumps and install either a genuine OEM unit or a high-quality OEM-supplier part like Denso or Bosch to permanently fix the noise and inaccuracy issues.
OEM Part Supersession History
17045-T0A-000→17045-T0A-010, then 17045-T0A-020— Standard part revisions for manufacturing improvements or supplier changes.
Heads up: The latest part number, 17045-T0A-020, is the correct replacement for all 2012-2014 CR-Vs. While earlier numbers may be found, using the latest revision is recommended.
Model Year Variations Within This Range
- 2012-2016: The 2015-2016 models received a facelift with a new engine and transmission, but the fuel tank, fuel pump module, and the associated P0462 diagnostic procedure remained fundamentally the same as the 2012-2014 models. No significant variations affect this specific repair.
Diagnostic Flowchart
Used vs. New Parts: Buying Guide for This Vehicle
When a used part is the smart pick: A used OEM fuel pump assembly from a low-mileage (<75,000 miles) donor vehicle is a viable, cost-effective option. Given the reported issues with some new aftermarket units, a used original Honda part can be more reliable than a new, cheap, unbranded part.
Donor-vehicle mileage cap: roughly under 75000 miles for the part to have meaningful remaining life.
What to inspect on the donor part:
- Check the electrical connector pins for any signs of green or white corrosion.
- Ensure the plastic 'top hat' of the assembly is not cracked or brittle.
- Verify the float arm is present and moves freely without binding.
- If possible, ask for the donor vehicle's VIN to confirm it's from a compatible year range.
OEM-only on this vehicle (don't cheap out):
- While not strictly 'OEM-only', the Fuel Pump Module Assembly is a part where using a genuine Honda part is strongly recommended to avoid compatibility issues that can prevent the P0462 code from being resolved.
Aftermarket brands forum-validated for this vehicle:
- Denso (often the Original Equipment Manufacturer for Honda)
- Bosch
- Delphi
Brands owners have reported issues with on this vehicle:
- Unbranded, 'white-box' units from online marketplaces.
- Brands like Spectra have been anecdotally reported by owners to be noisy or fail prematurely.
Real Owner Stories
Aggregated from forums and TSBs cited above. Mileages and costs reflect what owners reported in those sources.
2012-2016 Honda CR-V
Symptoms: The P0462 code and associated symptoms persisted even after replacing the entire fuel pump assembly.
What fixed it: The problem was not the part itself. The recommended next step and likely cause was a short to ground in the wiring harness leading to the fuel pump.
Source hint: Car-Killer Forums - 'P0462 Code...Still not working after Replaced Fuel Pump Assembly'
Related OBD-II Codes
Frequently Asked Questions
On my 2014 CR-V, do I have to replace the entire fuel pump assembly for a P0462 code, or can I just buy the sending unit?
I replaced the fuel pump on my CR-V, but the P0462 code came back. What should I check next?
Are there any TSBs or recalls for the fuel gauge problem on the 2012-2016 Honda CR-V?
How can I test the fuel sending unit on my CR-V myself to confirm it's bad?
Is it safe to buy a used fuel pump assembly from a junkyard to save money?
My fuel gauge suddenly got stuck on empty after I hit a big pothole. Could this be related to P0462?
Which aftermarket fuel pump brands are recommended for the Honda CR-V?
Helpful Videos
Used OEM Parts in Stock
New Aftermarket Parts Available


The information in this article is provided for general reference and educational purposes only. Vehicle specifications, procedures, and part compatibility can vary by production date, trim level, and region. Always consult your vehicle's factory service manual and verify part numbers before purchasing or performing repairs. Safety-critical components such as airbags, seat belts, and braking systems should be installed by a qualified professional.
- Honda CR-V:
- 🧭 Diagnostic Flowchart
- 🎬 Helpful Videos
- 🛍️ Shop This Part
- What's Unique About the 2012-2016 Honda CR-V
- Symptoms You May Notice
- Most Likely Causes
- Rare But Worth Checking
- Diagnosis Steps
- Parts You'll Likely Need
- Related Codes That Often Appear With This One
- Technical Service Bulletins (TSBs) & Recalls
- Platform-Specific Known Issues
- Mechanic-Grade Diagnostic Values
- Scan Tool Commands That Help
- Wiring & Ground Locations
- Real Owner Repair Stories
- OEM Part Supersession History
- Model Year Variations Within This Range
- Used vs. New Parts: Buying Guide for This Vehicle
- Real Owner Stories
- 2012-2016 Honda CR-V
- Related OBD-II Codes
- Frequently Asked Questions
- 🎟️ Get 5% Off