
P2015 on 2010-2018 Audi A6 2.0L TFSI: Intake Manifold Runner Sensor Causes and Fixes
On the 2.0L TFSI engine, code P2015 is almost always caused by a worn-out plastic stop on the intake manifold, causing the runner flap actuator to move too far. An inexpensive metal repair bracket can often fix this without replacing the entire manifold, which can cost over $500. In some cases, the issue can be a faulty vacuum solenoid or internal manifold linkage failure.
- P2015 on this Audi almost always points to a mechanical issue with the intake manifold, not a bad sensor.
- Before buying expensive parts, check for actuator over-travel. If it's present, a simple, inexpensive repair bracket is the most likely solution.
- If the repair bracket doesn't work, the next step is to inspect for vacuum leaks before condemning the entire intake manifold.
- Replacing the entire intake manifold is the final, most expensive solution, typically done when the internal flaps are damaged or seized.
What's Unique About the 2010-2018 Audi A6
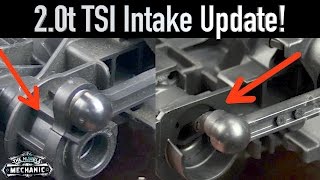
This P2015 code is exceptionally common on the VAG EA888 2.0L TFSI engine platform. The issue is rarely the sensor itself, but rather a design flaw in the intake manifold. A small plastic stop that limits the movement of the actuator arm for the runner flaps wears down or breaks off. This allows the arm to over-travel, which the position sensor correctly reports as an out-of-range condition. This specific failure mode has led to a popular and effective aftermarket solution: a simple metal bracket that bolts on to provide a new, durable stop for the actuator. Volkswagen acknowledged this issue with a warranty extension on some models, though it may not apply to all Audis or years.
Generation note: The 2010-2018 year range covers the end of the Audi A6 C6 generation (through 2011) and the C7 generation (2012-2018). The 2.0L TFSI (EA888) engine was available in both, and this intake manifold issue is common to the engine platform across these years and many other VW/Audi models. The failure is most prominent on the EA888 Gen 2 engines, found in models from approximately 2009-2015.
Symptoms You May Notice
- Check Engine Light is on
- Reduced engine performance and acceleration
- Rough or unstable idle
- Decreased fuel economy
- Hesitation or stumbling during acceleration
- Engine may enter 'limp mode'.
- Audible whistling or vacuum leak noise if linkage has popped out.
- Replacing the intake runner position sensor by itself. The sensor is often not sold separately from the manifold and is usually not the root cause of the problem.
- Immediately replacing the entire intake manifold without first attempting the inexpensive repair bracket fix or checking the vacuum system.
Most Likely Causes
- Worn or Broken Intake Manifold Actuator Stop 🔴 High Probability → Shop Engine Intake Manifold The original stop is made of plastic and is integrated into the manifold. Over time, heat cycles and constant movement cause it to wear down or break, allowing the actuator arm to move past its specified limit. This is a widely documented design flaw.
How to confirm: With the engine off, locate the intake manifold actuator motor on the driver's side of the manifold. Have a helper turn the ignition on (do not start the car) to cycle the actuator. Visually inspect the linkage arm for excessive movement. If it moves too far and 'slaps' against its limit with a noticeable jump, the internal plastic stop has failed.
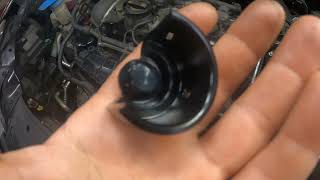
Typical fix: Install an aftermarket P2015 repair bracket. This bracket bolts onto the manifold and provides a new, solid stop for the actuator arm, preventing over-rotation. This is a very common, inexpensive, and permanent repair that takes less than an hour. 🎬 See how to install the quick-fix repair bracket
Est. part cost: $20-$60 - Faulty Intake Manifold Assembly 🟡 Medium Probability → Shop Engine Intake Manifold Besides the actuator stop, the internal flaps can become clogged with carbon buildup, or the internal linkage connecting the flaps to the external arm can break or develop excessive play. Carbon buildup is a known issue on direct-injection engines like the TFSI. The actuator arm can also pop out of its socket, creating a large vacuum leak.
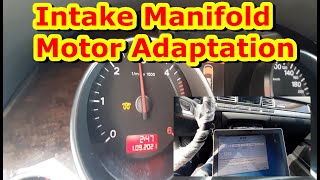
How to confirm: If the repair bracket does not solve the issue, or if the actuator arm moves but the flaps do not (or vice versa), the manifold itself is faulty. A technician can use a scan tool to command the flaps to move while observing live data. A user on the Audi Owners Club forum reported that even a new aftermarket manifold did not fix the code until a 'basic settings' adaptation was performed using VCDS.
Typical fix: Replace the entire intake manifold assembly. This is a more expensive and labor-intensive repair. After replacement, it is recommended to perform a basic settings adaptation with a diagnostic tool. 🎬 Watch: How to perform the intake manifold adaptation
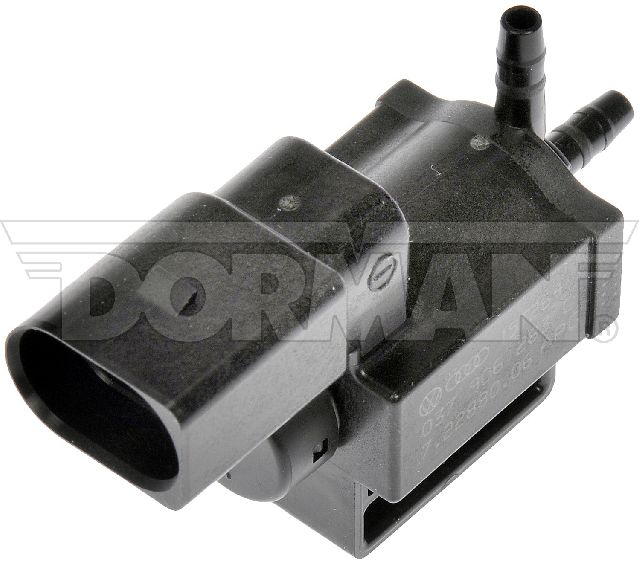
Est. part cost: $250-$600 - Faulty Vacuum Control Solenoid (N316) ⚪ Low Probability The system uses a vacuum solenoid (part of the N316 valve assembly) to operate the actuator. This solenoid can fail, preventing vacuum from reaching the actuator diaphragm, meaning the flaps won't move even if the manifold is mechanically sound.
How to confirm: Visually inspect all vacuum hoses connected to the intake manifold and the control solenoid for cracks, breaks, or loose connections. With the engine running, disconnect the vacuum line at the manifold actuator and check for vacuum using a gauge. If there is no vacuum, the solenoid or the lines leading to it are suspect. One owner documented this exact failure mode as the root cause of his P2015 code.
Typical fix: Replace the faulty vacuum line or the control solenoid itself.
Est. part cost: $10-$70
Rare But Worth Checking
- Faulty Intake Runner Position Sensor: While the code directly names the sensor, it is rarely the actual point of failure on this engine. It's more often accurately reporting a mechanical problem with the manifold or actuator. The sensor is also not typically sold separately from the manifold assembly.
- Wiring Harness Issues: Damaged wiring or a corroded connector for the position sensor or control solenoid can cause an implausible signal, triggering the code.
Diagnosis Steps
- Scan the vehicle for fault codes to confirm P2015 is the primary code. 🎬 Watch: A step-by-step guide to diagnosing the P2015 code Note any other codes like misfires or lean conditions.
- With the engine off, visually inspect the intake manifold runner flap actuator on the driver's side of the intake manifold. Check if the linkage arm has popped out of its socket.
- Have an assistant turn the ignition key to the 'On' position (without starting the engine). The actuator should cycle once. Watch the actuator arm for excessive movement. If it appears to over-rotate and 'jump' at the end of its travel, the internal plastic stop has failed.
- If excessive movement is confirmed, the most likely fix is a P2015 repair bracket. Install the bracket according to manufacturer instructions.
- If no excessive movement is seen, check the vacuum system. Inspect the vacuum lines running to the actuator and its control solenoid for any cracks, breaks, or disconnections.
- With the engine running, carefully check for vacuum at the actuator diaphragm itself. If no vacuum is present, the control solenoid (N316) or its supply line is likely faulty.
- If the bracket is installed and the vacuum system is working, but the code persists, the issue may be a faulty manifold (stuck/broken internal flaps) or a failed position sensor. Further diagnosis with a scan tool to monitor live data and perform basic settings is recommended.
Parts You'll Likely Need
- Intake Manifold Repair Bracket — This is the most common, effective, and cheapest fix. It addresses the root cause of the code on most 2.0T engines by providing a new, durable stop for the actuator arm, preventing over-rotation.
Trusted brands: X8R, URO Parts, ECS Tuning, Diesel Geek, Dynoracing
Aftermarket price range: $20-$60 - Intake Manifold Assembly
(OEM #06H133201AT (supersedes 06H133201AN))— Required if the internal flaps are broken, seized due to carbon, or if the repair bracket does not resolve the code. The position sensor and actuator are integrated into this assembly. Several part numbers exist; always verify by VIN.
Trusted brands: Audi Genuine, Pierburg, Mahle
OEM price range: $450-$600
Aftermarket price range: $250-$400
Related Codes That Often Appear With This One
- P0300, P0301, P0302, P0303, P0304 (Misfire codes) - Can occur if the actuator linkage pops out, creating a large vacuum leak.
- P0171 (System Too Lean) - Can also be caused by a vacuum leak from a disconnected manifold actuator.
Technical Service Bulletins (TSBs) & Recalls
- Audi TSB 24 16 53 / 2044003: Addresses DTC P2015 and the 'Changeover valve for intake manifold flap N316'. It suggests checking the system and may lead to manifold replacement.
Platform-Specific Known Issues
- The primary issue for the 2.0L TFSI engine is the failure of the plastic actuator stop on the intake manifold, a well-documented design weakness.
- Some owners on forums have noted that after replacing the manifold, a 'Basic Settings' procedure using a diagnostic tool like VCDS is necessary for the ECU to learn the new component's position, or the code may return.
- Audi issued a Technical Service Bulletin (TSB 24 16 53 / 2044003) related to P2015 and the changeover valve (N316), indicating an official recognition of issues in this system.
Mechanic-Grade Diagnostic Values
- Intake Manifold Runner Position Sensor (G336) Supply Voltage — expected: Approximately 5V. Failure: Voltage is significantly lower or absent, indicating a wiring or ECU fault.
- VCDS Live Data: Measuring Block 142, Field 3 (Flap Position) — expected: Should be near 0-5% at idle, and move towards 95-99% when engine RPMs are raised above 3,000.. Failure: Values are stuck, do not change with RPM, or the adaptation process results in an 'ERROR' status.
- Wiring Harness Resistance (Sensor to ECM) — expected: 1.5 Ohms maximum. Failure: Higher resistance indicates an open circuit or corrosion in the harness.
- VCDS Live Data: Runner Flap B1 Position Offset Voltage — expected: Approximately 4.5V at startup/idle (flaps closed).. Failure: Voltage is stuck or does not correspond to the expected value for the flap position.
Hidden / Shadow Codes Worth Checking
- 08213: This is the VAG-specific fault code that corresponds to the generic OBD-II code P2015. It means 'Intake Manifold Flap Position Sensor (Bank 1): Implausible Signal'. (see via VCDS (VAG-COM), ODIS, or other professional scanners capable of reading manufacturer-specific codes.)
Scan Tool Commands That Help
- VCDS (VAG-COM): Engine -> Basic Settings -> Group 142 -> Go! — This function performs the Intake Manifold Runner Adaptation. It must be run after replacing the intake manifold or actuator. The tool will display 'ADP. RUN' as it cycles the flaps, and should finish with 'ADP. OK'. If it shows 'ERROR', a mechanical or electrical fault is still present.
- VCDS (VAG-COM): Engine -> Meas. Blocks -> Group 142 — Use this to monitor the live position of the intake runner flaps. Field 3 shows the actual percentage of flap opening, and Field 4 shows the adaptation status. This is useful for diagnosing if the flaps are physically moving as commanded.
- VCDS (VAG-COM): Engine -> Output Tests — Use this to manually cycle the Intake Manifold Flap Motor (V157). This can help determine if the motor is receiving commands and is electrically functional, separate from the sensor's feedback.
Wiring & Ground Locations
- G336 Sensor Connector — On the driver's side (US) of the intake manifold, connected to the round position sensor which is part of the actuator assembly.. This is the primary connector for the sensor reporting the fault. Check for 5V reference voltage between pins 1 and 3 (with ignition on) to verify power supply.
- Engine Block Ground Point — There are several main ground points in the engine bay. A key one is on the engine block itself, often near the oil filter housing or alternator.. A corroded or loose engine ground can cause erratic behavior and implausible signals from various engine sensors, including the G336 position sensor.
- ECM Connector (J623) — Typically located in the plenum chamber at the base of the windshield, protected by a plastic cover.. This is the destination for the sensor's signal. Technicians may need to test for continuity from the G336 connector pins back to the corresponding pins on the ECM's T60 or T94 connector to rule out a wiring break.
Real Owner Repair Stories
- Reddit user 'nondescrip82' (2019 Audi RS3 (different engine, but analogous system failure)) — Drive system malfunction on cold start, RPM limited to 4k. P2006 code initially, then persistent P2015 after a solenoid replacement.
❌ Tried (didn't work) Replacing a vacuum pump solenoid., Replacing the entire lower intake manifold assembly (with sensors)., Replacing the PCV system., Checking for vacuum leaks and electrical continuity between sensor and ECU.
✅ What actually fixed it The dealership found coolant had contaminated the vacuum lines that control the intake runner flaps. Replacing the leaking water pump and the affected vacuum lines resolved the fault. - AudiWorld Forums user 'SMac770' diagnosing another user's issue (Audi A4 B8 2.0 TFSI (EA888 engine)) — P2015 code returned after replacing the intake manifold.
❌ Tried (didn't work) Replacing the intake manifold.
✅ What actually fixed it The issue was not fully resolved until a VCDS adaptation of the intake manifold runner was successfully completed. The user also had to investigate a faulty N316 control solenoid that was preventing the adaptation from succeeding, even though it seemed to function correctly in basic tests.
"I Checked Everything" — The Actual Cause
- A known case on an EA888 engine involved passing both smoke and vacuum pump tests, yet the P2015 code and adaptation would fail. The root cause was a faulty N316 Intake Manifold Runner Control Solenoid that was electrically failing under load but appeared mechanically sound.
- On a similar VAG engine, after a new manifold was installed, all vacuum and electrical checks passed. The P2015 code persisted until a technician discovered coolant from a leaking water pump had entered the vacuum lines, preventing the actuator from functioning correctly. This type of fluid contamination is not detectable by a standard smoke test.
When the Usual Fixes Don't Work
- While the aftermarket repair bracket is the most common fix, there are numerous documented cases where it did not solve the problem. In these instances, the fault was often a completely failed internal flap mechanism, a bad N316 control solenoid, or an issue that prevented the post-repair VCDS adaptation from completing. One owner replaced the manifold, confirmed all mechanicals were sound, but could not clear the code until the faulty N316 solenoid was also replaced, which allowed the adaptation to finally pass.
OEM Part Supersession History
06H133201AN, 06H133201AF, 06H133201AA, 06H133201J→06H133201AT— Revised design to improve reliability of the runner flap system.
Heads up: The updated manifold 06H133201AT has an extra port for a breather hose. If the vehicle is not equipped with this hose, this port MUST be left open to atmosphere. Capping it will cause a pressure differential and can trigger a fault code.
Model Year Variations Within This Range
- 2010-~2015 (EA888 Gen 2): These years are most susceptible to the plastic intake manifold's actuator stop failure. The manifold part number is typically 06H133201AN, superseded by 06H133201AT. This is the primary failure pattern.
- ~2015-2018 (EA888 Gen 3): Later models use the revised EA888 Gen 3 engine, which features a different intake manifold design as part of a larger engine overhaul (including an integrated exhaust manifold). While a P2015 code is still possible, the specific failure mode of the worn plastic stop is less common compared to the Gen 2 engine.
Diagnostic Flowchart
Used vs. New Parts: Buying Guide for This Vehicle
When a used part is the smart pick: Almost never for the intake manifold assembly. The part fails due to a known design flaw (worn plastic) and is prone to performance-robbing carbon buildup. A used part carries a very high risk of having or quickly developing the same P2015 fault.
Donor-vehicle mileage cap: roughly under 20000 miles for the part to have meaningful remaining life.
What to inspect on the donor part:
- Must be the latest OEM part number (e.g., 06H133201AT or newer).
- Inspect the actuator arm area for witness marks that would indicate a repair bracket was previously installed and removed.
- Look inside the intake runners with a light; avoid any manifold with visible, thick carbon deposits.
- Ensure the actuator linkage arm is intact and moves smoothly without binding.
OEM-only on this vehicle (don't cheap out):
- Intake Manifold Assembly. Using a non-OEM part can lead to failed adaptations with VCDS, as the integrated position sensor's range may not match the ECU's expectations.
Aftermarket brands forum-validated for this vehicle:
- For the repair bracket: Diesel Geek, X8R, and ECS Tuning are well-regarded.
- For a full manifold replacement: Pierburg and Mahle are OEM suppliers and are considered equivalent to Genuine Audi/VW parts.
Brands owners have reported issues with on this vehicle:
- Unnamed, low-cost manifolds from eBay or Amazon are frequently reported on forums to cause persistent issues, particularly failing the crucial post-install 'Basic Settings' adaptation.
Real Owner Stories
Aggregated from forums and TSBs cited above. Mileages and costs reflect what owners reported in those sources.
Audi A6 2.0L TFSI
Symptoms: The P2015 code returned immediately after replacing the entire intake manifold with an aftermarket part.
What fixed it: Performing a 'Basic Settings' adaptation using VCDS to allow the ECU to learn the new part's range of motion finally cleared the code.
Source hint: Audi Owners Club (UK) - 'Dreaded P2015 inlet manifold flaps' (June 2024)
Audi A6 2.0L TFSI
Symptoms: Check Engine Light with code P2015. Visual inspection showed the actuator arm was over-rotating at the end of its cycle.
What fixed it: Installed an aftermarket P2015 repair bracket, which provided a new physical stop for the actuator arm and corrected its range of motion.
Cost: $20-$60
Source hint: Common repair documented in article context for worn actuator stop.
Audi A6 2.0L TFSI
Symptoms: P2015 code was present, but the actuator arm was not showing excessive movement, suggesting the common plastic stop was intact.
What fixed it: Diagnosis revealed no vacuum at the actuator. The root cause was a failed vacuum control solenoid (N316), which was replaced.
Cost: $10-$70
Source hint: Owner documentation cited in article context regarding faulty vacuum control solenoid.
Related OBD-II Codes
Frequently Asked Questions
I have a P2015 code on my Audi A6 2.0T. Is this a common, known issue?
My mechanic wants to replace the entire intake manifold. Is there a cheaper fix for P2015?
How can I quickly check if I need the P2015 repair bracket?
I replaced my intake manifold, but the P2015 code came back. What went wrong?
Is there an official Audi Technical Service Bulletin (TSB) for the P2015 code?
Besides the plastic stop, what else could cause P2015 on this engine?
Helpful Videos


We Have This Part in Stock


The information in this article is provided for general reference and educational purposes only. Vehicle specifications, procedures, and part compatibility can vary by production date, trim level, and region. Always consult your vehicle's factory service manual and verify part numbers before purchasing or performing repairs. Safety-critical components such as airbags, seat belts, and braking systems should be installed by a qualified professional.
- Audi A6:
- 🧭 Diagnostic Flowchart
- 🎬 Helpful Videos
- 🛍️ Shop This Part
- What's Unique About the 2010-2018 Audi A6
- Symptoms You May Notice
- Most Likely Causes
- Rare But Worth Checking
- Diagnosis Steps
- Parts You'll Likely Need
- Related Codes That Often Appear With This One
- Technical Service Bulletins (TSBs) & Recalls
- Platform-Specific Known Issues
- Mechanic-Grade Diagnostic Values
- Hidden / Shadow Codes Worth Checking
- Scan Tool Commands That Help
- Wiring & Ground Locations
- Real Owner Repair Stories
- "I Checked Everything" — The Actual Cause
- When the Usual Fixes Don't Work
- OEM Part Supersession History
- Model Year Variations Within This Range
- Used vs. New Parts: Buying Guide for This Vehicle
- Real Owner Stories
- Audi A6 2.0L TFSI
- Audi A6 2.0L TFSI
- Audi A6 2.0L TFSI
- Related OBD-II Codes
- Frequently Asked Questions
- 🎟️ Get 5% Off