
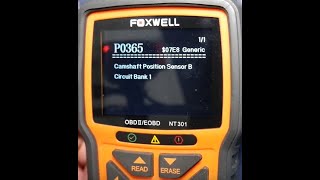
P0365 on 2010-2017 Toyota Camry 2.5L: Exhaust Cam Sensor Circuit Causes and Fixes
P0365 on a 2010-2017 Camry 2.5L almost always means the exhaust camshaft position sensor has failed. It's an easy DIY replacement located on top of the engine, costing about $40-$80 for an aftermarket part or $100-$150 for an OEM sensor. Before replacing, always check the connector and wiring for damage, as that is the second most common cause.
- P0365 points specifically to the exhaust camshaft position sensor circuit.
- The most likely cause is a failed sensor, which is an inexpensive part and very easy to replace on the 2.5L Camry engine.
- Always inspect the wiring and connector for damage before replacing the sensor, as this is the second most common cause.
- The OEM part number is likely 90919-05060, and Denso is the OEM supplier.
What's Unique About the 2010-2017 Toyota Camry
On the 2AR-FE engine used in this Camry, the camshaft position sensors are known to be reliable but can fail with age and heat cycles. The good news for owners is that the exhaust sensor (Sensor 'B') is extremely accessible, located right on top of the valve cover and held by a single bolt, making it a very straightforward DIY repair. Unlike some other manufacturers where this code might point to complex oil pressure or phaser issues, on this platform, the cause is most often a simple electrical fault in the sensor itself or its wiring.
Generation note: This range covers the late XV40 generation (2010-2011) and the entire XV50 generation (2012-2017). Both generations use the 2AR-FE 2.5L engine, and the location and replacement procedure for the camshaft position sensor are very similar and accessible on both.
Symptoms You May Notice
- Check Engine Light is on
- Engine is hard to start or cranks longer than usual
- Rough or fluctuating idle
- Engine hesitation or stumbling during acceleration
- Engine misfires
- Stalling at low speeds
- Noticeable decrease in fuel economy
- Replacing the intake camshaft position sensor ('A' sensor) instead of the exhaust ('B' sensor).
- Replacing the crankshaft position sensor, which is a different part and has its own set of codes.
- Assuming the sensor is bad without first checking for 5V power, ground, and signal wire integrity at the connector.
Most Likely Causes
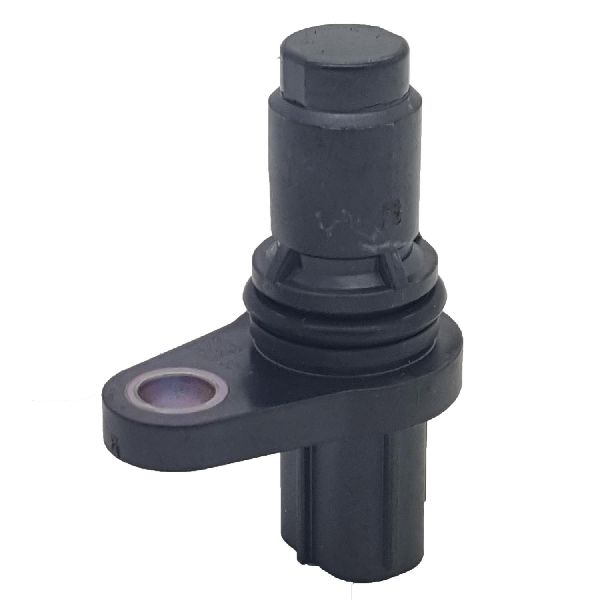
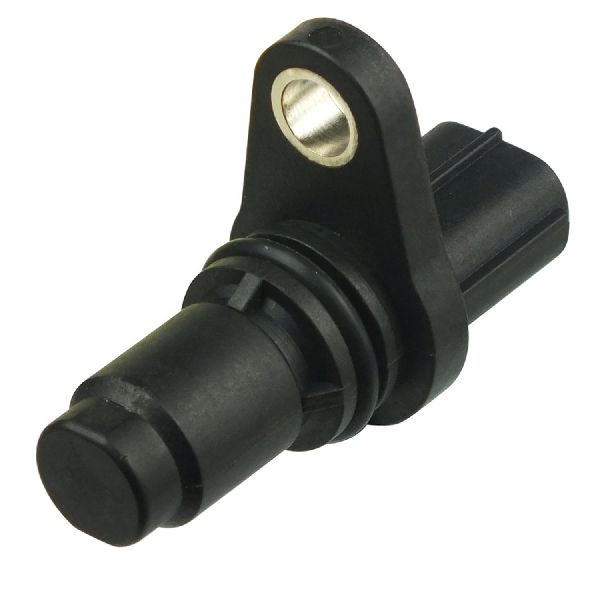
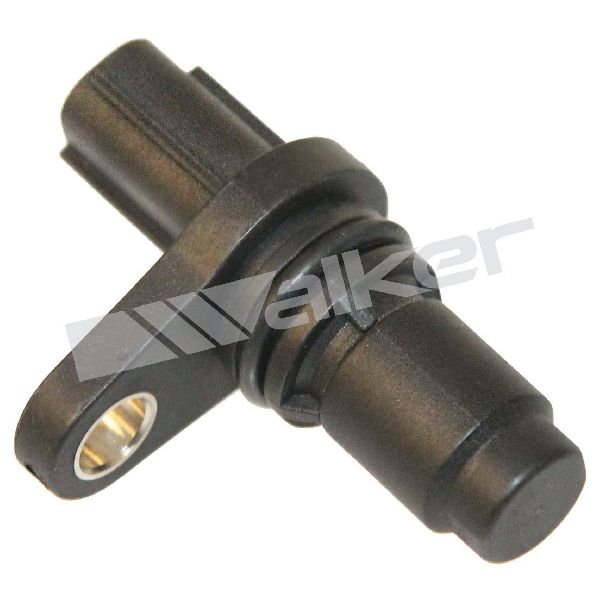
- Faulty Exhaust Camshaft Position Sensor 🔴 High Probability → Shop Engine Camshaft Position Sensor The sensor is exposed to high heat at the top of the engine, and internal electronics can fail over time, leading to an open or shorted circuit. This is the most common cause, accounting for a majority of P0365 cases. 🎬 See: Common causes and fixes for code P0365
How to confirm: After confirming the wiring is intact and has power/ground, replacing the sensor is the most direct way to confirm. A workshop may use an oscilloscope to check for a proper square wave signal from the sensor.
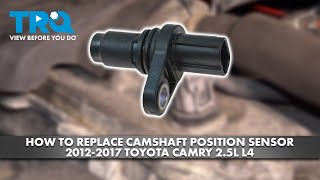
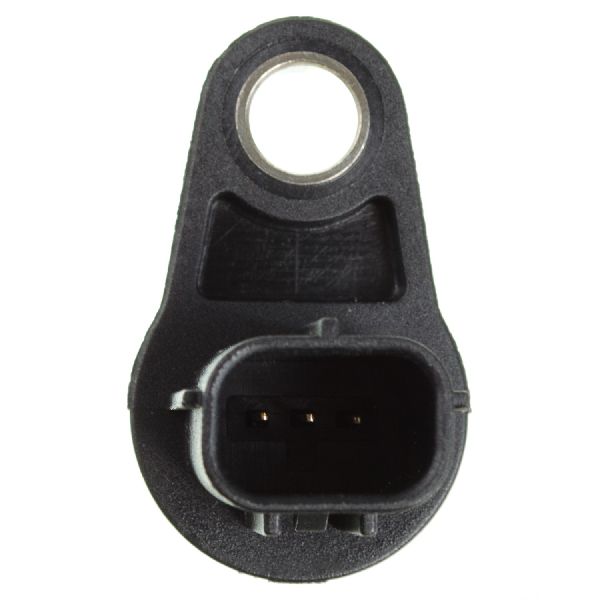
Typical fix: Replace the exhaust camshaft position sensor. It is located on the driver's side of the valve cover and secured with a single 10mm bolt.
Est. part cost: $40-$150 - Wiring Harness or Connector Damage 🟡 Medium Probability The plastic connector can become brittle from heat and break, or wires can be damaged by rodents or previous repairs. Oil leaking from the valve cover gasket can also contaminate the connector. It's also possible to inadvertently damage the wiring or fail to reseat the connector properly during other maintenance, such as changing spark plugs.
How to confirm: Visually inspect the sensor's connector for cracks, corrosion, or pushed-out pins. Use a multimeter to test for correct voltage (typically 5V) and a good ground at the connector.
Typical fix: Repair the damaged section of wire or replace the connector pigtail. Clean any oil or corrosion from the connector with electrical contact cleaner. Ensure the connector is fully seated with a click.
Est. part cost: $10-$30
Rare But Worth Checking
- Stretched Timing Chain or Timing Issue: → Shop Engine Timing Chain While P0365 is an electrical code, a severe mechanical timing issue (like a jumped tooth on the timing chain) can cause the cam and crank signals to be so out of sync that the ECM flags a sensor circuit fault. This is rare and would typically be accompanied by other timing correlation codes like P0016 or P0017. A rattle noise may also be present, which on 2010-2011 models could be related to a faulty exhaust cam gear per TSB T-SB-0012-11 Rev1.
- Faulty Engine Control Module (ECM): This is extremely rare. The ECM's internal driver for the sensor circuit can fail, but all other possibilities should be exhausted before considering ECM replacement.
Diagnosis Steps
- Read the trouble codes with an OBD-II scanner to confirm P0365 is present.
- Visually inspect the exhaust camshaft position sensor and its electrical connector on the driver's side of the valve cover. Look for any obvious damage, loose connection, or oil contamination.
- Inspect the wiring harness leading to the sensor for any signs of fraying, melting, or rodent damage. Pay close attention to areas that may have been disturbed during prior repairs.
- If the wiring looks good, use a multimeter to test the connector. With the key on, engine off, you should have a power supply voltage (typically 4.5V-5.0V) and a good ground. The third wire is the signal wire.
- If power and ground are present, the sensor itself is the most likely culprit. It is held in by a single 10mm bolt.
- Before installing the new sensor, apply a light coat of clean engine oil to the O-ring to ensure it seats properly and doesn't tear.
- Install the new sensor, tighten the bolt gently (it does not require high torque), and reconnect the electrical connector. 🎬 Watch: Step-by-step exhaust camshaft sensor replacement guide
- Clear the trouble code with the scanner and start the engine. Take a test drive to ensure the code does not return.
Parts You'll Likely Need
- Exhaust Camshaft Position Sensor
(OEM #90919-05060)— This sensor is the most common failure point for code P0365. Internal electronics fail from heat and age, causing a circuit fault. This part number is widely used across many Toyota, Lexus, and Scion models.
Trusted brands: Denso (OEM Supplier), Beck/Arnley, Walker, NGK/NTK
OEM price range: $100-$150
Aftermarket price range: $40-$80
Related Codes That Often Appear With This One
- P0366 — This code indicates a 'Range/Performance' problem with the same sensor, suggesting the signal is present but erratic or irrational, which can be caused by the same failing sensor or wiring issues.
- P0367 — This indicates 'Circuit Low Input' for the same sensor, pointing more specifically to a short to ground in the wiring or a failed sensor.
- P0368 — This indicates 'Circuit High Input' for the same sensor, pointing to a short to power or an open ground circuit.
Technical Service Bulletins (TSBs) & Recalls
- TSB T-SB-0012-11 Rev1: Issued for 2010-2011 Camry and 2009-2011 RAV4 models with the 2AR-FE engine. It addresses a MIL ON with codes P0015/P0017 and/or a rattle noise from the engine. The procedure involves replacing the exhaust camshaft gear assembly, which is directly related to the sensor that triggers P0365.
Platform-Specific Known Issues
- The 2AR-FE engine is known for a brief VVT gear rattle on cold starts. While usually harmless, a persistent rattle or one accompanied by timing codes (like P0015/P0017) could indicate a more serious issue with the camshaft gear assembly, as noted in TSB T-SB-0012-11 for 2010-2011 models.
Mechanic-Grade Diagnostic Values
- Camshaft Position Sensor Internal Resistance — expected: 835 - 1,400 Ohms (cold) or 1,060 - 1,645 Ohms (hot). Failure: A reading of infinity (open circuit) or zero (short circuit) indicates a failed sensor.
- Connector Voltage (Key On, Engine Off) — expected: Pin 1 (Power): ~5.0V DC; Pin 2 (Ground): 0V (Good ground continuity); Pin 3 (Signal): Varies, but should show voltage.. Failure: No voltage on the power pin points to a fuse or ECM issue. High resistance on the ground pin indicates a bad ground connection. No voltage or a fixed voltage on the signal wire when the engine is cranked suggests a bad sensor or wiring fault.
- Signal Waveform (using Oscilloscope) — expected: A clean square wave that toggles between approximately 0V and 5V as the engine is running or cranked.. Failure: A flat line at 0V or 5V, or a noisy/erratic waveform, indicates a problem with the sensor, wiring, or reluctor wheel.
Scan Tool Commands That Help
- Toyota Techstream: Read Freeze Frame Data — This is a standard function, but critical for P0365. It captures vehicle data (engine speed, temp, etc.) at the exact moment the fault was logged, which can help determine if the failure happens during cranking, at idle, or under load.
- Generic OBD-II Scanner / Toyota Techstream: Cam/Crank Relearn Procedure — For this specific vehicle and code, a relearn procedure is generally NOT required after replacing the camshaft position sensor. The ECM typically adapts to the new sensor automatically after clearing the codes and a short drive cycle.
Wiring & Ground Locations
- Engine Harness Ground (Valve Cover) — There are two main engine harness ground points located on top of the valve covers, bolted directly to the cover. One is on the front (radiator side) and one is on the rear (firewall side).. The camshaft position sensors rely on a clean ground reference to send an accurate signal. A loose or corroded ground at these common points can introduce electrical noise or high resistance, potentially causing a P0365 code even with a good sensor.
- Sensor Connector (C33 - Exhaust Cam Sensor) — On the driver's side of the valve cover, connecting directly to the exhaust camshaft position sensor.. This is the primary point of failure for wiring issues. The connector's pins for power (VC), signal (VVT-), and ground (E2) must be clean and secure. Oil contamination from a leaking valve cover gasket is common here.
Real Owner Repair Stories
- YouTube channel 'ShreqBoi's Garage' (Toyota Camry (specific year not mentioned, but within the 2AR-FE family)) — Check Engine Light with code P0365.
❌ Tried (didn't work) Replacing the exhaust camshaft position sensor ('B' sensor).
✅ What actually fixed it The code returned immediately after sensor replacement. Further diagnosis revealed a previous, faulty wiring repair on the sensor's harness. The wires were re-spliced and properly repaired, which permanently resolved the P0365 code.
When the Usual Fixes Don't Work
- In a documented case on a Toyota Camry, replacing the camshaft position sensor, which is the most common fix, did not resolve the P0365 code. The check engine light returned immediately. The actual cause was found to be a damaged wiring harness leading to the sensor. This highlights the critical importance of testing the circuit's power, ground, and signal wires before and after replacing the sensor, as a wiring fault will mimic a sensor failure perfectly.
OEM Part Supersession History
90919-05060→90919-T5005 (among others like 90919-C5001, 90919-T5002)— Standard part evolution, potential improvements in materials or internal electronics.
Heads up: The primary part number 90919-05060 and its direct replacements are generally interchangeable for this application. However, always verify fitment with the vehicle's VIN, as some part numbers in the supersession chain may be for different applications (e.g., crankshaft vs. camshaft).
Model Year Variations Within This Range
- 2010-2011: Early 2AR-FE engines in 2010-2011 Camrys were subject to TSB T-SB-0012-11 Rev1. This addressed a rattle noise and/or codes P0015/P0017 due to a faulty exhaust camshaft gear assembly. While P0365 is an electrical code, a failing gear could potentially cause erratic readings that might be misinterpreted by the ECM, making this TSB relevant context for those specific model years.
Diagnostic Flowchart
Other Known Issues on This Vehicle
Issues unrelated to this code that are worth knowing about as an owner of this generation:
- Torque Converter Shudder 🟠 Medium — Common on 2012-2014 models with the U760E transmission, typically appearing between 30-50 mph under light load. Feels like driving over rumble strips. (Ref: TSB T-SB-0312-17 (supersedes T-SB-0034-14) and Warranty Enhancement Program ZE5 were issued. The fix involves an ECM update and/or torque converter replacement.)
- Melting or Sticky Dashboard 🟡 Low — Affects 2010-2011 models within this range, especially in high-heat, high-humidity climates. The dashboard surface can become shiny, sticky, or crack. (Ref: Toyota issued Warranty Enhancement Program ZE6 to cover dashboard replacement for this condition until May 31, 2017, or for 10 years from the vehicle's first use.)
- VVT Cam Gear Rattle at Cold Start 🟡 Low — A very common characteristic of the 2AR-FE engine is a brief (1-2 second) rattle or grinding noise on a cold start. It is often considered benign but can be concerning. It's caused by the VVT gear's locking pin not engaging instantly until oil pressure builds. (Ref: TSB T-SB-0012-11 Rev1 was issued for 2010-2011 Camry models (and RAV4) for a rattle noise accompanied by codes P0015/P0017, which involves replacing the exhaust camshaft gear assembly.)
Used vs. New Parts: Buying Guide for This Vehicle
When a used part is the smart pick: A used OEM sensor from a low-mileage donor vehicle is a reasonable choice if on a tight budget. Since the failure mode is often electronic breakdown from heat cycles, a newer, lower-mileage part has significant life left. It is a better option than a cheap, no-name aftermarket sensor.
Donor-vehicle mileage cap: roughly under 80000 miles for the part to have meaningful remaining life.
What to inspect on the donor part:
- Check for a clean connector; avoid parts from oily/neglected engines.
- Ensure the plastic housing has no cracks or signs of brittleness.
- Ask for the VIN of the donor car to verify its year and mileage.
- If possible, test the resistance of the used sensor with a multimeter before purchase to ensure it's within the specified range (835-1645 Ohms).
OEM-only on this vehicle (don't cheap out):
- Engine Control Module (ECM)
Aftermarket brands forum-validated for this vehicle:
- Denso (this is the original equipment manufacturer)
- NTK/NGK
- Beck/Arnley
Brands owners have reported issues with on this vehicle:
- Unbranded, 'white-box' parts from online marketplaces should be avoided. They are known for high failure rates, incorrect signal outputs, and can cause more diagnostic confusion.
Real Owner Stories
Aggregated from forums and TSBs cited above. Mileages and costs reflect what owners reported in those sources.
Toyota Camry 2AR-FE
Symptoms: Check Engine Light for camshaft position sensor B circuit Bank 1. The light would come on as soon as the car was turned on.
What fixed it: Repaired a previously damaged wire in the harness after a new sensor failed to fix the issue.
Source hint: YouTube - Shreqboi's Garage
2012-2017 Toyota Camry 2AR-FE
Symptoms: P0365 code present; needed a simple sensor replacement.
What fixed it: Replaced the camshaft position sensor using a 10mm socket; noted as a very easy DIY repair.
Source hint: YouTube - 1A Auto
Toyota (similar engine to 2AR-FE)
Symptoms: Triggered code P0365 immediately after performing a spark plug change.
What fixed it: Resolved by addressing the sensor's connector/wiring which was disturbed during the unrelated maintenance.
Source hint: Tacoma World - 'P0365 Camshaft position sensor code after Spark Plug replacement'
Related OBD-II Codes
Frequently Asked Questions
Does TSB T-SB-0012-11 apply to my 2010-2011 Toyota Camry with the 2AR-FE engine?
I just changed my spark plugs and now I have a P0365 code. Is this common on the Camry?
Where is the exhaust camshaft position sensor located on the 2.5L 2AR-FE engine?
Could the cold start rattle in my 2012 Camry be related to the P0365 code?
Is there a warranty program for the sticky dashboard on my 2011 Camry?
What should I check if replacing the sensor doesn't clear my P0365 code?
Helpful Videos


We Have This Part in Stock


The information in this article is provided for general reference and educational purposes only. Vehicle specifications, procedures, and part compatibility can vary by production date, trim level, and region. Always consult your vehicle's factory service manual and verify part numbers before purchasing or performing repairs. Safety-critical components such as airbags, seat belts, and braking systems should be installed by a qualified professional.
- Toyota Camry:
- 🧭 Diagnostic Flowchart
- 🎬 Helpful Videos
- 🛍️ Shop This Part
- What's Unique About the 2010-2017 Toyota Camry
- Symptoms You May Notice
- Most Likely Causes
- Rare But Worth Checking
- Diagnosis Steps
- Parts You'll Likely Need
- Related Codes That Often Appear With This One
- Technical Service Bulletins (TSBs) & Recalls
- Platform-Specific Known Issues
- Mechanic-Grade Diagnostic Values
- Scan Tool Commands That Help
- Wiring & Ground Locations
- Real Owner Repair Stories
- When the Usual Fixes Don't Work
- OEM Part Supersession History
- Model Year Variations Within This Range
- Other Known Issues on This Vehicle
- Used vs. New Parts: Buying Guide for This Vehicle
- Real Owner Stories
- Toyota Camry 2AR-FE
- 2012-2017 Toyota Camry 2AR-FE
- Toyota (similar engine to 2AR-FE)
- Related OBD-II Codes
- Frequently Asked Questions
- 🎟️ Get 5% Off